Champ Setup Assistant Save
CHAMP Package Config Generator
CHAMP Setup Assistant 
This software auto generates a configuration package containing all the files necessary to make CHAMP walk.
1. Installation
1.1. Clone and install all dependencies:
    sudo apt install -y python-rosdep
    cd <your_ws>/src
    git clone https://github.com/chvmp/champ_setup_assistant
    cd ..
    rosdep install --from-paths src --ignore-src -r -y
1.2. Build your workspace:
    cd <your_ws>
    catkin_make
    source <your_ws/>/devel/setup.bash
2. Quick Start
2.1. Run the setup assistant:
roslaunch champ_setup_assistant setup_assistant.launch
Configure your robot by loading a URDF or manually key in the configuration parameters. If you don't have a URDF now, you can download ANYmal or SpotMicro to try the package.
3. Leg Configuration
You can either use a URDF file or manually key in the origin of each actuator in the robot.
3.1. Using a URDF file:
3.1.1 The following assumptions have been made to avoid fragmentation across different robots as there can be thousands of ways to create a robot's URDF. You need to modify your URDF if any of these assumptions are not met:
- There are no rotation between frames (joint's origin-rpy are all set to zero).
- Hip joints rotate in the X axis.
- Upper Leg joints rotate in the Y axis.
- Lower Leg joints rotate in the Y axis.
- Origins of actuators' meshes are located at the center of rotation.
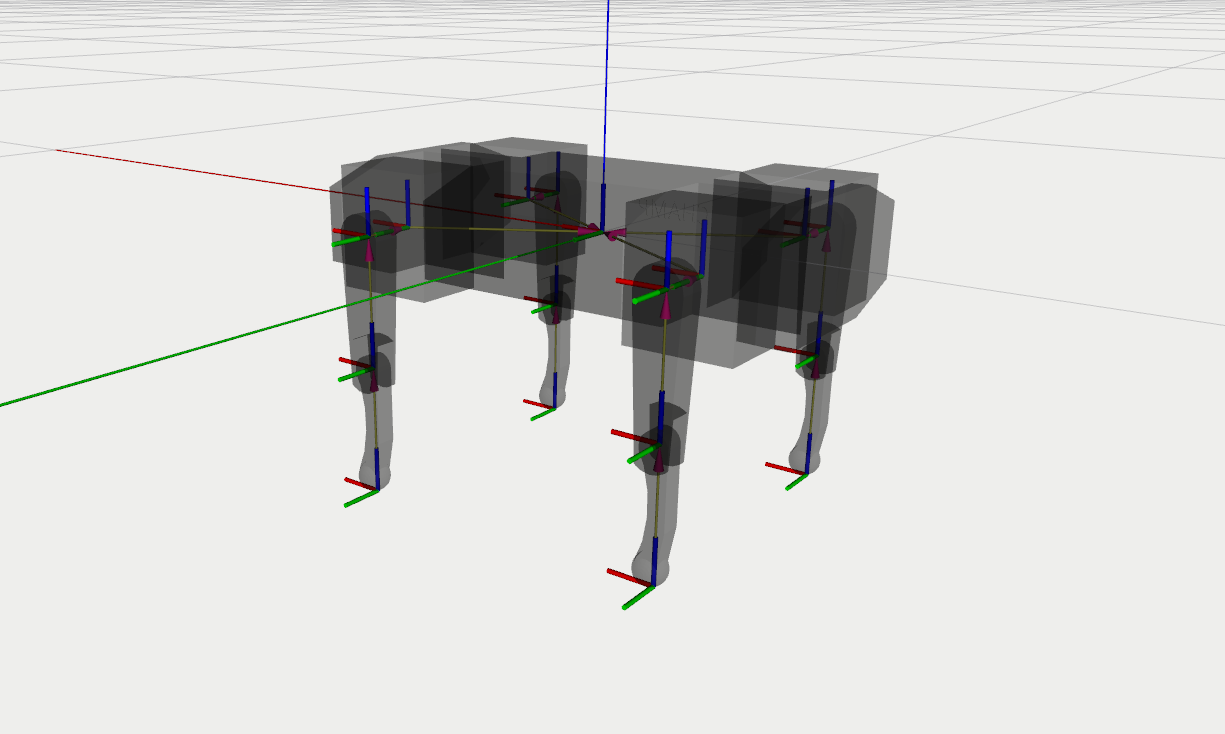
- All joints at zero position will results the robot's legs to be fully stretched towards the ground. From frontal and sagittal view, all legs should be perpendicular to the ground.
You can use the image below as a reference.
AXES: +X: Red, +Y: Green, +Z: Blue
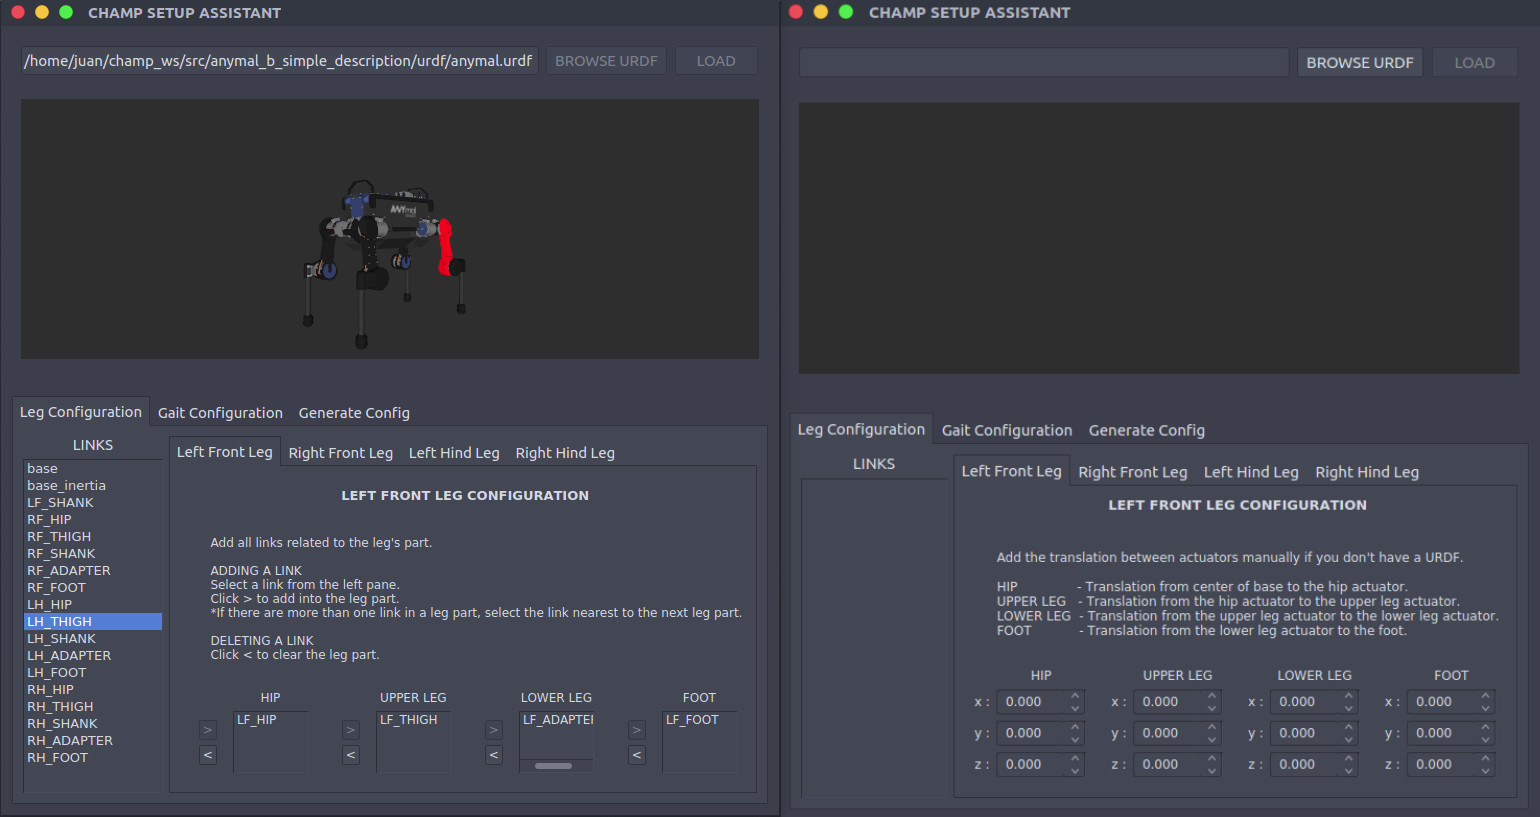
3.1.2 Load the URDF file:
-
Click the 'BROWSE URDF' button on the upper right corner and click the URDF file you want to use from the file browser. Double click the file or click 'Open' to load the URDF.
-
Click the 'LOAD' button. This will list down the links of the robot on the left pane and display the robot's meshes on the RVIZ widget. Take note that it may take a while for huge mesh files to load.
3.1.3 Select the namespace for each leg (auto-configuration):
-
Select the correct namespace for each leg on the drop-down menu.
This namespace is the unique identifier used by the URDF's author to differentiate each leg. For instance, Anymal's hip links are named as LF_HIP (front left), LH_HIP (rear left), RF_HIP (right front), RH_HIP (rear right). The assistant will parse the namespaces as LF_, LH_, RF_, and RH_. After selecting the namespaces for all the legs, the assistant will automatically drag the links to its respective leg parts, emptying the left pane.
3.1.4 Manually adding links if auto-configuration in previous step (3.1.2) fails:
-
You can also add a link to each leg part manually by clicking on a leg tab (ie 'Left Front Leg'). Select a link on the left pane and click '>' to add. This would be useful if the assistant fails to parse the namespaces.
3.1.5 Verify the configuration:
-
To visualize a configured link for a leg part, click on one of the leg tabs (ie 'Left Front Leg') and select the part. The link should now be highlighted on the RVIZ widget. Check all the leg tabs if the configuration is correct.
3.2. Manual Joint Configuration:
This step is only required if you don't have a URDF file to use. In this step, you'll define the position of each actuator in your robot to help the controller find the relative position of each joints.
-
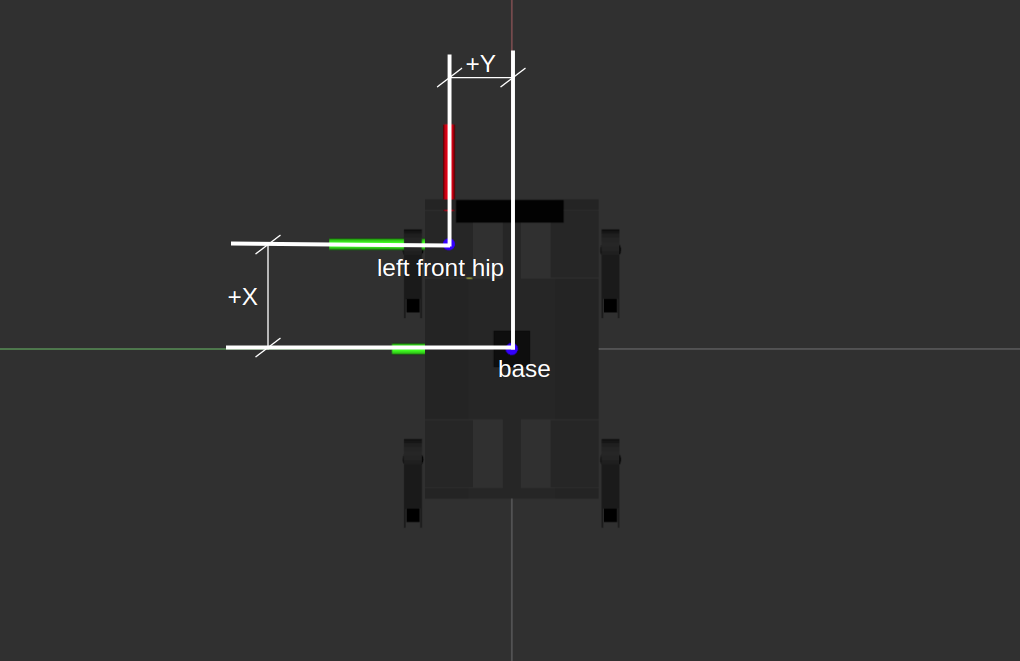
Click the 'Left Front Leg' tab and key in the position for each actuator. When defining an actuator's position, x, y, and z refers to:
x: Translation in the x axis from a reference frame. + x to the front, -x to the back.
y: Translation in the y axis from a reference frame. + y to the left, -y to the right.
z: Translation in the z axis from a reference frame. + z up, -z down.
By reference frame, it means the previous part in this chain: base - hip - upper_leg - lower_leg - foot. For instance if you're defining the position of the actuator at the hip, the reference frame will be 'base' and if youre defining the position of the upper_leg then your reference frame will be 'hip'.
You can take a look at the diagram below to gain some intuition. Alway define these positions from a bird's eye view.
Some axis won't allow you to define in a certain direction if the assistant thinks that it doesn't make sense to define the position towards that direction. For instance, you won't be able to define front right hip's actuator y value as positive as this actuator is always at the right side (-y) of the base.
Once you're done with the left-front leg, the assistant will somehow predict the rest of the actuators' position. You can click on the rest of the leg tabs to check if the predictions are correct. You can still define the position manually if the prediction is wrong.
4. Gait Configuration
Click on the 'Gait Configuration' tab to define the robot's walking parameters.
-
Knee Orientation - How the knees should be bent. You can can configure the robot to follow the following orientation .>> .>< .<< .<> where dot is the front side of the robot.
-
Max Linear Velocity X (meters/second) - Robot's maximum forward/reverse speed.
-
Max Linear Velocity Y (meteres/second) - Robot's maximum speed when moving sideways.
-
Max Angular Velocity Z (radians/second)- Robot's maximum rotational speed.
-
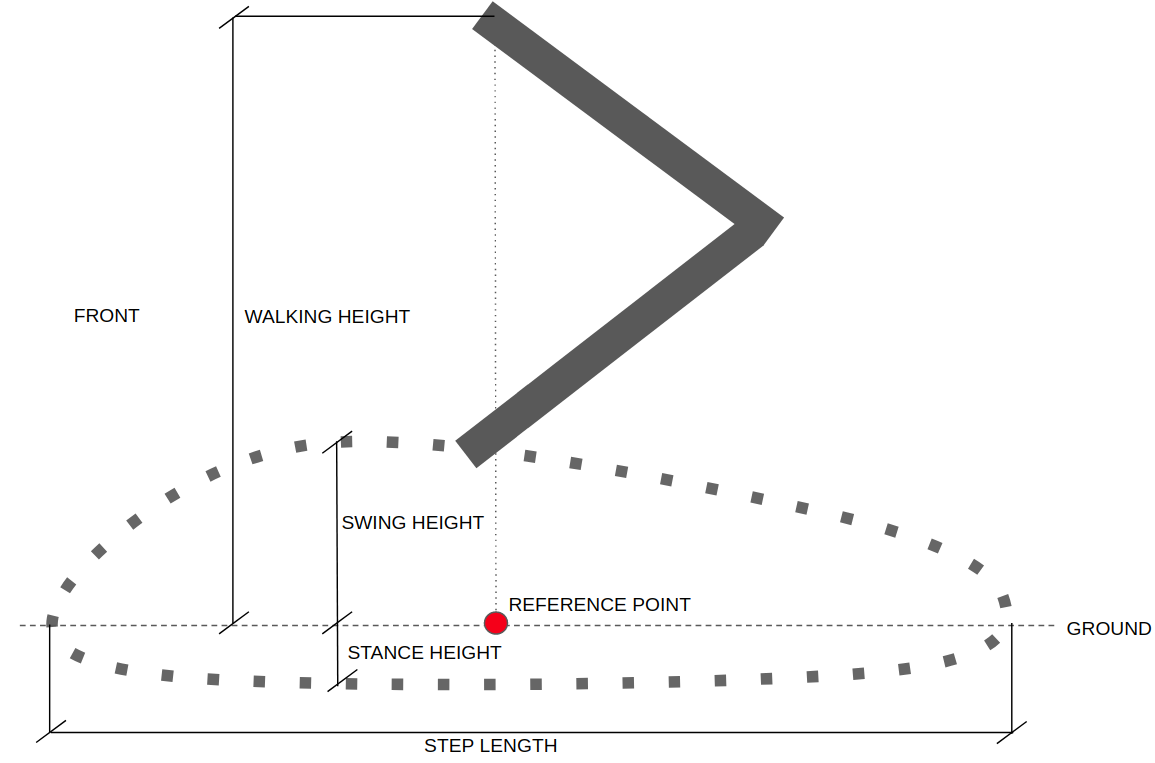
Stance Duration (seconds)- How long should each leg spend on the ground while walking. You can set this to default(0.25) if you're not sure. The higher the stance duration the further the displacement is from the reference point.
-
Leg Swing Height (meters)- Trajectory height during swing phase.
-
Leg Stance Height (meters)- Trajectory depth during stance phase.
-
Robot Walking Height (meters) - Distance from hip to the ground while walking. Take note that setting this parameter too high can get your robot unstable.
-
CoM X Translation (meters) - You can use this parameter to move the reference point in the X axis. This is useful when you want to compensate for the weight if the center of mass is not in the middle of the robot (from front hip to rear hip). For instance, if you find that the robot is heavier at the back, you'll set a negative value to shift the reference point to the back.
-
Odometry Scaler - You can use this parameter as a multiplier to the calculated velocities for dead reckoning. This can be useful to compensate odometry errors on open-loop systems. Normally this value ranges from 1.0 to 1.20.
5. Generate Config Package
Before you generate the configuration package make sure you have configured all the legs and set the correct gait configurations.
-
Click the 'Generate Config' tab and key-in the robot name.
-
Click the 'Browse' button to choose the 'src' directory of your current catkin workspace.
-
Click 'Generate' button to create the configuration package.