Brummi BehindTheScenes Save
Official implementation of the paper: Behind the Scenes: Density Fields for Single View Reconstruction (CVPR 2023)
Behind the Scenes: Density Fields for Single View Reconstruction
Paper | Video | Project Page
This is the official implementation for the CVPR 2023 paper:
Behind the Scenes: Density Fields for Single View Reconstruction
Felix Wimbauer1, Nan Yang1, Christian Rupprecht2 and Daniel Cremers1
1Technical University of Munich, 2University of Oxford
If you find our work useful, please consider citing our paper:
@article{wimbauer2023behind,
  title={Behind the Scenes: Density Fields for Single View Reconstruction},
  author={Wimbauer, Felix and Yang, Nan and Rupprecht, Christian and Cremers, Daniel},
  journal={arXiv preprint arXiv:2301.07668},
  year={2023}
}
https://github.com/Brummi/BehindTheScenes/assets/16351108/bedef923-b8b9-4849-b641-e6732d4b273c
📋 Abstract
Inferring a meaningful geometric scene representation from a single image is a fundamental problem in computer vision. Approaches based on traditional depth map prediction can only reason about areas that are visible in the image. Currently, neural radiance fields (NeRFs) can capture true 3D including color but are too complex to be generated from a single image. As an alternative, we introduce a neural network that predicts an implicit density field from a single image. It maps every location in the frustum of the image to volumetric density. Our network can be trained through self-supervision from only video data. By not storing color in the implicit volume, but directly sampling color from the available views during training, our scene representation becomes significantly less complex compared to NeRFs, and we can train neural networks to predict it. Thus, we can apply volume rendering to perform both depth prediction and novel view synthesis. In our experiments, we show that our method is able to predict meaningful geometry for regions that are occluded in the input image. Additionally, we demonstrate the potential of our approach on three datasets for depth prediction and novel-view synthesis.
🪧 Overview
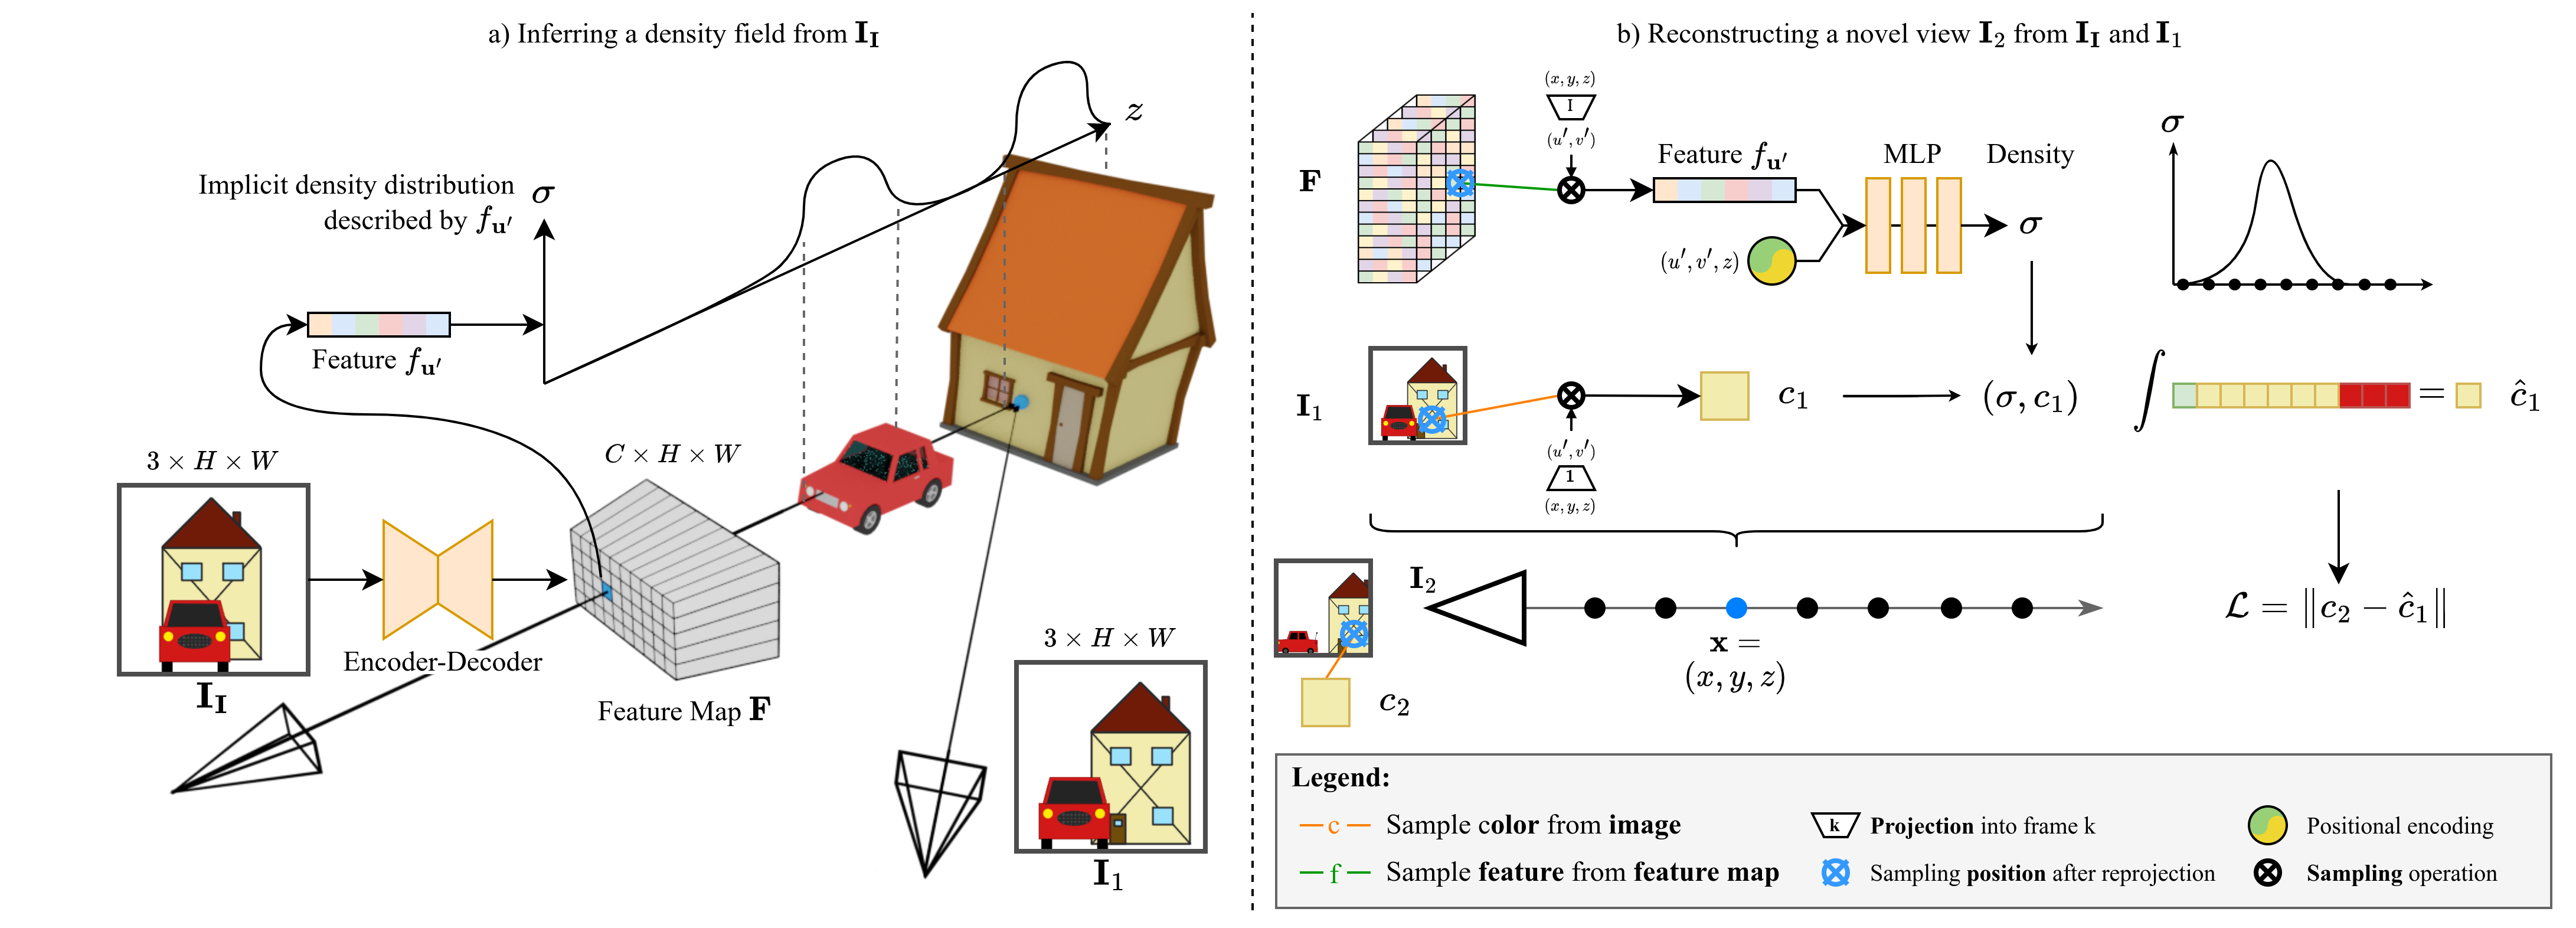
a) Our method first predicts a pixel-aligned feature map F, which describes a density field, from the input image II. For every pixel u', the feature fu' implicitly describes the density distribution along the ray from the camera origin through u'. Crucially, this distribution can model density even in occluded regions (e.g. the house).
b) To render novel views, we perform volume rendering. For any point x, we project x into F and sample fu'. This feature is combined with positional encoding and fed into an MLP to obtain density σ. We obtain the color c by projecting x into one of the views, in this case I1, and directly sampling the image.
🏗️️ Setup
🐍 Python Environment
We use Conda to manage our Python environment:
conda env create -f environment.yml
Then, activate the conda environment :
conda activate bts
💾 Datasets
All data should be placed under the data/ folder (or linked to there) in order to match our config files for the
different datasets.
The folder structure should look like:
data/KITTI-360
data/KITTI-Raw
data/RealEstate10K
All non-standard data (like precomputed poses and datasplits) comes with this repository and can be found in the datasets/ folder.
KITTI-360
To download KITTI-360, go to https://www.cvlibs.net/datasets/kitti-360/index.php and create an account. We require the perspective images, fisheye images, raw velodyne scans, calibrations, and vehicle poses.
KITTI (Raw)
To download KITTI, go to https://www.cvlibs.net/datasets/kitti/raw_data.php and create an account.
We require all synched+rectified data, as well as the calibrations.
The website also provides scripts for automatic downloading of the different sequences.
As we have found the provided ground truth poses to be lacking in quality, we computed our own poses with ORB-SLAM3 and use them by default.
They can be found under datasets/kitti_raw/orb-slam_poses.
RealEstate10K
You first have to download the camera trajectories and video information from https://google.github.io/realestate10k/download.html.
Place these files under data/RealEstate10K/train and data/RealEstate10K/test respectively.
We then provide a script to download and preprocess the videos.
Note that these scripts may take several days to run.
Further, the download script uses the tempory folder (default /dev/shm/).
python datasets/realestate10k/download_realestate10k.py -d data/RealEstate10K -o data/RealEstate10K -m train
python datasets/realestate10k/download_realestate10k.py -d data/RealEstate10K -o data/RealEstate10K -m test
python datasets/realestate10k/process_realestate10k.py -d data/RealEstate10K -m train
python datasets/realestate10k/process_realestate10k.py -d data/RealEstate10K -m test
Other Dataset Implementations
This repository contains dataloader implementations for other datasets, too. These are not officially supported and are not guaranteed to work out of the box. However, they might be helpful when extending this codebase.
📸 Checkpoints
We provide download links for pretrained models for KITTI-360, KITTI, and RealEstate10K (soon).
Models will be stored under out/<dataset>/pretrained/<checkpoint-name>.pth.
download_checkpoint.sh {kitti-360|kitti-raw|realestate10k}
🏃 Running the Example
We provide a script to run our pretrained models with custom data.
The script can be found under scripts/images/gen_img_custom.py and takes the following flags:
-
--img <path>/i <path>: Path to input image. The image will be resized to match the model's default resolution. -
--model <model>/-m <model>: Which pretrained model to use (KITTI-360(default),KITTI-Raw,RealEstate10K). -
--plot/-p: Plot outputs instead of saving them.
media/example/ contains two example images. Note that we use the default projection matrices for the respective datasets
to compute the density profiles (birds-eye views).
Therefore, if your custom data comes from a camera with different intrinsics, the output profiles might be skewed.
# Plot outputs
python scripts/images/gen_img_custom.py --img media/example/0000.png --model KITTI-360 --plot

# Save outputs to disk
python scripts/images/gen_img_custom.py --img media/example/0000.png --model KITTI-360
🏋 Training
We provide training configurations for our different models. Generally, all trainings are run on a single Nvidia A40 GPU with 48GB memory.
KITTI-360
python train.py -cn exp_kitti_360
KITTI (Raw)
python train.py -cn exp_kitti_raw
RealEstate10K
python train.py -cn exp_re10k
📊 Evaluation
We further provide configurations to reproduce the evaluation results from the paper for occupancy and depth estimation.
# KITTI-360 Lidar Occupancy
python eval.py -cn eval_lidar_occ

# KITTI Raw Depth
python eval.py -cn eval_depth
📽 Rendering Images & Videos
We provide scripts to generate images and videos from the outputs of our models.
Generally, you can adapt the model and configuration for the output by changing some constant in the scripts.
Generated files are stored under media/.
Inference on custom images
Please refer to the example section.
Generate images for samples from the datasets
python scripts/images/gen_imgs.py
Generate depth / profile videos
python scripts/videos/gen_vid_seq.py
Generate novel view animations
python scripts/videos/gen_vid_nvs.py
We provide different camera trajectories under scripts/videos/trajectories.
Generate animation from depth map to top-down profile
python scripts/videos/gen_vid_transition.py
🗣️ Acknowledgements
This work was supported by the ERC Advanced Grant SIMULACRON, the GNI project AI4Twinning and the Munich Center for Machine Learning. C. R. is supported by VisualAI EP/T028572/1 and ERC-UNION-CoG-101001212.
This repository is based on the PixelNeRF code base and takes a lot of inspiration from Monodepth2.
