Rpanion Server Save
Web-based configurator for companion computers of MAVLink vehicles
![]()
![]()
User Documentation is at https://www.docs.rpanion.com/software/rpanion-server
Rpanion-server
This is a node.js based server for companion computers used in Mavlink-based vehicles (ie Ardupilot, PX4).
It presents a web-based interface (running on the companion computer), where system settings such as network, telemetry and video streaming can be configured from.
On the Raspberry Pi, Rpanion-server is compatible with the Raspberry Pi OS and Ubuntu 20.04 LTS.
On the Nvidia Jetson, Rpanion-server is compatible with Ubuntu 18.04 LTS.
On the Libre Computer Le Potato, Rpanion-server is compatible with their flavor of Raspberry Pi OS.
[!NOTE] Some users may have issues connecting to the UART on the Raspberry Pi 3B+. Further details and configuration fixes are at https://github.com/stephendade/Rpanion-server/issues/215#issuecomment-2049058406.
Features
Rpanion-server allows the user to configure:
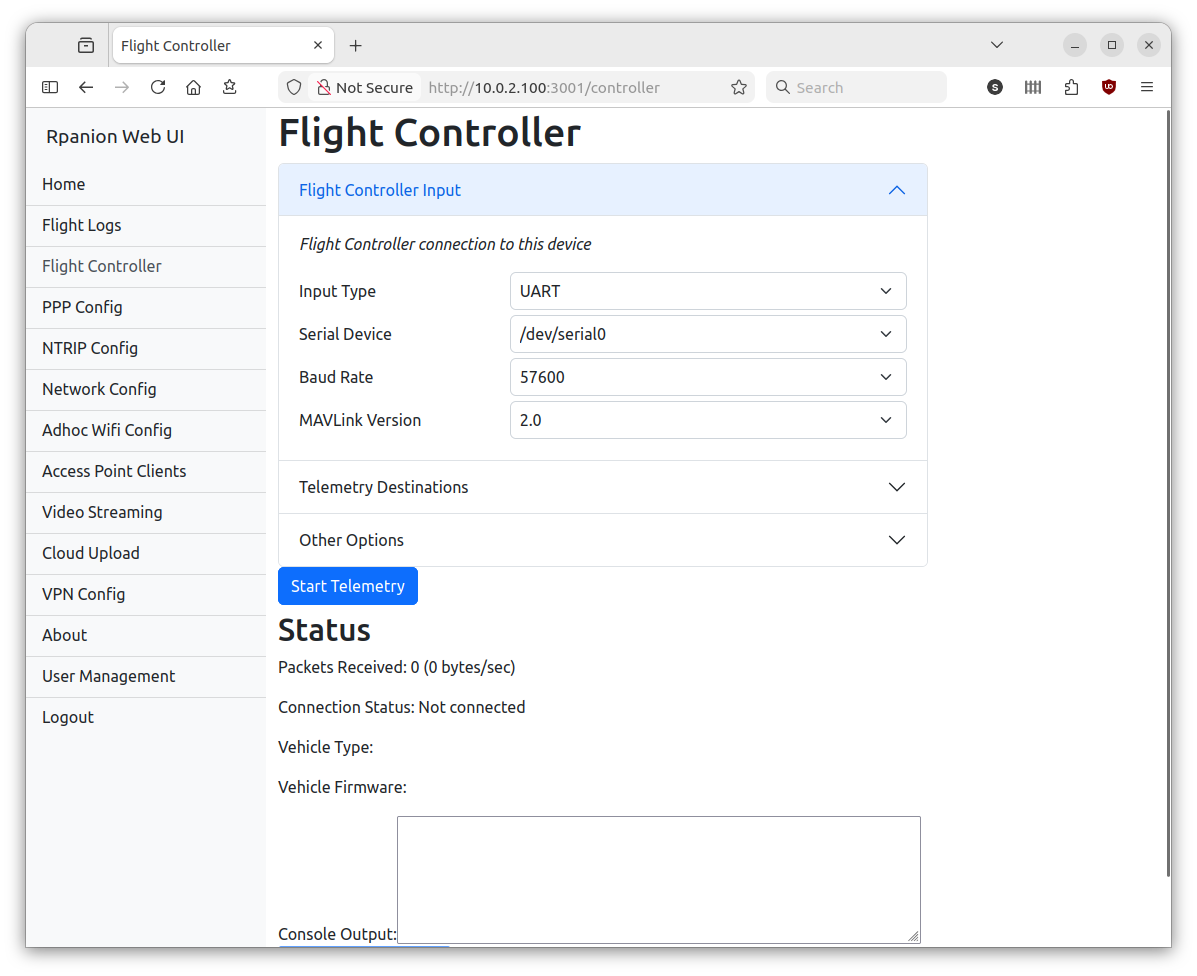
- Flight Controller telemetry routing to udp outputs
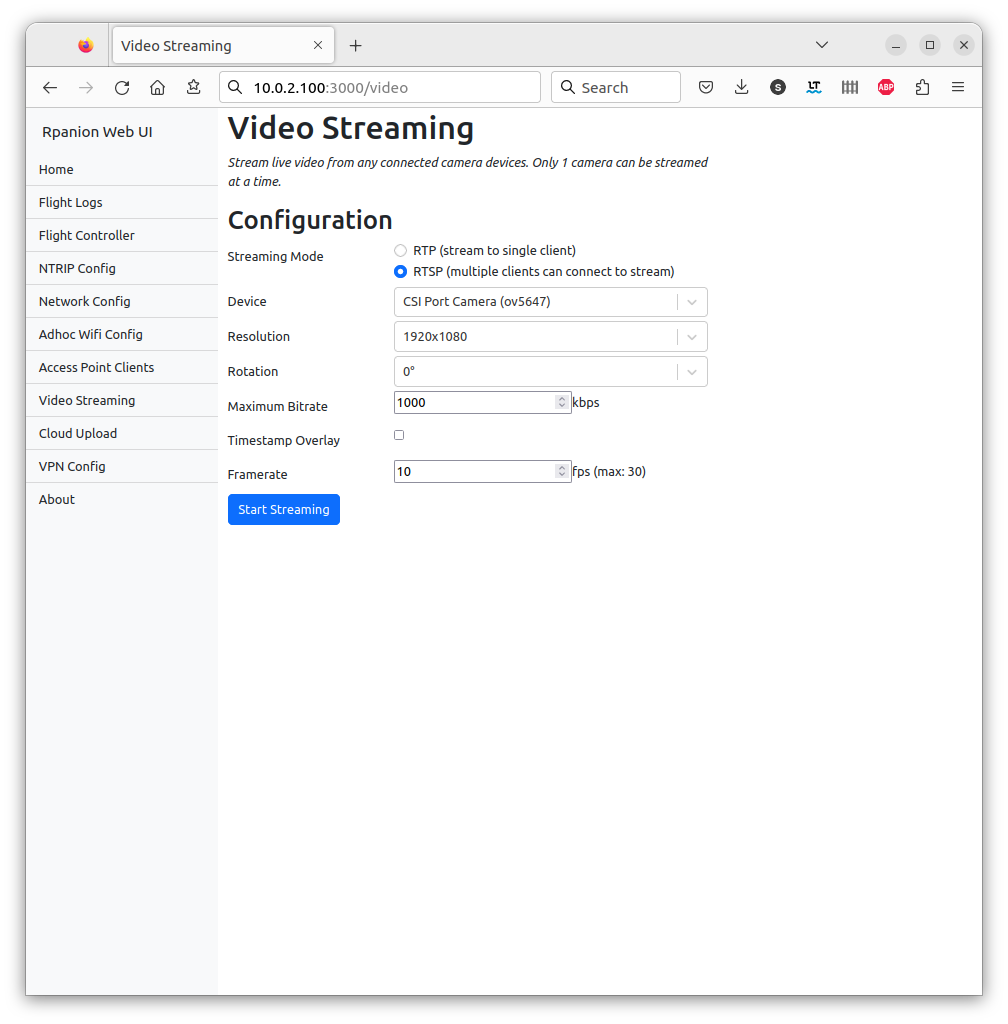
- Video Streaming via an RTSP server
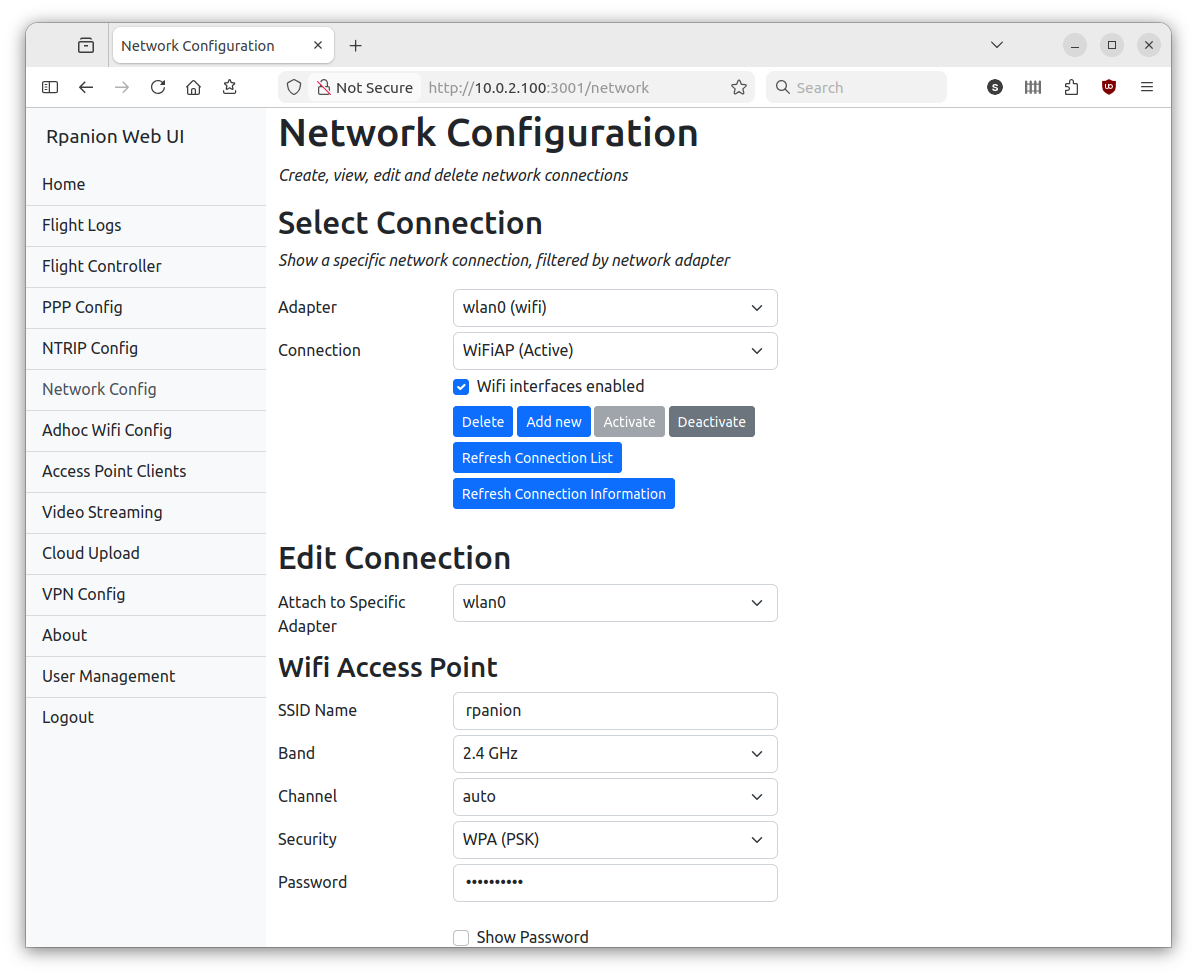
- Network configuration
- NTRIP Streaming
- Logging (tlog and bin logs)
Dependencies and First-time configuration
The following instructions assumes you have cloned the Rpanion-server repository to ~/.
If not, use:
cd ~/ && git clone --recursive https://github.com/stephendade/Rpanion-server.git
Automatic (Raspberry Pi)
The Raspberry Pi Zero W(1) is not supported from version 0.10.0 onwards.
For the Raspberry Pi 2, 3, 4,5 and Zero(2) run the below command on a fresh Raspberry Pi OS install to configure and install Rpanion-server with all required dependencies. Note this does not configure an initial Wifi hotspot.
cd ./deploy && ./RasPi2-3-4-5-deploy.sh
If running Ubuntu 20.04 OS on the Pi, use:
cd ~/Rpanion-server/deploy/ && ./RasPi-ubuntu20-deploy.sh
If running Ubuntu 22.04 OS on the Pi, use:
cd ~/Rpanion-server/deploy/ && ./RasPi-ubuntu22-deploy.sh
Note the CSI camera does not currently work on Ubuntu 22.04, due to incompatibilities with the Raspberry Pi.
If not already configured for an initial Wifi hotspot, run the ./deploy/wifi_access_point.sh script.
The hotspot has the SSID "rpanion" and password "rpanion123". The Pi's IP address will be 10.0.2.100,
so the Rpanion-sever website will be available at http://10.0.2.100:3000.
Manual (Raspberry Pi OS)
Rpanion-server requires a recent version of node.js. It can be installed via package manager:
sudo apt-get install -y ca-certificates curl gnupg
sudo mkdir -p /etc/apt/keyrings
curl -fsSL https://deb.nodesource.com/gpgkey/nodesource-repo.gpg.key | sudo gpg --dearmor -o /etc/apt/keyrings/nodesource.gpg
echo "deb [signed-by=/etc/apt/keyrings/nodesource.gpg] https://deb.nodesource.com/node_20.x nodistro main" | sudo tee /etc/apt/sources.list.d/nodesource.list

sudo apt update
sudo apt install -y nodejs
The required prerequisite packages can be installed via:
sudo apt install libgstreamer-plugins-base1.0* libgstreamer1.0-dev gstreamer1.0-plugins-ugly libgstrtspserver-1.0-dev gstreamer1.0-plugins-base-apps network-manager python3 python3-dev python3-gst-1.0 python3-pip dnsmasq ninja-build

sudo pip3 install meson
pip3 install netifaces --user
For some systems (such as the Raspberry Pi), additional permissions may be requires to run nmcli from the
default user. In /etc/NetworkManager/NetworkManager.conf add auth-polkit=false in the main section.
If an older version of the Raspberry Pi OS is used (Buster, V10 or below), the gst-rpicamsrc Gstreamer element
must be installed. See https://github.com/thaytan/gst-rpicamsrc for install instructions.
To (optionally) use the Zerotier and/or Wireguard VPN's, install as follows:
curl -s https://install.zerotier.com | sudo bash
sudo apt install wireguard wireguard-tools
The mavlink-router (https://github.com/intel/mavlink-router) software is used for backend routing and is required to be installed:
git submodule init && git submodule update
cd ./modules/mavlink-router
meson setup build . --buildtype=release
ninja -C build
sudo ninja -C build install
The node.js packages need to be installed using npm install in the Rpanion-server folder.
Automatic (Nvidia Jetson)
For the Nvidia Jetson run the below command on a fresh OS install to configure and install Rpanion-server and all required dependencies. Note this does not configure an initial Wifi hotspot.
cd ./deploy && ./jetson-deploy.sh
Automatic (Libre Computer AML-S905X-CC aka 'Le Potato')
For the Le Potato run the below command on a fresh OS install to configure and install Rpanion-server and all required dependencies. Note this does not configure an initial Wifi hotspot.
cd ./deploy && ./RasPi2-3-4-deploy.sh
If using a usb to serial converter, you might need to modify permissions of the device.
Temporary device permission update
sudo chmod 666 /dev/ttyACM0
Persistent device permission update
Follow the steps on this site for your specific device: https://www.xmodulo.com/change-usb-device-permission-linux.html
Automatic (x86 boards and laptops)
For any x86 based modules or laptops, run the following script to configure and install Rpanion-server and all required dependencies. Note this does not configure an initial Wifi hotspot.
cd ./deploy && ./x86-ubuntu20-deploy.sh
Updating
When updating Rpanion-server from Github, run npm install to grab any
changed dependencies.
If running in production mode, run npm run build too for the ReactJS app
to be rebuilt.
If running Rpanion-server as a service, ensure to restart the service.
An automatic update script performed via:
./deploy/upgrade.sh
Building and Running in production mode
Running in production mode builds the reactJS app first. This gives performance increases over running in development mode.
npm run build
PORT=3000
npm run server
Building and Running in development mode
Running in development mode allows for any code changes to trigger a restart of Rpanion-server.
Rpanion-server consists of a node.js server running on port 3001 and a React frontend application running on port 3000 in development mode.
In production mode, the React application is rendered statically
from the node.js server on port 3001. This can be overidden via setting the PORT environment
variable (see rpanion.service for for example).
You can start the server on its own with the command:
npm run server
Run the React application on its own with the command:
npm start
Run both applications together with the command:
npm run dev
At this point, the website will be active at http://<ip of device>:3000
Tests
Unit tests are split into separate commands for the frontend (ReactJS) and backend.
Unit tests can be run with the command:
npm run testback
npm run testfront
Code coverage statistics are automatically calculated for the backend tests.
Linting (via eslint) is available via:
npm run lint
Releasing
Use npx npm-check-updates -u to update nodejs libraries.
Use npm version minor to create a new release.
To produce a disk image from a SD card, insert the card and run ./deploy/create_image.sh.
Running as a Service
To have Rpanion-server running on automatically on boot, there is an included systemd service file.
This can be enabled via:
sudo cp rpanion.service /etc/systemd/system
sudo systemctl enable rpanion.service
