ESP RFID Thief Save
!!! Deprecated, see www.rfid-tool.com instead !!! The ESP-RFID-Thief is a port of the Tastic RFID Thief to the ESP12S chip with the addition of a web interface and various new features. Repository includes files for both the hardware and software.
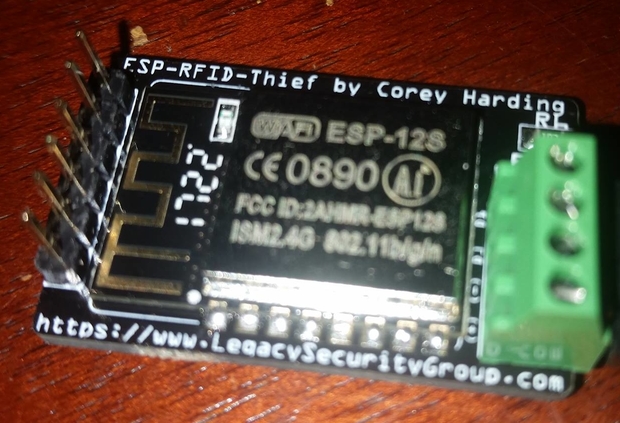
ESP-RFID-Thief
Hardware and software has been reworked and will be sold as the ESP-RFID-Tool by April Brother.
See www.rfid-tool.com for more info
The ESP-RFID-Thief is a port of the Tastic RFID Thief(Originally created by Fran Brown from Bishop Fox) to the ESP12S chip. One of the benefits the ESP-RFID-Thief has over the original Tastic RFID Thief is the addition of WiFi and a web interface to review captured credentials. The on board flash also eliminates the need for an SD card. The device can be combined with a RFID reader that outputs Wiegand data along with a battery pack to create a standalone RFID reader that saves all scanned cards to a log file accessible through the web interface. The HID MaxiProx 5375 running on 12V(8xAA Batteries) can capture cards from up to two feet away when combined with this device. This device can also be planted inside existing RFID reader installations to capture card data.
Hardware License
Attribution-ShareAlike 3.0 Unported (CC BY-SA 3.0)
Hardware by Corey Harding
Software License
MIT License
Based off the work of Fran Brown from Bishop Fox
Ported to the ESP12S with a web interface by Corey Harding
Video Demo
Instructions
Gather parts
-See BOM under Board Folder
Assemble board
-Simple surface mount assembly when using low temp solder paste and a hot air rework station.
-I suggest leaving the programming header unpopulated and using pogo pins or clips to program.
Program board using FTDI
-FTDI must supply 3V3 and have 6 pins(DTR,RXD,TXD,VC,CTS,GND) and a reset button
-Be sure to press the reset button on the FTDI or hit the reset jumper on the ESP-RFID-Thief board to start flashing
-Linux: https://github.com/exploitagency/esptool
python esptool.py --port=/dev/ttyUSB1 --baud 115000 write_flash 0x00000 espthief.ino.generic.bin --flash_size 32m
-Windows: https://github.com/nodemcu/nodemcu-flasher
Install into RFID reader
-Make sure the reader outputs data in the Wiegand format
-Connect D0 on device to D0 on reader
-Connect D1 on device to D1 on reader
-Connect + on device to + on reader
-Connect - on device to - on reader
-Connect 4.5-18V battery into the same + and -(only if building a portable unit, do not add a battery if implanting device into an existing installation)
Configure settings
-See Below
Software Help
Accessing ESP-RFID-Thief Web Interface
SSID: "ESP-RFID-Thief"
URL: http://192.168.1.1
Configure ESP-RFID-Thief
Default credentials to access the configuration page:
Username: "admin"
Password: "hacktheplanet"
Default credentials for ftp server:
Username: "ftp-admin"
Password: "hacktheplanet"
WiFi Configuration:
Network Type:
Access Point Mode: Create a standalone access point(No Internet Connectivity-Requires Close Proximity)
Join Existing Network: Join an existing network(Possible Internet Connectivity-Could use Device Remotely)
Hidden: Choose whether or not to use a hidden SSID when creating an access point
SSID: SSID of the access point to create or of the network you are choosing to join
Password: Password of the access point which you wish to create or of the network you are choosing to join
Channel: Channel of the access point you are creating
IP: IP to set for device
Gateway: Gateway to use, make it the same as ESP-RFID-Thief's IP if an access point or the same as the router if joining a network
Subnet: Typically set to 255.255.255.0
Web Interface Administration Settings:
Username: Username to configure/upgrade ESP-RFID-Thief
Password: Password to configure/upgrade ESP-RFID-Thief
FTP Server Settings:
Note: Supports Passive(PASV) Mode Only!
Enabled: Turn FTP Server ON
Disabled: Turn FTP Server OFF
Username: Username to login to ftp server
Password: Password to login to ftp server
Power LED:
Enabled: Turn ON Power LED
Disabled: Turn OFF Power LED
RFID Capture Log:
Useful to change this value to differentiate between facilities during various security assessments.
File Name: File name to save captured RFID tags to for the current security assessment.
List Exfiltrated Data
Displays all log files containing RFID tag captures.
Format File System
This will erase the contents of the SPIFFS file system including ALL RFID tag captures.
Formatting may take up to 90 seconds.
All current settings will be retained unless you reboot your device during this process.
Upgrade ESP-RFID-Thief Firmware
Authenticate using your username and password set in the configuration page.
Default credentials to access the firmware upgrade page:
Username: "admin"
Password: "hacktheplanet"
Select "Browse" choose the new firmware to be uploaded and then click "Upgrade".
You will need to manually reset the device upon the browser alerting you that the upgrade was successful.
Jumpers
J1: Bridge to reset the board(your FTDI doesn't have a reset button?)
J2: Cut the trace to disable DTR pin after programming then use it as an additional IO(continue updating firmware via web interface)
Restore Default Settings
Option 1: Go to settings under web interface and choose restore default configuration.
Option 2: With power applied to the device bridge J1 twice within 3 seconds waiting a second between each "press".
Licensing Information
Created by Corey Harding
https://github.com/exploitagency/ESP-RFID-Thief
ESP-RFID-Thief software is licensed under the MIT License
ESP-RFID-Thief hardware is licensed under the Attribution-ShareAlike 3.0 Unported (CC BY-SA 3.0) License
