DigiHuman Save
Automatic 3D Character animation using Pose Estimation and Landmark Generation techniques
DigiHuman
Digihuman is a project which aims to automatically generate whole body pose animation + facial animation on 3D Character models based on the camera input.
This project is my B.Sc thesis of Computer Engineering at Amirkabir University of Technology(AUT).
About DigiHuman
DigiHuman is a system for bringing automation in animation generation on 3D virtual characters.
It uses Pose estimation and facial landmark generator models to create entire body and face animation on 3D virtual characters.
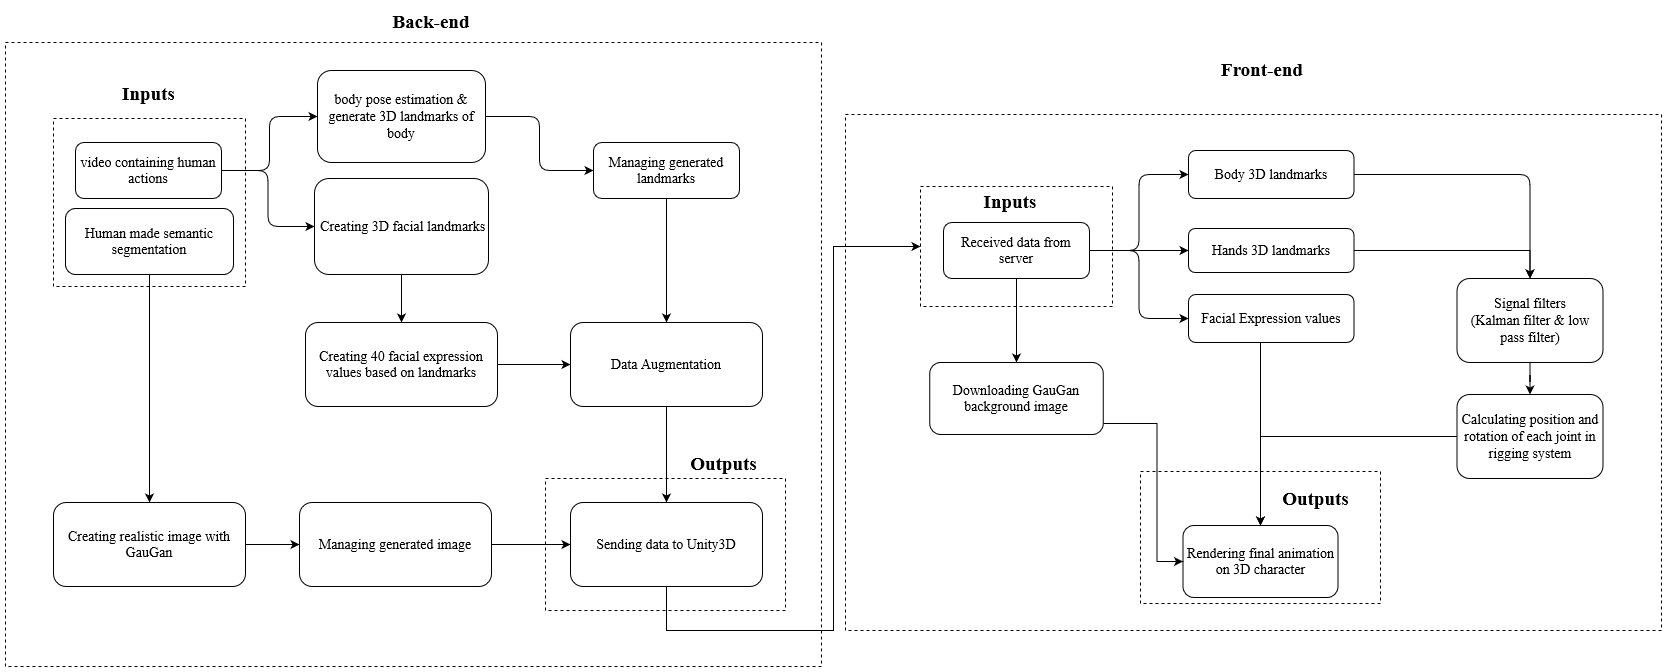
DigiHuman is developed with MediaPipe and Unity3D.
MediaPipe generates 3D landmarks for the human whole body and face, and Unity3D is used to render the final animation after processing the generated landmarks from MediaPipe. The diagram below, shows the whole architucture of the application.
Sample Outputs of the project
Hands animations


Full body animation


Face animation


Installation
Follow the instructions to run the program!
Backend server installtion
- Install MediaPipe python.
pip install mediapipe
- Install OpenCV python.
pip install opencv-python
- Go to
backenddirectory and install other requirements:
pip install -r requirements.txt
- You'll need to download the pre-trained generator model for the COCO dataset and place it into
backend/checkpoints/coco_pretrained/.
Unity3D Installation
Install Unity3D and its requirements by the following guidelines(Skip 1-3 if Unity3D is already installed).
- Download and install UnityHub
- Add a new license in UnityHub and register it
- Install a Unity Editor inside UnityHub(
LTSversions and a version higher than2020.3.25f1are recommended). - In the Unity project setting, allow HTTP connections in the player setting.

- Download and import the following packages into your project to enable the recording option available with FFmpeg(Download
.unitypackagefiles and drag them to your project).
- FFmpegOut package (MIT license)
- FFmpegOutBinaries package (GPL)
Usage
- Run backend server at
backenddirectory with the following command:python server.py - Run Unity Project and open the main scene at
Assets\Scenes\MainScene.unity - Test the program by uploading videos to backend from the Unity project(You can test the application by selecting provided animations from the right side menu!).
Adding new 3D characters
You can add your characters to the project! Characters should have a standard Humanoid rig to show kinematic animations. For rendering face animations, characters should have a facial rig(Blendmesh). Follow these steps to add your character:
- Find a 3D character model from Unity asset store or download a free one(You can download them from websites like Mixamo).
- Open the character setting and set the rig to humanoid

- Drag and drop your 3D character model to
CharacterChooser/CharacterSlideshow/Parentobject in Unity main Scene like the image below

- Add
BlendShapeControllerandQualityDatacomponents to the character object in the scene(which is dragged inside the Parent object in the last step). - Set
BlendShapeControllervalues
- Add character
SkinnedMeshRenderercomponent toBlendShapeControllercomponent.

- Find each blnedShape weight number under
SkinnedMeshRendererand set those numbers inBlendShapesfield insideBlendShapeController(for specifying each blendshape value to theBlendShapeControllercomponent so the animation would be shown on character face by modification on these blnedShape values)

- Open
CharacterSlideshowObject onCharacterChooser/CharacterSlideshowpath inside the scene hierarchy, then add a new dragged character to thenodesproperty(all characters should be referenced insidenodes).

- Run the application and you can now select your character for rendering animation!
Features
- Making full body animation
- Animating multiple blendShapes on 3D character (up to 40 blendshape animations is supported currently)
- Supporting any 3D models with Humanoid T-Pose rig
- Exporting animation in a video file
- Saving animation data and re-rendering it for future usage
- Filtering mediaPipe outputs in order to detect and remove noises and better smoothness (Low Pass Filtering is used currently)
- Animating the character's face in great details
- Training a regression model to generate Blendmesh weights by feeding the output data of mediaPipe FaceMesh(468 points)
- Using StyleGan techniques to replace whole character face mesh
- Automatic rigging for 3D models without humanoid rig (Using deep neural network models like RigNet)
- Generating complete character mesh automatically using models like PIFuHD (in progress!)
- Animating 3D character mouth in great detail using audio signal or natural language processing methods
- Generating complete environment in 3D
Resources
- Body Pose Estimation: BlazePose model
- Hands Pose Estimation: MediaPipe Hands model
- Face Detection: BlazeFace model
- Face Landmark Generator: MediaPipe Face Landmark Model
Licenses & Citations
DigiHuman Licence
Application License: GPL-3.0 license Non-commercial use only. If you distribute or communicate copies of the modified or unmodified Program, or any portion thereof, you must provide appropriate credit to Danial Kordmodanlou as the original author of the Program. This attribution should be included in any location where the Program is used or displayed.
FFmpeg
- FFmpeg is licensed under the GNU Lesser General Public License (LGPL) version 2.1 or later. However, FFmpeg incorporates several optional parts and optimizations that are covered by the GNU General Public License (GPL) version 2 or later. If those parts get used the GPL applies to all of FFmpeg.
- Unity FFmpeg packages are licensed under Keijiro Takahashi MIT
GauGan
- Used SPADE repository developed by NVIDIA and the customization is addapted from Smart-Sketch with GPL V 3.0 licence
@inproceedings{park2019SPADE,
  title={Semantic Image Synthesis with Spatially-Adaptive Normalization},
  author={Park, Taesung and Liu, Ming-Yu and Wang, Ting-Chun and Zhu, Jun-Yan},
  booktitle={Proceedings of the IEEE Conference on Computer Vision and Pattern Recognition},
  year={2019}
}
3D Characters
Unity-chan model & mixamo models
Contact
Danial Kordmodanlou - [email protected]
Website : danial-kord.github.io
Project Link: github.com/Danial-Kord/DigiHuman
Telegram ID: @Danial_km
