Zabbix Notify Save Abandoned
Notify alarms from Zabbix to Slack Hipchat and PagerDuty
DEPRECATED! For Zabbix 4.4 or newer please use the official integration with Slack/PagerDuty based on webhooks.
https://git.zabbix.com/projects/ZBX/repos/zabbix/browse/templates/media/slack https://git.zabbix.com/projects/ZBX/repos/zabbix/browse/templates/media/pagerduty
zabbix-notify

Notify alarms from Zabbix 3.x to Slack, HipChat and PagerDuty
About
This guide provides step-by-step guide how to install and use scripts to send notifications from Zabbix to popular collaborations platforms: HipChat (Deprecated), Slack and Incident Management system PagerDuty. Here is the idea in brief:
-
Install scripts on Zabbix Server
-
In HipChat, Slack or PagerDuty generate access key for Zabbix
-
In Zabbix setup new Media Type, Actions and assign new media type to new impersonal user
-
Catch messages in Slack channel:

-
HipChat room:

-
or PagerDuty Console:

Features Include:
All:
- All configuration is done in Zabbix web-interface (no config files anywhere)
- UTF8 supported
- HTTPS/HTTP proxy supported (see how at the end)
Slack:
- Color coding events depending on Trigger Status and Severity
- Recovery and acknowledgements from Zabbix will be posted as new messages (
--slack_mode=event) - Acknowledgements (Zabbix 3.4+) will be attached as replies to Slack message thread. Recovery message from Zabbix will update and then delete initial problem message as well as all acknowledgements. (
--slack_mode=alarm)
- Acknowledgements will be attached as replies to Slack message thread. Recovery message from Zabbix will update initial message. (
--slack_mode=alarm-no-delete) - JSON can be used to compose Slack messages. See Slack message attachments
HipChat:
- Color coding events depending on Trigger Status and Severity
- HTML or plain text can be used to format HipChat messages.
- JSON can be used to compose messages. See HipChat API
PagerDuty:
- Recovery message from Zabbix will resolve already created incident in PagerDuty
- Acknowledgements will be added already created incidents
- JSON can be used to compose messages. See PagerDuty API here and here
There are limitations to note as well:
- Slack and HipChat can reject you messages if you are sending them too often (more then 1 per second). It can accept short bursts but If you continue to spam - you will be blocked for one minute or so. So use Acton Conditions wisely to avoid event storms.
Zabbix Server preparations
Start with installing the script to Zabbix Server.
The script is written in Perl and you will need common modules in order to run it:
LWP
JSON::XS
There are numerous ways to install them:
| in Debian | In Centos | using CPAN | using cpanm |
|---|---|---|---|
apt-get install libwww-perl libjson-xs-perl |
yum install perl-JSON-XS perl-libwww-perl perl-LWP-Protocol-https perl-parent |
PERL_MM_USE_DEFAULT=1 perl -MCPAN -e 'install Bundle::LWP' and PERL_MM_USE_DEFAULT=1 perl -MCPAN -e 'install JSON::XS' |
cpanm install LWP and cpanm install JSON::XS |
You may also might requireadditional modules to do make test and installation:
| in Debian | In Centos | using CPAN | using cpanm |
|---|---|---|---|
apt-get install libtest-simple-perl libtest-most-perl |
yum install perl-ExtUtils-MakeMaker perl-Test-Simple perl-Test-Exception |
cpan install ExtUtils::MakeMaker and PERL_MM_USE_DEFAULT=1 perl -MCPAN -e 'install Test::Simple' and PERL_MM_USE_DEFAULT=1 perl -MCPAN -e 'install Test::Exception' |
cpanm install ExtUtils::MakeMaker and cpanm install Test::Simple and cpanm install Test::Exception |
Once this is done, download tar and install it into the system:
perl Makefile.PL INSTALLSITESCRIPT=/usr/local/share/zabbix/alertscripts
make test
make install
where INSTALLSITESCRIPT is your Zabbix's alert script folder as defined in zabbix_server.conf.
Please note that currently make test requires Internet connection to test with mocks :) So skip if you don't have one.
Slack Setup
- You have to have the Bots app installed.
- Create a bot

- Fill in the card:

- Upload this icon for the bot, or choose another:

- If you want the bot to broadcast to a channel, invite it to the channel, where you want it to post. to do this in Slack channel type:
/invite @zabbix_bot
Test with Slack
Once you have done the basic setup, go back to the terminal and test the script by running it under the zabbix user:
root#: sudo -u zabbix /bin/sh
cd /usr/local/share/zabbix/alertscripts
To ADD ALARM:
./zbx-notify @your_name_in_slack_here 'PROBLEM:myHOSTNAME Temperature Failure on DAE5S Bus 1 Enclosure 1' 'Host: myHOSTNAME \
Trigger: PROBLEM: myHOSTNAME Temperature Failure on DAE5S Bus 1 Enclosure 1: High \
Timestamp: 2016.03.14 11:57:10 YEKT eventid: 100502' --api_token=your_token_here --slack
To CLEAR ALARM RUN:
./zbx-notify @your_name_in_slack_here 'OK:myHOSTNAME Temperature Failure on DAE5S Bus 1 Enclosure 1' 'Host: myHOSTNAME \
Trigger: OK: myHOSTNAME Temperature Failure on DAE5S Bus 1 Enclosure 1: High \
Timestamp: 2016.03.14 11:57:10 YEKT eventid: 100502' --api_token=your_token_here --slack
Zabbix Configuration (Slack)
Now all is left is to setup new Action and Media Type.
Media type
First go to Administration -> Media Types, press Create media type

Choose Type: Script
Name: Slack
Script name: zbx-notify
Fill Script parameters in the following order
1: {ALERT.SENDTO}
2: {ALERT.SUBJECT}
3: {ALERT.MESSAGE}
4: --api_token=you_token_here
5: --slack
6: --no-fork (for Zabbix 3.4+ only)
Note that there should be no ticks or quotes after --api-token= only the key itself.
You may provide additional params as well, by pressing Add and filling them in the form:
--param=value
Here is what you can setup for Slack:
| Parameter | Description | Default value | Example value | JSON mode(see below) |
|---|---|---|---|---|
api_token |
you bot api token (Mandatory) | none | --api_token=xoxb-30461853043-mQE7IGah4bGeC15T5gua4IzK |
Yes |
slack_mode |
operation mode (event, alarm, alarm-no-delete) |
event | --slack_mode=event |
Yes |
debug |
For providing debug output, useful when running from command line | none | --debug |
Yes |
no-fork |
To prevent script from forking on posting to Slack. | none | --no-fork |
Yes |
no-ssl_verify_hostname |
To ignore SSL certificate validation failures. | none | --no-ssl_verify_hostname |
Yes |
Press Add to finish media type creation.
User changes (for direct to user notifications)
If you want your users to be able to get direct notifications from the bot...
Setting up zabbix slack media for multiple users
- Go to Administration->Users
- Select a user
- Select the Media tab
- Click Add
- Select Type: Slack
- Fill in Send to:
@slackusername(with the user's corresponding slack address) - Click Add
- Click Update
- Repeat for as many users as you want to preconfigure
Setting up zabbix slack media as a user
If your users want to make changes:
- Click the profile icon (near the top right of a zabbix page)
- Select the Media tab
- If there's no Slack type already set up:
- Click Add
- Select Type: Slack
- Fill in Send to:
@slackusername(with the user's corresponding slack address) - Click Add
- If there's already a Slack type, click the corresponding Edit action
- Update the Send to field with the appropriate
@slackusername(with the user's corresponding slack address) - Update When active as appropriate (see zabbix documentation)
- Update Use if severity as desired
- Click Update
- Click Update
User creation (For channel notifications)
As you finish with defining new Media Type for Slack proceed to next step and create impersonal user:
-
Go to Administration->Users
-
Click Create user:
-
In User tab:
-
Alias: Notification Agent
-
Groups: Make sure you add him proper Group Membership so this user has the rights to see new Events (and so notify on them).
-
Password: anything complex you like, you will never use it

-
In Media tab:
-
Create New media:
1. Type: Slack
1. Send to: Place your Slack #channel name here for example #zabbix.

Action creation:
To Create a new action:
- Go to Configuration -> Action
- Choose Event source: Triggers
- press Create action
- that is to be sent to Slack.
Here is the example:
In Operations tab:
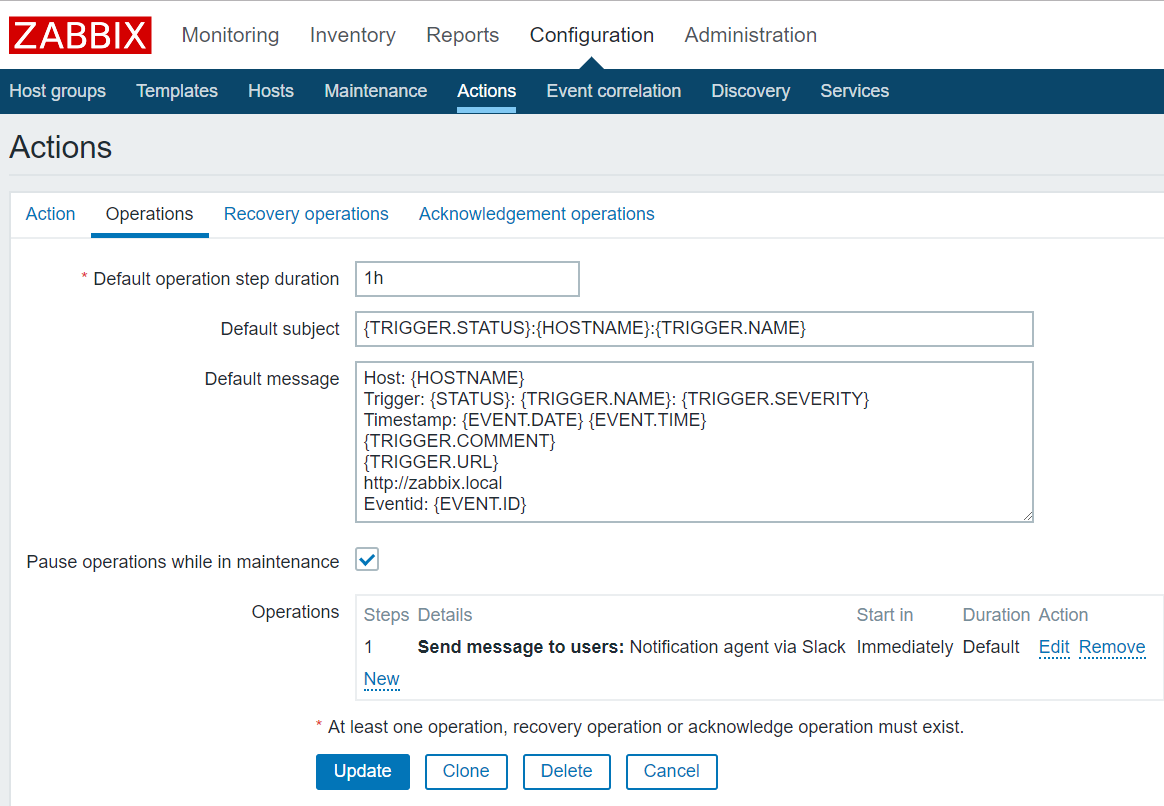
Default subject: anything you like, but I recommend:
{TRIGGER.STATUS}:{HOSTNAME}:{TRIGGER.NAME}.
Default message: anything you like.
Host: {HOSTNAME}
Trigger: {STATUS}: {TRIGGER.NAME}: {TRIGGER.SEVERITY}
Timestamp: {EVENT.DATE} {EVENT.TIME}
{TRIGGER.COMMENT}
{TRIGGER.URL}
http://zabbix.local
Eventid: {EVENT.ID}
In Recovery operations tab: Default subject: anything you like, but I recommend
{TRIGGER.STATUS}:{HOSTNAME}:{TRIGGER.NAME}.
Default message:
Host: {HOSTNAME}
Trigger: {STATUS}: {TRIGGER.NAME}: {TRIGGER.SEVERITY}
Timestamp: {EVENT.RECOVERY.DATE} {EVENT.RECOVERY.TIME}
{TRIGGER.COMMENT}
{TRIGGER.URL}
http://zabbix.local
Eventid: {EVENT.ID}
In Acknowledgement operations (Zabbix 3.4+) tab:
{USER.FULLNAME} acknowledged problem at {ACK.DATE} {ACK.TIME} with the following message:
{ACK.MESSAGE}
Current problem status is {EVENT.STATUS}, Eventid: {EVENT.ID}
Note: if you place Macros {TRIGGER.SEVERITY} and {STATUS} then your messages in Slack will be color coded.
Note: place line Eventid: {EVENT.ID} if you want to use Alarm mode in all messages, including Acknowledgements.
As an alternative you can place JSON object here that would represent Slack attachment:

Note though, that it is required to place all Zabbix MACROS in double brackets [[ ]], so they are properly transformed into JSON String.
For TRIGGER transitioning to PROBLEM you might use:
{
            "fallback": "[[{HOST.NAME}:{TRIGGER.NAME}:{STATUS}]]",
            "pretext": "New Alarm",
            "author_name": "[[{HOST.NAME}]]",
            "title": "[[{TRIGGER.NAME}]]",
            "title_link": "http://zabbix/tr_events.php?triggerid={TRIGGER.ID}&eventid={EVENT.ID}",
            "text": "[[{TRIGGER.DESCRIPTION}]]",
            "fields": [
                {
                    "title": "Status",
                    "value": "{STATUS}",
                    "short": true
                },
                {
                    "title": "Severity",
                    "value": "{TRIGGER.SEVERITY}",
                    "short": true
                },
                {
                    "title": "Time",
                    "value": "{EVENT.DATE} {EVENT.TIME}",
                    "short": true
                },
                {
                    "title": "EventID",
                    "value": "eventid: {EVENT.ID}",
                    "short": true
                }


            ]
        }
And for Recovery:
{
            "fallback": "[[{HOST.NAME}:{TRIGGER.NAME}:{STATUS}]]",
            "pretext": "Cleared",
            "author_name": "[[{HOST.NAME}]]",
            "title": "[[{TRIGGER.NAME}]]",
            "title_link": "http://zabbix/tr_events.php?triggerid={TRIGGER.ID}&eventid={EVENT.RECOVERY.ID}",
            "text": "[[{TRIGGER.DESCRIPTION}]]",
            "fields": [
                {
                    "title": "Status",
                    "value": "{STATUS}",
                    "short": true
                },
                {
                    "title": "Severity",
                    "value": "{TRIGGER.SEVERITY}",
                    "short": true
                },
                {
                    "title": "Time",
                    "value": "{EVENT.RECOVERY.DATE} {EVENT.RECOVERY.TIME}",
                    "short": true
                },
                {
                    "title": "EventID",
                    "value": "eventid: {EVENT.ID}",
                    "short": true
                },
                {
                    "title": "Event Acknowledgement history",
                    "value": "[[{EVENT.ACK.HISTORY}]]",
                    "short": false
                },
                {
                    "title": "Escalation history",
                    "value": "[[{ESC.HISTORY}]]",
                    "short": false
                }


            ]
        }
In Condition tab do not forget to include Trigger value = Problem condition (This option is removed in Zabbix 3.4). The rest depends on your needs.

In Operations tab select Notification Agent as recipient of the message sent via Slack.

More on Action configuration in Zabbix can be found here:
That it is it
Hipchat Setup
Moved here to wiki:
PagerDuty Setup
And finally PagerDuty. If your team doesn't have the account you can get it here
Once inside PagerDuty you will need to setup Services that will provide you with data. To do this go to Configuration->Services:

On the next page choose Zabbix from the list of services and choose a name for your Zabbix installation:
 You will see Service key on the next page: save it somewhere as you will need this in Zabbix.
Test with PagerDuty
Once you have done the previous step, go back to console and test the script by running it under user Zabbix:
root#:su - zabbix
cd /usr/local/share/zabbix/alertscripts
To ADD ALARM:
./zbx-notify pagerduty 'PROBLEM:myHOSTNAME Temperature Failure on DAE5S Bus 1 Enclosure 1' \
'Host: myHOSTNAME \
Trigger: PROBLEM: myHOSTNAME Температуа Failure on DAE5S Bus 1 Enclosure 1: High \
Timestamp: 2016.03.14 11:57:10 eventid: 100502' \
--api_token=1baff6f955c040d795387e7ab9d62090 \
--pagerduty --no-fork
To RESOLVE IT:
./zbx-notify pagerduty 'OK:myHOSTNAME Temperature Failure on DAE5S Bus 1 Enclosure 1' \
'Host: myHOSTNAME \
Trigger: OK: myHOSTNAME Температуа Failure on DAE5S Bus 1 Enclosure 1: High \
Timestamp: 2016.03.14 11:57:10 eventid: 100502' \
--api_token=1baff6f955c040d795387e7ab9d62090 \
--pagerduty --no-fork
Zabbix Configuration (PagerDuty)
Now all is left is to setup new Action and Media Type.
Media type
First go to Administration -> Media Types, press Create media type

Choose Type: Script
Name: PagerDuty
Script name: zbx-notify
Fill Script parameters in the following order
1: {ALERT.SENDTO}
2: {ALERT.SUBJECT}
3: {ALERT.MESSAGE}
4: --api_token=you_token_here
5: --pagerduty
6: --no-fork (for Zabbix 3.4+ only)
Note that there should be no ticks or quotes after --api-token= only the key itself.
You may provide additional params as well, by pressing Add and filling them in the form:
--param=value
Here is what you can setup for PagerDuty:
| Parameter | Description | Default value | Example value | JSON mode(see below) |
|---|---|---|---|---|
| api_token | your Service key(Mandatory) | none | --api_token=1baff6f955c040d795387e7ab9d62090 | Yes |
| pagerduty_client | Zabbix instance name(only works if both client and client_url are provided) | none | --pagerduty_client=Myzabbix | Ignored |
| pagerduty_client_url | Zabbix instance name link | none | --pagerduty_client_url=http://zabbix.local | Ignored |
| debug | For providing debug output, useful when running from command line | none | --debug | Yes |
| no-fork | To prevent script from forking on posting to Slack | none | --no-fork | Yes |
| no-ssl_verify_hostname | To ignore SSL certificate validation failures. | none | --no-ssl_verify_hostname | Yes |
Click Add to finish media type creation.
User creation
As you finish with defining new Media Type for PagerDuty proceed to next step and create impersonal user:
Go to Administration->Users Click Create user:
In User tab:
Alias: Notification Agent
Groups: Make sure you add him proper Group Membership so this user has the rights to see new Events (and so notify on them).
Password: anything complex you like, you will never use it
In Media tab:
Create New media:
Type: PagerDuty
Send to: PagerDuty

Action creation:
Create new action (go to Configuration -> Action ,choose Event source: Triggers Click Create action) that is to be send to PagerDuty.
Here is the example:
In Action tab:
Default/recovery subject: anything you like, but I recommend
{STATUS} : {HOSTNAME} : {TRIGGER.NAME}
Default message:
anything you like, for example:
{TRIGGER.DESCRIPTION}
Status: {STATUS}
Severity: {TRIGGER.SEVERITY}
Timestamp: {EVENT.DATE} {EVENT.TIME}
eventid: {EVENT.ID}
Recovery message:
{TRIGGER.DESCRIPTION}
Status: {STATUS}
Severity: {TRIGGER.SEVERITY}
Timestamp: {EVENT.DATE} {EVENT.TIME}
eventid: {EVENT.ID}
Event Acknowledgement history: {EVENT.ACK.HISTORY}
Escalation history: {ESC.HISTORY}
As an alternative you can place JSON object here that would represent PagerDuty
See PagerDuty API here and here.
Note though, that it is required to place all Zabbix MACROS in double brackets [[ ]], so they are properly transformed into JSON String.
For TRIGGER transitioning to PROBLEM you might use (Default Message):
{

      "incident_key": "{EVENT.ID}",
      "event_type": "trigger",
      "description": "[[{TRIGGER.NAME}]]",
      "client": "Zabbix Monitoring system",
      "client_url": "http://zabbix",
      "details": {
        "Status": "[[{STATUS}]]",
        "Timestamp": "[[{EVENT.DATE} {EVENT.TIME}]]",
        "Hostname": "[[{HOST.NAME}]]",
        "Severity": "[[{TRIGGER.SEVERITY}]]",
        "Description": "[[{TRIGGER.DESCRIPTION}]]",
        "IP": "[[{HOST.IP}]]"
      },
      "contexts":[
        {
          "type": "link",
          "href": "http://zabbix/tr_events.php?triggerid={TRIGGER.ID}&eventid={EVENT.ID}",
          "text": "View Event details in Zabbix"
        }
      ]
    }
And for Recovery:
{
    "incident_key": "{EVENT.ID}",
    "event_type": "resolve",
    "description": "[[{TRIGGER.NAME}]]",
    "details": {
        "Status": "[[{STATUS}]]",
        "Timestamp": "[[{EVENT.RECOVERY.DATE} {EVENT.RECOVERY.TIME}]]",
        "Event Acknowledgement history: ": "[[{EVENT.ACK.HISTORY}]]",
        "Escalation history:": "[[{ESC.HISTORY}]]"
    }
}
Note: do not insert "service_key": "key" in JSON, it is appended automatically.

In Condition tab do not forget to include Trigger value = Problem condition (This option is removed in Zabbix 3.4). The rest depends on your needs.
In Operations tab select Notification Agent as recipient of the message sent via PagerDuty.

More on Action configuration in Zabbix can be found here:
About using --no-fork
If you have Zabbix 3.4 or newer, it recommended to use --no-fork option from Zabbix. This will give you an ability to see errors in Zabbix if something goes wrong:

Just make sure you enabled concurrent sessions in Zabbix.
Use --no-fork with care if you use Slack with --slack_mode=alarm, since script then sleeps for 30s before removing messages from Slack.
Troubleshooting
In order to troubleshoot problems, try to send test message from the command line under user zabbix.
Try using --no-fork and --debug command line switches
You may also want to increase the logging of alerter process to DEBUG for a while. (optional) If appropriate, decrease the level of logging of all zabbix processes to reduce the noise in the log file:
zabbix_server --runtime-control log_level_decrease
zabbix_server --runtime-control log_level_decrease
zabbix_server --runtime-control log_level_decrease
zabbix_server --runtime-control log_level_decrease
Then increase the logging of alerter process to DEBUG for a while:
To do it run it as many times as required to reach DEBUG from your current level (4 times if your current log level is 0)
zabbix_server --runtime-control log_level_increase=alerter
zabbix_server --runtime-control log_level_increase=alerter
zabbix_server --runtime-control log_level_increase=alerter
zabbix_server --runtime-control log_level_increase=alerter
now tail you log to see what the problem might be:
tail -f /var/log/zabbix-server/zabbix_server.log
HTTP(S) Proxy
If you need to use proxy to connect to services, make sure that environment variables
http_proxy and https_proxy are set under user zabbix, for example:
export http_proxy=http://proxy_ip:3128/
export https_proxy=$http_proxy
