Wiringpi Tft Tool Save
TFT Command Line Tool for Raspberry Pi
wiringpi-tft-tool
TFT Command Line Tool for Raspberry Pi.
This may works with other boards like OrangePi/NanoPi.
You can operate from command line.
You can show any text string.
You can choose BCM2835 library/WiringPi library.
Support driver
SPI TFT
- ST7735
- ILI9340
- ILI9341
8 bit Parallel Shield
- ILI9225
- ILI9226(Same as ILI9225)
- ILI9320
- ILI9325
- ILI9341
- ILI9342
- ILI9481
- ILI9486
- ILI9488
- SPFD5408(Same as ILI9320)
- R61509V
- ST7775(Same as ILI9225)
- ST7781
- ST7783(Same as ST7781)
- ST7793(Same as R61509)
- ST7796(Same as ILI9486)
OPEN-SMART Products
- OPEN-SMART ILI9225 TFT-Shield
- OPEN-SMART ILI9327 TFT-Shield(*2)
- OPEN-SMART ILI9340 TFT-Shield
- OPEN-SMART S6D1121 16Pin-Parallel(*1)
- OPEN-SMART ST7775 16Pin-Parallel(*1)
- OPEN-SMART ST7783 16Pin-Parallel(*1)
- OPEN-SMART R61509V 16Pin-Parallel(*1)
- OPEN-SMART ILI9488 16Pin-Parallel(*1)
(*1)
LED pins connect to GND instead of 3.3V.
(*2)
It has a GRAM offset.
You need to specify GRAM offset in tft.conf.
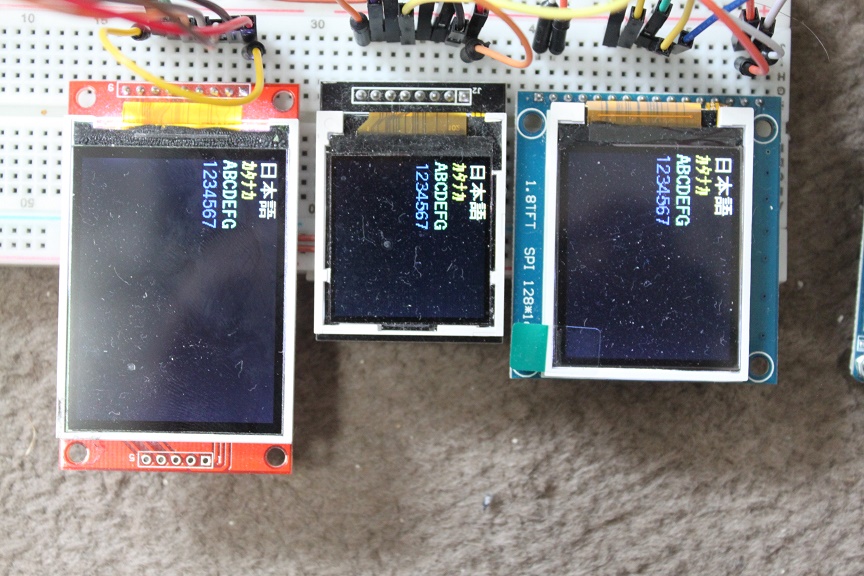
Left to Right
2.2 inch SPI 240x320 ILI9340
1.44 inch SPI 128x128 ST7735
1.8 inch SPI 128x160 ST7735

From Left Top to Right Buttom.
2.4 inch 8Bit Parallel 240x320 ILI9341
3.5 inch 8Bit Parallel 320x480 ILI9181
2.4 inch 8Bit Parallel 240x320 ILI9325
3.6 inch 8Bit Parallel 240x400 ILI9327

Software requirement
- WiringPi Library
This project uses the wiringPiSetupGpio() function to initialize GPIOs.
If you use it on a board other than the RPI board, you may need to change the GPIO number.
As far as I know, there are these libraries.- WiringPi for OrangePi
- WiringPi for BananaPi
- WiringPi for NanoPi
- WiringPi for Pine-64
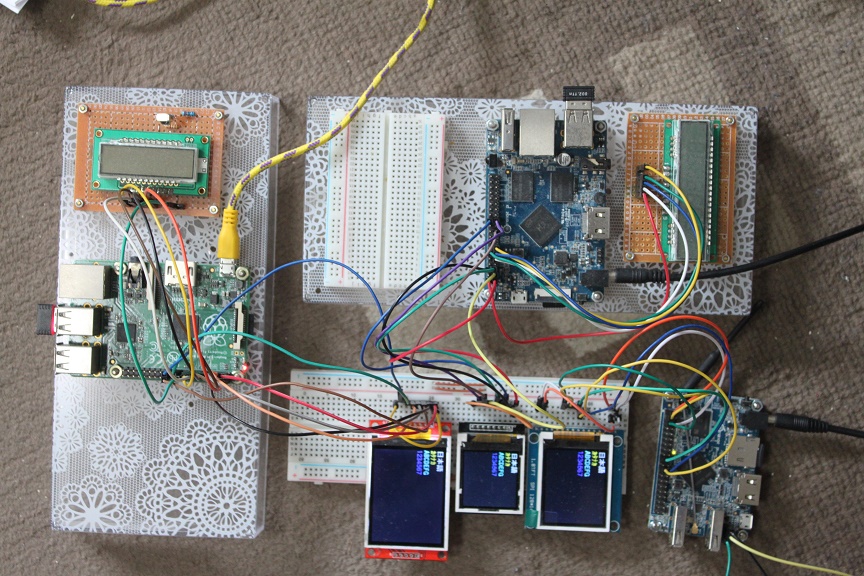
Wirering for SPI TFT
| TFT | Rpi | Symbol | |
|---|---|---|---|
| MISO | -- | N/C | |
| LED | -- | 3.3V | |
| SCK | -- | Pin#23 | SPI SCLK |
| MOSI | -- | Pin#19 | SPI MOSI |
| RS | -- | Pin#3(*) | GPIO2 |
| RST | -- | Pin#5(*) | GPIO3 |
| CS | -- | Pin#24 | SPI CE0(**) |
| GND | -- | GND | |
| VCC | -- | 3.3V |
*You can change any pin.
**You can choose CE0 or CE1.
Pin define is "spi.conf".
Note:
Opi have only 1 SPI.
OPi-PC have CE0 and GPIO8.
OPi ZERO have CE1 and GPIO8.
Build for SPI TFT using BCM2835 library
RPi Only, Very fast.
wget http://www.airspayce.com/mikem/bcm2835/bcm2835-1.42.tar.gz
tar zxvf bcm2835-1.42.tar.gz
cd bcm2835-1.42
./configure
make
sudo make check
sudo make install
cd $HOME
git clone https://github.com/nopnop2002/wiringpi-tft-tool
cd wiringpi-tft-tool
cc -o tft tft.c fontx.c spilib.c -lbcm2835 -lm -lpthread -DSPI -DBCM
Build for SPI TFT using WiringPi library
git clone https://github.com/nopnop2002/wiringpi-tft-tool
cd wiringpi-tft-tool
cc -o tft tft.c fontx.c spilib.c -lwiringPi -lm -lpthread -DSPI -DWPI
Wirering for 8bit Parallel TFT
| TFT | Rpi | Symbol | |
|---|---|---|---|
| LCD_RST | -- | Pin#7 | GPIO4 |
| LCD_CS | -- | Pin#3 | GPIO2 |
| LCD_RS | -- | Pin#5 | GPIO3 |
| LCD_WR | -- | Pin#26 | GPIO7 |
| LCD_RD | -- | Pin#28 | GPIO1 |
| LCD_D0 | -- | Pin#29 | GPIO5 |
| LCD_D1 | -- | Pin#31 | GPIO6 |
| LCD_D2 | -- | Pin#33 | GPIO13 |
| LCD_D3 | -- | Pin#35 | GPIO19 |
| LCD_D4 | -- | Pin#37 | GPIO26 |
| LCD_D5 | -- | Pin#32 | GPIO12 |
| LCD_D6 | -- | Pin#36 | GPIO16 |
| LCD_D7 | -- | Pin#38 | GPIO20 |
| 5V | -- | 5V(*) | |
| 3.3V | -- | 3.3V(*) | |
| GND | -- | GND |
*When a regulator(It's often AMS1117) is mounted on the back, it's operated 5V.
*When a regulator is NOT mounted on the back, it's operated 3.3V.
You can change any pin.
Pin define is "pin.conf".
Build for 8bit Parallel TFT using WiringPi library
git clone https://github.com/nopnop2002/wiringpi-tft-tool
cd wiringpi-tft-tool
cc -o tft tft.c fontx.c 8bitlib.c -lwiringPi -lm -lpthread -D_DRIVER_
DRIVER
The information provided by sellers on Ebay or AliExpress is largely incorrect.
You waste time if you don't choose the right driver.
There are many variations of the 2.4 inch shield.
You can use this to find out your driver.
This is for Arduino UNO.
Do not use this on the RPI as the GPIO on the RPI is not 5V tolerant.
Never believe the seller's information.
- ILI9225
- ILI9226(Same as ILI9225)
- ILI9320
- ILI9325
- ILI9327
- ILI9340
- ILI9341
- ILI9342
- ILI9481
- ILI9486
- ILI9488
- LGDP4532
- R61509V
- S6D1121
- SPFD5408(Same as ILI9320)
- ST7775(Same as ILI9225)
- ST7781
- ST7783(Same as ST7781)
- ST7793(Same as R61509)
- ST7796(Same as ILI9486)
Example of build:
git clone https://github.com/nopnop2002/wiringpi-tft-tool
cd wiringpi-tft-tool
cc -o tft tft.c fontx.c 8bitlib.c -lwiringPi -lm -lpthread -DILI9341
How to use
At first, edit "tft.conf".
Set your TFT's resolution.
If you use SPI TFT, check "spi.conf".
Set your pin assignment.
If you use 8bit Parallel TFT, check "pin.conf".
Set your pin assignment.
Command line parameters
s : show display(must root or sudo)
r : remove all string
+n String : String for #n line
-n : delete #n line
Fn : set fore ground color for #n line
Bn : set back ground color for #n line
B0 : set base color(Default is WHITE)
+U n : Set underline mode #n Line
-U n : Unset underline mode #n Line
+L : Scroll Up 1Line
-L : Scroll Down 1Line
Pn n : Set start colum n to line#n
16 : draw 16 dot fonts
24 : draw 24 dot fonts
32 : draw 32 dot fonts
R0 : set angle 0
R90 : set angle 0
R180 : set angle 0
R270 : set angle 0
M : show build model
P : show pin assignment
Start Demo
chmod 777 test.sh
chmod 777 me.sh
./test.sh
./me.sh
Font File
This tool uses the following as default fonts:
- fontx/ILGH16XB.FNT // 8x16Dot Alphanumeric & Japanese Hankaku KATAKANA
- fontx/ILGH24XB.FNT // 12x24Dot Alphanumeric & Japanese Hankaku KATAKANA
- fontx/ILGH32XB.FNT // 16x32Dot Alphanumeric & Japanese Hankaku KATAKANA
- fontx/ILGZ16XB.FNT // 16x16Dot Japanese 2byte Code(SJIS, Not unicode)
- fontx/ILGZ24XB.FNT // 24x24Dot Japanese 2byte Code(SJIS, Not unicode)
- fontx/ILGZ32XB.FNT // 32x32Dot Japanese 2byte Code(SJIS, Not unicode)
Changing this file will change the font.
You can add your original fonts.
The format of the font file is the FONTX format.
Please refer this page about FONTX format.
Font File Editor(FONTX Editor)
There is a font file editor.
This can be work on Windows 10.
You can download FONTX Editor fron here.

How to build your own font file
You can change these fonts to display the characters of your country.
- Default
From 0x00 to 0x7f, the characters image of Alphanumeric are stored.
From 0x80 to 0xff, the characters image of Japanese are stored.
fontx/ILGH16XB.FNT // 8x16Dot Alphanumeric & Japanese Hankaku KATAKANA
fontx/ILGH24XB.FNT // 12x24Dot Alphanumeric & Japanese Hankaku KATAKANA
fontx/ILGH32XB.FNT // 16x32Dot Alphanumeric & Japanese Hankaku KATAKANA
0xCA is Japanese.

- Localize
From 0x00 to 0x7f, the characters image of Alphanumeric are stored.
From 0x80 to 0xff, the characters image of your country are stored.
fontx/XXXXX16.FNT // 8x16Dot Alphanumeric & Local characters
fontx/XXXXX24.FNT // 12x24Dot Alphanumeric & Local characters
fontx/XXXXX32.FNT // 16x32Dot Alphanumeric & Local characters
0xCA is LATIN.

step1) download fontxedit.exe.
step2) download BDF font file from Internet. I downloaded from here.
step3) import one of them into your fontxedit.exe. This tool can convert from BDF to FONTX.

step4) adjust font size.

step5) check font pattern.

step6) save as .fnt file from your fontedit.exe.

step7) upload your font file to PI. Your font file is put in fontx directory.
How to change display font
step1) change font file.
if (sv.fontsize == 16) {
  strcat(fnameh,"fontx/16dot_your_font_file");
  strcat(fnamez,"fontx/ILGZ16XB.FNT");
} else if (sv.fontsize == 24) {
  strcat(fnameh,"fontx/24dot_your_font_file");
  strcat(fnamez,"fontx/ILGZ24XB.FNT");
} else if (sv.fontsize == 32) {
  strcat(fnameh,"fontx/32dot_your_font_file");
  strcat(fnamez,"fontx/ILGZ32XB.FNT");
}
step2) enable UTF to ISO.
By default,The 3-byte UTF code is converted to 2-byte SJIS code.
SJIS is Japanese extended character set.
The following changes will convert a 3-byte UTF code to a 1-byte ISO code.
//sv.save[num].size = String2SJIS((unsigned char*)argv[2], strlen(argv[2]), sv.save[num].sjis, MAXCHAR);
sv.save[num].size = String2ISO((unsigned char*)argv[2], strlen(argv[2]), sv.save[num].sjis, MAXCHAR);
step3) change character set.
"ISO_8859-1" will convert 3-byte UTF code to 1-byte ISO code.
Please change to the character set of your country.
if((cd = iconv_open("ISO_8859-1","utf-8")) == (iconv_t)-1){
    return 0;
}
Picuture by Olaf Sabatschus.

More detail is here.
Font File Viewer
$ cc -o dump dump.c fontx.c
$ ./dump fontx/font12x24.fnt 0xfc
argc=3
fontFile=[fontx/font12x24.fnt]
Font width=12
Font height=24
Code flag=1
Number of code blocks=0
character code=0xfc
code=fc
GetFontx OK. code=fc
00............
01............
02............
03..**....**..
04..**....**..
05............
06............
07............
08.**......**.
09.**......**.
10.**......**.
11.**......**.
12.**......**.
13.**......**.
14.**......**.
15.**......**.
16.**......**.
17..**.....**.
18...********.
19............
20............
21............
22............
23............
