Window Sensors Save
Insanely Cheap Wireless Window/Door Sensors
Incredibly Cheap Wireless Window/Door Sensors
Overview
This project is intended to provide tools/code/documentation for creating and setting up very inexpensive window/door sensors. The project will not describe every detail in the process but it will point you to the needed links. The sensors are designed to work within the following parameters.
- Cost under $5 each
- Work seemlessly with home automation software
- Be easy to create and maintain
- Be wireless (Wifi & Battery powered)
- Have a usable battery lifespan (YMMV, but I currently have some sensors over 2 years old with the original battery!)


Supplies/Requirements
Sensor Components
The following components are required to build a single sensor.
- x1 ESP8266 12E
- x1 Normally closed Reed Switch
- x1 3.7v YX-W9B Rechargable Battery
- x1 2" insulated small guage copper wire (The twisted pairs of a ethernet cable work perfectly)
- x1 15x5x5mm Magnets
Development Components
These following components can be purchased once and used to assemble any number of sensors:
- x1 USB to TTL adapter (Drivers can be found here)
- (Optional, but Highly Recommended) x1 Breadboard kit
- (Optional, but Highly Recommended) x1 ESP to Breadboard Adapter (Pin Headers, x2 Adapter)
- The Pin Headers fit into the holes on the ESP12E chip
- The Adapters connect the ESP to the breadboard without needing to solder anything!
Software Components
Building & Testing
The general build process to build a sensor looks like:
- Flash your ESP8266 with the ESPHome firmware
- Setup ESPHome integration in Homeassistant or Configure MQTT broker to receive signal from sensor
- Print the enclosure (Bottom,Top, MagnetHolder)
- Assemble & test sensor
- Repeat setps 1-4 for many more sensors!
Flash ESP8266 with ESPHome firmware
ESPHome makes programming the esp microcontroller very easy - no Arduino, or sketch programming knowledge is needed. All the configuration is done via simple yaml configurations. We just need to simply follow the ESPHome documentation to assemble a configuration file that will notify our home automation software whenever the microcontroller powers on. To install ESPHome Firmware:
- Follow the ESPHome Getting Started walkthrough.
- Once finished with the initial ESPHome wizard, download the base firmware from ESPHome by clicking on the three dot menu and choosing compile, then choosing Download Binary once compiling has finished. (We will update this fimware later with our own configuration)
- Flash the ESPHome Binary to the ESP8266 chip using ESPHomeFlasher
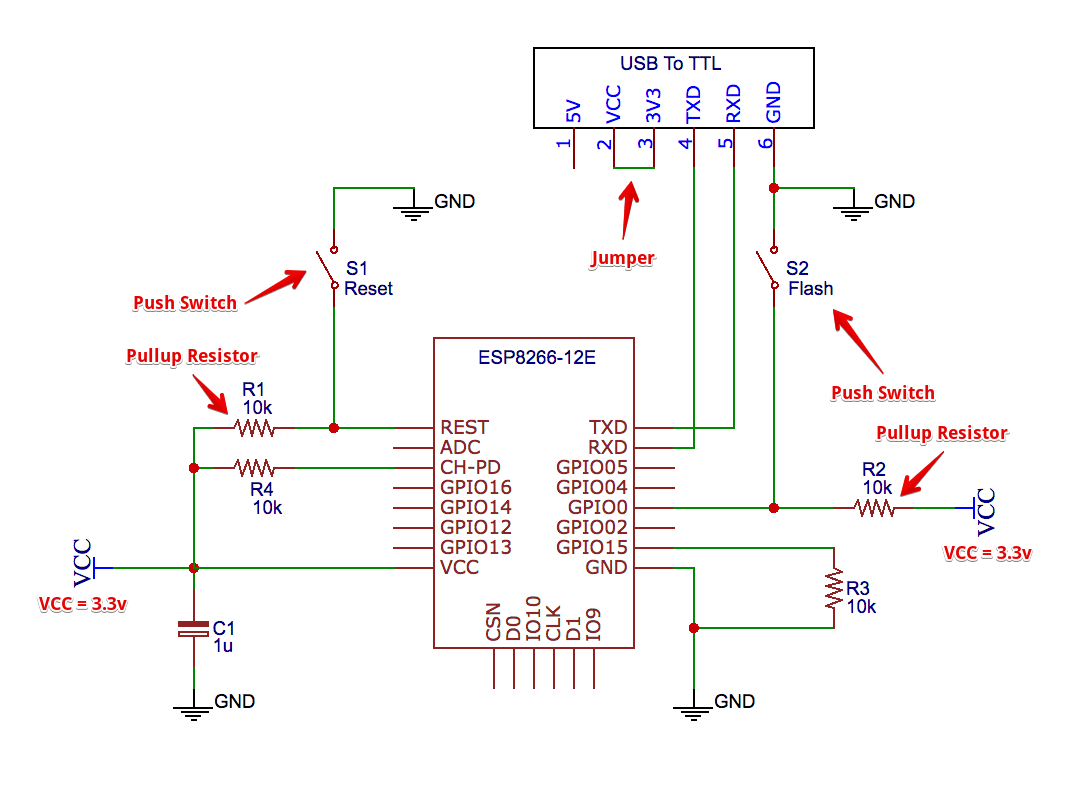
- Wire the ESP12E for flashing mode. (It is very helpful to use a breadboard along with the adapter mentioned above (See image)
- Download ESPHomeFlasher
- Flash the downloaded .bin firmware to the esp8266 chip using ESPHomeFlasher.
- Use the ESPHome web interface to configure and re-flash the esp8266 chip wirelessly with either the Homeassistant(recommended) or MQTT ESPHome config file containing the HomeAssistant/MQTT configurations explained below. Be sure to update the sample config files to rename the sensor and replace any
<replace_me>placeholders with your personal details.
Setup ESPHome integration in Homeassistantor or configure MQTT broker to receive signal from sensor
HomeAssistant (Recommended)
Using the sample HomeAssistant ESPHome config file, the sensor will notify HomeAssistant that the sensor's state has changed. This will be done via the HomeAssistant api as defined in the config file: api:. To let HomeAssistant know about the sensor, setup the ESPHome integration in HomeAssistant using the ip address (or hostname) you updated in the ESPHome config file (leave the default port).
Note: When setting up the HomeAssistant ESPHome integration, the window senwor should be powered on!
MQTT
If you are not using the recommended HomeAssistant configuration, you can setup this sensor to work with any MQTT broker. Using the sample MQTT ESPHome config file, the sensor will send an MQTT signal to a specific MQTT topic that is specified in the ESPHome configuration. In order for the sensor to be useful, you will need to configure an MQTT server (broker) to receive the message that will be sent by the sensor. HomeAssistant has a built-in MQTT server that is easy to configure and is the preferred MQTT broker that this project will use. Setup in HomeAssistant is simple:
- Setup Homeassistant & enable the HASSIO MQTT Add-On
- Test your MQTT broker by using an MQTT client. From your client MQTT tool, you will just need to make sure you are publishing to the same topic you've specified in your homeassistant setup.
Print Enclosure
You will need to 3D-Print or have someone print the enclosure for you. The enclosure consists of the following:
- The Bottom (Holds the ESP8266 chip and the magnetically activated reed switch)
- The Top (Seals the sensor & holds the battery in place)
- The Magnet Holder (Holds the magnets used to activate the sensor)
Note: If you would like to edit the design of the enclosure, open the WindowSensorEnclosure.skp file in Sketchup and submit a pull request if you think the desing is worth sharing!
Assemble & Test Sensor
Assemble the sensor by completing the following:
- Solder a jumper wire between the EN pin and the VCC pin on the esp8266
- Solder a jumper wire or bridge the IO15 pin and the GND pin on the esp8266 (See image)
- Solder one end of the reed switch to the GND pin of the esp8266
- Solder the copper wire to the EN or VCC pin of the esp8266
- Place the esp8266 in the bottom of the enclosure and bend the reed switch wire and the copper wire so that the ends sit in the grooves. (This requires a little patience to get the wires situated correctly, but once they are set, they shouln't need to be adjusted again.)
- Insert the battery and confirm that the esp8266 powers on. If it doesn't power on, re-check your wiring and battery voltage.
- Using Homeassistant or an MQTT Client, verify that the MQTT message is being sent on the topic you specified in the ESPHome config.
- (Optionally) Setup automations in HomeAssistant to your liking to trigger actions based upon sensor state. While you're at it setup iOS notifications to get notified of state changes on your iPhone and Apple Watch:

Known Issues
- Battery life should last over 1 year on windows/doors that are not opened frequently (Some of my sensors lasted 3 years!), but windows/doors that are opened frequently will last significantly less time as WiFi consumes battery power
- This sensor is built to run in a powered-off state until the door/window is opened - this may result in an 'unavailable' voltage state in HomeAssistant while the sensor is powered off.
Potential Improvements
- Ideally the sensor would be fall back to a Deep Sleep mode instead of powering completely off.
- This would speed up the sensor response times (They are currently about 2 seconds).
- This would likely require a change in wiring/soldering
- This may reduce battery life slightly.
- We need a 3D printed charging port for the batteries. I've currently just been throwing the batteries away since they are so cheap, but they should be re-chargable.
- It is also possible to charge the batteries using aligator clips and a programable power supply (Do this at your own risk!).
Credits & Inspiration
ESPHome
ESPHome made the whole project incredibly easier and more enjoyable. I'm glad I found ESPHome while working on this project! Please check them out and support their work if you can.
TheHookup
Original inspiration for this project came from thehookup. His youtube videos below were helpful in visualizing how the sensor could work. Wireless MQTT Window Sensors with the ESP-01: Part 1 & Part 2
Contributions
Any pull requests and/or improvements would be greatly appreciated.
License
Support
If you found this project helpful, please let me know by considering supporting me. This gives me an incentive to keep it up to date. You can support me on Liberapay or Github Sponsors:

