Whos On My Network Save
Keep an eye on who and when something is connected to your network
Keep and eye on who is on your network and when.
This tool allows you to identify and keep records of who's on your network and when.
After you scan your network, you can then view devices connected to your network, when they were last seen and keep track of who owns devices (thus allowing you to identify who's on the network).
🛠️ Setup
Docker Compose
docker-compose.yml contains a basic example that hosts the site and checks your network every 5min.
You can create an empty database.sqlite file when first starting the app.
See the "Known issues" section at the top of the default scanner for issues you might come across when using the default scanner in docker.
Local Docker Compose
docker-compose.dev.yml contains a basic example that hosts the site and checks your network every 5min. This builds an image locally.
docker compose --file .\docker-compose.dev.yml build
docker compose --file .\docker-compose.dev.yml up
🧪 Local Non-Docker (Development)
Requirements:
- Python 3.6
- Node 16
- Npcap (Windows Only)
Setup:
- Clone this git repository:
git clone https://github.com/brentvollebregt/whos-on-my-network - Go into the project:
cd whos-on-my-network - Create a Python venv:
python -m venv .venv - Activate the Python venv:
.venv/Scripts/activate.bat - Install Python dependencies:
python -m pip install -r requirements.txt - Build the webapp:
cd webapp && npm i && npm run build - Create a .env file:
cd .. && cp .env.example .env - Run the application:
python -m whos_on_my_network start
When running the client (webapp/) in development mode using npm start, the client will use the REACT_APP_API_ROOT environment variable value to decide where to send requests.
The same process for production and development is used for the server; running python -m whos_on_my_network or run.py in a debugger will allow you to set breakpoints and see what is going on.
Examples of using the Python application can be found in
.vscode/launch.json.
🖥️ Usage
There are two primary functions to this tool, scanning and viewing scans. To use the tool, use the whos_on_my_network folder as a Python module by executing python -m whos_on_my_network - this command will show you the usage.
To scan, you have two options; the current command and watch. To view scans, you can host the webapp using start.
Scanning Using current
The current command allows you to run a single scan and see who's currently on the network.
Usage can be found by executing:
python -m whos_on_my_network current --help
Arguments:
| Argument | Description |
|---|---|
| -s, --scanner | Scanner to use to scan the network. (see below) |
| -v, --verbose | Verbose output of scans. |
Examples:
| Command | Description |
|---|---|
python -m whos_on_my_network current |
Will scan the network once using all defaults and output a table displaying MAC addresses, IP addresses and hostnames. |
NETWORK_ID="192.168.2.0/24" python -m whos_on_my_network current --scanner default |
Will scan the network once for IP addresses in 192.168.2.0/24 and output a table displaying findings. |
Scanning Using watch
The watch command allows you to run multiple scans on a network with a delay indefinitely. This allows you to keep watching the network automatically as a background task.
Usage can be found by executing:
python -m whos_on_my_network watch --help
| Argument | Description |
|---|---|
| -t, --refresh-time | Seconds until the network is re-scanned. Default is 300s. |
| -a, --amount | Amount of times to scan the network. Default is no limit. |
| -s, --scanner | Scanner to use to scan the network. (see below) |
| -v, --verbose | Verbose output of scans. |
Examples:
| Command | Description |
|---|---|
python -m whos_on_my_network watch |
Will repeatedly scan the network using all defaults. |
python -m whos_on_my_network watch --refresh-time 60 |
Will repeatedly scan the network once every minute. |
python -m whos_on_my_network current --amount 5 |
Will scan the network five times and then stop. |
Hosting the Webapp and Server Using start
The start command starts the server that serves the webapp.
| Argument | Description |
|---|---|
| -p, --port | The port used to host the server. |
Examples:
| Command | Description |
|---|---|
python -m whos_on_my_network start |
Will start the server up at localhost:8080. |
python -m whos_on_my_network start --port 7000 |
Will start the server up at localhost:7000. |
⚙️ Configuration
Configuration is managed through environment variables. If an option is not supplied in the CLI, it will fallback to the related environment variables and that will fallback on default values.
| Environment Variable | Default Value | Description |
|---|---|---|
DATABASE_PATH |
./database.sqlite |
The location of the SQLite file to use |
PORT |
8080 |
The port to host the site when using start |
VERBOSE |
false |
Print extra messages |
SCANNER |
default |
The scanner to use - see the "Custom Scanners" header below for details on this |
NETWORK_ID |
192.168.1.0/24 |
[Not required] Used by the default scanner to identify which IPs to check |
Individual scanners can also have extra config, see the "Custom Scanners" header below for details on this.
You can clone
.env.exampleand use a .env file to set environment variables locally.
Screenshots
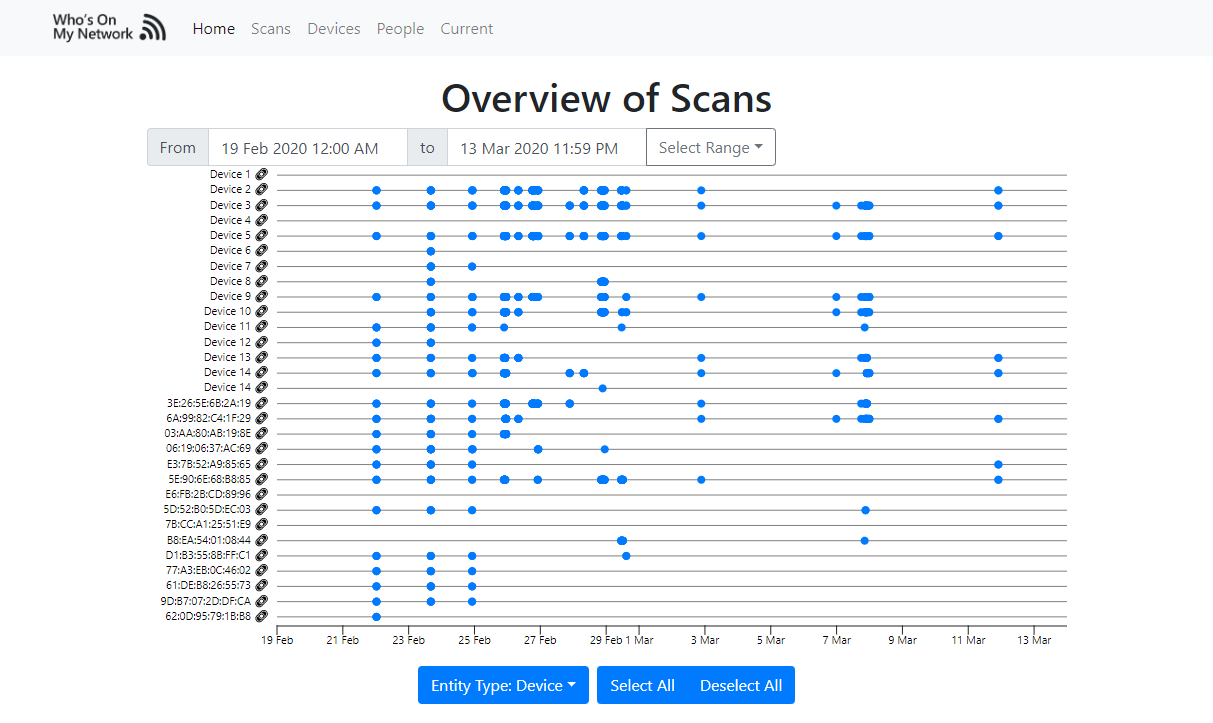
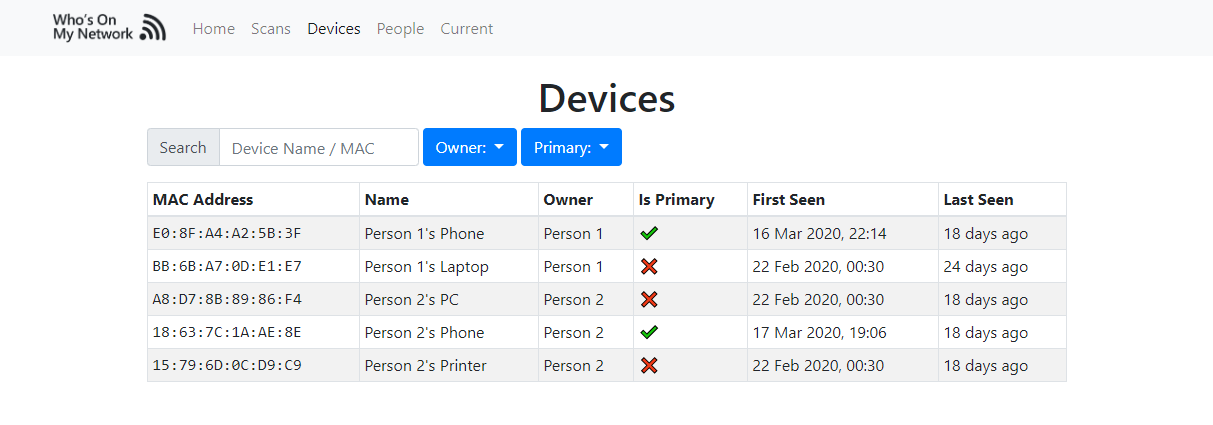
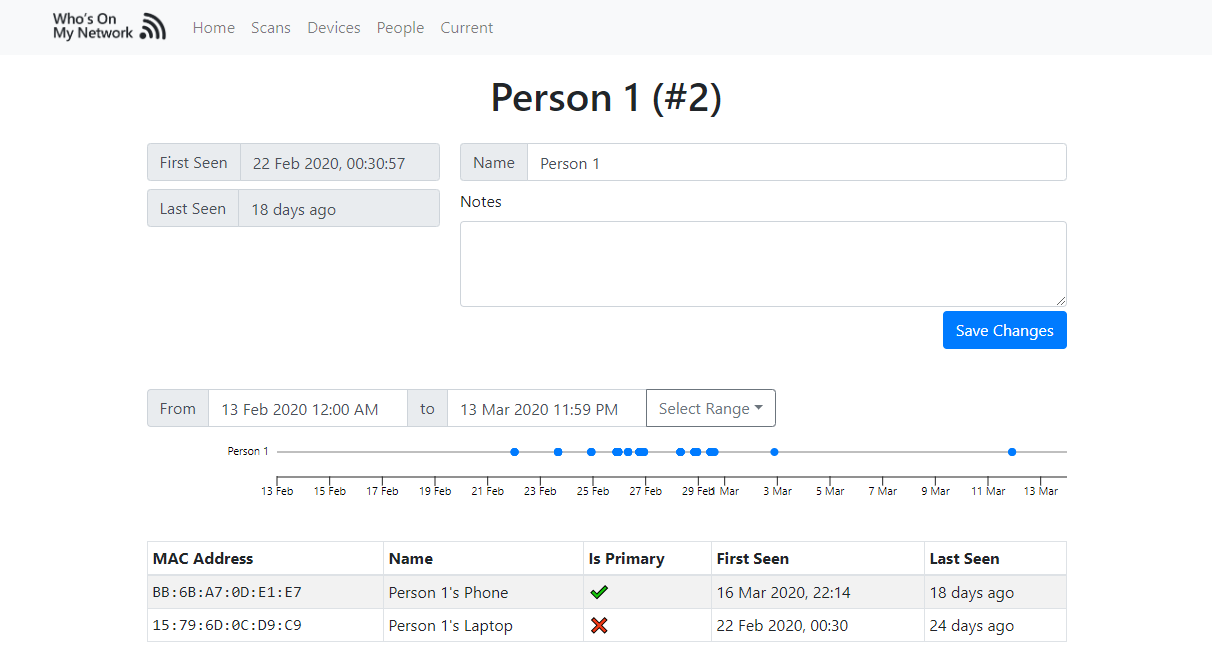
See more in my blog post.
🔌 Custom Scanners
If you have another method of checking devices on a network, you can add a custom scanner to /whos_on_my_network/scanners. asus_rt_ac58u.py and netcom_wireless_nf18acv.py are examples of custom scanners - you are welcome to submit your own.
To configure the scanner, you can use the SCANNER environment variable and also set any specific environment variables the scanner may need. For example, asus_rt_ac58u.py takes a SCANNER_ROUTER_USERNAME and SCANNER_ROUTER_PASSWORD to login to the ASUS router web interface, so these are supplied as environment variables.
❓ How Does This Tool Work?
By default, this tool uses scapy to send ARP packets to all addresses in the provided network range (default is 192.168.1.0/24) to identify what devices are on the network. When a host responds, its MAC address, IP address and hostname are obtained and an entry is added to the SQLite database matched to the current scan.
