Terraform Aws Zappa Save Abandoned
Create a AWS VPC with associated resources for use with Zappa
Zappa AWS Module
- Introduction
- Getting Started
- Taking it down
- License
Introduction
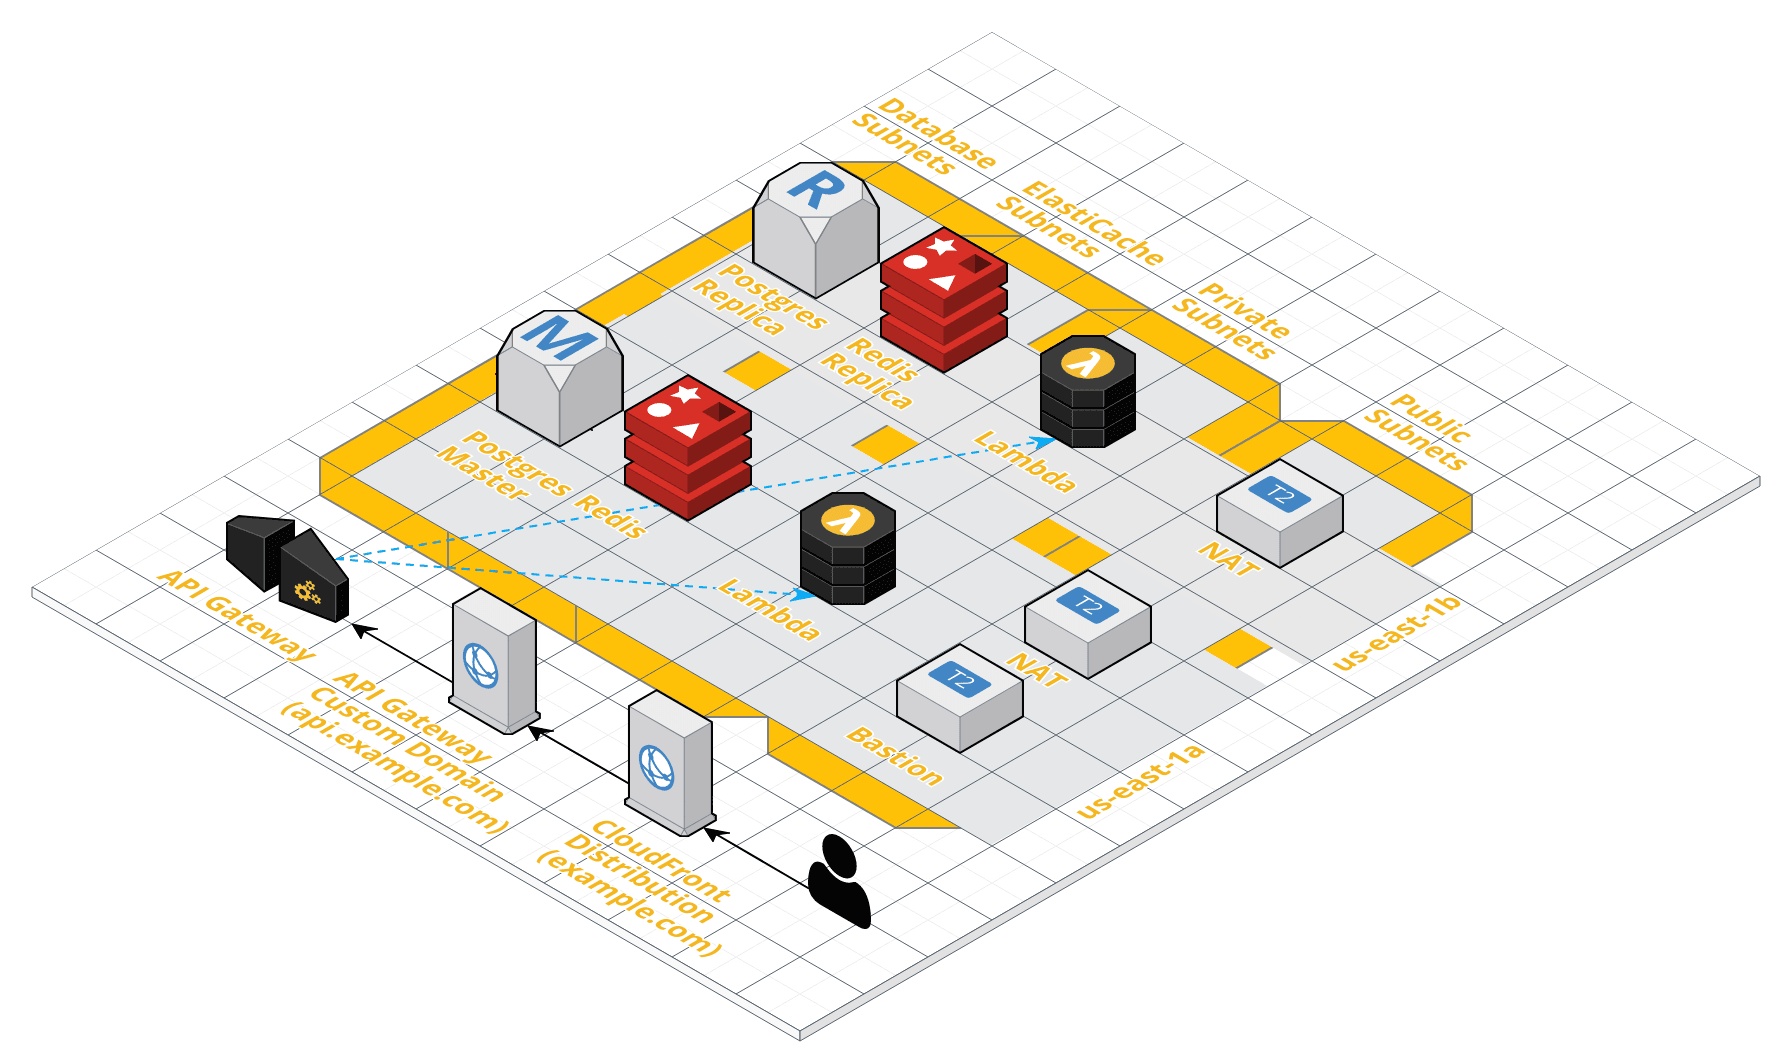
This module creates a VPC with the following resources to quickly get you up and running with Zappa:
- RDS Postgres Cluster
- ElastiCache Redis Cluster
- NAT Instance
- Custom Domain for the API Gateway
- Cloudfront Distribution
- Bastion Host
- Internal DNS records
- Associated security groups
It is based on following guides:
- https://github.com/Miserlou/Zappa/blob/master/README.md
- https://edgarroman.github.io/zappa-django-guide/walk_core/
- https://edgarroman.github.io/zappa-django-guide/walk_domain/
Please see them for the motivations behind this module.
Sample output
After the vpc module is run the output similar to the one below will be generated:
bastion_public_ip = 34.34.34.34
default_security_group_id = sg-bcbcbcbc
lambda_subnet_ids = [
    subnet-d1111111,
    subnet-cc222222,
    subnet-00000000
]
nat_private_ips = [
    10.10.11.55
]
postgres_cname = postgres.internal
postgres_password = <password>
redis_cname = redis.internal
Getting Started
This module is split into two parts as Zappa needs to be deployed after the VPC is created but before the custom domain and CloudFront distribution are created. Which gives us three phases:
- Create the VPC and internal resources
- Deploy the Zappa application
- Create the custom domain and CloudFront distribution
The instructions below will walk you through deploying a Django application with terraform and Zappa.
Setup
This guide requires that you have terraform and the aws cli configured and working. See:
- https://www.terraform.io/intro/getting-started/install.html
- https://docs.aws.amazon.com/cli/latest/userguide/installing.html
You will at least need to set the following:
$ export AWS_ACCESS_KEY_ID="anaccesskey"
$ export AWS_SECRET_ACCESS_KEY="asecretkey"
$ export AWS_DEFAULT_REGION="us-east-1"
To verify:
$ aws ec2 describe-vpcs
Copy the files in the examples to a location for editing:
mkdir -p <yourproject>/terraform/vpc
cp -R examples/vpc/simple/* <yourproject>/terraform/vpc
cp -R examples/cloudfront <yourproject>/terraform
This module assumes you are using a Route53 hosted zone for DNS. If you are not using Route53 you must create a zone and copy the resulting records to your authoritative source.
Phase 1 - Create the VPC
Create the terraform configuration
Edit:
vpc/main.tf
module "vpc" {
  source           = "github.com/dpetzold/terraform-aws-zappa/vpc"
  name             = "lambda"
  aws_key_name     = "lambda"
  aws_key_location = "${file(./private-key)}"
}
The name variable is used to name the vpc and the resources in it. The
aws_key_* variables are required to for ssh access to the bastion and NAT
instances.
Create the keypair
https://console.aws.amazon.com/ec2/v2/home?region=us-east-1#KeyPairs:sort=keyName
Download the PEM file to a location accessible to the module.
Run terrafrom
$ cd vpc
$ terraform init
$ terraform plan
$ terraform apply
Setup SSH
Edit your ssh configuration file to provide access to the EC2 instances:
.ssh/config
Host bastion
  Hostname <bastion-public-ip>
  User ubuntu
  IdentityFile <pathtopemfile>

Host nat1
  Hostname <nat-private-ip>
  User ubuntu
  IdentityFile <pathtopemfile>
  ProxyJump bastion
Initialize the database
$ scp <sqlfile> bastion:
$ ssh bastion
$ pg_restore -h postgres.internal -U postgres -W -C -d postgres <sqlfile>
Phase 2 - Deploy with Zappa
Update Django settings
CloudFront is configured to pass the Host field via the X-Forwarded-Host header. It is required by Django for host header validation and the sites framework. Update the settings file so the forwarded field is used.
USE_X_FORWARDED_HOST = True
Deploy Zappa
Update the Zappa settings file with the subnet ids and default security group from the terraform output.
zappa_settings.json
{
    "prod": {
        "django_settings": "config.settings.production",
        "aws_region": "us-east-1",
        "runtime": "python3.6",
        "s3_bucket": "lambda-example-com",
        "domain": "api.example.com",
        "aws_environment_variables": {
            "BROKER_URL": "redis://redis.internal:6379/4",
            "CELERY_RESULT_URL": "redis://redis.internal:6379/5",
            "DATABASE_URL": "postgres://postgres:<dbpassword>@postgres.internal/postgres",
            "DJANGO_AWS_REGION": "us-east-1",
            "DJANGO_SETTINGS_MODULE": "config.settings.production"
        },
        "vpc_config": {
            "SubnetIds": [
                "subnet-d1111111",
                "subnet-cc222222",
                "subnet-00000000"
            ],
            "SecurityGroupIds": [
                "sg-bcbcbcbc"
            ]
        }
    }
}
Then run:
zappa deploy prod
Phase 3 - Create the custom domain and CloudFront distribution
Create the SSL certificate
https://console.aws.amazon.com/acm/home?region=us-east-1#/
Get the api id
$ aws apigateway get-rest-apis --query 'items[0].id'
"8vpos55555"
Create the terraform configuration
Edit:
cloudfront/main.tf
module "lambda" {
  source       = "github.com/dpetzold/terraform-aws-zappa/cloudfront"
  domain_names = ["example.com"]
  stage_name   = "prod"
  api_id       = "yourapiid"
}
The domain_names variable is used to create the CloudFront distribution and
it is the key used to pull the SSL certificate. A CloudFront distribution is
created for each specified domain. This would be used if you have many domains
pointed to a single Django application. The stage_name and api_id
variables are used when creating the custom domain. The custom domain is named
api and is tertiary to the first domain name. For example, api.example.com.
It is what the CloudFront distribution will point to.
Create the Custom Domain and CloudFront Distribution
$ cd cloudfront
$ terraform init
$ terraform plan
$ terraform apply
It can take up to 15 minutes for the CloudFront distribution to provision.
Taking it down
To destroy the resources created run the following:
$ cd cloudfront
$ terraform destroy

$ cd ../..
$ zappa undeploy prod

$ cd terraform/vpc
$ terraform destroy
License
This code is released under the Apache 2.0 License. Please see LICENSE and for more details.
