SparseSync Save
Source code for "Sparse in Space and Time: Audio-visual Synchronisation with Trainable Selectors." (Spotlight at the BMVC 2022)
Audio-visual Synchronisation with Trainable Selectors
Our paper is accepted for a spotlight presentation at the BMVC 2022. Please, use this BibTeX if you would like to cite our work:
@InProceedings{sparse2022iashin,
  title={Sparse in Space and Time: Audio-visual Synchronisation with Trainable Selectors},
  author={Iashin, V., Xie, W., Rahtu, E. and Zisserman, A.},
  booktitle={British Machine Vision Conference (BMVC)},
  year={2022}
}
• [Project Page] • [ArXiv] • [BMVC Proceedings] • [Presentation (full)] • [Presentation (spotlight)] •
![]()

Audio-visual synchronisation is the task of determining the temporal offset between the audio and visual streams in a video. The synchronisation of 'in the wild' video clips might be challenged as the synchronisation cues might be spatially small and occur sparsely in time. However, recent literature was mostly dedicated to exploring videos of talking heads or playing instruments. Such videos have a dense synchronisation signal due to the strong correlation between audio and visual streams.
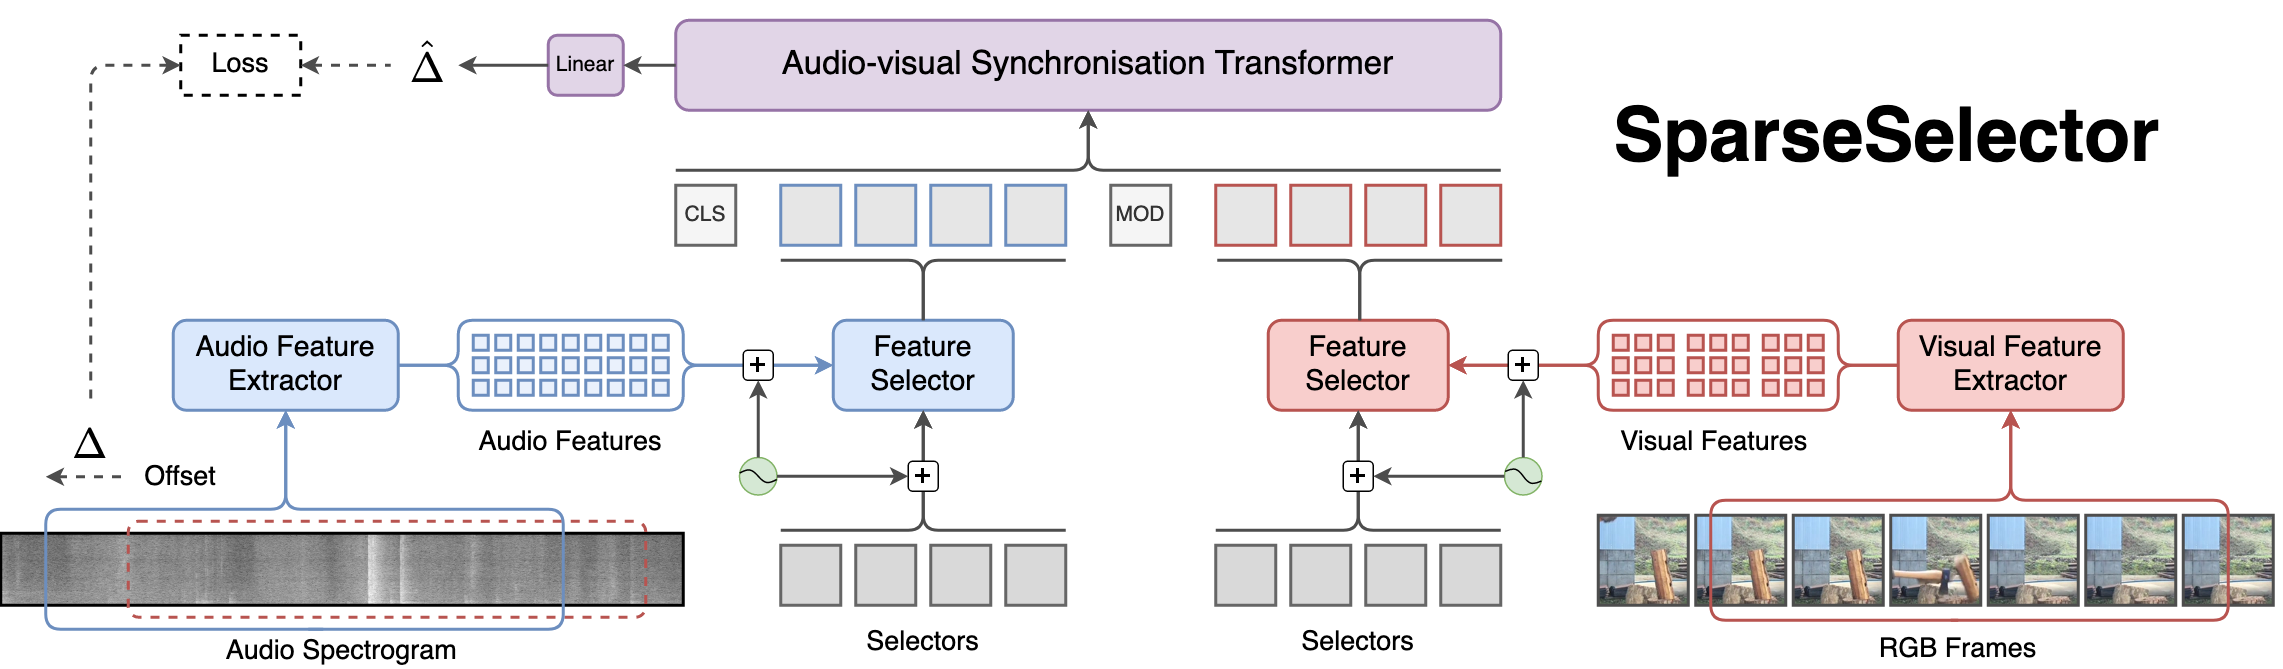
To handle the synchronisation of sparse signals in time a model should be able to process longer video clips and have enough capacity to handle the diversity of scenes. To this end, we propose SparseSelector, a transformer-based architecture that enables the processing of long videos in linear complexity with respect to the number of input tokens which grows rapidly with sampling rate, resolution, and video duration.
- Audio-visual Synchronisation with Trainable Selectors
Updates
- See our newest synchronisation model called Synchformer which significantly outperforms SparseSync.
- Added a model trained on AudioSet (see pre-trained checkpoints)
Environment Preparation
During experimentation, we used Linux machines with conda virtual environments, PyTorch 1.11 and CUDA 11.3.
Start by cloning this repo
git clone https://github.com/v-iashin/SparseSync.git
Conda
Next, install the environment.
For your convenience, we provide a conda environment:
conda env create -f conda_env.yml
Test your environment
conda activate sparse_sync
python -c "import torch; print(torch.cuda.is_available())"
# True
Docker
Download the image from Docker Hub and test if CUDA is available:
docker run \
    --mount type=bind,source=/absolute/path/to/SparseSync/,destination=/home/ubuntu/SparseSync/ \
    --mount type=bind,source=/absolute/path/to/logs/,destination=/home/ubuntu/SparseSync/logs/ \
    --shm-size 8G \
    -it --gpus '"device=0"' \
    iashin/sparse_sync:latest \
    python
>>> import torch; print(torch.cuda.is_available())
# True
or build it yourself
docker build - < Dockerfile --tag sparse_sync
Try one of the examples:
docker run \
    --mount type=bind,source=/absolute/path/to/SparseSync/,destination=/home/ubuntu/SparseSync/ \
    --mount type=bind,source=/absolute/path/to/logs/,destination=/home/ubuntu/SparseSync/logs/ \
    --shm-size 8G \
    -it --gpus '"device=0"' \
    iashin/sparse_sync:latest \
    bash

ubuntu@cfc79e3be757:~$
cd SparseSync/

ubuntu@cfc79e3be757:~/SparseSync$
python ./scripts/example.py \
  --exp_name "22-09-21T21-00-52" \
  --vid_path "./data/vggsound/h264_video_25fps_256side_16000hz_aac/3qesirWAGt4_20000_30000.mp4" \
  --offset_sec 1.6
# Prediction Results:
# p=0.8652 (8.4451), "1.60" (18)
Prepare Data
In this project, we used the LRS3 dataset and introduced a novel VGGSound-Sparse dataset. We provide the pre-processing scripts and assume that the original videos have been downloaded from YouTube.
LRS3-H.264 and LRS3-H.264 ('No Face Crop')
Difference between LRS3 and LRS3-H.264 and LRS3-H.264 ('No Face Crop')
For the setting 'dense in time and space', we rely on the LRS3 dataset.
One may access the original LRS3 dataset by following the instructions on the
project page.
However, this dataset is encoded with MPEG-4 Part 2 codec.
As per our discussion in the paper (sec. 4.), we would like to avoid this encoding.
For this reason, we obtain the original videos from YouTube using the provided
links (mind that _ and - in video ids were replaced by S).
By doing so, we could use videos with H.264 encoding which has another benefit.
In particular, the videos are of slightly better quality.
Another difference to the original LRS3 is in the way a face is cropped.
We could not replicate the same cropping algorithm but the authors
provided
bounding coordinates for a 'tight' crop.
We simply expanded the rectangular region to have square proportions and ensured
the bounding box within the video frame to avoid padding.
This has two benefits compared to the original LRS3: padding is not visible
and the visual track is not smooth which gives some sort of a natural
augmentation during training.
The trimming and cropping scripts are provided in ./scripts/make_lrs3_again.py.
The LRS3-H.264 ('No Face Crop') variant of the dataset does not have a face crop.
Therefore, the pre-processing pipeline is as follows.
First, obtain the original videos from YouTube
(ids are provided on LRS3 project page).
Second, slice each video into clips, do face crop, and resizing according to the LRS3 meta (see the link)
data with the ./scripts/make_lrs3_again.py script.
For LRS3-H.264 ('No Face Crop') use:
python ./scripts/make_lrs3_again.py \
    --lrs_meta_root "$LRS3_ROOT/orig_full/lrs3_v0.4/" \
    --full_vids_root "$LRS3_ROOT/orig_full/data/lrs_ref/video/" \
    --save_root "./data/lrs3/h264_uncropped_25fps_256side_16000hz_aac/" \
    --rescale_to_px 256
where full_vids_root has full-length .mp4 videos downloaded from YouTube.
For LRS3-H.264 use:
python ./scripts/make_lrs3_again.py \
    --lrs_meta_root "$LRS3_ROOT/orig_full/lrs3_v0.4/" \
    --full_vids_root "$LRS3_ROOT/orig_full/data/lrs_ref/video/" \
    --save_root "./data/lrs3/h264_orig_strict_crop_25fps_224side_16000hz_aac/" \
    --do_face_crop \
    --rescale_to_px 224
You can spawn as many processes as your machine permits to speed it up
(e.g. by running the same command in separate terminals).
The script (./scripts/make_lrs3_again.py) will randomize the order of videos to avoid processing collision.
SLURM might help here if you have a cluster at your disposal.
You may create an array of jobs running ./scripts/make_lrs3_again.py.
See ./data/lrs3/ (LRS3_ROOT) for the expected folder structure and a few examples.
VGGSound-Sparse
VGGSound-Sparse is based on the VGGSound dataset and you will need to obtain the original YouTube videos first. The annotations are freely downloadable.
There is no specific pre-processing is required on VGGSound videos, except for reencoding of streams.
This can be achieved with the script that is available in ./scripts/reencode_videos.py.
First, open the file and change the ORIG_PATH variable to a folder with a structure as in
./data/vggsound/video/:
python ./scripts/reencode_videos.py
It is also safe to parallelize for multiple threads and, perhaps, a cluster.
Pre-trained Model Checkpoints
When you run an example,
the checkpoints and configs for SparseSync will be downloaded automatically.
Alternatively, you can download the pre-trained weights manually:
LRS3 ('No Face Crop') Models
| Pre-trained on | Fine-tuned on | Classes | Accuracy | config | ckpt |
|---|---|---|---|---|---|
| LRS3 (‘No Face Crop’) | -- | 3 | 95.5 | link | link (md5: 56876db...) |
| LRS3 (‘No Face Crop’) | -- | 21 | 96.9 | link | link (md5: 63f883e...) |
The model is evaluated on the test set of LRS3 ('No Face Crop'). 3 offset classes: [-1, 0, +1], 21 offset classes: [-2.0, -1.8, ..., 0.0, ..., 1.8, 2.0].
VGGSound-Sparse Models
| Pre-trained on | Fine-tuned on | Classes | Accuracy | config | ckpt |
|---|---|---|---|---|---|
| LRS3 (‘No Face Crop’) | VGGSound-Sparse | 3 | 60.3 | link | link (md5: 08bb68a...) |
| LRS3 (‘No Face Crop’) | VGGSound-Sparse | 21 | 44.3 | link | link (md5: a26f207...) |
| LRS3 (‘No Face Crop’) | VGGSound | 21 | 51.2 | link | link (md5: 83fba5f... ) |
| LRS3 (‘No Face Crop’) | AudioSet | 21 | 56.7 | link | link (md5: d3c40b4... ) |
The models are evaluated on the test set of VGGSound-Sparse. 3 offset classes: [-1, 0, +1], 21 offset classes: [-2.0, -1.8, ..., 0.0, ..., 1.8, 2.0].
Training
The final model is pre-trained on dense signals (LRS3-H.264) and then finetuned on VGGSound-Sparse.
Besides plain python commands, we also provide sbatch scripts for distributed training.
Adapt variables in these scripts according to your cluster setup.
(Pre-)Train on LRS3-H.264 ('No face crop')
# conda activate sparse_sync
python main.py \
    config="./configs/sparse_sync.yaml" \
    logging.logdir="./logs/sync_models/" \
    data.vids_path="/path/to/h264_uncropped_25fps_256side_16000hz_aac/pretrain/vid_id/mp4s" \
    data.dataset.target="dataset.lrs.LRS3" \
    training.base_batch_size="10"
    # logging.use_wandb="False"
On a cluster if not run from a sbatch script, it may fail with
ValueError: Error initializing torch.distributed (complains about the absence of master address and port).
You can either switch to sbatch scripts ./scripts, define env variables:
export MASTER_ADDR=$MASTER_ADDR and export MASTER_PORT=$MASTER_PORT, or use
the torch launcher $ torchrun main.py ....
You may resume the training as follows:
# which experiment to resume from `./logs/sync_models/xx-xx-xxTxx-xx-xx`
CKPT_ID="xx-xx-xxTxx-xx-xx"

# conda activate sparse_sync
python main.py \
    config="./logs/sync_models/$CKPT_ID/cfg-$CKPT_ID.yaml" \
    training.resume="True" training.finetune="False"
    # logging.use_wandb="False"
Finetune on VGGSound-Sparse
We found that pre-training on a dataset with 'dense' signals significantly improves the
performance and training dynamics of the model trained on 'sparse' signals.
Given the checkpoint ./logs/sync_models/xx-xx-xxTxx-xx-xx/xx-xx-xxTxx-xx-xx.pt pre-trained
on LRS3 ('No face crop'), you may finetune this checkpoint on VGGSound-Sparse as
# which experiment to resume from `./logs/sync_models/xx-xx-xxTxx-xx-xx`
CKPT_ID="xx-xx-xxTxx-xx-xx"

# conda activate sparse_sync
python main.py \
    config="./configs/sparse_sync.yaml" \
    training.finetune="True" \
    data.dataset.target="dataset.vggsound.VGGSoundSparsePicked" \
    data.vids_path="/path/to/vggsound/h264_video_25fps_256side_16000hz_aac/" \
    ckpt_path="./logs/sync_models/$CKPT_ID/$CKPT_ID.pt" \
    data.audio_jitter_sec="0.05" \
    data.p_horizontal_flip="0.5" \
    data.sometimes_upscale_p="0.5" \
    data.p_gray_scale="0.2" \
    data.p_color_jitter="0.2" \
    data.p_audio_aug="0.2" \
    training.base_batch_size="10"
    # data.dataset.params.load_fixed_offsets_on_test="False" \
    # data.dataset.params.iter_times="10" \
    # logging.use_wandb="False"
During fine-tuning, we used mostly the same parameters as during pre-training except for data augmentations.
One may use data.dataset.params.load_fixed_offsets_on_test="False" and
data.dataset.params.iter_times="10" to stabilize the training curves a bit.
Train Audio Feature Extractor
The main training script loads both audio and RGB streams at once (torchvision.io.read_video('path_to_mp4')).
The script for training an audio feature extractor uses .wav files to
improve IO speed (torchaudio.load('path_to_wav')).
If you want to train audio feature extractor you may want to extract .wav files from .mp4 or
adapt datasets.vggsound.VGGSoundAudioOnly to load audio from a .mp4.
We provide the audio extraction script that will save the .wav files alongside the corresponding
.mp4 files:
# conda activate sparse_sync
# num_workers specifies how many threads to use for extraction. It speeds up extraction significantly
python ./scripts/extract_audio.py vid_dir="/path/to/h264_video_25fps_256side_16000hz_aac/mp4s" num_workers="8"
Now, the feature extractor can be trained.
The training will take a day or so on one Nvidia 2080Ti 12GB.
One GPU will be enough for training.
## 5-second temporal crops

# conda activate sparse_sync
python main.py \
    config="./configs/audio_feature_extractor.yaml" \
    data.vids_dir="/path/to/folder/with/mp4s" \
    data.crop_len_sec="5" \
    # logging.use_wandb="False"
Evaluation
The training script will take care of it on its own.
During training, the model will run a validation probe after each epoch.
The script will early stop the training once the
training.metric_name (accuracy) calculated on training.early_stop_phase (validation)
did not improve for training.patience (70-140) consecutive epochs or if training.num_epochs is reached.
After stopping the training, the model will do a probe on the test set.
However, if you would like to do it manually, here is the code chunk:
CKPT_ID="xx-xx-xxTxx-xx-xx"

python main.py \
    config="./logs/sync_models/$CKPT_ID/cfg-$CKPT_ID.yaml" \
    logging.log_code_state="False" \
    training.finetune="False" \
    training.run_test_only="True" \
    # data.dataset.params.load_fixed_offsets_on_test="False" \
    # data.dataset.params.iter_times="25"
# uncomment these two lines to randomize offset and crop start selection. See the note below
Please note, since there is a small number of videos in the VGGSound-Sparse test set (a few hundred)
we iterate the test set many times (e.g. iter_times="25" or "50") with random offsets and starting points
of the temporal crop (data.dataset.params.load_fixed_offsets_on_test="False").
We do this to get a more robust estimate (by reducing the std) of model performance.
Examples
A minimal working example that makes a prediction for a sample video. The script will download all necessary checkpoints and configs automatically.
Try our Colab notebook:
![]()
A sample from the LRS3 dataset (note, the video is in-sync):
# conda activate sparse_sync
python ./scripts/example.py \
  --exp_name "22-07-13T22-25-49" \
  --vid_path "./data/lrs3/h264_uncropped_25fps_256side_16000hz_aac/pretrain/C8zY0oAdQrs/00018.mp4"
# Prediction Results:
# p=0.9753 (17.1400), "0.00" (10)
You may artificially create an offset (the audio track will be 1.4 seconds early):
python ./scripts/example.py \
  --exp_name "22-07-13T22-25-49" \
  --vid_path "./data/lrs3/h264_uncropped_25fps_256side_16000hz_aac/pretrain/C8zY0oAdQrs/00018.mp4" \
  --offset_sec 1.4
# Prediction Results:
# p=0.8794 (14.7708), "1.40" (17)
Making the audio track to lag is also straightforward and can be achieved with a negative offset (note that we need to start the visual track later to accommodate the earlier start of the audio track):
python ./scripts/example.py \
  --exp_name "22-07-13T22-25-49" \
  --vid_path "./data/lrs3/h264_uncropped_25fps_256side_16000hz_aac/pretrain/C8zY0oAdQrs/00018.mp4" \
  --offset_sec -2.0 \
  --v_start_i_sec 4.0
# Prediction Results:
# p=0.9929 (15.0929), "-2.00" (0)
Similarly, this can be done for the model that was fine-tuned on VGGSound-Sparse
(note that the --exp_name has changed):
python ./scripts/example.py \
  --exp_name "22-07-28T15-49-45" \
  --vid_path "./data/vggsound/h264_video_25fps_256side_16000hz_aac/ZYc410CE4Rg_0_10000.mp4" \
  --offset_sec 1.0
# Prediction Results:
# p=0.7762 (13.0838), "1.00" (15)
Also, the model that was fine-tuned on the full VGGSound dataset
python ./scripts/example.py \
  --exp_name "22-09-21T21-00-52" \
  --vid_path "./data/vggsound/h264_video_25fps_256side_16000hz_aac/3qesirWAGt4_20000_30000.mp4" \
  --offset_sec 1.6
# Prediction Results:
# p=0.8652 (8.4451), "1.60" (18)
LICENSE
This project is licensed under the MIT License. See LICENSE for more details.
Acknowledgements
🙏 Thanks to all those who open-source their code:
- The cleanest implementation of a transformer minGPT
- A nice implementation of the pre-trained S3D network in PyTorch
