SimpleOpenSeaBot Save
A simple OpenSea bot made with AutoIt for mint massive NFTs collections
Hablas Español??? Ve aqui.
Simple OpenSea Bot
A simple OpenSea bot made with AutoIt for mint massive NFTs collections
Index
Description of the BOT and AutoIt
Download and install AutoIt
BOT download
BOT configuration
Execution of the BOT
Additional notes
Thanks
Description of BOT and AutoIt
SimpleOpenSeaBot is a bot to publish massive collections in OpenSea, the bot is developed as a script in AutoIt. The bot allows to mint and list NFTs in OpenSea automatically.
Throughout this document the explanation and configuration of the bot using the polygon network in OpenSea and the Metamask wallet is developed, but it is requested that at the end of the document you can configure it for any Market, Network and Wallet.
AutoIt is a tool that allows you to automate repetitive tasks in a simple way with very few lines of code. Unfortunately AutoIt is only available for the windows operating system but I am currently working on a python version that works on any operating system, keep an eye on my social networks, which I leave you below 👇, to find out when it will be available.
Download and install AutoIt
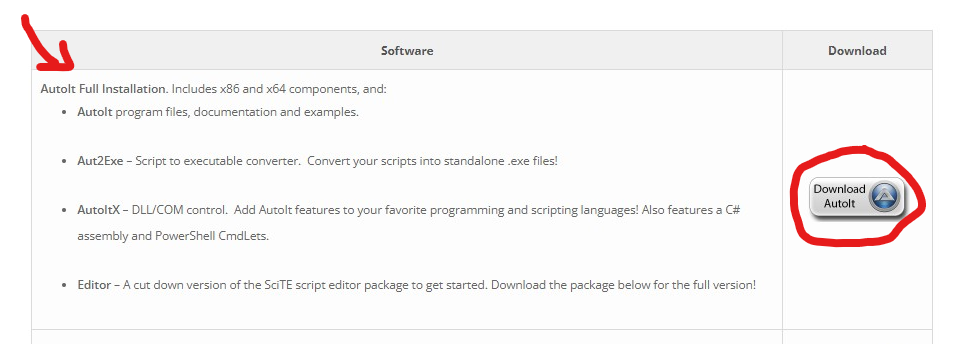
To download AutoIt, the first thing we have to do is go to its official website www.https://www.autoitscript.com/ to the section of downloads. We will go down until we find the next section called "AutoIt Full Installation" in which we will click on the "Download Autoit" button located on the right.
Once the download is finished, we must execute the .exe file that was downloaded, the AutoIt installation wizard will open, in which we will click "Next".

We click on "I Agree" to accept the license agreement (which I am sure you will read before) from AutoIt.

In the next window we click on "Next".

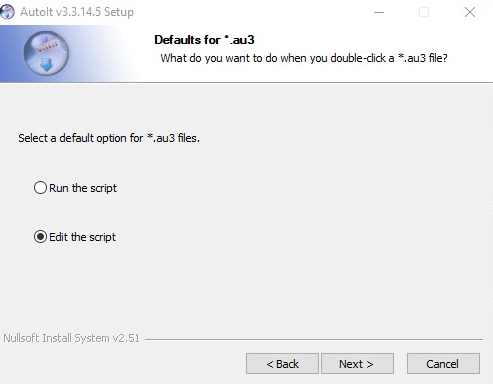
In this window we will select what we want to happen when we double-click on an AutoIt script, whether it is executed or opened for editing, in my case I want the second to happen therefore I will select the second option "Edit the script" and I will click "Next".
Here we will leave the full intallation selected by default and click on "Next".

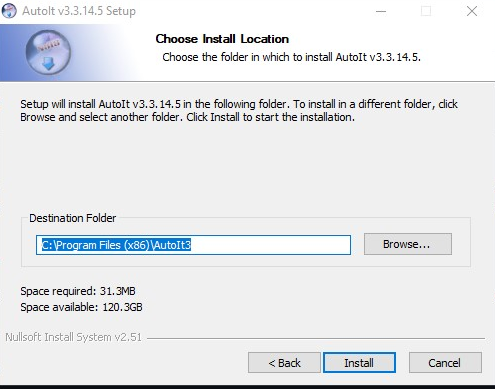
We select the place where we want AutoIt to be installed, in my case I will leave it by default, we will click "Next".
In this window the installation of AutoIt will begin, a green bar will show us the progress, we must wait for the bar to fill completely for the installation to finish.

Once the bar is full, it will show us the following window, in my case I will uncheck the box "Show update notes" since I do not want to see the notes of the new version, we will click on "Finish".

Finally the installation of AutoIt is complete, we can notice that in our start menu we find three AutoIt icons, the first will allow us to create or edit scripts, as for the second and the third will allow us to execute scripts either in 32-bit environments or 64 bits respectively depending on the case of our PC🖥️.

BOT download
To download the Bot we must click on the "Code" button and then we will click on "Download ZIP".

A ZIP file called SimpleOpenSeaBot-main will be downloaded which we must unzip, inside there is a folder that contains the file SimpleOpenSeaBot.au3 which is the bot script.

BOT configuration
To configure the bot we must open SciTE Script Editor and open the bot script.
The AutoIt instructions that we will use to configure the BOT are as follows:
MouseClick("ClickType", Xcoord, Ycoord, clicks): This instruction moves the cursor to a specific point on the screen and right or left click the number of times we indicate. With the example MouseClick("left",1268,176,1) will left click once on the coordinates x: 1268 and y: 176.
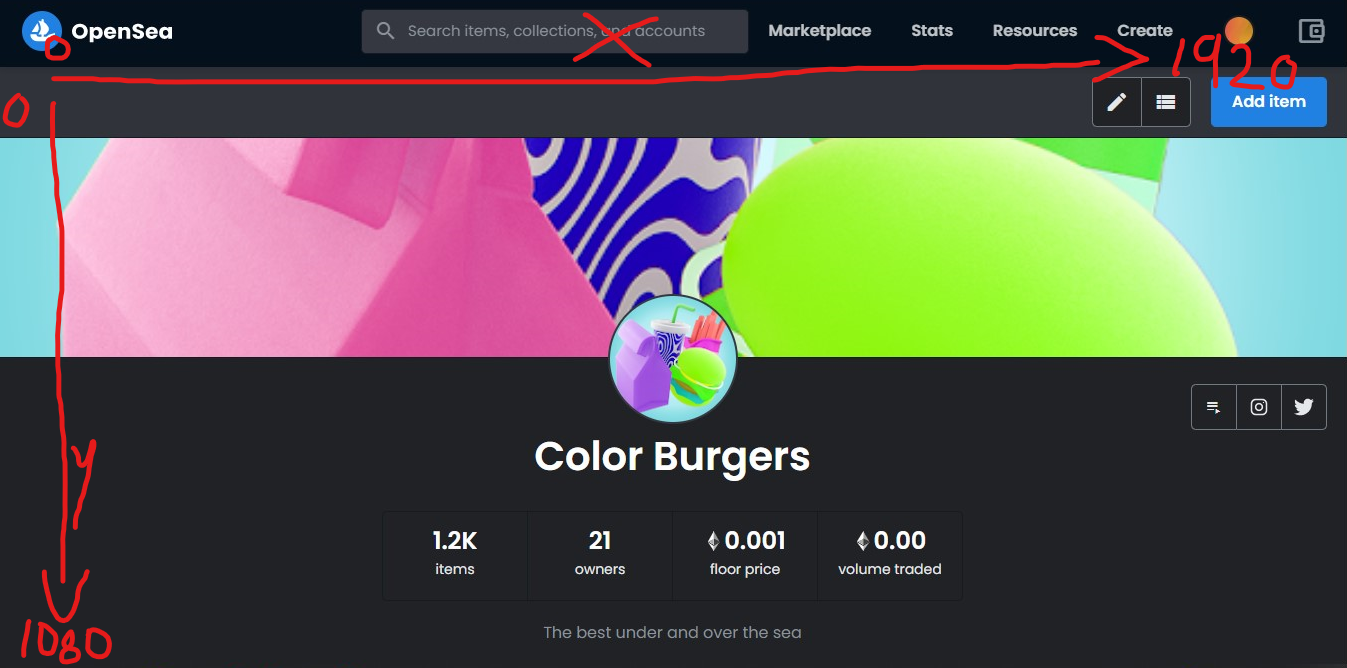
From the upper left corner of the screen to the right they are X coordinates and downwards they are Y coordinates, therefore the upper left corner would be the 0,0 coordinate while the lower right corner would be the 1920.1080 coordinate in a 1080p resolution screen.
Sleep(Mliseconds): This instruction allows the bot to pause in milliseconds. With the example Sleep(5000) the bot will pause for 5 seconds.
Send("Key/Text/Variable"): This works allows the bot to simulate that we are typing with the keyboard, it can write the text that we want, keyboard commands or even variables. With the example Send("{TAB}") the bot will do the function of the TAB key, with Send("{ENTER}") that of the ENTER key, with Send("^v") we will make the bot do CTRL+V to paste what we have in the clipboard, with Send($start) we will make the bot write the content that has the variable $start, with Send("Any text") we will make the bot write literally Any text.
ClipPut(variable): This instruction allows the bot to copy the content we have in any variable to the clipboard. With the example ClipPut($fileName) the bot will copy to the clipboard the content found in the variable $fileName.
MouseWheel("Direction",quantity): This instruction will allow us to simulate the mouse wheel. With the example MouseWheel("down",20) the bot will turn the mouse wheel down 20 times.
The variables that we will need to configure in the BOT are the following:
A variable is data that can store numbers, text, among others.
In AutoIt all variables start with a $ followed by the variable name.
$start: This variable stores the number of the first nft that we are going to upload.
$end: This variable stores the number of the last nft that we are going to upload.
$price: This variable stores the price of the nft.
$fileName: This variable stores the name of the file that we are going to upload.
$name: This variable stores the name of the nft that will be displayed in opensea.
$externalLink: This variable stores the external link that we can link to the nft in opensea
$description: This variable stores the description of the nft that will be shown in opensea.
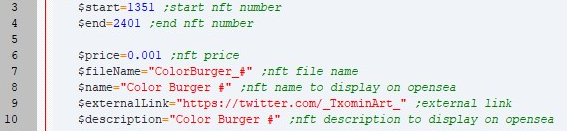
In the following example the data of my variables for the example will be the following:
$start: 1351 is the number of the first nft that I am going to upload, it will also be the number of the following nft that the bot will go up in each repetition, so at the end of each repetition the bot will increase this number by 1.
$end: 2401 is the number of the last nft I'm going to upload.
$price: 0.001 is the price of each nft.
$fileName: "Color_Burger_ #" is the name of my nfts, my nfts are named with the fileName followed by the number, as this data is text, it must be enclosed in single quotes.
$name: "Color Burger #" is the name of my nfts, my nfts in opensea are named with the Name followed by the number, as this data is text, it must be enclosed in single quotes.
$externalLink: "https://twitter.com/TxominArt" is the external link that I want to link to my nft, in this case is the link to my twitter, this is optional so if we do not want to put any we only leave the single quotes, as this data is text it must be enclosed in single quotes.

$description: "Color Burger #" in my case the description of my nft is the name followed by the number, this is optional so if we do not want to put any we only leave the single quotes, as this data is text it must be enclosed in single quotes.
Why the bot for me will have this configuration:
The next thing we will do is go to the collection in which we want to upload the NFTs

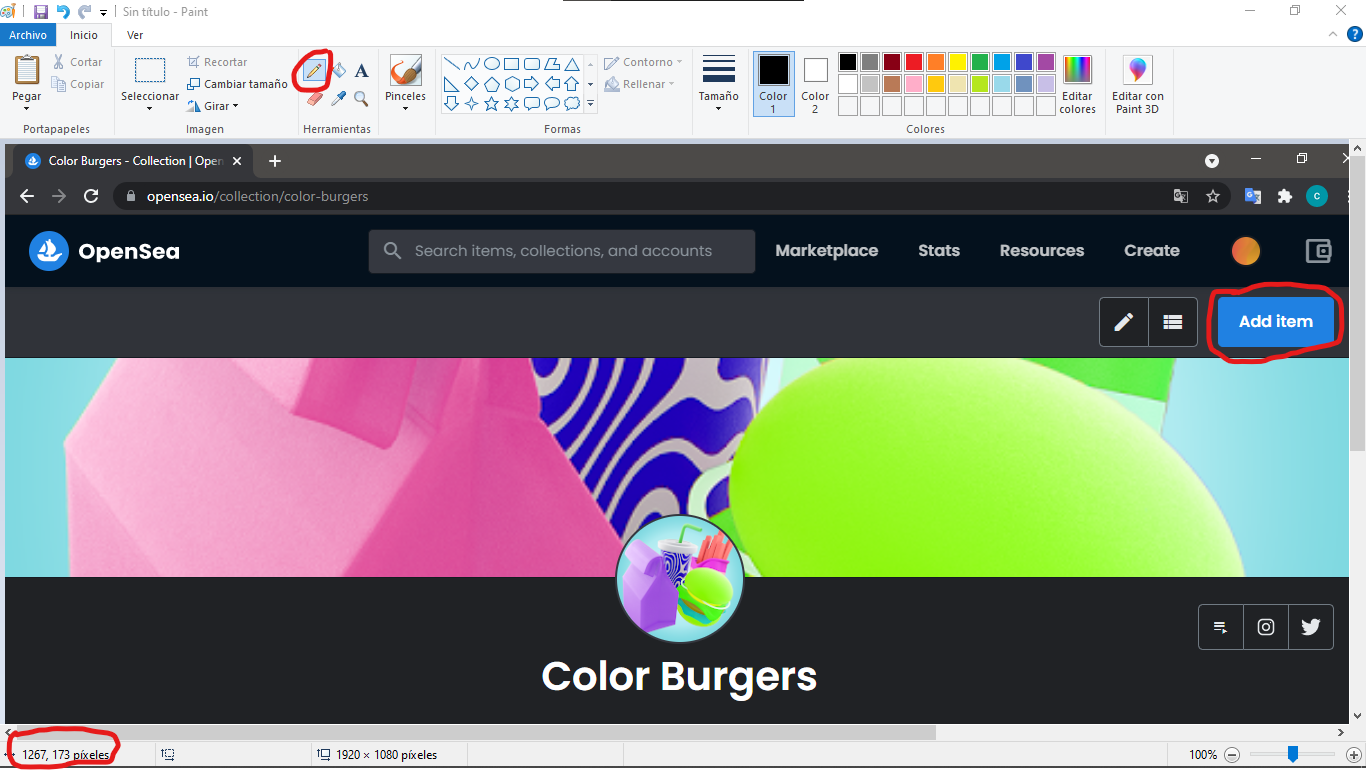
We will open "Paint" or any other software that indicates the coordinates within an image, for what? the bot needs to move the cursor to click all the buttons throughout the minting and listing of the NFTs, and there are quite a few.
The position of the buttons will depend on the size of our screen, the browser we use, if the bookmarks bar or the task bar is visible or not, so your positions may vary from mine, so this process it is very particular to each user.
To be able to do this we must take a screenshot of opensea making sure that the button we want to configure is visible, in this first case we will configure the "Add Item" button of the collection, we must paste the screenshot into paint and select the Tool "Pencil", this tool will show us the coordinates in pixels in the lower left corner of Paint, we must position the cursor on the button to configure, in my case the center of the button is at [1267,173] pixels.
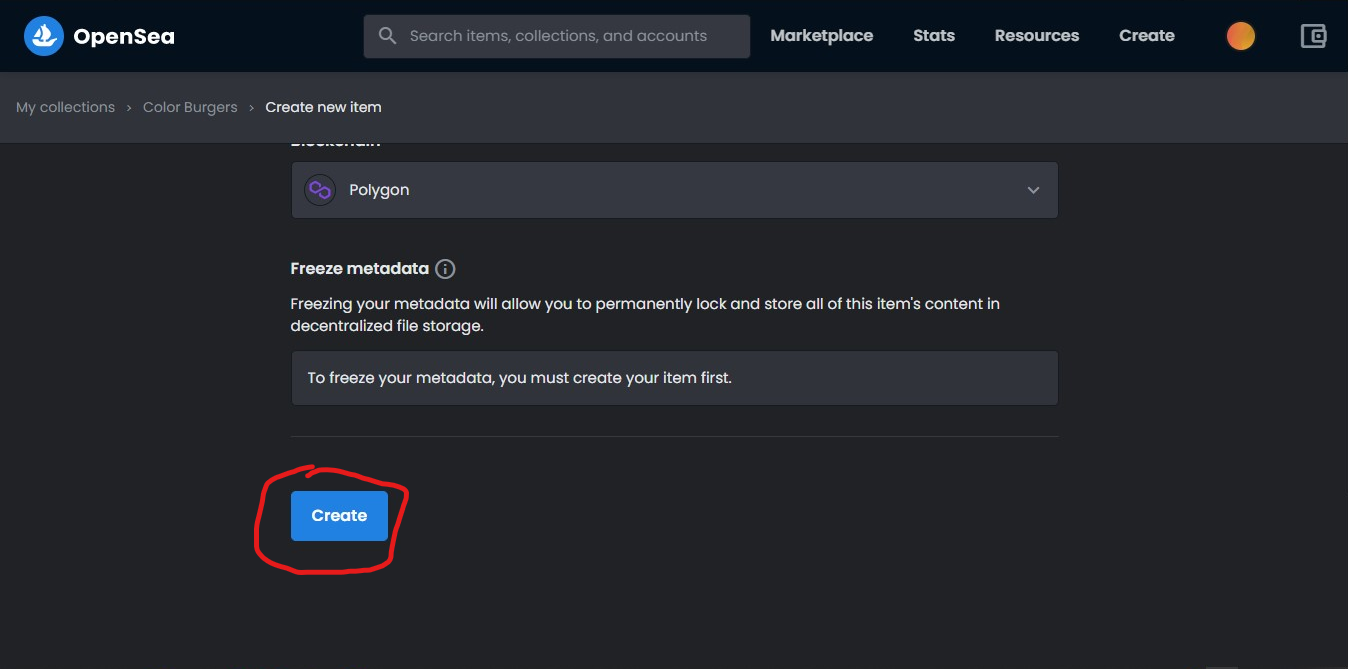
Other buttons that we must configure are the "Upload file" button and the "Create" button. We will do it in the same way as the "Add Item" button.

The "Create" button is a bit special since in most cases we must rotate the mouse wheel to scroll down and be able to visualize the button, so we must go down as much as possible and obtain its coordinates.
These coordinates must be entered in the bot script, the instructions that we must modify are related to the handling of the cursor (MouseClick), specifically we must enter the coordinates obtained previously in the spaces corresponding to the X coordinate and the Y coordinate.
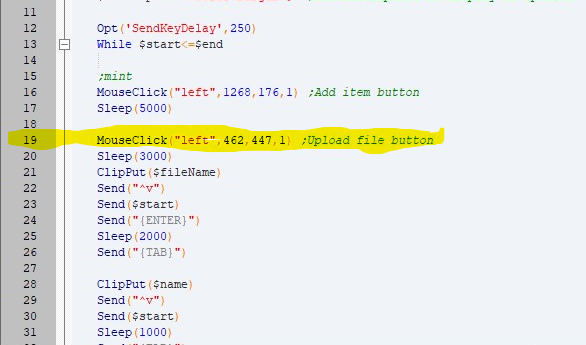
The instruction to modify for the "Add Item" button will be the following:

The instruction to modify for the "Upload file" button will be the following:
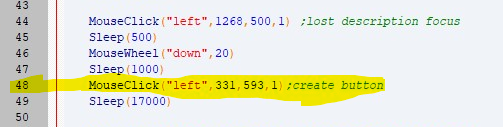
The instruction to modify for the "Create" button will be the following:
In this case we must modify an additional instruction for the "Create" button, this because the description text can generate conflict with the mouse wheel, so we must click on an empty space, any of the marked ones is good option:

The instruction to modify is the following:

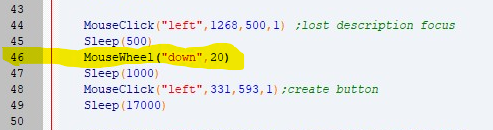
We must also adjust the number of turns that the mouse will make to go down until the "Create" button, this is adjusted in the following line by changing the number of turns, in the example it is 20 but it must be adjusted in a particular way:
We must repeat the process for each of the OpenSea buttons involved in the minting and in the NFT listing. The buttons to configure and their respective lines in the bot file are listed below:
- "Add Item" button, line 16.
- "Upload file" button, line 19.
- "Create" button, line 48.
- Selection of empty space, line 44.
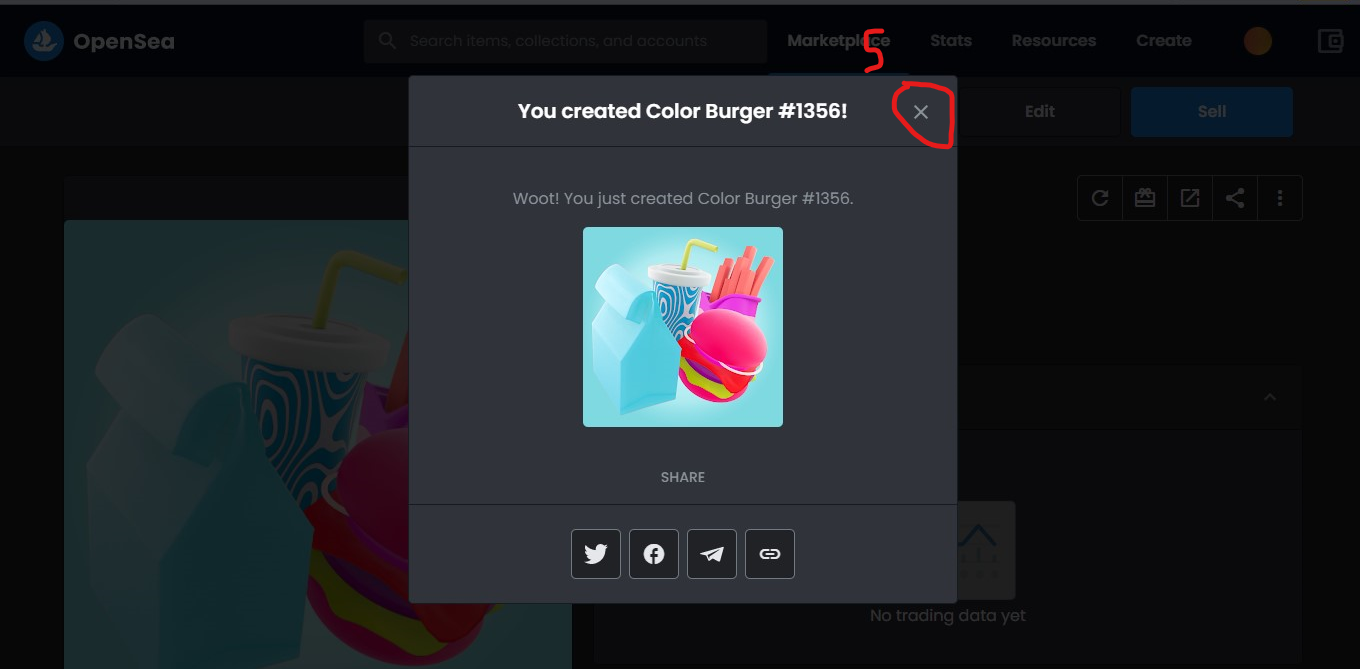
- Button "Close notification of minting", line 51.
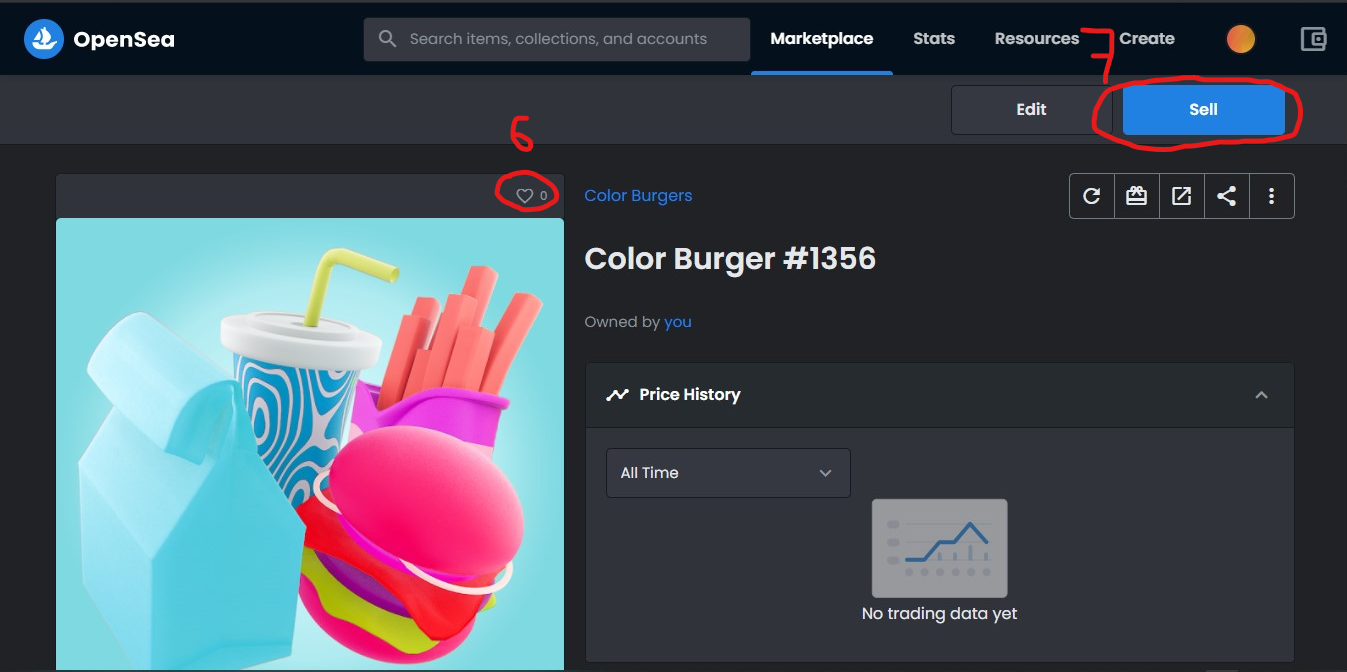
- "Favorite" button, line 56.
- "Sell" button, line 61.
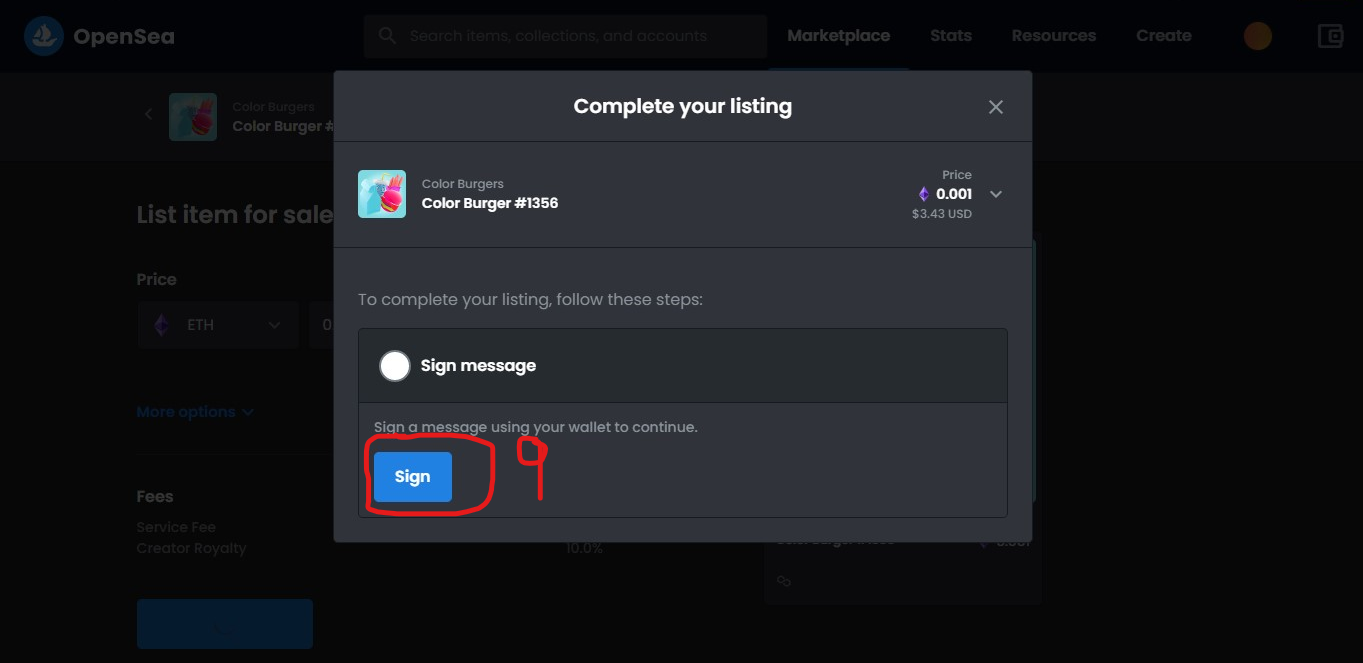
- "Complete listing" button, line 66.
- "Sign" button, line 69.
- "Sign" button in metamask, line 71.
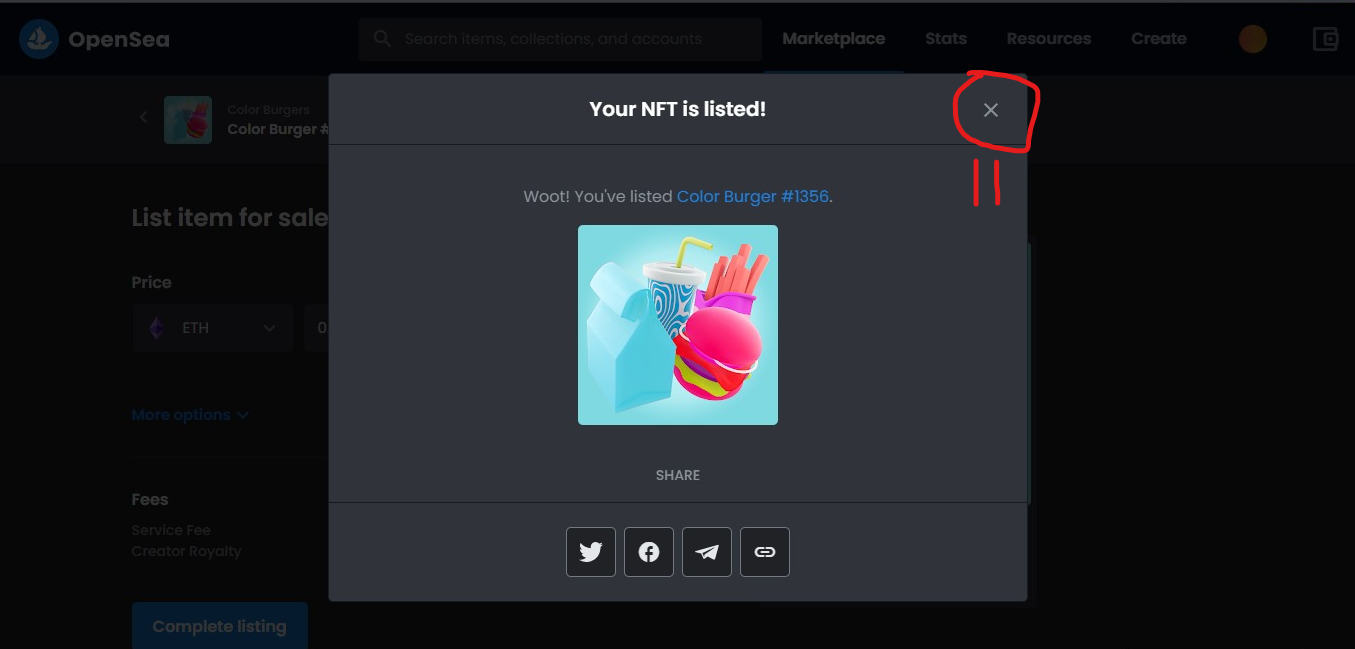
- "Close listing notification" button, line 73.
- Name of the collection, line 78.


As for the "Sleep" instructions, we must adjust them according to our PC or our connection to intener allows it, each "Sleep" pauses to allow opensea to load the pages and windows that are shown to us during the whole process, for this We must upload several NFTs manually and measure the loading times to adjust them in the Bot, remember that the time entered in "Sleep" must be in milliseconds.
BOT execution
Once the Bot is configured we must go to our collection in Opensea, we will click on the button "Add item" and we will sign what it asks us, then we will click on the button "Upload file" and we will upload any file from our collection, once done this we can go back to the collection.
We did the above since every time we enter opensea and upload an NFT they are asked to sign only once before allowing us to continue with the process and we upload a file to establish the path from which the bot will upload the files.
We must also open any NFT and mark it as a favorite since also opensea will ask us to sign only once before being able to mark all the NFts we want as favorites.
We can also upload an NFT manually to do the whole process and sign the above, either of the two processes works.
We must position ourselves again in the collection of NFTs that we are going to upload:

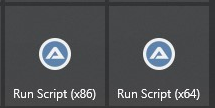
Then we only need to run the bot, for this we must run AutoIt by clicking on the "Run Script" icon, either the "x86" for 32-bit systems or the "x64" for 64-bit systems.
A window will open that will ask us to select the bot script, select the scrpt and click on "Open" and the bot will begin to run

Once the execution has started, it is important not to move the mouse or press the keyboard since we can generate errors in the execution of the bot.
To stop the bot or pause it, we must click on the AutoIt icon that appears on our taskbar:

Additional notes
The speed with which the NFTs are uploaded depends on the performance of our PC and the quality of our connection to the Internet since then it influences the loading times to be more or less short.
Using the same principles with which we configure the Bot for OpenSea, in theory, we can configure it for any NFT market, we only need to adapt the configurations to adapt to the peculiarities of each market. The same would happen to use a network other than polygon and even wallets other than Metamask.
Unfortunately AutoIt is only available for windows platforms but I am currently working on a version of python that works on any operating system, keep an eye on my social networks, which I leave below, more find out about when it will be available.
Attach the official AutoIt documentation in case you want to explore this tool https://www.autoitscript.com/autoit3/docs/
Thanks
Please share and leave your star ⭐
If you found it useful, invite me a beer 🍺 and a pizza 🍕, here is my Ethereum address: 0xb3351B9f0A06CF1E847DD6d5c9aE527182763d40
I also leave you my Bitso email for say you want to send me some crypto: [email protected]
Either you can buy some of my NFTs in OpenSea or send me some, my profile is TxominArt And my collections are:
Feel free to bid on the NFT that you like best.
You can also support me acquiring the NFT of this BOT in OpenSea
Also I leave you my referral links from Opensea, Binance and Bitso:
Opensea: https://opensea.io?ref=0xb3351b9f0a06cf1e847dd6d5c9ae527182763d40
Binance: https://accounts.binance.com/es-MX/register?ref=73006333 ID: 73006333
Bitso: https://bitso.com/register?ref=vipdo
I also leave you my social networks:
Thank you very much and much success, see you soon ...
