Shiruken Hackintosh Save
Hackintosh v3 (i7-9700K + Radeon RX 5700 XT) - OpenCore 0.9.9 + Kexts + BIOS - macOS 14.4.1 (Sonoma)
Hackintosh v3

Installation guide for my Hackintosh v3 build dual-booting macOS Sonoma and Windows 10. This build is based on Dortania's OpenCore Install Guide. The previous version of this guide using the Clover bootloader can be found here. The version numbers reported in this guide were the releases available at the time of installation and more than likely can be replaced with the latest iteration.
- EFI: Copy of current EFI directory from macOS boot drive
- EFI_install: Copy of EFI directory from the USB drive used during installation

BTC: 3ELvsExgq8S24FdGtm4mupQvb3BwiHwWuB
Table of Contents
- The Build
- Installation
- Post Installation
- Dual-Boot Windows
- Final BIOS Settings
- Final OpenCore Configuration
- Benchmarks
- Issues
- Upgrade Log
- References
- Resources
The Build
- CPU: Intel Core i7-9700K
-
CPU Cooler: Corsair H100i PRO (Connected to
CPU_FANandF_USB2) - Motherboard: Gigabyte Z390 AORUS PRO WIFI
- Memory: Corsair Vengeance RGB Pro 16 GB DDR4-3600
-
Storage (macOS): Samsung 970 Evo 1 TB M.2 NVME SSD (
M2Aslot) -
Storage (Windows): Intel 660p Series 1 TB M.2 NVME SSD (
M2Mslot) - Video Card: Gigabyte Radeon RX 5700 XT 8 GB GAMING OC
- Power Supply: Corsair RM650 80+ Gold
- Case: NZXT H510
- Monitor: Dell S2719DGF 27" LED QHD FreeSync Monitor
- Keyboard: Keychron K8
- Mouse: Logitech G603
View the build on PCPartPicker: https://pcpartpicker.com/list/kBK7TC
Installation
USB Creation
Follow the OpenCore Install Guide to create the macOS installer, prepare the base OpenCore system, and gather the necessary files to boot macOS. The drivers, kexts, and SSDTs I used are as follows:
- Drivers
- HfsPlus.efi
- OpenRuntime.efi (Included with OpenCore)
- Kexts
- AppleALC.kext (v1.5.8)
- IntelMausi.kext (v1.0.5)
- Lilu.kext (v1.5.1)
- USBInjectAll.kext (v0.7.1)
-
VirtualSMC.kext (v1.2.1)
- SMCProcessor.kext
- SMCSuperIO.kext
- WhateverGreen.kext (v1.4.8)
- SSDTs (Prebuilt for Intel Desktop Coffee Lake)
OpenCore Configuration
Follow the OpenCore Install Guide to setup the initial config.plist file and configure for Intel Desktop Coffee Lake.
- To enable the iGPU (UHD 630) for headless compute tasks, set
AAPL,ig-platform-id=0300913Eand exclude theframebuffer-patch-enableandframebuffer-stolenmemproperties. - The Gigabyte Z390 AORUS PRO WIFI motherboard has supported disabling CFG-Lock since BIOS version F12j, which means you can disable the
AppleXcpmCfgLockandAppleXcpmCfgLockquirks. - If you already know the MAC address of your ethernet adapter, enter it under
PlatformInfo > Generic > ROM. If you don't, this can be updated during post installation using System Preferences > Network > Ethernet > Advanced > Hardware > MAC Address to identify the correct value.
A sanitized version of my USB drive config file can be found here.
BIOS Settings (Version F12k)
Enter Advanced Mode and Load Optimized Defaults to reset the default BIOS settings. Modify the following settings (may vary depending on motherboard model and BIOS version):
- Tweaker
- Advanced CPU Settings
- Vt-d → Disabled
- Advanced CPU Settings
- Settings
- IO Ports
- Initial Display Output → PCIe 1 Slot
- Internal Graphics → Enabled
- DVMT Pre-Allocated → 64MB
- Above 4G Decoding → Enabled
- USB Configuration
- XHCI Hand-off → Enabled
- SATA and RST Configuration
- SATA Mode Selection → ACHI
- Miscellaneous
- Intel Platform Trust Technology (PTT) → Disabled
- Software Guard Extensions (SGX) → Disabled
- Smart Fan 5
- CPU_FAN (or whichever header was used for the AIO CPU cooler)
- Speed Control → Full Speed
- CPU_FAN (or whichever header was used for the AIO CPU cooler)
- IO Ports
- Boot
- CFG Lock → Disabled
- Fast Boot → Disabled
- Windows 8/10 Features → Windows 8/10
- CSM Support → Disabled
- Secure Boot
- Secure Boot Enable → Disabled
Select Save and Exit to save the new BIOS settings
Install macOS
I performed the installation with the USB drive, keyboard, and mouse plugged into the USB 2.0 ports at the top of the motherboard. My display was connected to the graphics card via DisplayPort.
- Restart computer and set the USB drive as the default BIOS boot device
- Select the
Install macOS (external)option from the OpenCore Boot Menu - Launch Disk Utility and format the destination drive (Samsung 970 Evo)
- Name:
Macintosh SSD - Format:
APFS - Scheme:
GUID Partition Map
- Name:
- Launch Install macOS and select the
Macintosh SSDdrive as the destination- As the system restarts, keep selecting
macOS Installerfrom the OpenCore Boot Menu
- As the system restarts, keep selecting
- Once the installation is complete, select
Macintosh SSDfrom the OpenCore Boot Menu and proceed through the normal macOS setup
Post Installation
Based heavily on Dortania's OpenCore Post-Install Guide.
Make macOS Drive Bootable
- Mount the EFI partition of
Macintosh SSDand copy over the entire EFI directory from the USB drive - Restart the computer and select the internal drive (Samsung 970 Evo) as the default BIOS boot device
- Select
Macintosh SSDfrom the OpenCore Boot Menu - You should now have a bootable macOS installation!
Note: You can now remove the USB drive but keep it handy for debugging issues with your Hackintosh.
Enable FileVault
FileVault is used to encrypt the startup disk on your Hackintosh. Enabling it is entirely optional, but probably a good idea for the security conscious. Before turning on the feature, you will need to make sure that OpenCore is properly configured to interact with the encrypted drive. Follow the OpenCore Post-Install Guide to prepare your config.plist file for use with FileVault.
The following (optional) changes were made:
-
Misc > Boot > PollAppleHotKeys→True -
Misc > Security > AuthRestart→True
You can now enable FileVault in Security & Privacy in System Preferences like on a real Mac. Once the encryption process is complete, your account password will be required to decrypt the startup disk every time your Hackintosh starts up.
Note: You should also make these changes to your USB drive OpenCore configuration so that it can properly boot your system if the Macintosh SSD EFI partition gets messed up. If you don't update the configuration, then the OpenCore bootloader may not be able to properly handle the FileVault-encrypted drive.

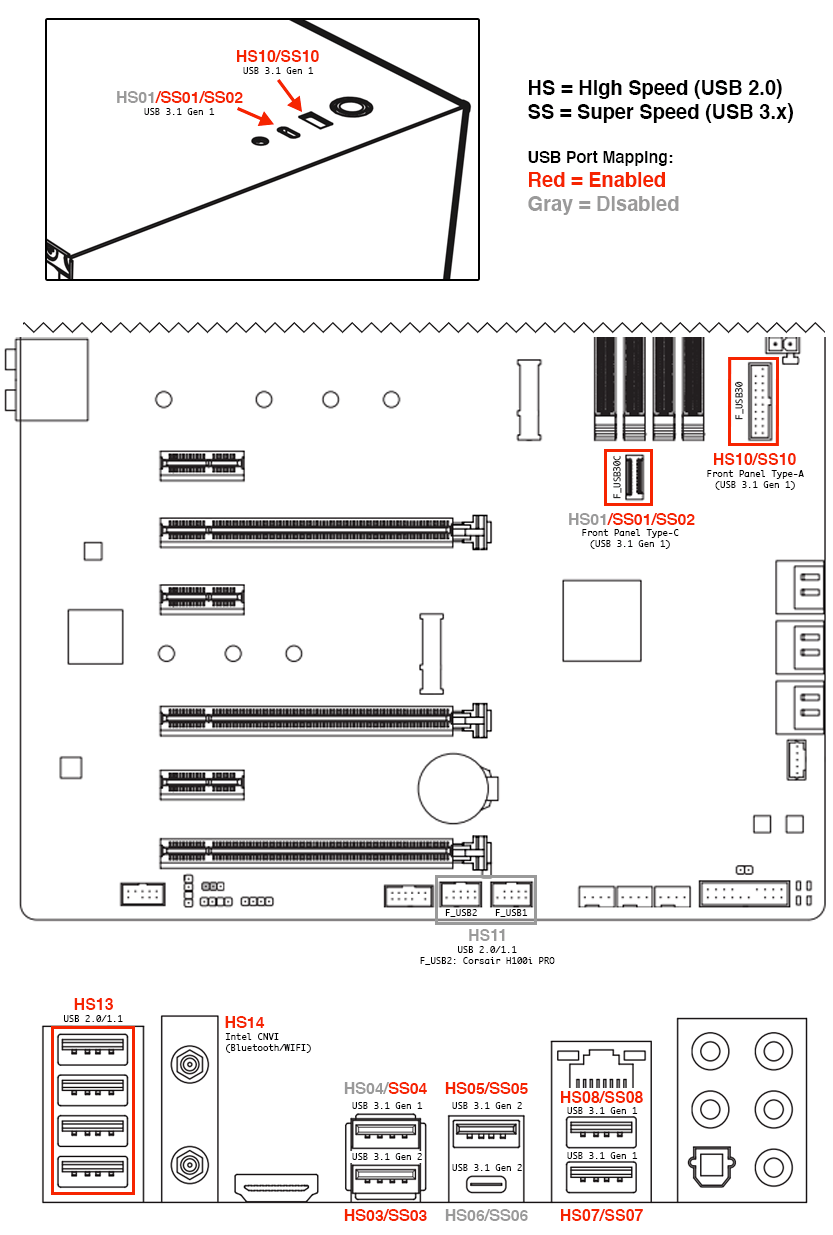
Map USB Ports
Follow the OpenCore Post-Install Guide to map USB on your system. The complete USB port layout for the Gigabyte Z390 AORUS PRO WIFI motherboard is detailed in the image below with the ports I enabled indicated in red. If you have the same motherboard and want to use this exact USB port mapping, you can download my USBMap.kext.
- No ACPI patches were necessary to rename mappings
- Disabling the internal USB 2.0 headers (
HS11) can prevent sleep issues caused by the AIO controller - If you don't need Bluetooth/Wi-Fi, you can disable
HS14and enable one of the disabled ports - You can disable the
XhciPortLimitquirk in your OpenCore configuration once complete
Enable Bluetooth and Wi-Fi
The Intel CNVi modules that provide integrated Bluetooth and Wi-Fi functionality on motherboards are not natively supported by macOS but can be enabled using IntelBluetoothFirmware and itlwm on supported devices. The Gigabyte Z390 AORUS PRO WIFI contains a compatible Intel Wireless-AC 9560 CNVi (Vendor ID: 0x8087, Device ID: 0x0AAA). Hackintool can be used to determine the specific model on your motherboard (System > Peripherals > Bluetooth).
In order to use these kexts, you must must enable the internal USB port used by the CNVi module during USB mapping. Download the latest IntelBluetoothFirmware.kext and itlwm.kext, place in your EFI/OC/Kexts directory, and add to your OpenCore configuration. Reboot and you should be able to use both Bluetooth and Wi-Fi on your Hackintosh without any additional hardware.
-
IntelBluetoothInjector.kextseems necessary to turn Bluetooth on/off -
itlwmshows up as an Ethernet adapter and requires use of the standalone app HeliPort to connect/disconnect from Wi-Fi networks. You can Option-click on the menu bar icon and select "Launch at Login" to have it automatically start.

Enable OpenCore GUI
Follow the OpenCore Post-Install Guide to set up the GUI for the bootloader. I also removed auxiliary entries (macOS Recovery and Reset NVRAM) from the picker.
-
Misc > Boot > HideAuxiliary→TRUE
Note: The auxiliary entries can still be accessed from the GUI by pressing the spacebar key.

Enable LauncherOption
Follow the OpenCore Post-Install Guide to run OpenCore directly from firmware without requiring a launcher. This will add OpenCore to the motherboard boot menu and prevent issues where Windows or Linux could overwrite EFI/BOOT/BOOTx64.efi. This file can now be safely removed. Be sure to select OpenCore as the default boot option in your BIOS.

Disable verbosity and debugging
Once your installation is complete and/or stable, you can disable verbose output and debug logging during booting. Follow the OpenCore Post-Install Guide to declutter macOS and OpenCore.
-
Misc > Debug > AppleDebug→FALSE -
Misc > Debug > Target→3 - Remove
-vfromNVRAM > Add > 7C436110-AB2A-4BBB-A880-FE41995C9F82 > boot-args
If you installed using the DEBUG version of OpenCore, replace all the drivers with the RELEASE versions.
Dual-Boot Windows
I used an existing installation of Windows 10 on the Intel 660p Series NVMe drive. The steps taken during that installation process (removing macOS drive and placing Windows drive in M2M motherboard slot) should be unnecessary when LauncherOption is enabled since Windows will not be able to mess up the OpenCore EFI. For more information, check out the Multiboot with OpenCore Guide.
One of the benefits of OpenCore is that you can now use Startup Disk to reboot your system directly into Windows without further user input, just like on a real Mac.

Install Boot Camp Utilities
In order to return to macOS from Windows without requiring user input during boot, Apple's Windows Support Software must be installed. The OpenCore Post-Install Guide includes instructions on using a third-party tool to download these drivers. However, they can also be directly downloaded on macOS using Boot Camp Assistant.
-
Launch Boot Camp Assistant and select the
Action > Download Windows Support Softwaremenu item -
Copy the downloaded files to a Windows-compatible USB drive and reboot to Windows
-
Remove all unnecessary Boot Camp drivers:
- All folders in
$WinPEDriver$(keep the parent folder) - All folders in
BootCamp/Drivers/exceptApple/ - All folders/files in
BootCamp/Drivers/Apple/exceptBootCamp.msi

- All folders in
-
Run
BootCamp/Setup.exeto install the Boot Camp software. -
You can now use the Boot Camp Control Panel on the taskbar to restart directly into macOS without requiring further user input, just like on a real Mac running Boot Camp.

Final BIOS Settings
Screenshots of my current BIOS settings on my working system
Tweaker

Advanced CPU Settings

Settings
Platform Power

IO Ports

USB Configuration

SATA and RST Configuration

Miscellaneous

Boot

Smart Fan 5 Settings

Final OpenCore Configuration
A sanitized version of my working config file can be found here.
Benchmarks
All values are the average of three runs
-
Geekbench 5.4
- Single Core: 1253
- Multicore: 7598
- OpenCL: 66013
- Metal: 71480
- LuxMark v3 LuxBall HDR: 27444
- Cinebench R23 (Multi-core): 9205
- BruceX (Final Cut Pro 10.5.2): 6.40 seconds
-
Blackmagic Disk Speed Test (Samsung 970 Evo)
- Read: 2996 MB/s
- Write: 2547 MB/s
Issues
See the GitHub repository issues tracker
Upgrade Log
- 2024-05-15: Updated to OpenCore 1.0.0, AppleALC 1.9.0, and itlwm 2.3.0-alpha
- 2024-04-02: Updated to macOS 14.4.1, OpenCore 0.9.9, and itlwm 2.3.0-alpha
- 2024-02-27: Updated to itlwm 2.3.0-alpha and IntelBluetoothFirmware 2.4.0
- 2024-02-16: Updated to macOS 14.3.1, OpenCore 0.9.8, AppleALC 1.8.9, and itlwm 2.3.0-alpha
- 2024-02-01: Updated to macOS 14.3
- 2024-01-31: Replaced thermal paste on GPU after increasingly encountering stability issues while gaming. Stress testing with OCCT revealed the card was immediately and continuously thermal throttling under load and eventually (hard) crashing the system. Used Noctua NT-H2 as the replacement thermal paste. Follow-up OCCT stress testing showed the GPU was no longer thermal throttling and performing as expected.
- 2023-12-19: Updated to macOS 14.2.1, OpenCore 0.9.7, and AppleALC 1.8.8
- 2023-12-02: Updated to macOS 14.1.2
- 2023-11-27: Updated to macOS 14.1.1, OpenCore 0.9.6, and AppleALC 1.8.7
- 2023-11-02: Updated to macOS 14.1, AppleALC 1.8.6, and itlwm 2.3.0-alpha
- 2023-10-13: Updated to macOS 14.0
- 2023-10-02: Updated to macOS 13.6, OpenCore 0.9.5, AppleALC 1.8.5, and itlwm 2.3.0-alpha
- 2023-09-08: Updated to macOS 13.5.2
- 2023-09-05: Updated to macOS 13.5.1, OpenCore 0.9.4, Lilu 1.6.7, WhateverGreen 1.6.6, AppleALC 1.8.4, itlwm 2.3.0-alpha, IntelBluetoothFirmware 2.3.0, and
BlueToolFixup.kextfrom BrcmPatchRAM 2.6.8 - 2023-07-03: Updated to macOS 13.4.1, OpenCore 0.9.3, Lilu 1.6.6, WhateverGreen 1.6.5, VirtualSMC 1.3.2, AppleALC 1.8.3, and
BlueToolFixup.kextfrom BrcmPatchRAM 2.6.7 - 2023-06-06: Updated to macOS 13.4 (required this fix for Bluetooth issues) and itlwm 2.2.0
- 2023-05-19: Updated to OpenCore 0.9.2, Lilu 1.6.5, AppleALC 1.8.2, itlwm 2.2.0-alpha, and
BlueToolFixup.kextfrom BrcmPatchRAM 2.6.6 - 2023-04-15: Updated to macOS 13.3.1, OpenCore 0.9.1, AppleALC 1.8.1, and
BlueToolFixup.kextfrom BrcmPatchRAM 2.6.5 - 2023-03-29: Updated to OpenCore 0.9.0, Lilu 1.6.4, VirtualSMC 1.3.1, and AppleALC 1.8.0
- 2023-02-18: Updated to macOS 13.2.1, OpenCore 0.8.9, WhateverGreen 1.6.4, AppleALC 1.7.9, and itlwm 2.2.0-alpha
- 2023-01-04: Updated to OpenCore 0.8.8, Lilu 1.6.3, WhateverGreen 1.6.3, AppleALC 1.7.8, and itlwm 2.2.0-alpha
- 2022-12-17: Updated to macOS 13.1, OpenCore 0.8.7, WhateverGreen 1.6.2, AppleALC 1.7.7, and itlwm 2.2.0-alpha
- 2022-11-12: Updated to macOS 13.0.1, OpenCore 0.8.6 and AppleALC 1.7.6
- 2022-10-15: Updated to macOS 12.6, OpenCore 0.8.5, itlwm 2.2.0-alpha, and
BlueToolFixup.kextfrom BrcmPatchRAM 2.6.4 - 2022-09-08: Updated to OpenCore 0.8.4, AppleALC 1.7.5, itlwm 2.2.0-alpha, and IntelBluetoothFirmware 2.2.0
- 2022-08-06: Updated to macOS 12.5, OpenCore 0.8.3, Lilu 1.6.2, WhateverGreen 1.6.1, and AppleALC 1.7.4
- 2022-07-10: Updated to OpenCore 0.8.2, Lilu 1.6.1, WhateverGreen 1.6.0, VirtualSMC 1.3.0, AppleALC 1.7.3, and
BlueToolFixup.kextfrom BrcmPatchRAM 2.6.3 - 2022-06-12: Updated to macOS 12.4, OpenCore 0.8.1, WhateverGreen 1.5.9, AppleALC 1.7.2, and
BlueToolFixup.kextfrom BrcmPatchRAM 2.6.2 - 2022-05-03: Updated to OpenCore 0.8.0 and AppleALC 1.7.1
- 2022-04-12: Updated to macOS 12.3.1
- 2022-03-10: Updated to macOS 12.2.1, OpenCore 0.7.9, WhateverGreen 1.5.8, VirtualSMC 1.2.9, and AppleALC 1.7.0
- 2022-02-15: Updated to OpenCore 0.7.8, Lilu 1.6.0, WhateverGreen 1.5.7, and AppleALC 1.6.9
- 2022-01-13: Updated to OpenCore 0.7.7, Lilu 1.5.9, WhateverGreen 1.5.6, and AppleALC 1.6.8
- 2022-01-07: Updated to macOS 12.1, IntelBluetoothFirmware 2.1.0, and itlwm 2.1.0
- 2021-12-10: Updated to OpenCore 0.7.6, Lilu 1.5.8, VirtualSMC 1.2.8, and AppleALC 1.6.7
- 2021-12-02: Updated to OpenCore 0.7.5, Lilu 1.5.7, WhateverGreen 1.5.5, and AppleALC 1.6.6
- 2021-11-02: Updated
BlueToolFixup.kextfrom BrcmPatchRAM 2.6.1 - 2021-10-29: Updated to macOS 12.0.1, OpenCore 0.7.4, WhateverGreen 1.5.4, and AppleALC 1.6.5. Removed
IntelBluetoothInjector.kextand addedBlueToolFixup.kextfrom BrcmPatchRAM 2.6.0 to resolve Bluetooth issues. - 2021-09-24: Updated to macOS 11.6, OpenCore 0.7.3, Lilu 1.5.6, WhateverGreen 1.5.3, VirtualSMC 1.2.7, AppleALC 1.6.4, and IntelBluetoothFirmware 2.0.1
- 2021-08-11: Updated to macOS 11.5.2, OpenCore 0.7.2, Lilu 1.5.5, WhateverGreen 1.5.2, VirtualSMC 1.2.6, AppleALC 1.6.3, IntelMausi 1.0.7, itlwm 2.0.0, and IntelBluetoothFirmware 2.0.0
- 2021-06-26: Updated to macOS 11.4, OpenCore 0.7.0, WhateverGreen 1.5.0, VirtualSMC 1.2.4, AppleALC 1.6.1, and IntelBluetoothFirmware 1.1.3
- 2021-05-16: Updated to macOS 11.3.1, OpenCore 0.6.9, Lilu 1.5.3, VirtualSMC 1.2.3, AppleALC 1.6.0, and IntelMausi 1.0.6
- 2021-05-01: Updated to macOS 11.3
- 2021-04-24: Updated to OpenCore 0.6.8, Lilu 1.5.2, WhateverGreen 1.4.9, VirtualSMC 1.2.2, AppleALC 1.5.9, and itlwm 1.3.0
References
- OpenCore Install Guide
- OpenCore Post-Install Guide
- WhateverGreen Intel® HD Graphics FAQs
- DarkWake on macOS Catalina | boot args darkwake=8 & darkwake=10 are obsolete
- How to recreate Windows 10 EFI partition
