Sd Wav2lip Uhq Save
Wav2Lip UHQ extension for Automatic1111
🔉👄 Wav2Lip STUDIO extension for Stable Diffusion WebUI Automatic1111
https://user-images.githubusercontent.com/800903/262435301-af205a91-30d7-43f2-afcc-05980d581fe0.mp4
STANDALONE VERSION CAN BE FOUND HERE : WAV2LIP STUDIO STANDALONE
In the standalone version you can :
- ♻ Manage project: Add a feature to manage multiple project
- 👪 Introduced multiple face swap: Can now Swap multiple face in one shot
- ⛔ Visible face restriction: Can now make whole process even if no face detected on frame!
- 📺 Video Size: works with high resolution video input, (test with 1980x1080, should works with 4K but slow)
- 🔑 Keyframe manager: Add a keyframe manager for better control of the video generation
- 🍪 coqui TTS integration: Remove bark integration, use coqui TTS instead
- 💬 Conversation: Add a conversation feature with multiple person
- 🔈 Record your own voice: Add a feature to record your own voice
- 👬 Clone voice: Add a feature to clone voice from video
- 🎏 translate video: Add a feature to translate video with voice clone (HEYGEN like)
- 🔉 Volume amplifier for wav2lip: Add a feature to amplify the volume of the wav2lip output
- 🕡 Add delay before sound speech start
- 🚀 Speed up process: Speed up the process
💡 Description
This repository contains a Wav2Lip Studio extension for Automatic1111.
It's an all-in-one solution: just choose a video and a speech file (wav or mp3), and the extension will generate a lip-sync video. It improves the quality of the lip-sync videos generated by the Wav2Lip tool by applying specific post-processing techniques with Stable diffusion tools.
📖 Quick Index
- 🚀 Updates
- 🔗 Requirements
- 💻 Installation
- 🐍 Usage
- 👄 Note on the bark Fidelity
- 📺 Examples
- 📖 Behind the scenes
- 💪 Quality tips
- ⚠️Noted Constraints
- 📝 To do
- 😎 Contributing
- 🙏 Appreciation
- 📝 Citation
- 📜 License
- ☕ Support Wav2lip Studio
🚀 Updates
2023.09.13
- 👪 Introduced face swap: facefusion integration (See Usage section) this feature is under experimental.
2023.08.22
- 👄 Introduced bark (See Usage section), this feature is under experimental.
2023.08.20
- 🚢 Introduced the GFPGAN model as an option.
- ▶ Added the feature to resume generation.
- 📏 Optimized to release memory post-generation.
2023.08.17
- 🐛 Fixed purple lips bug
2023.08.16
- ⚡ Added Wav2lip and enhanced video output, with the option to download the one that's best for you, likely the "generated video".
- 🚢 Updated User Interface: Introduced control over CodeFormer Fidelity.
- 👄 Removed image as input, SadTalker is better suited for this.
- 🐛 Fixed a bug regarding the discrepancy between input and output video that incorrectly positioned the mask.
- 💪 Refined the quality process for greater efficiency.
- 🚫 Interruption will now generate videos if the process creates frames
2023.08.13
- ⚡ Speed-up computation
- 🚢 Change User Interface : Add controls on hidden parameters
- 👄 Only Track mouth if needed
- 📰 Control debug
- 🐛 Fix resize factor bug
🔗 Requirements
- latest version of Stable Diffusion WebUI Automatic1111 by following the instructions on the Stable Diffusion Webui repository.
- FFmpeg : download it from the official FFmpeg site. Follow the instructions appropriate for your operating system, note ffmpeg have to be accessible from the command line.
💻 Installation
- Launch Automatic1111
- Face Swap : On Windows, download and install Visual Studio. During the install, make sure to include the Python and C++ packages.
- In the extensions tab, enter the following URL in the "Install from URL" field and click "Install":
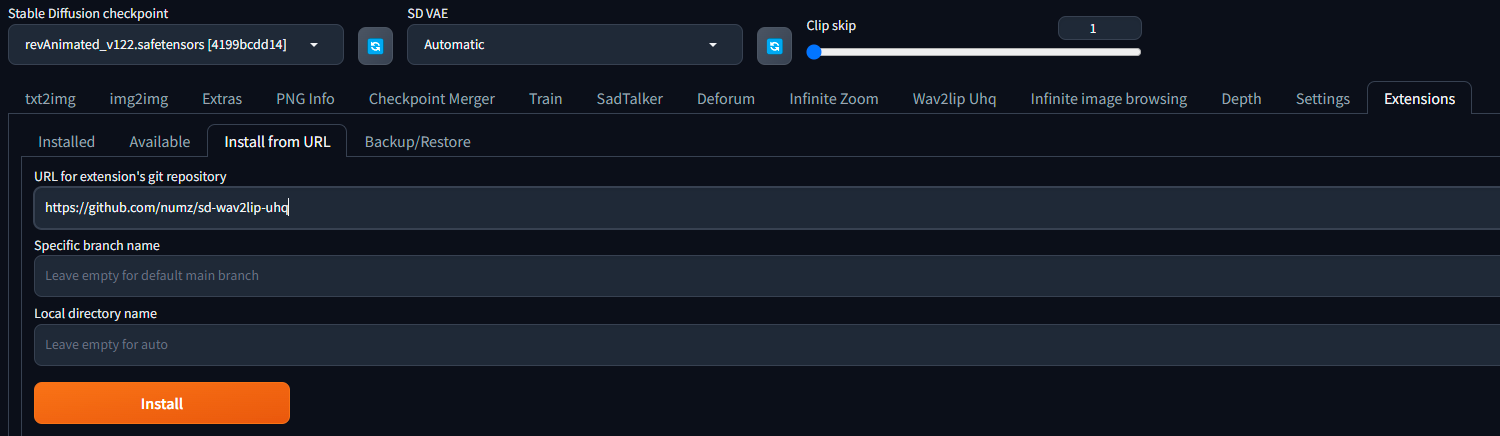
- Go to the "Installed Tab" in the extensions tab and click "Apply and quit".

-
If you don't see the "Wav2Lip UHQ tab" restart Automatic1111.
-
🔥 Important: Get the weights. Download the model weights from the following locations and place them in the corresponding directories (take care about the filename, especially for s3fd)
| Model | Description | Link to the model | install folder |
|---|---|---|---|
| Wav2Lip | Highly accurate lip-sync | Link | extensions\sd-wav2lip-uhq\scripts\wav2lip\checkpoints\ |
| Wav2Lip + GAN | Slightly inferior lip-sync, but better visual quality | Link | extensions\sd-wav2lip-uhq\scripts\wav2lip\checkpoints\ |
| s3fd | Face Detection pre trained model | Link | extensions\sd-wav2lip-uhq\scripts\wav2lip\face_detection\detection\sfd\s3fd.pth |
| landmark predicator | Dlib 68 point face landmark prediction (click on the download icon) | Link | extensions\sd-wav2lip-uhq\scripts\wav2lip\predicator\shape_predictor_68_face_landmarks.dat |
| landmark predicator | Dlib 68 point face landmark prediction (alternate link) | Link | extensions\sd-wav2lip-uhq\scripts\wav2lip\predicator\shape_predictor_68_face_landmarks.dat |
| landmark predicator | Dlib 68 point face landmark prediction (alternate link click on the download icon) | Link | extensions\sd-wav2lip-uhq\scripts\wav2lip\predicator\shape_predictor_68_face_landmarks.dat |
| face swap model | model used by face swap | Link | extensions\sd-wav2lip-uhq\scripts\faceswap\model\inswapper_128.onnx |
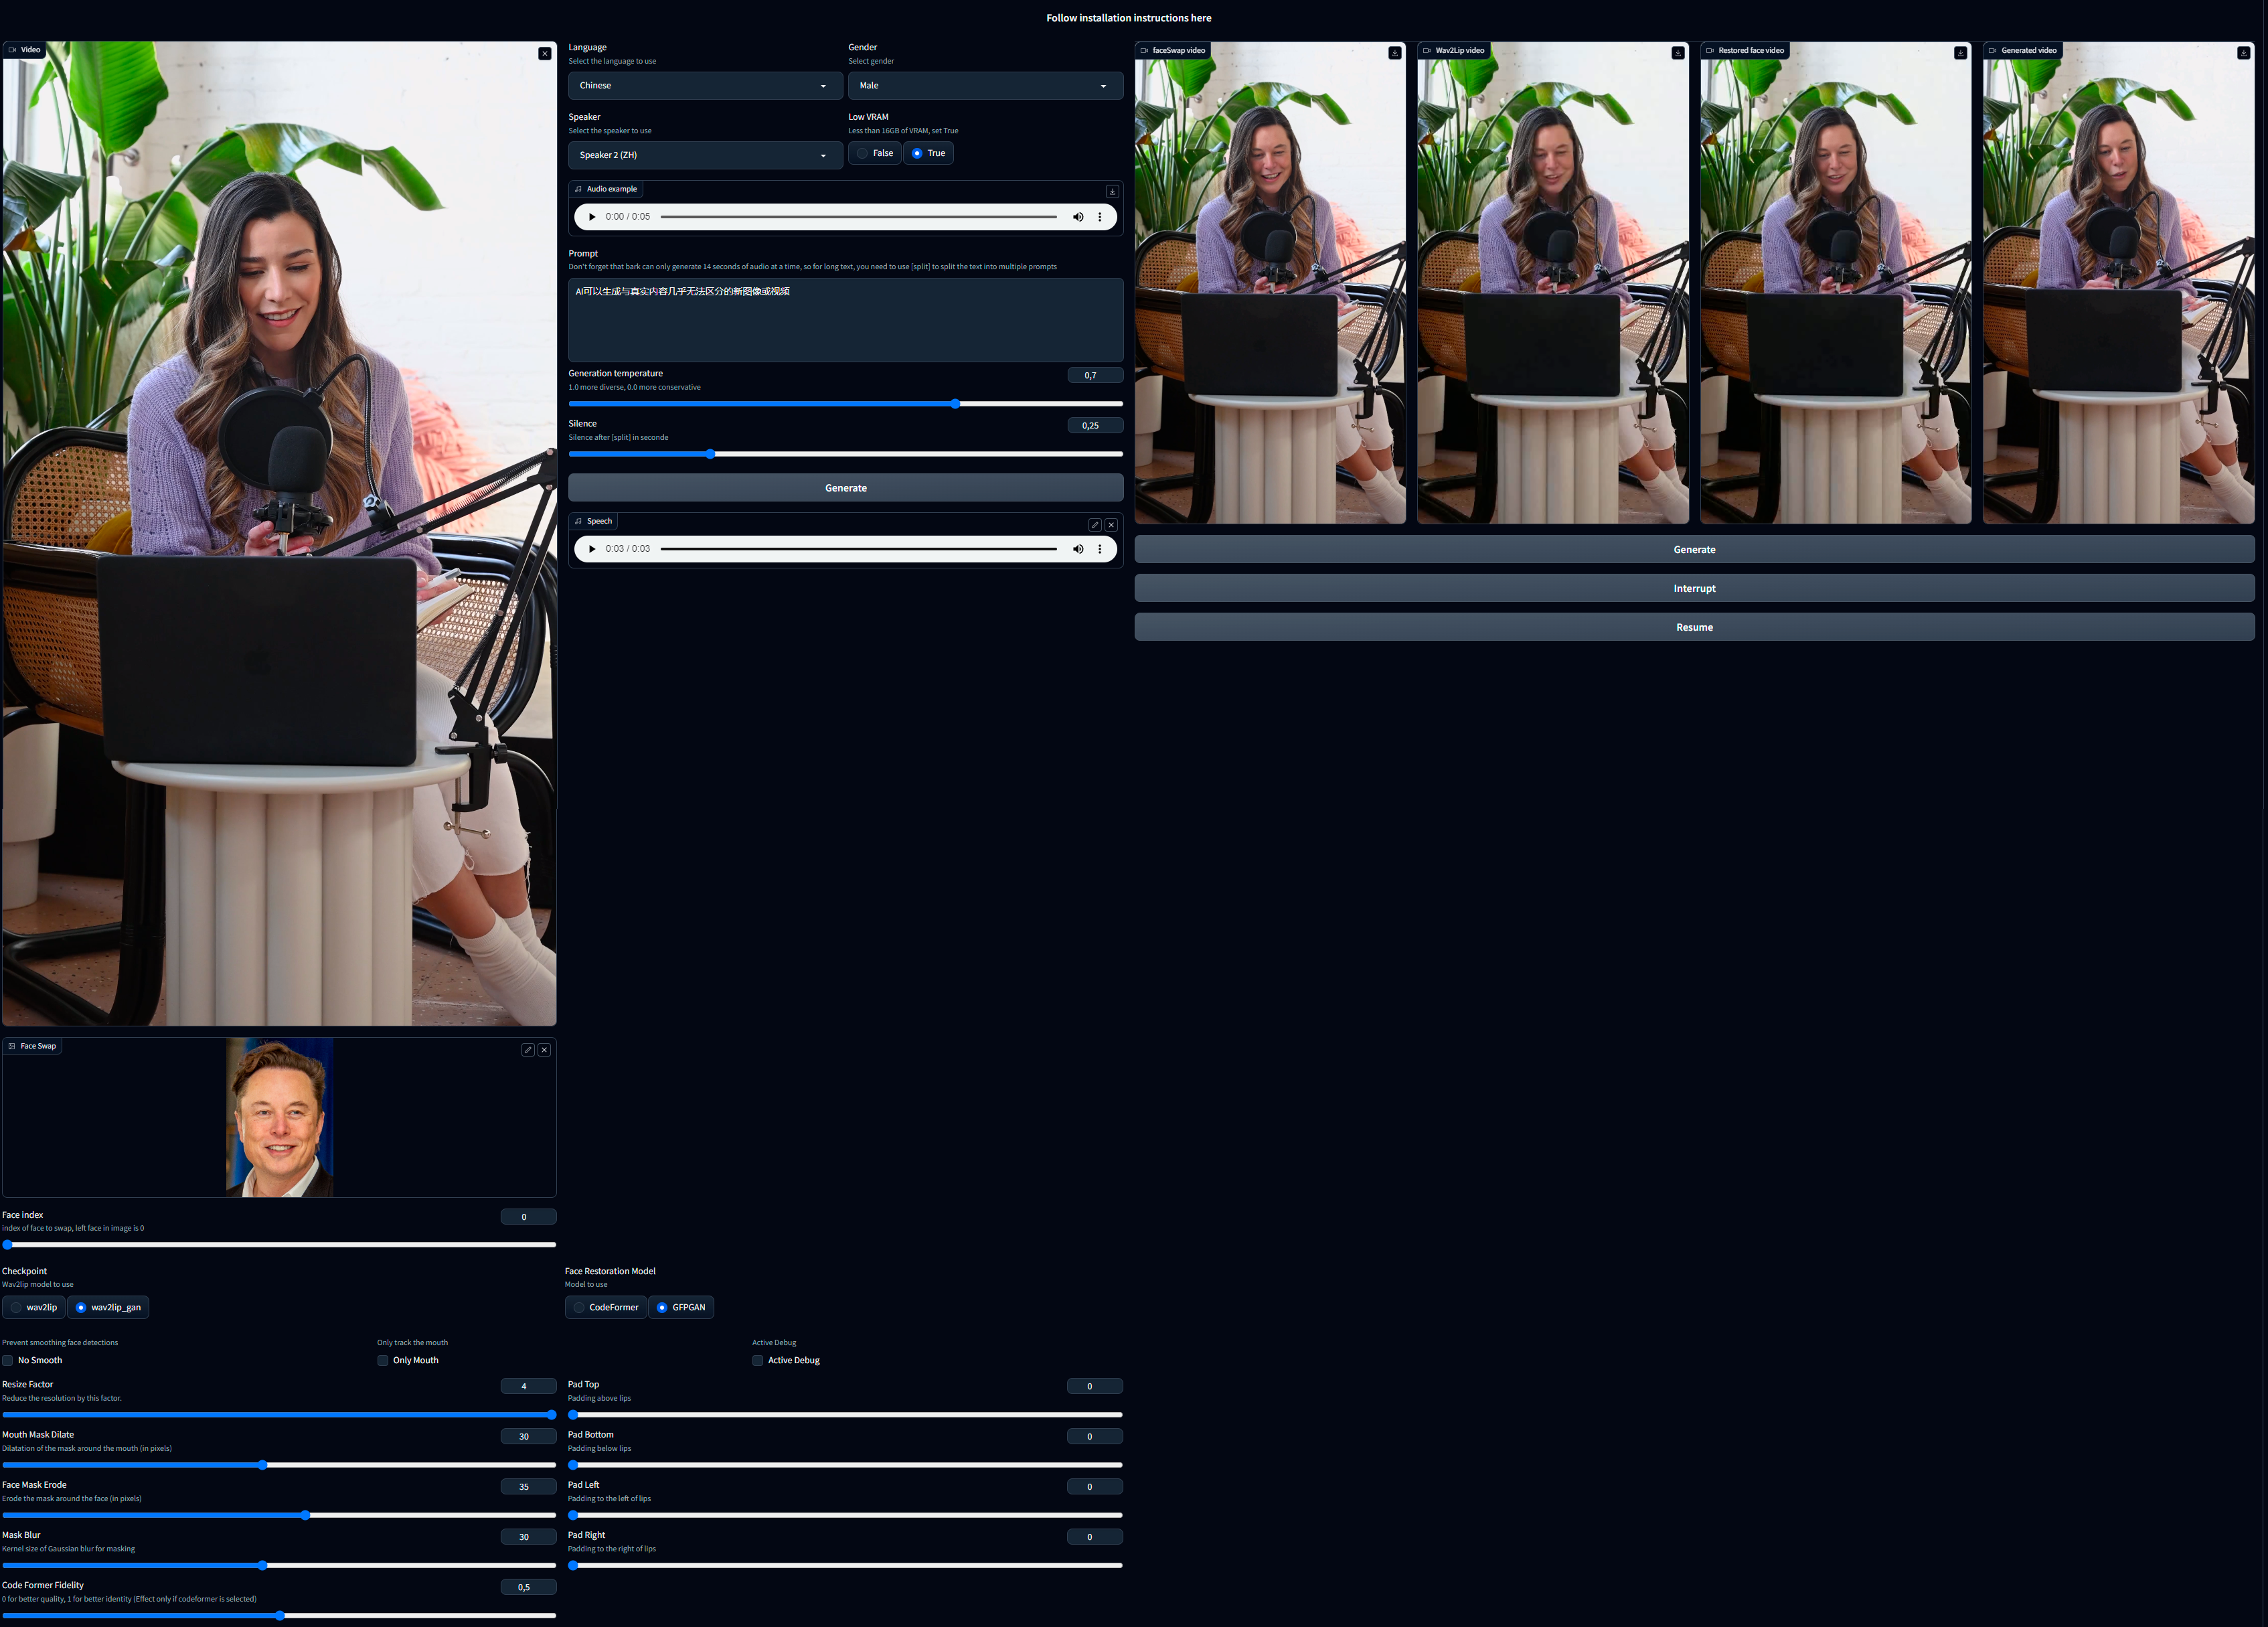
🐍 Usage
- Choose a video (avi or mp4 format) with a face in it. If there is no face in only one frame of the video, process will fail. Note avi file will not appear in Video input but process will works.
- Face Swap (take times so be patient):
- Face Swap: chose the image of the face you want to swap with the face in the video.
- Face Index: if there are multiple faces in the image, you can choose the face you want to swap with the face in the video. 0 is the first face from left to right.
- Audio, 2 options:
- Put audio file in the "Speech" input.
- Generate Audio with the text to speech bark integration.
- Choose the language : Turkish, English, Chinese, Hindi, Italian, Japanese, Korean, Portuguese, Russian, Spanish, Polish, German, French
- Choose the Gender
- Choose your speaker, you can ear a sample in the "Audio Example"
- Choose Low VRAM True (default) if you have a Video Card with less than 16GB VRAM
- Write your text in the text area "Prompt"
- Note that bark can only generate 14 seconds of audio, so if you want to generate a longer audio, you have to use "[split]" in your text.
- For example, if you want to generate a 30 seconds audio, you have to write your text like this :
- "This is the first part of my text [split] This is the second part of my text"
- Temperature: 0.0 is supposed to be closer to the voice, and 1.0 is more creative, but in reality, 0.0 yields strange results and 1.0 something very far from the voice. 0.7 is the default value set by 'bark', try different values to see what works best for you.
- Silence : Time in seconds between each punctuation(。!!.??,). Default is 0.25 seconds.
- See Bark documentation for more details.
- Below is a list of some known non-speech sounds.
- [laughter]
- [laughs]
- [sighs]
- [music]
- [gasps]
- [clears throat]
- "-" or ... for hesitations
- ♪ for song lyrics
- CAPITALIZATION for emphasis of a word
- [MAN] and [WOMAN] to bias Bark toward male and female speakers, respectively
- choose a checkpoint (see table above).
- Padding: Wav2Lip uses this to move the mouth. This is useful if the mouth is not at the good place. Usually, default value is good, but certain video may need to be adjusted.
- No Smooth: When checked, this option retains the original mouth shape without smoothing.
- Resize Factor: This is a resize factor for the video. The default value is 1.0, but you can change it to suit your needs. This is useful if the video size is too large.
- Only Mouth: This option tracks only the mouth, removing other facial motions like those of the cheeks and chin.
- Mouth Mask Dilate: This will dilate the mouth mask to cover more area around the mouth. depends on the mouth size.
- Face Mask Erode: This will erode the face mask to remove some area around the face. depends on the face size.
- Mask Blur: This will blur the mask to make it more smooth, try to keep it under or equal to Mouth Mask Dilate.
-
Code Former Fidelity:
- A value of 0 offers higher quality but may significantly alter the person's facial appearance and cause noticeable flickering between frames.
- A value of 1 provides lower quality but maintains the person's face more consistently and reduces frame flickering.
- Using a value below 0.5 is not advised. Adjust this setting to achieve optimal results. Starting with a value of 0.75 is recommended.
- Active debug: This will create step-by-step images in the debug folder.
- Click on the "Generate" button.
- ⚠ "resume" button can be use if face swap and wav2lip step have been done, then you can adjust "mouth mask dilate", "face mask erode", "mask blur" and change "restoration model" without regenerate face swap and wav2lip.
👄 Note on the bark Fidelity
Bark is interesting but sometimes yields strange results (or even hilarious ones). Each generation will give you something different and It may take several generations before you achieve something conclusive. Apart from English, it seems that the other languages speak as if they were being used by a foreigner. Sometimes even if you choose "Male" it will speak like a woman, and vice versa. Sometimes, even when choosing a specific speaker, it will sound like another speaker or even another language.
📺 Examples
https://user-images.githubusercontent.com/800903/262439441-bb9d888a-d33e-4246-9f0a-1ddeac062d35.mp4
https://user-images.githubusercontent.com/800903/262442794-61b1e32f-3f87-4b36-98d6-f711822bdb1e.mp4
https://user-images.githubusercontent.com/800903/262449305-901086a3-22cb-42d2-b5be-a5f38db4549a.mp4
https://user-images.githubusercontent.com/800903/267808494-300f8cc3-9136-4810-86e2-92f2114a5f9a.mp4
📖 Behind the scenes
This extension operates in several stages to improve the quality of Wav2Lip-generated videos:
- Generate face swap video: The script first generates the face swap video if image is in "face Swap" field, this operation take times so be patient.
- Generate a Wav2lip video: Then script generates a low-quality Wav2Lip video using the input video and audio.
- Video Quality Enhancement: Create a high-quality video using the low-quality video by using the enhancer define by user.
- Mask Creation: The script creates a mask around the mouth and tries to keep other facial motions like those of the cheeks and chin.
- Video Generation: The script then takes the high-quality mouth image and overlays it onto the original image guided by the mouth mask.
- Video Post Processing: The script then uses the ffmpeg tool to generate the final video.
💪 Quality tips
- Use a high quality video as input
- Utilize a video with a consistent frame rate. Occasionally, videos may exhibit unusual playback frame rates (not the standard 24, 25, 30, 60), which can lead to issues with the face mask.
- Use a high quality audio file as input, without background noise or music. Clean audio with a tool like https://podcast.adobe.com/enhance.
- Dilate the mouth mask. This will help the model retain some facial motion and hide the original mouth.
- Mask Blur maximum twice the value of Mouth Mask Dilate. If you want to increase the blur, increase the value of Mouth Mask Dilate otherwise the mouth will be blurred and the underlying mouth could be visible.
- Upscaling can be good for improving result, particularly around the mouth area. However, it will extend the processing duration. Use this tutorial from Olivio Sarikas to upscale your video: https://www.youtube.com/watch?v=3z4MKUqFEUk. Ensure the denoising strength is set between 0.0 and 0.05, select the 'revAnimated' model, and use the batch mode. i'll create a tutorial for this soon.
- Ensure there is a face on each frame of the video. If the face is not detected, process will stop.
⚠ Noted Constraints
- for speed up process try to keep resolution under 1000x1000px, so use resize factor and upscaling after process.
- If the initial phase is excessively lengthy, consider using the "resize factor" to decrease the video's dimensions.
- While there's no strict size limit for videos, larger videos will require more processing time. It's advisable to employ the "resize factor" to minimize the video size and then upscale the video once processing is complete.
📖 Troubleshooting
- Mac users: dlib will not install correctly. in requirements.txt, replace "dlib-bin" with "dlib"
📝 To do
- Tutorials
- Convert avi to mp4. Avi is not show in video input but process work fine
- Add Possibility to use a video for audio input
- Standalone version
- ComfyUI intergration
😎 Contributing
We welcome contributions to this project. When submitting pull requests, please provide a detailed description of the changes. see CONTRIBUTING for more information.
🙏 Appreciation
☕ Support Wav2lip Studio
this project is open-source effort that is free to use and modify. I rely on the support of users to keep this project going and help improve it. If you'd like to support me, you can make a donation on my Patreon page. Any contribution, large or small, is greatly appreciated!
Your support helps me cover the costs of development and maintenance, and allows me to allocate more time and resources to enhancing this project. Thank you for your support!
📝 Citation
If you use this project in your own work, in articles, tutorials, or presentations, we encourage you to cite this project to acknowledge the efforts put into it.
To cite this project, please use the following BibTeX format:
@misc{wav2lip_uhq,
  author = {numz},
  title = {Wav2Lip UHQ},
  year = {2023},
  howpublished = {GitHub repository},
  publisher = {numz},
  url = {https://github.com/numz/sd-wav2lip-uhq}
}
📜 License
- The code in this repository is released under the MIT license as found in the LICENSE file.
