Sample Godot Rust App Save
Sample CI powered multi-platform Rust/GDNative based boilerplate project
:warning: Important !
This boilerplate project is currently based on
godot-rust 0.8.x, it will be upgrading togodot-rust 0.9.x, introducing several API changes. As a result, a bunch of tests and refactoring needs to be done. Here are the newly planned changes :
- :collision: BREAKING CHANGE : Move to a single crate project model outside Godot project, which is recommended by
godot-rustmaintainers- Update the guide to
godot-rust 0.9.x, provide a book because the README is getting big now- Replace any deprecated
godot-rust 0.8.xmethod or macro- Remove
speculatecrate since it is not maintained anymore- Re-launch tests, make sure
godot-ruststill compiles for the supported targets
Sample Godot Rust App
![]()
Sample CI powered multi-platform Rust/GDNative based boilerplate project The main purpose of this repo is to help understanding how Rust and Godot Engine work and provide a well documented project boilerplate able to display some scenes and handle signals, using properly tested Rust based logic and automatic builds via Github Actions for multiple platforms.
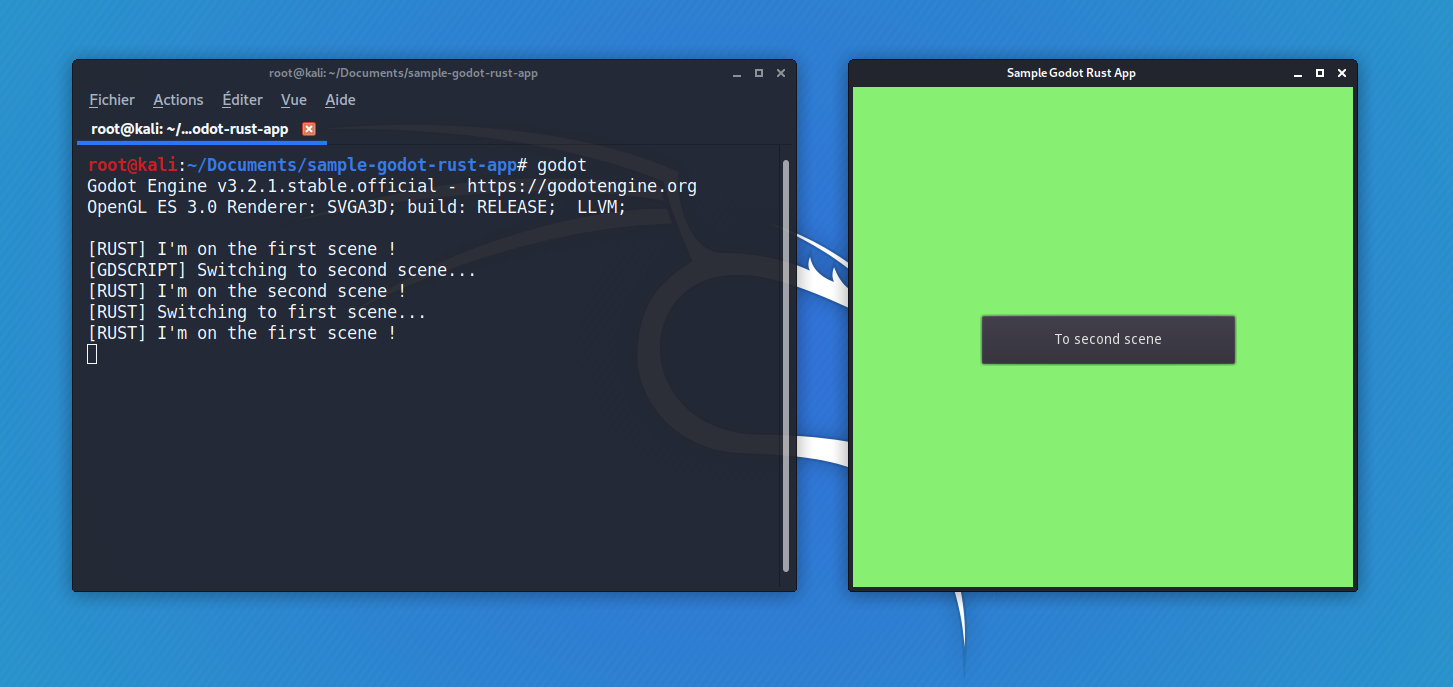
Table of contents
Features
- Sample project with two Godot scenes
- Use of Cargo workspaces for flexibility
- Worry-free multi-platform builds and exports via Github Actions
Currently supported : Linux ✅ Windows ✅ MacOS ✅ Android ✅
Stack
| Tool | Purpose | |
|---|---|---|
| Rust 1.41.1 | The actual language we will use for game logic | |
gdnative crate |
For Rust bindings to Godot Engine | |
speculate.rs crate |
For Rust based BDD tests | |
| Godot Engine 3.2 | The actual game engine | |
| Github Actions | For CI/CD |
Tutorial
This tutorial is intended to re-create this boilerplate project from scratch and understand how things are connected while trying to make things clear for any newcomer in Godot / Rust without going too much into details.
Setup
We will need to install the proper tools first so we can start setting up our workspace.
Godot
After installing Godot, we can start creating a new project by using any empty directory, this will be the root of the project, we usually end up with the following file structure, including a project.godot file which is the main Godot project file.
.
├─── .import
├   default_env.tres
├   icon.png
├   icon.png.import
└   project.godot
Now let's setup a Cargo workspace.
Rust
The idea is to compile Rust scripts into libraries with proper C++ bindings for Godot Engine. To make things easier, we will use rustup so the whole Rust toolchain can be installed in a few steps, including Cargo which is the Rust package (crate) manager.
# Check Rust toolchain installer version
rustup -V
# Check Rust version
rustc --version
# Check Cargo version
cargo -V
In order to build gdnative and other libraries effectively using whatever Rust toolchain, we need to install CLang which is released as part of LLVM.
# Check if LLVM is installed and registerd in PATH
llvm-config --version
# Check if CLang is installed and registered in PATH
clang -v
If working on Windows, there is an additional step depending of the installed Rust toolchain. When using stable-x86_64-pc-windows-msvc, Visual Studio Build Tools is required. Otherwise, if using x86_64-pc-windows-gnu, a full GNU-compatible environment is required, this can be provided by MinGW (more details can be found on Working with Rust on Windows).
Now we can start setting up the workspace. One convenient way to split Rust codebase into libraries with each their own purposes would be using Cargo workspaces. The motivation here is to isolate Rust scripts and make them significantly smaller, more readable while still being easily testable.
We only have to put at the root of the project a primary Cargo.toml file and a project.godot file so both Cargo and Godot can work properly. Then, any Godot related resource or asset can be placed in whatever adequate folder as long as every path in the project.godot file is correctly set.
The final file structure should look like this :
.
├─── .import
├─── assets
│   ├   icon.png
│   └   icon.png.import
├─── scenes
│   ├   my_scene.gdlib
│   └   my_scene.tscn
├─── src
├   Cargo.toml
└   project.godot
The primary Cargo.toml file should be set up as it follows. It simply tells Cargo to compile any library in /src folder, no need to declare each of them.
[workspace]
members = ["src/*"]
Creating libraries
To create any new Rust library, we first need to tell Cargo to prepare a new library :
cargo new src/my_lib --lib
A new folder /src/my_lib will appear, with a sample lib.rs file and a Cargo.toml file.
src
└   my_lib
   ├   src
   │   └   lib.rs
   └   Cargo.toml
There are now two choices :
- This library is intended to be used as a GDNative script by Godot
- This library is intended to be used as a crate by Rust
For example, it is possible to have a Button node with an attached custom GDNative script which is also internally using a custom Rust crate for math stuff.
When the whole workspace is set up. We can tell Cargo to build our libraries using this command :
cargo build --release # Build workspace libraries
The build result should appear in /target/release. We may find our Rust libraries with and .rlib extension and our dynamic GDNative libraries with .dll (Windows), .so (Linux) or .dylib (Mac) extension, depending of the toolchain we use.
For example, when building for Windows using a compatible toolchain like x86_64-pc-windows-gnu, we are expecting to find .dll files as output.
Rust to GDNative
If creating a GDNative script, like core in this boilerplate codebase, the lib.rs should look like the example one in godot-rust.
It is recommended to have only one Rust/GDNative library in a project, to avoid a lot of duplicated code from std or somewhere else. Fortunately, it is possible to register multiple NativeClass at once using add_class method in the init function. In the example below, we are providing some classes like MyClassA and MyClassB to Godot.
fn init(handle: gdnative::init::InitHandle) {
    handle.add_class::<MyClassA>();
    handle.add_class::<MyClassB>();
    ...
}

godot_gdnative_init!();
godot_nativescript_init!(init);
godot_gdnative_terminate!();
The second step is telling Cargo to compile the library into a GDNative script, open the src/my_lib/Cargo.toml file and then set the lib.crate-type value as it follows.
# When using "cargo build", two crates will be created...
[lib]
crate-type = [
  "cdylib", # A GDNative library with C++ bindings for Godot
  "lib" # A regular Rust library for integration tests
]
Rust to Rust
In case we only want some utility Rust crate, like fullscreen_colored_panel in this boilerplate codebase, the only requirement is to tell Cargo to build a regular Rust library only.
[lib]
crate-type = [
  "lib"
]
Now, assuming this library is called my_crate, we can import it in any Cargo workspace member by using use.
use my_crate::*;
Binding libraries to scenes
To bind a GDNative library to a Godot node, we first need to reference library paths in a .gdnlib library file so Godot can guess which file to use depending of the host OS.
Remember the .dll , .so or .dylib files we generated in previous steps ? This is where we have to tell Godot how to reach them and which one to use for specific platforms.
[entry]

X11.64="res://target/release/my_lib.so"
OSX.64="res://target/release/my_lib.dylib"
Windows.64="res://target/release/my_lib.dll"

[dependencies]

X11.64=[  ]
OSX.64=[  ]

[general]

singleton=false
load_once=true
symbol_prefix="godot_"
reloadable=true
In a Godot scene file, load the .gdnlib library file as an external resource (ext_resource) with an unique identifier.
[ext_resource path="res://path/to/my_lib.gdnlib" type="GDNativeLibrary" id=1]
Then, create a sub-resource with an unique identifier, link the newly created external resource with its id and pick a specific NativeClass among the ones we previously registered in the "Rust to GDNative" part, like MyClassA.
[sub_resource type="NativeScript" id=1]
resource_name = "MyClassA"
class_name = "MyClassA"
library = ExtResource( 1 )
Finally, attach the sub-resource to a specific existing node in the scene, using its id :
[node name="RootNode" type="Node"]
script = SubResource( 1 )
Once everything is binded, we can press F5 on keyboard or ![]() "Play" button at the top-right of Godot Engine UI to run the app preview.
"Play" button at the top-right of Godot Engine UI to run the app preview.
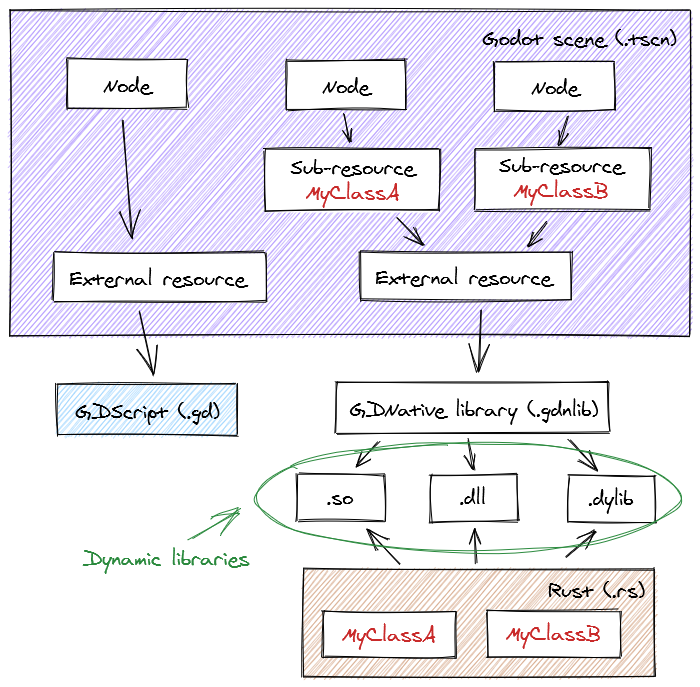
Here is a typical Godot scene diagram, this can be a decent summary about how things are connected.
Testing
Theoretically, since this project is a Cargo workspace, any testing methodology is fine. To run tests for the whole workspace, use the following command :
cargo test --release
For demo purposes, this boilerplate project is arbitrarily using speculate-rs crate in the core library, and a basic #[cfg(test)] Rust attribute in the fullscreen_colored_panel library. When running tests from the root of the project, Cargo is smart enough to run library-specific tests no matter how they are implemented.
speculate-rs is a crate for testing purposes with a Jest-like syntax that should be familiar for those coming from a JavaScript environment. Here is an example :
use speculate::speculate;
use my_crate::my_function;

speculate! {
    describe "sample test" {
        it "can use my_function and return true" {
            assert_eq!(my_function(), true);
        }
    }
}
Exporting
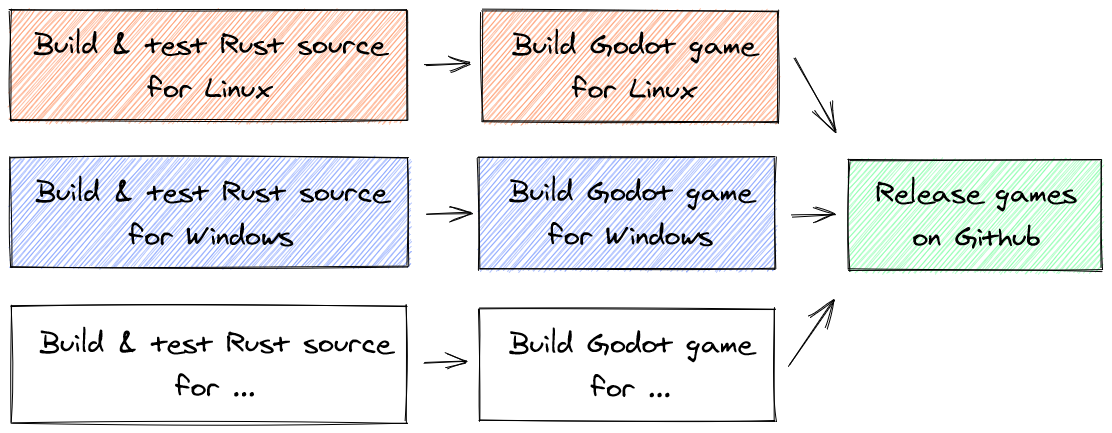
Under the hood, this boilerplate is using Github Actions and a headless Godot Engine instance to test, build and export for multiple platforms, allowing users to focus on game development while abstracting a lot of tedious tasks, using a export_presets.cfg file at the root of the project.
Here is the current workflow :
Here is the list of all known supported and tested targets :
| OS | Build | Export | Signed | |
|---|---|---|---|---|
| Windows | ✅ x86_64-pc-windows-msvc✅ x86_64-pc-windows-gnu |
✅ | ❓💰[1] | |
| Linux | ✅ x86_64-unknown-linux-gnu |
✅ | ❓ | |
| Mac OS | ✅ x86_64-apple-darwin |
✅ | ❓💰[2] | |
| Android | ✅ aarch64-linux-android ✅ x86_64-linux-android ✅ armv7-linux-androideabi[3]✅ i686-linux-android [3] |
✅ | ✅ | |
| iOS | ✅ aarch64-apple-ios✅ x86_64-apple-ios❌ armv7-apple-ios[4]❌ armv7s-apple-ios[4]❌ i386-apple-ios[4] |
✅ | ❓💰[2] |
✅ Supported 💰 Paid ❓ Untested ❌ Not supported
[1] → Requires Windows Authenticode code signing certificate (annual fees).
[2] → Requires Apple Developer Program subscription (annual fees).
[3] → Google will drop support for 32-bit programs in August 2021, Rust might stop support for any related toolchain by then.
[4] → Starting from macOS 10.15 and iOS 11, Apple dropped support for 32-bit programs. Any related Rust toolchain is now unsupported.
The export_presets.cfg file keeps track of the specific export presets for each platform. For some targets, this file may also contain sensitive data that must be properly handled if committed into VCS. Android is one of them.
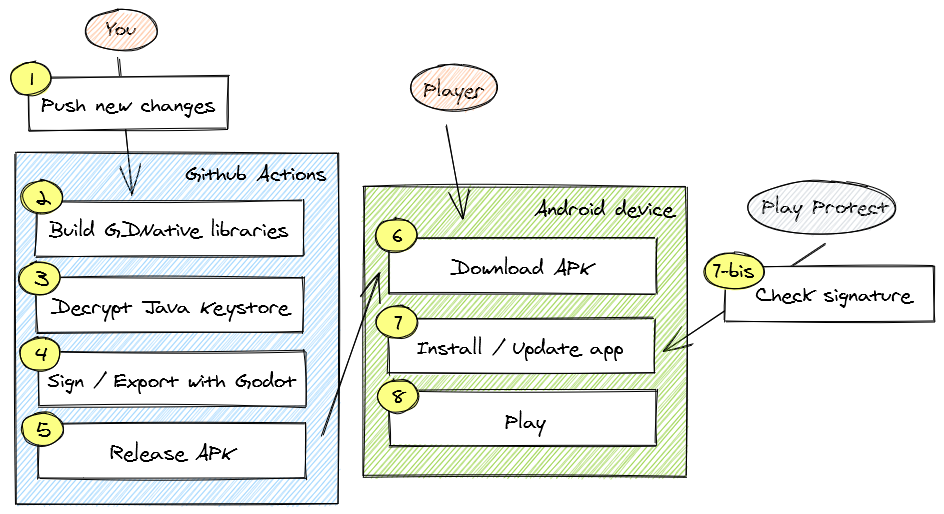
Exporting for Android
While the CI workflow is abstracting the Rust source compilation and the Godot Android export processes so we don't have to worry too much about how to properly setup Cargo and Android Studio, there are still some additional steps to do because of the way Android/Java is designed, like :
- Explicitly setting the Java package name (
package/unique_name) - Explicitly setting the screen orientation (
screen/orientation) - Explicitly telling which permissions we need (
permissions/*) - Properly signing the app (unless released in debug mode for debugging purposes)
- Explicitly telling which architectures to support (
architectures/*) - etc.
Permissions and most of the mentioned fields are found in export_presets.cfg file, under Android related presets, there should be boolean permissions/* fields we can edit at our convenience.
The hardest part is signing the app when releasing it in release mode. If not properly handled, Play Protect might consider the APK as unsecured or worse, Godot Engine will fail to export our game. Usually, when exporting for Android, Godot Engine is requiring us to set up JAR Signing and Verification Tool (jarsigner) executable path, Android Debug Bridge (adb) executable path and a Java keystore path.

What we need to do on our side is :
-
Install Android SDK, it usually comes up with
adb, a debug Java keystore (debug.keystore), and a JRE which comes up withjarsignerand a Java Keytool (keytool) -
Register
adbandjarsignerpaths in Editor > Editor Settings in the GUI, this also can be done while editing theeditor-settings-3.tresfile which can be located inAppData\Roaming\Godot(Windows) or in~/.config/godot/(Ubuntu) -
(Mandatory for signed releases) Use
keytoolto create a Java keystore and choose an alias (using-aliasoption), it will ask us some questions, the newly created keystore that will be located in the relative path we set as-keystoreoption value and must be protected by one single password that must be set as-storepassand-keypassoptions values (as related in official docs)
keytool -genkeypair -v -keystore ./my.keystore -alias some-alias -keyalg RSA -keysize 2048 -validity 10000 -storepass my-password -keypass my-password
- (Mandatory for signed releases via CI/CD) Consider adding another security layer to our release keystore. We can choose to use GNU Privacy Guard (
gpg) to encrypt the keystore as a newly createdmy.keystore.gpgfile that will be protected by another passphrase (as a decryption key) we will be asked to set up and confirm.gpgis available in most Linux distributions, or can be found in GnuPG Binary Releases for Windows users
# -c, --symmetric
#   Encrypt with symmetric cipher only. This command asks for a passphrase.
gpg -c ./my.keystore
- Finally, register the release (or debug) keystore and the alias in
export_presets.cfgunder the properkeystore/*fields
keystore/debug=""
keystore/debug_user=""
keystore/debug_password=""
keystore/release="my.keystore"
keystore/release_user="some-alias"
keystore/release_password="<SECRET-PASSWORD>"
As mentioned before, it is highly recommended to not commit any keystore password into VCS. We can just leave it as <SECRET-PASSWORD> and then set up a Github secret ($KEYSTORE_PASS) for the keystore password so it can be passed to export_presets.cfg using simple sed commands during the CI workflow.
For our interest, when we want to decrypt my.keystore.gpg, we would be using the following gpg command without forgetting to set up --output option value.
gpg --quiet --batch --yes --passphrase="$DECRYPTION_KEY" --output my.keystore my.keystore.gpg
This step is done during the CI workflow, so we just need to set up a second Github secret ($DECRYPTION_KEY) to pass the decryption key passphrase.
Troubleshooting
Everything has been properly set up, but some error
error: linking with "link.exe" failed: exit code: 1104is encountered while re-building libraries.
This commonly happens when editing and then re-building Rust libraries while the Godot Engine preview is still running. Stop the preview and then Cargo commands should be working fine again.
Cargo is correctly building
bindgenandclang-sysetc. while LLVM is not in PATH. Is LLVM really needed ?
clang-sys is hardcoding LLVM paths for Linux, MacOS and Windows, in case LLVM is not registered on PATH.
Does any project contributor need to install Android SDK, especially if the whole CI/CD setup is ready for Android exports ?
The only purpose of the CI workflow is to abstract the Rust source compilation and Android export processes. For quick debugging, we would still need to use adb and Android Virtual Device (AVD). Eventually, we can use GDNative library artifacts from Github Actions to skip the Cargo setup step.
Roadmap
Setting up the project
- Init repo
- Setup Rust
- Add documentation for Rust related setup steps
- Make a sample Rust library
- Setup BDD tests, using
speculate-rs - Setup Github Actions for CI/CD
- Setup Godot Engine
- Add documentation for Godot Engine related setup steps
Rust/GDNative showcase
- Create/Interact with Godot nodes from Rust
- Handle signals between Rust and GDScript
- Switch Godot scenes via Rust/GDScript
- Interact with assets like images via Rust/GDScript
- Make HTTP requests via Rust
- ... etc.
Build
- Release a
 Windows executable
 - Release a
 Linux executable
 - Release a
 MacOS executable
 - Release an
 Android application
 - Release an
 iOS application (if possible)
Automatic releases
- Release a Windows executable via Github Actions
- Release a Linux executable via Github Actions
- Release a MacOS executable via Github Actions
- Release an Android application via Github Actions
- Release an iOS application via Github Actions (if possible)
