RPi Image Save
Raspberry Pi 4 Buster 64-bit OS with deep learning examples
Raspberry Pi 4 Buster DNN image

A Raspberry Pi 4 Buster 64-OS image with deep-learning examples
![]()
June 12, 2023
- Release of the Bullseye version.
Update 7-26-2022.
- New download site (Gdrive has a limited number of downloads per day).
February 19, 2022
- Use PiShrink to support of different SD sizes. Reduced the file from 4.83 to 2.68 GByte
January 24, 2022
- Updated and upgraded to the latest Debian 10 Buster release.
Regularly, we get the question if we have an image of our Raspberry Pi with some frameworks and our deep-learning examples. We are happy to comply with this request.
Installation.
- Get a 16 GB SD card which will hold the image.
- Download the image RPi_64OS_DNN.xz (2.68 GByte!) from Sync.
- Flash the image on the SD card with the Imager or balenaEtcher.
- Insert the SD card into your Raspberry Pi 4.
- Wait a few minutes, while the image will expand to the full size of your SD card.
- No WiFi installed. Password: 3.14
- RPi_64OS_DNN.xz md5sum: c4c7b4e6571f690d4f6c156ca5df9444
Tips.
- You can overclock the Raspberry Pi if your SD-card is not too worn out. 1800 MHz is no problem. Most deep learning examples even work at 1950 MHz.
- If you are in need of extra space, you can delete the opencv and the opencv_contrib folder from the SD card. They are no longer needed since all libraries are placed in the /usr/local directory.
Contents.
Clicking on the links below will direct you to our GitHub repo.
- OpenCV
- Classification
- SSD
- Segmentation
- Segmentation Yolact
- Pose
- Face detection
- Face mask detection Paddle
- Face mask detection TensorFlow
- Face recognition
Pre-installed frameworks.
Clicking on the links below will direct you to our installation guide.
- OpenCV 4.5.1
- ncnn 20210124
- MNN 1.1.0
- Paddle-Lite 2.7
- TensorFlow-Lite 2.4.1
- TensorFlow 2.4.1
- TensorFlow Addons 0.13.0-dev
- Pytorch 1.8.0
- TorchVision 0.9.0

WiFi.
Since everyone has a unique password for their WiFi connection, we have not activated the WiFi.
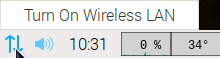
To enable the wireless LAN to follow the next steps:
- Left-click on the Ethernet symbol.
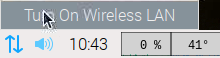
- Click "Turn on wireless LAN", and wait a few seconds. Your RPi will scan for available networks.
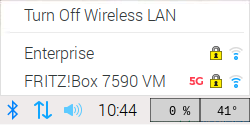
- Left-click again on the Ethernet symbol and choose your network.
- Give your key, and wait a couple of seconds to let the RPi establish the connection.
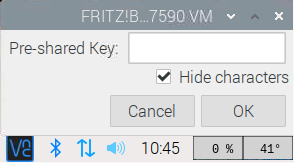
- Success!

OpenCV + TensorFlow.
Importing both TensorFlow and OpenCV in Python can throw the error: cannot allocate memory in static TLS block.
This behaviour only occurs on an aarch64 system and is caused by the OpenMP memory requirements not being met.
For more information, see GitHub ticket #14884.

There are a few solutions. The easiest is to import OpenCV at the beginning, as shown above.
The other is disabling OpenMP by setting the -DBUILD_OPENMP and -DWITH_OPENMP flags OFF.
Where possible, OpenCV will now use the default pthread or the TBB engine for parallelization.
We don't recommend it. Not all OpenCV algorithms automatically switch to pthread.
Our advice is to import OpenCV into Python first before anything else.

