Rootbot Save
Teams AI Bot integrated with several LLMs services (ChatGPT, GPT-3, DALL-E) from Azure OpenAI & OpenAI. Support Teams Message Extensions, Teams Task Modules and Adaptive Cards.
![]()
Index 
This repository contains sample code to integrate AI services into Microsoft Teams as a bot. Since chat is very common in Teams, this interface is very natural, and allows Microsoft 365 security, compliance and governance policies to be leveraged as a gateway for all conversations (just like a human chatting with a human).
This is sample code -- it is not a product or a supported release. Our intention is to give a starting point so that people can quickly connect AI services running via Azure or OpenAI, to Microsoft Teams. Microsoft has announced a product line (Co-pilot and Business Chat) that takes this concept much further and is integrated with the Microsoft Graph for better fact checking and prompt enhancement with context.
But right now, you can use this sample code to experiment, learn and plan for the future, and it provides an interface to the ChatGPT expertienc but allowing monitoring and governance.
-
Want to get started with the simplest most common use case? Use the Express Deployment Release. (friendly to IT Admins)
-
Want to understand how this bot works?
-
Want to build/customize Teams AI Bot with Teams Toolkit? (friendly to Developers beginning on the bot app journey)
-
Want to experiment with more advanced features with Bot Framework Composer? (Good start to understand more integration possiblities with Teams Features as Bot app)
Express Deployment of pre-built ChatGPT Teams Bot.

-
Preparation is minimal - you need an Azure subscription, access to the Azure OpenAI API, and an endpoint for gpt-35-turbo (version 0301) model.
-
The script will help users setup all other Azure resources using a single command.
-
It will create a downloadable Teams App you can side-install.
-
No build environment is needed.
-
You can choose to use the Online Azure Shell, a local Azure CLI shell, or For Online Azure Shell, choose PowerShell option.
-
For local environment, Windows, PowerShell and latest AZ CLI 2.46.0 are required.
-
Deployment will take around 7~10 minutes.
-
After completion, open the created bot service in resource group, and can open it in Teams Channel directly
NOTE:
AZ CLI 2.4.6.0 has a bug that it reports [No section: 'bicep] when run bicep without configurations at first time:
https://github.com/Azure/azure-cli/issues/25710
The script has handled this error inside using a retry method. In case you keep hitting this, please close the running PS window, and start second time with the same parameters, then it will work.
Required Parameters of deploy.ps1
baseName
You give a name like "MyAIBot". A resource group name will be created with {baseName}RG and all other services used will be inthat resource group. The bot app registration in Azure AD will be {baseName}.
apiBase
The Azure OpenAI Service Endpoint. This is a URL that is generated when you setup OpenAI API in Azure.
apiKey
The Aure OpenAI Service Access Key. This also gets generated when you setup the API.
chatGPTDeployName
The gpt-35-turbo (version 0301) deployment name in your Azure OpenAI Service (whatever you called it).
In this sample, it is 'chatgpt'

Other optional parameters
Run "get-help ./deploy.ps1", and refer to below sample commands.
Option One: Online Azure Shell
Deploy all resourses into the Azure Shell Subscription
- Open Azure Shell
- Choose PowerShell from the pull down menu.

- Run below command. Please be careful to keep a blankspace before the ` character in the Powershell command.
#Clone Branch to Azure Shell Cloud Drive
Get-CloudDrive | Select-Object -ExpandProperty MountPoint | set-location
git clone -b chatgptonly https://github.com/freistli/rootbot.git
set-location ./rootbot/Deployment

#Deployment
.\deployInAzureShell.ps1 -baseName <resource base name> `
-apiBase <Azure OpenAI Service Endpoint> `
-apiKey <Azure OpenAI Key> `
-chatGPTDeployName <gpt-35-turbo Model Deployment name> `
-zipUrl "https://github.com/freistli/rootbot/releases/download/Release/code_20230323-144829.zip"
Let it run for a while. If you get an error message about bicep you should run it a second time. It takes about 10 minutes to deploy all the services.
- Click Manage File Share. Download the TeamsAIBot.zip to your local machine, and then you can side-load it to Teams.


Option Two: Local PowerShell & AZ CLI on Windows.
Choose one of below commands, which will auto generate TeamsAIBot.App, open it in Explorer.exe for Teams App side load.
Deploy All Resources to single Azure Subscription, let you pick up which subscription needs to be used
#Clone Branch to local folder
git clone -b chatgptonly https://github.com/freistli/rootbot.git
cd .\rootbot\deployment

#Deployment
.\deploy.ps1 -baseName <resource base name> `
-apiBase <Azure OpenAI Service Endpoint> `
-apiKey <Azure OpenAI Key> `
-chatGPTDeployName <gpt-35-turbo Model Deployment name> `
-sameSubscription $true `
-zipUrl "https://github.com/freistli/rootbot/releases/download/Release/code_20230323-144829.zip"
Deploy All Resources to single Azure Subscription, choose subscription id directly (if your Azure AD is different)
#Clone Branch to local folder
git clone -b chatgptonly https://github.com/freistli/rootbot.git
cd .\rootbot\deployment

#Deployment
.\deploy.ps1 -baseName <resource base name> `
-apiBase <Azure OpenAI Service Endpoint> `
-apiKey <Azure OpenAI Key> `
-chatGPTDeployName <gpt-35-turbo Model Deployment name> `
-aadSubscription <Bot App Registration Azure Subscription id> `
-sameSubscription $true `
-zipUrl "https://github.com/freistli/rootbot/releases/download/Release/code_20230323-144829.zip"
Option Three: More Complex Deployments
Deploy All Resources to single Azure Subscription, choose subscription id directly, use Azure Cache for Redis to host conversation flows for ChatGPT
#Clone Branch to local folder
git clone -b chatgptonly https://github.com/freistli/rootbot.git
cd .\rootbot\deployment

#Deployment
.\deploy.ps1 -baseName <resource base name> `
-apiBase <Azure OpenAI Service Endpoint> `
-apiKey <Azure OpenAI Key> `
-chatGPTDeployName <gpt-35-turbo Model Deployment name> `
-aadSubscription <Bot App Registration Azure Subscription id> `
-sameSubscription $true `
-zipUrl "https://github.com/freistli/rootbot/releases/download/Release/code_20230323-144829.zip"
-useCache "AzureRedis" `
-azureCacheForRedisHostName "<your redis cache host>.redis.cache.windows.net" `
-azureCacheForRedisAccessKey "<your redis cache access key>"
Deploy Bot App Registration and Azure Resources to different Azure Subscriptions
#Clone Branch to local folder
git clone -b chatgptonly https://github.com/freistli/rootbot.git
cd .\rootbot\deployment

#Deployment
.\deploy.ps1 -baseName <resource base name> `
-apiBase <Azure OpenAI Service Url> `
-apiKey <Azure OpenAI Key> `
-chatGPTDeployName <gpt-35-turbo Model Deployment name> `
-sameSubscription $false `
-zipUrl "https://github.com/freistli/rootbot/releases/download/Release/code_20230323-144829.zip"
Welcome to the AI Teams bot lab
This bot project was created using the Bot Framework Composer using the Empty Bot template. It therefore contains a minimal set of files necessary to have a working bot. We have then added certain triggers, dialogs and skills to integrate with LLM (Large Language Model) services, usually via the Azure OpenAI API.
Added certain triggers, dialogs and skills to make the bot integrated with several LLMs services (ChatGPT can be from Azure OpenAI or OpenAI, GPT-3 from Azure OpenAI, DALL-E from OpenAI), working on Microsoft Teams Platform. You can configure the triggers in the project to use one or more LLMs services based on your needs.


ChatGPT responses in Teams Conversation


Interactive in Teams Message Extension


"Act As" ChatGPT with preset prompts in Adaptive Cards [experimental feature]


DALLE in in Teams Message Extension


Credits
ChatGPT API Pckages by Travis Fischer. Base on it, I implemented Azure OpenAI ChatGPT API Package
awesome-chatgpt-prompts by Fatih Kadir Akın.
chatgpt-prompts package by Pacholo Amit. Based on it, I implemented Azure OpenAI ChatGPT Prompts
Build More Features In Dev environment
Prerequests
-
Azure Subscription (able to create App Registration in AAD, Azure Bot, Azure function app, and Azure Web App resources)
-
OpenAI account if want to use ChatGPT and DALLE
-
Azure OpenAI account if want to use GPT-3
-
Teams Environment (Microsoft 365 Business Basic license & Microsoft Teams) if want to use in Teams Channel and Teams Message Extension)
Steps
-
Clone the root bot from the main branch
git clone https://github.com/freistli/rootbot.git -
After cloning the project, rename .\Empty\settings\appsettings.template.json as .\Empty\settings\appsettings.json
-
Open the folder in Bot Framework Composer
Note: If BFC is not installed, please go through Environment Preparation of this article https://techcommunity.microsoft.com/t5/modern-work-app-consult-blog/create-a-weather-forecast-bot-with-azure-luis-and-maps-services/ba-p/3261135 on how to use Bot Framework Composer.
Building this project requires expereinces on building and publishing Bot App to Teams Platform in Bot Framework Composer. If not quite certain, can refer to below articles to get quick ideas on important concepts and steps before bullding this project:
-
Open Bot Framework Composer, open the project folder in it to load the bot project.
-
Provision root bot in in Bot Framework Composer (setup publish profile). Don't need to choose Azure Luis Resource because the project uses Regex to handle user intents of the bot now. (refer to steps 5 - 12 in this blog for more details)
-
Setup AppID/PWD (refer to steps 18~19 in this blog for more details)

-
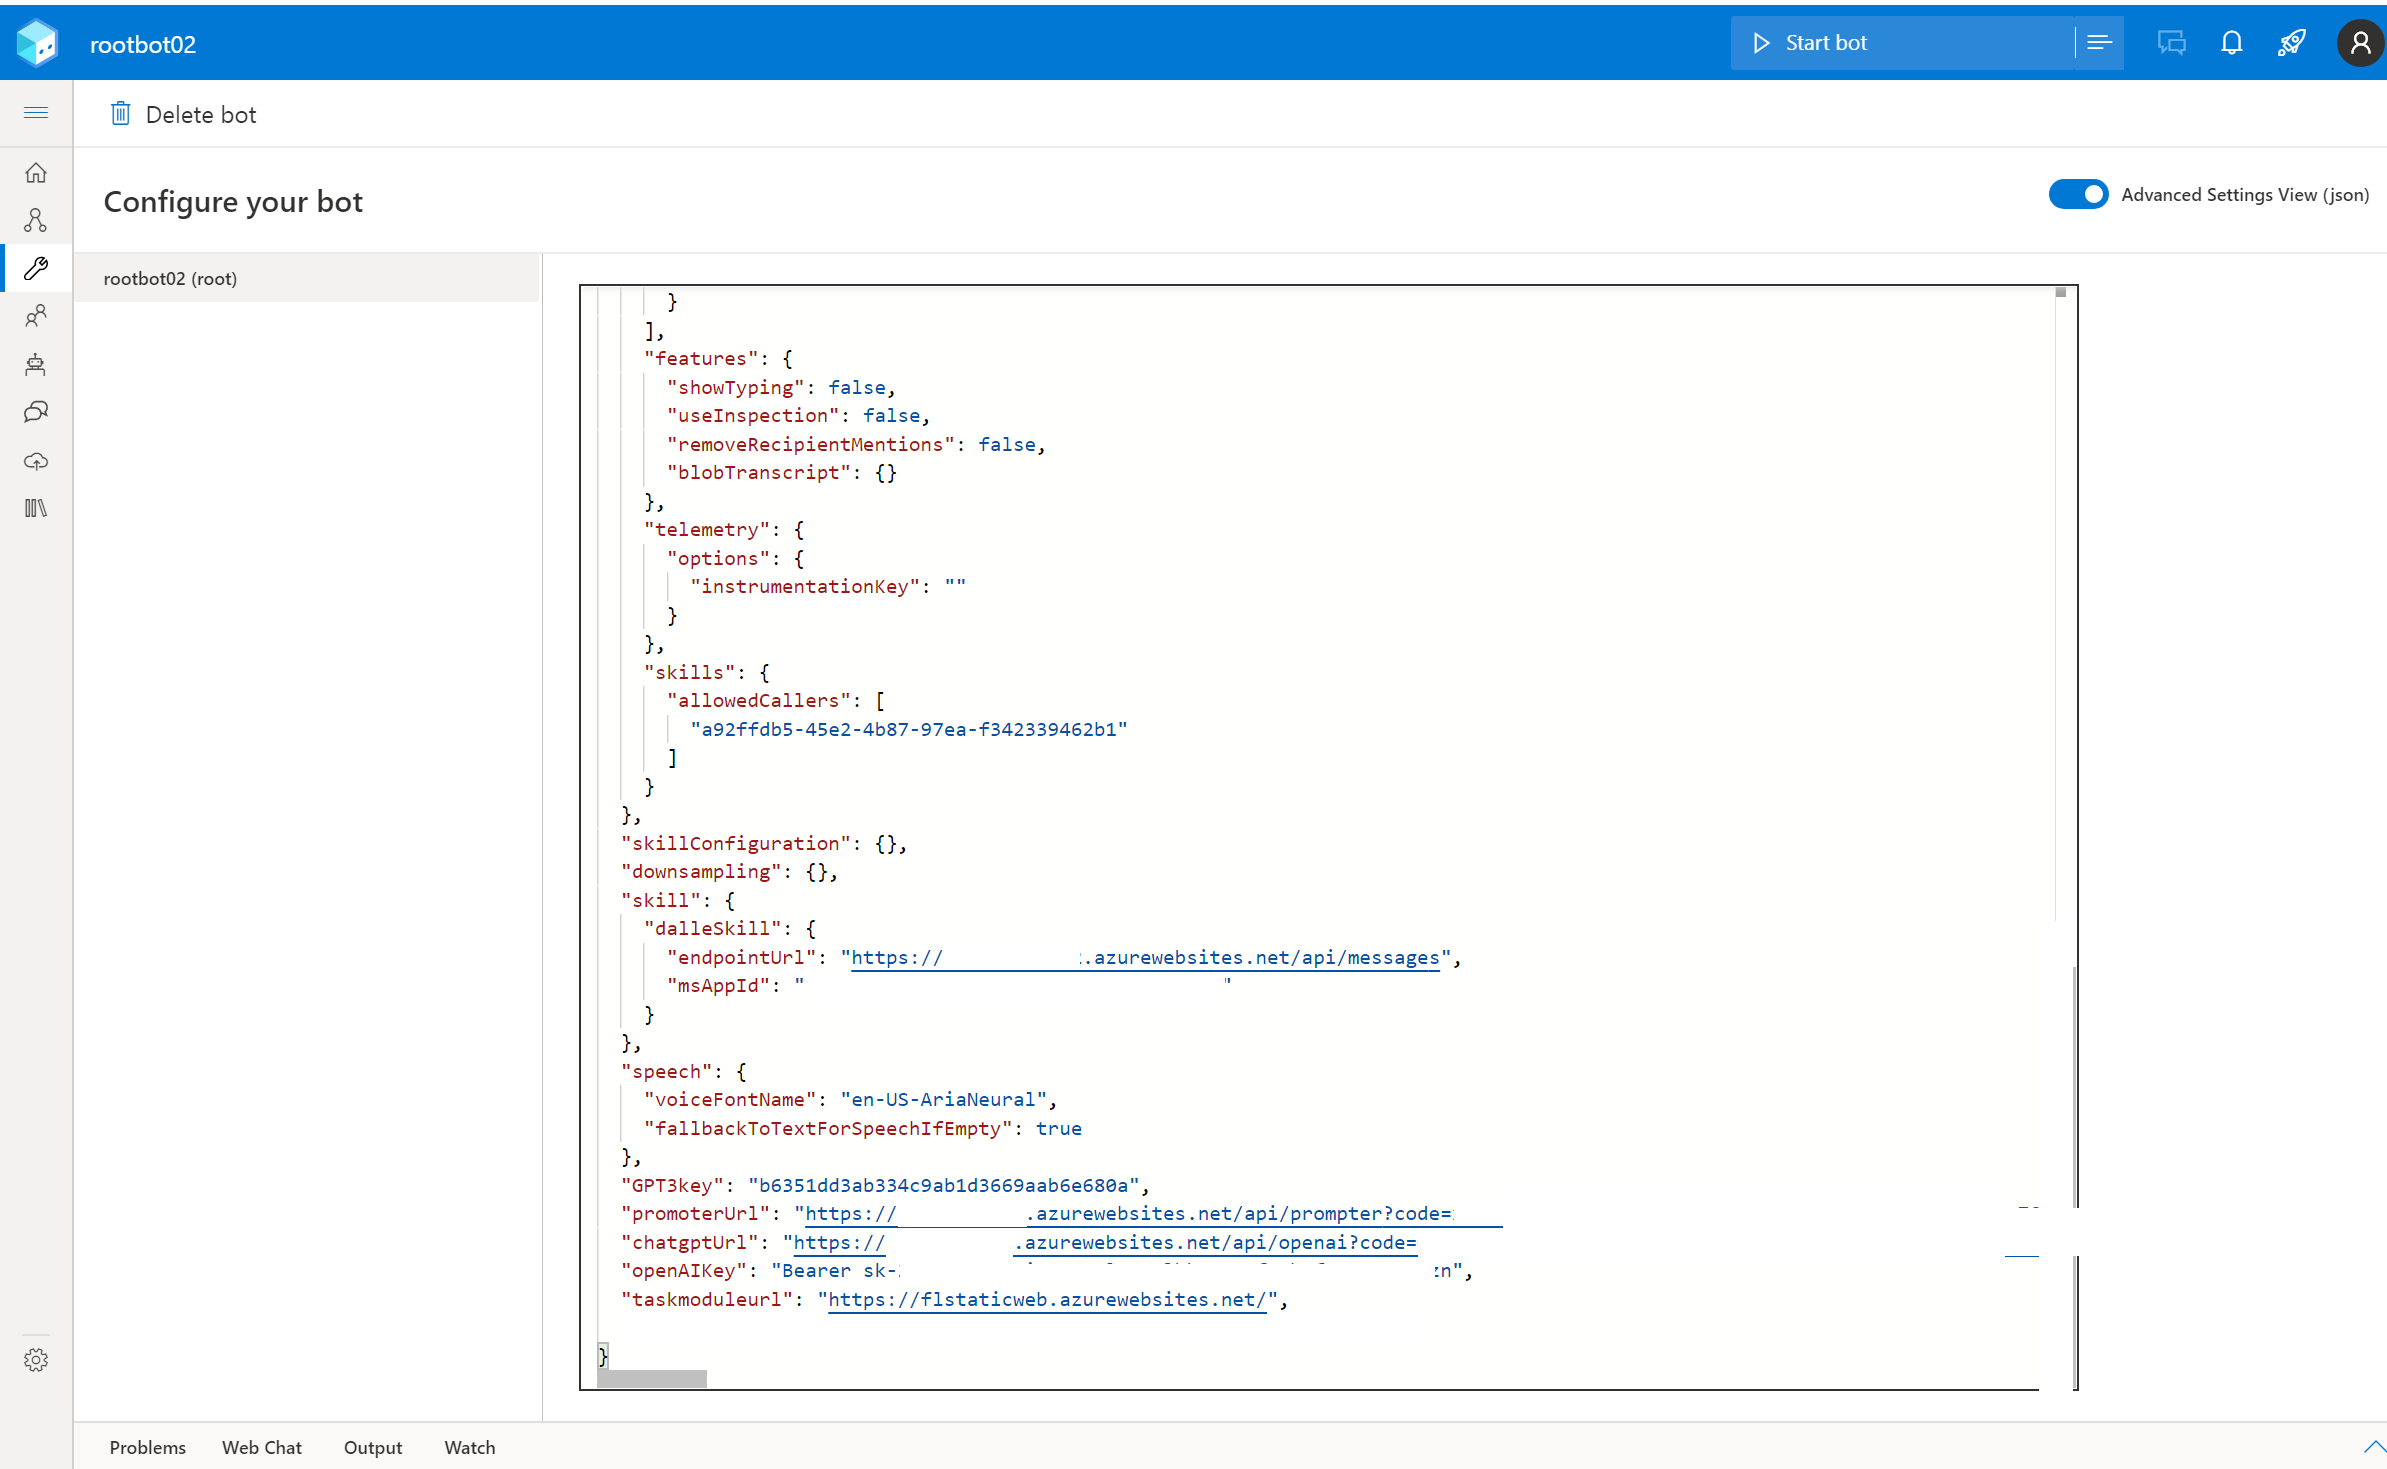
Add necessary configuration keys in root bot configuration json
Note: for test purpose, you don't have to put real values for all of them. Setup what you need.
-
GPT3Key & GPT3Url are for GPT3 feature
-
prompterUrl is for Act As feature
-
chatgptUrl is for ChatGpt feature
-
openAIKey is for DALLE feature
"GPT3key": "Your Azure Open AI key for GPT-3",

"GPT3Url" : "Your Azure Open AI Endpoint Url"

"promoterUrl": "Azure Function Endpoint of Act As Prompoter",

"chatgptUrl": "Azure Function Endpoint of Azure OpenAI or OpenAI ChatGPT Wrapper",

"openAIKey": "Bearer sk-your OpenAI API Key"
Note:
Prompter is optimized for Azure OpenAI specifically. Can use the same azureprompter function URL in promoterUrl and chatgptUrl.
promoterUrl is the function url after publishing azureprompter / prompter Azure Function (Node.JS 18 LTS) from Visual Studio Code:
  Azure OpenAI:
  https://github.com/freistli/chatgpt-api/tree/main/demos/demo-azure-chatgpt-function

  OpenAI:
  https://github.com/freistli/rootbot/tree/main/demo-azurefunction
chatgptUrl is the function url after publishing another azureopenai / openai Azure Function (Node.JS 18 LTS) from Visual Studio Code:
  Connect to offical Azure OpenAI Service (deploy your ChatGPT model on Azure OpenAI as a name 'chatpgt'):

  https://github.com/freistli/chatgpt-api/tree/main/demos/demo-azure-chatgpt-function

  Connect to offical OpenAI service:

  https://github.com/freistli/rootbot/tree/main/demo-azurefunction
If use OpenAI, need to configure your OpenAI_API_Key there after publishing the function apps:
https://github.com/freistli/chatgpt-api/blob/main/demos/demo-azurefunction/Readme.md

If you use Azure OpenAI ChatGPT, need to configure below three variables in Application Settings:
AZURE_OPENAI_API_KEY
AZURE_OPENAI_API_BASE
CHATGPT_DEPLOY_NAME
The BFC JSON configuration UI is similar to:
-
-
Publish root bot. (If didn't use Bot composer before, refer to this blog for more details)
NOTE: After the bot is published, in the bot Azure Web App, please double check if the AAD password (MicrosoftAppPasssword) is added
in the c:\home\site\wwwroot\settings\appsettings.json by Bot Composer.
- Enalbe Teams Channel, create App Package for teams. The Teams App Manifest can refer to \package\manifest.json
Host Bot App in other non-Azure environments
- The enviroment needs to have .net core 3.1 runtime setup by default. And after above steps you will have publictarget folder, run the command in this way:
"C:\BotComposerProject\Empty\Empty\bin\release\publishTarget\Empty.exe" --port 3980 --urls http://0.0.0.0:3980 --MicrosoftAppPassword [the AAD bot app secret key] --luis:endpointKey "" --SkillHostEndpoint http://127.0.0.1:3980/api/skills'
- The environment needs to have a reverse proxy, for example, ngrok:
ngrok http 3980 --host-header=localhost
- Configure Azure Bot Service to use this endpoint:
Note: If you don't use Bot Framework Composer to publish this bot, but want to get the release folder, can use Visual Studio 2022 to open empty.sln and build it as release. If you want it to run in .Net Core 6.0, can modify the project setting from <TargetFramework>netcoreapp3.1</TargetFramework> to <TargetFramework>netcoreapp6.0</TargetFramework>
Next steps
Start building your bot
Composer can help guide you through getting started building your bot. From your bot settings page (the wrench icon on the left navigation rail), click on the rocket-ship icon on the top right for some quick navigation links.
Another great resource if you're just getting started is the guided tutorial in our documentation.
Connect with your users
Your bot comes pre-configured to connect to our Web Chat and DirectLine channels, but there are many more places you can connect your bot to - including Microsoft Teams, Telephony, DirectLine Speech, Slack, Facebook, Outlook and more. Check out all of the places you can connect to on the bot settings page.
Publish your bot to Azure from Composer
Composer can help you provision the Azure resources necessary for your bot, and publish your bot to them. To get started, create a publishing profile from your bot settings page in Composer (the wrench icon on the left navigation rail). Make sure you only provision the optional Azure resources you need!
Extend your bot with packages
From Package Manager in Composer you can find useful packages to help add additional pre-built functionality you can add to your bot - everything from simple dialogs & custom actions for working with specific scenarios to custom adapters for connecting your bot to users on clients like Facebook or Slack.
Extend your bot with code
You can also extend your bot with code - simply open up the folder that was generated for you in the location you chose during the creation process with your favorite IDE (like Visual Studio). You can do things like create custom actions that can be used during dialog flows, create custom middleware to pre-process (or post-process) messages, and more. See our documentation for more information.
