Rails7 Startkit Versions Save
Launch Rails with 1 shell command!
v2.1
7 months agoRails 7. Start Kit Loves Nginx
At this weekend I've added NGINX to my start kit setup.
Time to time it is important to debug and check an application in mode that is close to the real production environment. Using NGINX helps to do it. I have added certificates to provide access via https.
In this PULL REQUEST You can check changes related to the enhancement.
/etc/hosts
To have an access to the project on local machine do not forget config your /etc/hosts file
How it looks
| http | https | certificate |
|---|---|---|
Naming and Conventions note
Time to time people ask me, - "Why do you name configuration files so?". They mean that I underscore and uppercase some configuration files and folders like you can see it here:
I do it to highlight some important configuration files, folders and other stuff for demonstration and education purposes.
If you do not like naming like that or my way to place configuration files - you always can change it following your personal preferences.
One-liner for launching Ruby on Rails
❤️ Linux / MacOS
git clone https://github.com/the-teacher/rails7-startkit.git && \
  cd rails7-startkit && \
  ruby bin/setup
💙 Windows
git clone https://github.com/the-teacher/rails7-startkit.git & cd rails7-startkit & ruby bin/setup
Prerequisites
On your host you have to have:
- Any version of Ruby
- Any version of Git
- Any version of Docker
Like, Share, Tell to your Colleagues
👉 The project needs for your help to make it helpful for as much people is it possible.
Please Like 👍 , Share 💁 and Tell 📣 to your Colleagues!
❤️ Happy coding with Rails 7. Start Kit
v2.0
8 months agoRails 7. Start Kit. Windows, Linux, MacOS
Launching Ruby on Rails, Simplified
Staring a new Ruby on Rails application never been so easy!
I'm happy to introduce 2nd release of Rails 7. Start Kit project.
This is the game changing project that will improve development, learning and teaching processes in the Rails ecosystem.
Our team have tested and debugged project for the all major platforms - Windows, Linux and MacOS.
Since now anyone can launch a recent version of Ruby on Rails in minutes and start development instantly.
One-liner for launching Ruby on Rails
❤️ Linux / MacOS
git clone https://github.com/the-teacher/rails7-startkit.git && \
  cd rails7-startkit && \
  ruby bin/setup
💙 Windows
git clone https://github.com/the-teacher/rails7-startkit.git & cd rails7-startkit & ruby bin/setup
Prerequisites
On your host you have to have:
- Any version of Ruby
- Any version of Git
- Any version of Docker
Like, Share, Tell to your Colleagues
👉 The project needs for your help to make it helpful for as much people is it possible.
Please Like 👍 , Share 💁 and Tell 📣 to your Colleagues!
❤️ Happy coding with Rails 7. Start Kit
Special thanks to People who helped to test the the project for different platforms:
- @Kronen10
- @denislituev
- @sk8higher
- @unurgunite
v1.9
1 year agoRails 7. Start Kit. Assets and Asset Pipelines
Install and Run Ruby on Rails now!
Copy & Paste in your terminal
git clone https://github.com/the-teacher/rails7-startkit.git && \
  cd rails7-startkit && \
  bin/setup
I want to use Bootstrap. What next?
I just want to install Bootstrap. What should I do?
Option 1
Oldish "rails way" with installing a gem like "bootstrap-rails". Right? Maybe it still even works. Who knows.
Bootstrap is a front-end solution. I'm sure It has to be managed with a typical front-end approach. I mean node, npm or yarn.
Wrapping a front-end solution with a ruby code in 2023 is a very weird approach. Not my way!
Option 2
I heard something about ImportMap. Ok. Maybe it may help somehow. For sure, partially, because it is about JS code only. I should investigate what I can do with that.
Option 3
I can (even I have to) use a typical Front-end way with using yarn and compiling Bootstrap assets with a processor or processors. I'm going to use this way.
A Direction to Go
Before I continue, I should clearly understand what asset management approaches Rails provides out of the box (or recommends) and how to use them for my goals.
Let's do a quick overview first.
Sprockets
What is that? A way to deliver CSS/JS assets of a web page. What does it do? It merges all assets described in a manifest in the only bundle-file. What types of assets? It can work with CSS / JS. Something else? It can minify a js/css bundle file and provide for a bundle a hashed name to provide caching. Best Match For precompiled assets that you want to merge in the only bundle file and deliver in a typical Rails way.
ImportMap
What is that? A way to deliver JS assets of a web page.
What does it do? It emulates a modern way to import JS modules in an entryPoint.js file
What types of assets? Only JS files without any compilation or processing.
Something else? It can minify a js/css bundle file and provide for a bundle a hashed name to provide caching.
Best Match For small JS scripts and modules to make alive some of your elements on a page.
NPM/YARN and node_modules
What is that? A typical way to work with any Front-end assets and tools. What does it do? It does everything what any FE developer needs, because it is FE eco system. What types of assets? Any types. Something else? Can be difficult to setup and use with Rails. Best Match For front-end developers who are going to work with Rails and for heavy and big FE solutions for Rails apps.
What a Plan?
I want to use in my Application all possible approaches. I will use.
-
yarn+ESBuild+SASSto build Bootstrap Assets. -
importMapto deliver on a page my own small JS scripts that I do not need to compile. -
Sprocketsto deliver precompiled assets on a page in a typical Rails way.
Yes, my friend! The party is going to be hard.
Naming is everything!
To avoid mixing different things the first thing that I'm going to do is renaming.
Having only application.js or application.css in the project may confuse when you use different approaches at the same time.
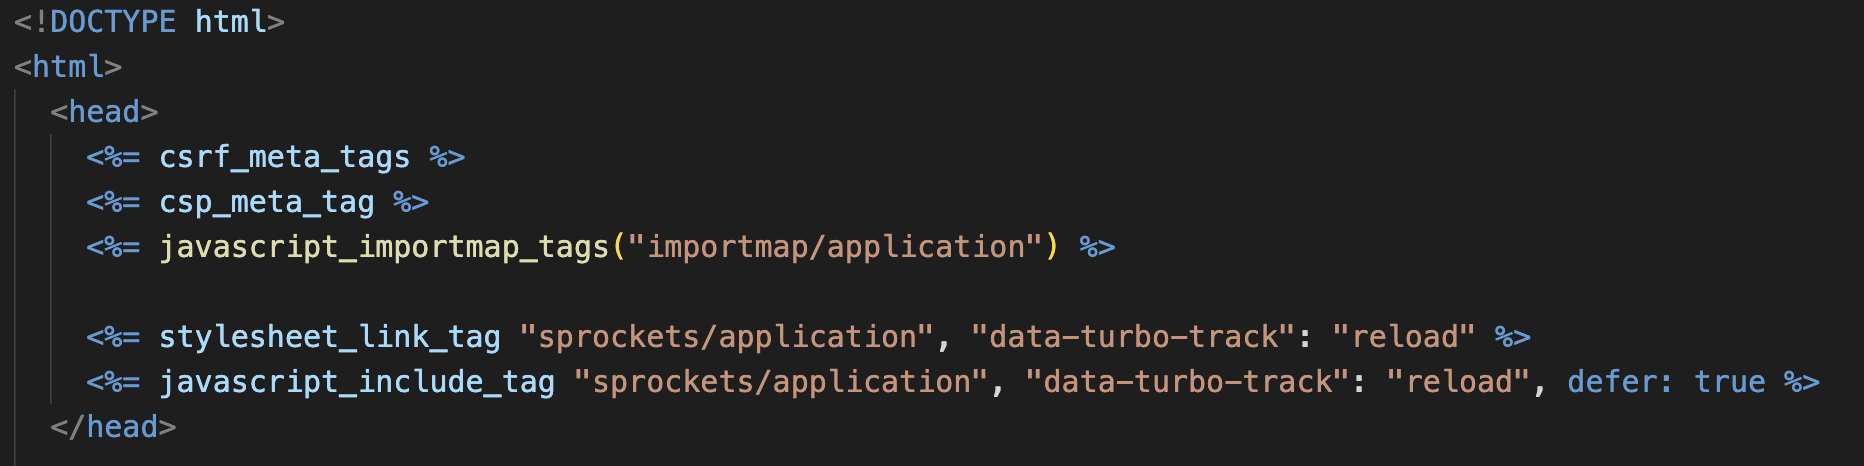
Let's isolate importmap and sprockets and place them in different folders (read scopes)
    <%= javascript_importmap_tags("importmap/application") %>

    <%= stylesheet_link_tag "sprockets/application", "data-turbo-track": "reload" %>
    <%= javascript_include_tag "sprockets/application", "data-turbo-track": "reload", defer: true %>
app/javascript/
├── importmap
│   ├── application.js
│   ├── articlesIndex.js
│   └── theSearchHighlight.js
└── sprockets
    └── application.js
app/assets/stylesheets/
├── demo
│   ├── articles.css
│   ├── demo.css
│   ├── devise.css
│   ├── main.css
│   └── users.css
└── sprockets
    └── application.css
ImportMap
In my project I'm going to use ImportMap for delivering on the page my own simple JS scripts. It is a cheap and interesting way which I never used before. Why not? It just works and does not intersect with other things in the project.
app/javascript/importmap/
├── application.js
├── articlesIndex.js
└── theSearchHighlight.js
app/javascript/importmap/application.js
import ArticlesIndex from 'importmap/articlesIndex'
import TheSearchHighlight from 'importmap/theSearchHighlight'

console.log("Hello World! This is `importmap` entry point")

ArticlesIndex.init()
TheSearchHighlight.init('.the-search-highlight')
My config/importmap.rb looks so:
# Pin npm packages by running ./bin/importmap

pin "importmap/articlesIndex",      preload: true
pin "importmap/theSearchHighlight", preload: true
pin "importmap/application", preload: true
And together with
javascript_importmap_tags("importmap/application")
It produces the following code:
<script type="importmap" data-turbo-track="reload">
  { "imports": {
  "importmap/articlesIndex": "/assets/importmap/articlesIndex-69e4089.js",
  "importmap/theSearchHighlight": "/assets/importmap/theSearchHighlight-c58f503.js",
  "importmap/application": "/assets/importmap/application-acea523.js"
  }}
</script>

<link rel="modulepreload" href="/assets/importmap/articlesIndex-69e4089.js">
<link rel="modulepreload" href="/assets/importmap/theSearchHighlight-c58f503.js">
<link rel="modulepreload" href="/assets/importmap/application-acea525.js">

<script src="/assets/es-module-shims.min-d89e732.js" async="async" data-turbo-track="reload"></script>

<script type="module">import "importmap/application"</script>

|
⚠️ ⚠️ ⚠️ Note 1
Potentially you can even to install and use additional packages with using something like ./bin/importmap pin react react-dom or even ./bin/importmap pin react react-dom --download.
I would like to recommend you to avoid it. Because installing any front-end packages with this way will contradict with a regular way to install packages with using node.
⚠️ ⚠️ ⚠️ Note 2
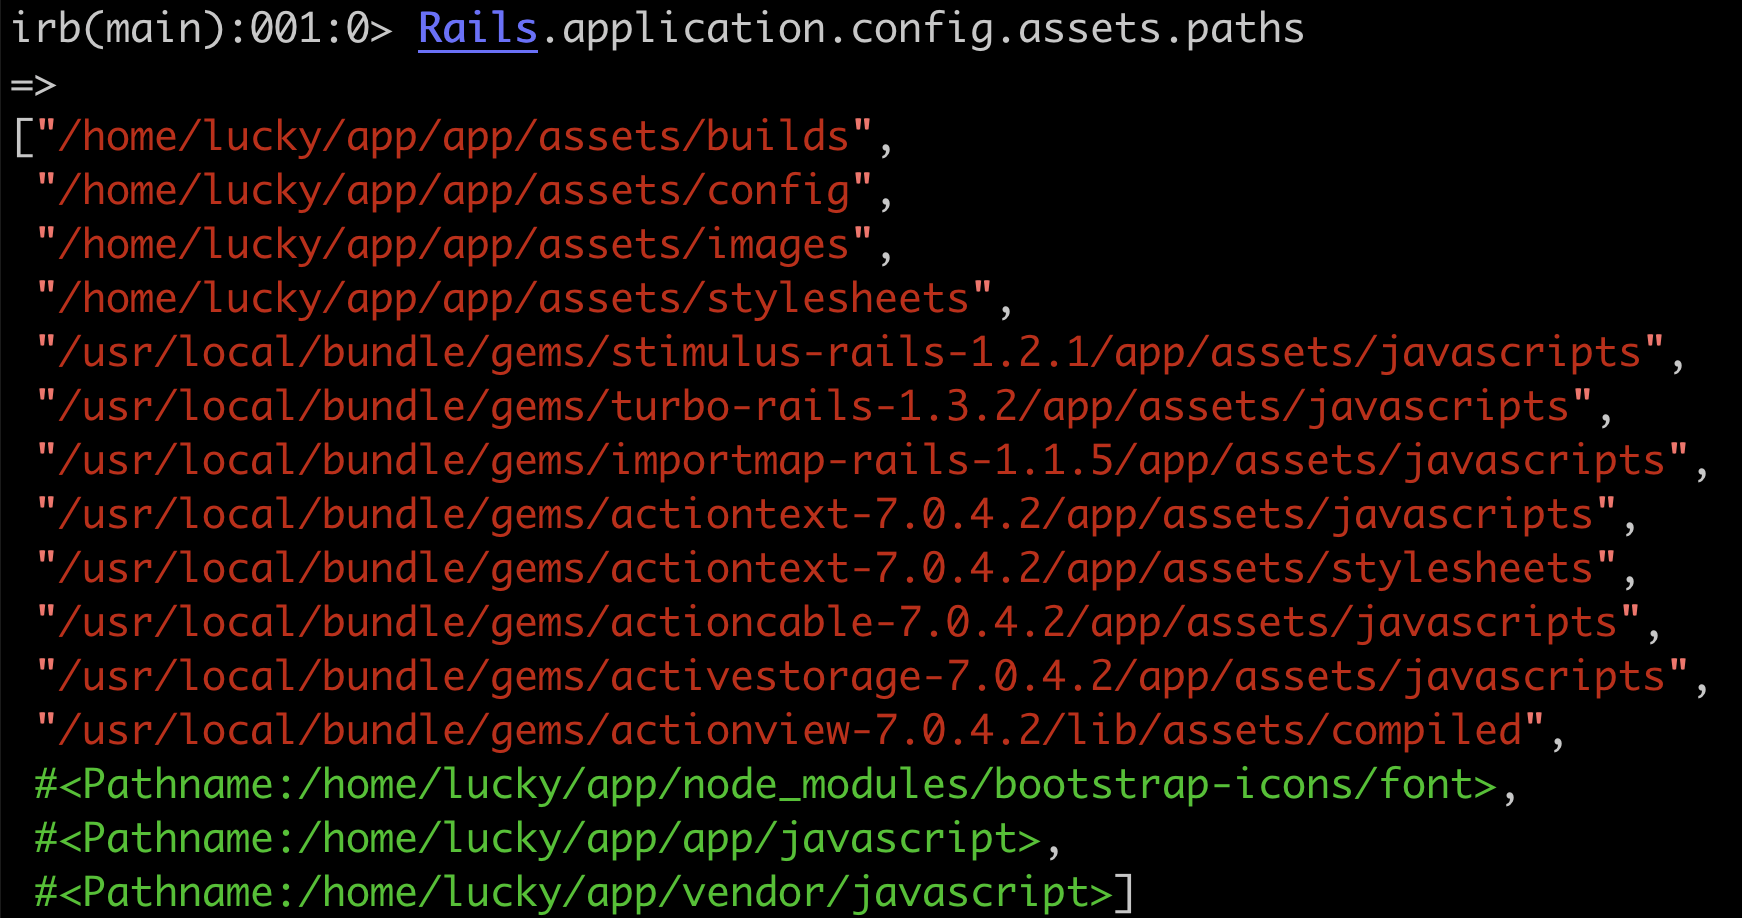
As you can see -- all ImportMap assets have hashed tails to provide a correct caching. It is because ImportMap is integrated with sprockets and rails asset pipeline. Not sure if I name things correctly. But you can see it here
Rails.application.config.assets.paths
ImportMap. Conclusion
ImportMap is a simple way to use simple modular JS scripts that do not need any compilation. You can use this approach even if you use something more difficult. No need to remove it if you are going to use something else, like esbuild or typical sprockets.
Node + Bootstrap + ESBuild + SASS
- I'm going to install Bootstrap in my project.
- Bootstrap is a pure Front-end solution
- I'm going to use only FE ecosystem solutions. No rails gems or something like that!
Node and Yarn
$ node -v
v18.12.1

$ yarn -v
3.4.1
{
  "name": "rails7startkit",

  "scripts": {
    "start": "yarn build:js:watch & yarn build:sass:watch",
    "build": "yarn build:js & yarn build:sass",

    "build:sass": "sass ./app/assets/stylesheets/sass/application.scss:./app/assets/builds/sass/application.css --verbose --no-source-map --load-path=node_modules",
    "build:sass:watch": "yarn build:sass --watch",

    "build:js": "esbuild app/javascript/esbuild/application.js --outdir=app/assets/builds/esbuild --bundle --sourcemap --public-path=assets",
    "build:js:watch": "yarn build:js --watch"
  },

  "dependencies": {
    "@popperjs/core": "2.11.6",
    "bootstrap": "5.2.3",
    "bootstrap-icons": "1.10.3",
    "esbuild": "0.17.10",
    "sass": "^1.58.3"
  },
  "packageManager": "[email protected]"
}
Now let's install required things
yan install
Let's add some things in our JS, SASS entry points.
app/javascript/esbuild/application.js
import 'bootstrap'
import * as Popper from '@popperjs/core'
app/assets/stylesheets/sass/application.scss
@import 'bootstrap/scss/bootstrap';
@import 'bootstrap-icons/font/bootstrap-icons';
yarn build
lucky@bb2cd8bf2c41:~/app$ yarn build
[1]
[1]   app/assets/builds/esbuild/application.js      186.8kb
[1]   app/assets/builds/esbuild/application.js.map  356.9kb
[1]
[1] ⚡ Done in 66ms
Job [1], 'yarn build:js' has ended
Now we have some precompiled files
app/assets/builds/
├── esbuild
│   ├── application.js
│   └── application.js.map
└── sass
    └── application.css

Node and Yarn. Conclusion
Installation front-end packages with using Node and Yarn and compiling them is a typical way in front-end ecosystem. Use it for your front-end solutions. It may improve your development experience and will work correctly in a chain with Rails' Sprockets.
Sprockets
Now, when we have Bootstrap and precompiled bootstrap assets, we can use them as a typical local assets for sprockets
We will just use existed precompiled sass and js assets and use them in a sprocket's manifests.

app/javascript/sprockets/application.js
//= require esbuild/application.js
console.log("Hello from `sprockets/application.js`")
app/assets/stylesheets/sprockets/application.css
/*
 *= require "demo/main"
 *= require "demo/demo"
 *= require "demo/articles"
 *= require "demo/devise"
 *= require "demo/users"

 *= require "sass/application"
 */
To make things work property do not forget to edit manifest.js
app/assets/config/manifest.js
//= link_tree ../builds
//= link_tree ../images
//
//= link_directory ../stylesheets/sprockets
//
//= link_directory ../../../vendor/javascript
//= link_directory ../../javascript/importmap
//
//= link sprockets/application.js
Now, in development mode sprockets will merge all possible JS and CSS assets in bundles like that.

In production mode everything will be managed during assets:precompile
Conclusion
- I've successfully and simultaneously used in my project 3 different types to work with assets
- Careful naming and placing files in the system opens comfortable ways to use approaches together
- I better understood advantages and boundaries different approaches to work with assets in Rails
- Sprockets can be easily used with tools like
eslintandsassand be a good addition for them - To work with FE tools in Rails you do not need and additional gems like
jsbundling-rails
Personal recommendations
- Use
ImportMapto manage simple modular scripts for your page. - Avoid installing any assets or packages with
ImportMap. It is not a best way that you can use. Avoid a mess in a project. - Use
node,npm,yarnas a main way to install and compile any FE solutions. With FE solutions better to work in FE way. - You precompiled assets can be used by
Sprocketsand extend a typical Rails approach to manage assets.
That is it!
👉 Subscribe to the project to know about most recent updates.
Happy coding with Rails 7. Start Kit
v1.8
1 year agoRails 7. Start Kit. Production Mode and Configurations

Install and Run Ruby on Rails now!
Copy & Paste in your terminal
git clone https://github.com/the-teacher/rails7-startkit.git && \
  cd rails7-startkit && \
  bin/setup
Rails 7. My Configuration Approach
It was time when I finally had to manage configuration of my Rails application.
A Rails app always full of configuration parameters. There are some places where you can meet them
-
config/database -
config/initializers -
config/credentials.yml.encandconfig/master.key
It is normal when you need to provide many different parameters for different parts of your "system".
Configuration files and "Classic approach"
Probably you know, that from the very beginning of the software engineering it was fine to have configurations in files. In rails you can find an example of it in config/database.yml. It originally looks like that
development:
  pool: 5
  adapter: mysql2
  encoding: utf8
  database: app_development
  username: root
  password: qwerty
  socket: /tmp/mysql.sock
ENV variables for configuration. "Cloud oriented approach"
After cloud calculations and automatic infrastructure scaling took the world many applications started to use ENV variables for application configuration by default.
Lets take the same config/database.yml and show how it may look in Rails
development:
  pool: 5
  adapter: mysql2
  encoding: utf8
  database: <%= ENV['DATABASE_NAME']%>
  username: <%= ENV['DATABASE_USER']%>
  password: <%= ENV['DATABASE_PASSWORD']%>
  socket: /tmp/mysql.sock
What an approach is better?
If you ask people around "what is better?" they may answer differently. I think it is a "holy war" topic. I can provide only my own opinion:
File configuration
- is great for small and not "very serious" projects
- is great for having structured parameters and group configurations in order to their scope
- not very good for auto-scaling systems
ENV configuration
- is great for big and auto-scalable (cloud) projects
- not very convenient. Structure is plain and could be scoped only by using a name convention
- can be uncontrolled spread in the application. Can be a cause of problems with running an application until you find all required variables in the application
Synthetic approach
I prefer to use a Synthetic configuration approach. It can be implemented with using to ruby gems
- gem dotenv -- For managing Env variables
- gem config -- For managing configurations in an application
The idea is clear
- I use
ENVas a source of the configuration information - I use
ENVvariables only in one configuration file to collect allENVin the only place to avoid pollution of the code with ENVs - I use classic config files to provide a structure and scoping of parameters
- I use gem config to provide a comfortable interface for configurations
Synthetic Configuration Approach in Practice
We have ENV variables on the level of the OS, or for local development in .env files

.env file

All this parameters go to config/_CONFIG.yml. This file is being managed by gem config
- As you can see I use
ENV.fetchfor setting up defaults - As you can see I collect all
ENVvariables in the only place in my application

Now in my application I use so beauty way to setup required configurations:
For database:

For elastic:

Also sometimes it is very great to do something like that Settings.redis.to_hash:

⚠️ Combining 2 different solutions for rails configuration I keep my code clean, maintainable, ready for clouds services, and easy to use.
And one more time:
- gem dotenv -- For managing Env variables
- gem config -- For managing configurations in an application
The idea and following changes was provided in the PR
Production Mode
Finally I spent some time to improve my code to make possible running Rails 7. Start Kit in Production mode.
You can easily use production mode, just with setting a required ENV variable.
RAILS_ENV=production bin/setup

RAILS_ENV=production bin/exec start
RAILS_ENV=production bin/exec stop

RAILS_ENV=production bin/exec start_all
RAILS_ENV=production bin/exec stop_all
That is it!
👉 Subscribe to the project to know about most recent updates.
Happy coding with Rails 7. Start Kit
v1.7
1 year agoRails 7. Start Kit and ActiveStorage

Rails 7 Start Kit — Dockerized Rails App with the most popular preinstalled tools.
Install and Run Ruby on Rails now!
Copy & Paste in your terminal
git clone https://github.com/the-teacher/rails7-startkit.git && \
  cd rails7-startkit && \
  bin/setup
I've done a mistake when I've chosen ActiveStorage
I didn't write any rails code last 5 or 6 years. I've heard that now Rails has a default solution to upload files. Moreover I saw the following message on the paperclip page

Since that moment it was clear to me that I have to use ActiveStorage for image uploading. Probably all other uploading solutions just died for rails.
Intuitively I expected that ActiveStorage will help me to do all the same things that I did for paperclip or carrierwave. Storage is just storage. What can be wrong with it?
When I have installed ActiveStorage I found that it is impossible to setup a human-friendly path for files' location. All file paths and files look like that.

I was confused, and looks like I'm not the first person who was. Link 1 Link 2
I looked for solutions or workarounds. I asked people in different RoR communities, and I found that not so much people understand why it is so.
Some people just switch to other solutions like carrierwave or shrine.
After a small investigation I should say the following:
ActiveStorage is a cloud solution
- If you read a definition: Active Storage makes it simple to upload and reference files in cloud services like Amazon S3, Google Cloud Storage, or Microsoft Azure Storage, and attach those files to Active Records.
- You should accept that Active Storage will use not a human-friendly paths for your files
- You should accept that Active Storage will use not a human-friendly file names
- You should accept that Active Storage will stream your files via the Application
If you want to to have human-friendly locations and file names to navigate on it sometimes and feel a full control over the situation -- Active Storage is a mistake. You probably should use something else. I wanted just a "typical" file uploading solution with a friendly file structure like paperclip or carrierwave, but AS is a bit different. I needed time to accept it.
:warning: I've done a mistake when I've chosen Active Storage as a typical file upload solution. It is not so simple as I expected.
I relied on my intuition, but not on the description of the library. I think Active Storage should be renamed to Active Cloud Storage to avoid confusing people like me, who like to do something but not to read a boring definitions on a Readme page 😄
Conclusion
Now when I see all aspects and boundaries of this solution I can choose exactly what I need for my specific cases in future. I think sometimes I can even use multiple solutions in the same app for different models and goals.
Using ActiveStorage for User Avatar in 10 steps
Step 1
Like it was described in the official documentation I did
For generation of database migrations and migrating
$ bin/rails active_storage:install

$ bin/rails db:migrate
No need modify config/storage.yml. We will go with default settings
test:
  service: Disk
  root: <%= Rails.root.join("tmp/storage") %>

local:
  service: Disk
  root: <%= Rails.root.join("storage") %>
Step 2
Now it is time to improve app/models/user.rb and add an attachment
class User < ApplicationRecord
  # img_path = Rails.root.join('public/Rails7.StartKit.jpg')
  # u = User.first
  # u.avatar.attach(io: File.open(img_path), filename: 'avatar.jpg')
  #
  # u.avatar.purge
  has_one_attached :avatar

   ...
end
As you see I left some commands in the comments to check the functionality from Rails Console
Step 3
Checking that everything works from Rails Console
From the root of the application
$ rails c
Now when you are in Rails Console:
img_path = Rails.root.join('public/Rails7.StartKit.jpg')

u = User.first

u.avatar.attach(io: File.open(img_path), filename: 'avatar.jpg')

In the project in storage folder you will see something like that:

Everything works!
Step 4
Now we ned to modify the app. We use Devise and we need to integrate our uploading with it. No problems!
We create a controller for User model.
I created the file app/controllers/users_controller.rb manually. It is simple and I do not need any code generator.
# frozen_string_literal: true

class UsersController < ApplicationController
  before_action :authenticate_user!, except: :profile

  def profile; end

  def update
    current_user.update(user_params)
    redirect_to profile_user_path, notice: 'Avatar is uploaded'
  end

  private

  def user_params
    params.require(:user).permit(:avatar)
  end
end
Step 5
To have an access to this controller I need routing. config/routes.rb
Rails.application.routes.draw do
  devise_for :users
  root 'demo#index'

   ...

  resource :user, only: [:update] do
    get :profile
  end
end
Step 6
I need a link to my profile page
<div class="examples">
   ...
  <%= link_to "Upload Avatar", profile_user_path, class: 'example-item' %>
</div>
Step 7
When I'm not a logged in user I should not have an access to uploading, because I do not know a user to which I'm going to attach my avatar.

In the file app/views/users/profile.html.erb
  <% unless user_signed_in? %>
    <p>
      You can not upload an avatar until user is logged in:
      <%= link_to "Sign In", new_user_session_path %>
    </p>

    <p>
      email: <b>[email protected]</b>
    </p>

    <p>
      password: <b>qwerty123</b>
    </p>
  <% end %>
If you have passed logging process you will see

  <% if user_signed_in? %>
    <p>
      Current user: <%= current_user.email %> |
      <%= link_to "Sign Out", destroy_user_session_path%>
    </p>

    <% if current_user.avatar.attached? %>
      <%= image_tag current_user.avatar, class: :user_avatar %>
    <% end %>

    <%= form_for current_user, method: :patch do |form| %>
      <p><%= form.file_field :avatar %></p>
      <p><%= form.submit "Upload" %></p>
    <% end %>
  <% end %>
Step 8
Now you can upload a new file and check how it works.

Step 9
You can visit web inspector and check how actually you image was received. Definitely Rails controller was involved into this process.

Step 10
Company JetBrains found my project interesting and I was given a licence to use RubyMine for my project. They didn't ask about anything in return, but I would like to acknowledge them. I found their IDE really helpful.

That is it!
👉 Subscribe to the project to know about most recent updates.
Happy coding with Rails 7. Start Kit
v1.6
1 year agoRails 7. Start Kit loves Devise

Rails 7 Start Kit — Dockerized Rails App with the most popular preinstalled tools.
Rails App and many typical services can be installed via the only command:
eval "$(curl -sSL rails-start.com)"
👉 Subscribe to the project to know about most recent updates. Rails 7 Start Kit
gem Devise. 10 Steps to install in 2023
Hello everyone! Today it is time to revisit installation and setup process of gem devise. Devise is the most popular and famous Ruby on Rails gem for authentication. Simpler, If you want to provide login/logout functionality in a Ruby on Rails application, gem devise is good choice for you!
PULL REQUEST with the code of this Release.
Devise Installation Step by Step
Step 1
Add the gem in Gemfile
# Authentication solution
gem "devise", "4.8.1"
Step 2
Install the gem with running bundle install. Run in terminal from the root of your app:
$ bundle install
Step 3
Generate User Model. Run in terminal from the root of your app:
$ rails generate devise user
Step 4
Choose and uncomment the most useful and common settings in app/models/user.rb
class User < ApplicationRecord
  # Include default devise modules. Others available are:
  # :confirmable, :lockable, :timeoutable, :trackable and :omniauthable
  devise :database_authenticatable,
         :registerable,
         :confirmable,
         :rememberable,
         :recoverable,
         :trackable,
         :validatable
end
Step 5
Check and uncomment required fields in order to the options you have chosen for the User Model
In the file db/migrate/XXX_devise_create_users.rb you should have the following:
# frozen_string_literal: true

# rails generate devise user

# rubocop:disable Metrics/AbcSize, Metrics/MethodLength
class DeviseCreateUsers < ActiveRecord::Migration[7.0]
  def change
    create_table :users do |t|
      ## Database authenticatable
      t.string :email,              null: false, default: ''
      t.string :encrypted_password, null: false, default: ''

      ## Recoverable
      t.string   :reset_password_token
      t.datetime :reset_password_sent_at

      ## Rememberable
      t.datetime :remember_created_at

      ## Trackable
      t.integer  :sign_in_count, default: 0, null: false
      t.datetime :current_sign_in_at
      t.datetime :last_sign_in_at
      t.string   :current_sign_in_ip
      t.string   :last_sign_in_ip

      ## Confirmable
      t.string   :confirmation_token
      t.datetime :confirmed_at
      t.datetime :confirmation_sent_at
      t.string   :unconfirmed_email # Only if using reconfirmable

      # NameError in Devise::RegistrationsController#create
      # undefined local variable or method `unconfirmed_email'

      ## Lockable
      # t.integer  :failed_attempts, default: 0, null: false # Only if lock strategy is :failed_attempts
      # t.string   :unlock_token # Only if unlock strategy is :email or :both
      # t.datetime :locked_at

      t.timestamps null: false
    end

    add_index :users, :email,                unique: true
    add_index :users, :reset_password_token, unique: true
    # add_index :users, :confirmation_token,   unique: true
    # add_index :users, :unlock_token,         unique: true
  end
end
# rubocop:enable Metrics/AbcSize, Metrics/MethodLength
Potential problem 1
You should be careful here. I missed uncommenting unconfirmed_email and later got the following issue. It was not very clear to me, that I need to uncomment it. There was a mention of reconfirmable option bit in my User Model I have confirmable. At a first moment I thought that these things are different.

Step 6
Let’s setup typical routes in config/routes.rb
Rails.application.routes.draw do
  devise_for :users

  # Defines the root path route ("/")
  root 'demo#index'
end
Step 7
Run migration command to create User Model in your database. Run in terminal from the root of your app:
$ rake db:migrate
Step 8
It is difficult to me to imagine how to work with Devise without a customisation of views and mailers. Now I install the view files. Run in terminal from the root of your app:
$ rails generate devise:views
It will create app/views/devise folder with view files

Some most useful views I’ve wrapped with <div class="devise"> and added to my CSS some very initial CSS rules like that:
.devise {
  background-color: aliceblue;
  padding: 20px;
  margin-bottom: 20px;
}

.devise input[type=email],
.devise input[type=password],
.devise input[type=submit] {
  font-size: 16px;
  padding: 10px;
}

.devise .field,
.devise .actions {
  margin-bottom: 20px;
}

.devise #error_explanation {
  padding: 10px;
  background: antiquewhite;
  border: 1px solid rgb(242, 189, 120);
  list-style: circle;
}
Step 9
Add in your Layout lines to check routes and registration process
<% if user_signed_in? %>
  <%= current_user.email %> |
  <%= link_to "Sign Out", destroy_user_session_path%>
<% else %>
  <%= link_to "Sign In", new_user_session_path %> |
  <%= link_to "Sign Up", new_user_registration_path %>
<% end %>
Potential Problem 2
If you do not use something like ujs or turbo-rails than Sign Out link will work by default via http GET method, but Devise expects DELETE method. It may lead you the the issue like that

You have multiple options here:
- Allow using GET method for log out
- Use
turbo-rails - Emulate DELETE method with button_to helper
I’ve chosen the first option and made a change in config/initializers/devise.rb
  # The default HTTP method used to sign out a resource. Default is :delete.
  # Devise. Make sign out work with GET method
  config.sign_out_via = :get
Step 10
Run the app and play with Devise.

|
Right after you set up your data you can go to Mailer Service and confirm your registration

|
That is it!
👉 Subscribe to the project to know about most recent updates.
Happy coding with Rails 7. Start Kit
v1.5
1 year agoRails 7. Start Kit loves RSpec!

Rails 7 Start Kit — Dockerized Rails App with the most popular preinstalled tools.
Great if you want to:
- Start a new Rails project
- Write a new article about Rails
- Have a playground to learn Rails
👉 Subscribe to the project to know about most recent updates.
RELEASE 1.5 DETAILS
- RSpec is installed. There is PR
- docker images are updated
- article on medium
In the top of GITHUB trends
This week me and the project few days were in the top of Github trends

The Story
In this release I introduce RSpec for Rails. Not so big difference with minitest in order to popularity and an amount of downloading, but almost everywhere where I worked RSpec was a standard de-facto.

There is PR that introduces RSpec. Now let me tell you what I have done.
How I did it
Step 0
Removed a folder with minitest specs
rm -rf test
Step 1
I've added rspec-rails gem in Gemfile
group :development, :test do
  # RSpec testing
  gem "rspec-rails", "6.0.1"

  ...
end
Step 2
I found that I do not use (at least now) some testing dependencies and commented them out in Gemfile
group :test do
  # Use system testing [https://guides.rubyonrails.org/testing.html#system-testing]
  # gem "capybara", "3.38.0"
  # gem "selenium-webdriver", "4.7.1"
  # gem "webdrivers", "5.2.0"
end
Step 3
bundle install
Step 4
To initialise rspec you need to run
rails generate rspec:install
Folder structure and some important files were created.
Step 5
I use Chewy gem to provide ElasticSearch indexing of my models. Because of that I need to modify some rspec files.
In spec/spec_helper.rb and spec/rails_helper.rb I need to add the following:
RSpec.configure do |config|
  config.before(:suite) do
    Chewy.strategy(:bypass)
  end
  ...
end
Step 6
To check specs I modified a bit the only model in my project app/models/article.rb
class Article < ApplicationRecord
  ...
  # Validations
  validates :title, presence: true, length: { minimum: 3 }
  ...
end
Step 7
Now I can write some tests for my Model
spec/models/article_spec.rb
# frozen_string_literal: true

require 'rails_helper'

RSpec.describe Article, type: :model do
  it 'creates an article' do
    Article.create(
      title: 'ABC',
      content_raw: 'test content'
    )
    expect(Article.count).to eq(1)
  end

  it 'processes content_raw in content' do
    article = Article.create(
      title: 'Article title',
      content_raw: '<h1>test content<h1>'
    )
    expect(article.content).to eq('test content')
  end

  context 'negative cases' do
    it 'fails if title is of whitespaces ' do
      article = Article.create(
        title: '        ',
        content_raw: '<h1>test content<h1>'
      )

      expect(
        article.errors.messages[:title]
      ).to eq(["can't be blank"])
    end

    it 'fails if article title length less than 3 symbols' do
      article = Article.create(
        title: 'AB',
        content_raw: 'test content'
      )

      expect(
        article.errors.messages[:title]
      ).to eq(['is too short (minimum is 3 characters)'])
    end
  end
end
Step 8
Also I did some simple tests for Mailer. I just followed documentation for RSpec
# frozen_string_literal: true

require 'rails_helper'

RSpec.describe DemoMailer, type: :mailer do
  let(:mail) { DemoMailer.welcome_email }

  it 'renders the headers' do
    expect(mail.subject).to eq('Welcome to Rails 7. StartKit')
    expect(mail.to).to eq(['[email protected]'])
    expect(mail.from).to eq(['[email protected]'])
  end

  it 'renders the body' do
    expect(mail.body.encoded).to match('Welcome to Rails7. StartKit')
    expect(mail.body.encoded).to match('Thanks for using this project!')
  end
end
Step 9
On the final step I just did some improvements in scripts of my project to make it run easily
# frozen_string_literal: true

module Rails7StartKit
  class << self
    def rspec
      container_bash_exec('rails', 'rspec -f documentation')
    end
  end
end
Step 10
And now when you run bin/exec rspec from the host machine you can see the following

Happy Coding!
Happy coding and tell your friends about this project 👍
v1.4
1 year agoRails 7. Startkit

Rails 7 Start Kit. Dockerized Rails App with the most popular preinstalled tools.
Great if you want to:
- Start a new Rails project
- Write a new article about Rails
- Have a playground to learn Rails
👉 Subscribe to the project to know about most recent updates.
RELEASE 1.4 DETAILS
I have updated a way how to organise bin/ folder.
I moved all helpers to a specific folder. Wrapped commands with Rails7StartKit module


Now it bin folder only 3 endpoints left.
-
bin/setup-- main command to setup the project -
bin/open-- to get in a rails container -
bin/exec-- to execute all the rest
Linux Env Setup is fixed
Also I found I did a mistake for Linux amd64 environment. I had to pass a PLATFORM argument to run a proper docker image.
I hope since now Linux users will have less problems to start the project.
v1.3
1 year agoRails 7. Startkit

Rails 7 Start Kit. Dockerized Rails App with the most popular preinstalled tools.
Great if you want to:
- Start a new Rails project
- Write a new article about Rails
- Have a playground to learn Rails
👉 Subscribe to the project to know about most recent updates.
RELEASE 1.3 DETAILS
- Rubocop is installed
- Code was checked and improved following the Rubocop recommendations
- PR of the related changes
v1.2
1 year agoRails 7. Startkit

Rails 7 Start Kit. Dockerized Rails App with the most popular preinstalled tools.
Great if you want to:
- Start a new Rails project
- Write a new article about Rails
- Have a playground to learn Rails
👉 Subscribe to the project to know about most recent updates.
RELEASE 1.2 DETAILS
- Rails updated to 7.0.4.2
- gem updated to 3.4.5
- installed
gem mailcatcher - example of
ActionMailer::Previewis added - article on medium
- docker images

|

|
Rails 7. ActionMailer::Preview and Mailcatcher
This week I've added to Rails 7. Start Kit functionality related to sending and previewing emails. Release 1.2 is here. Details you can find in the PR.
How I did it
Step 1
I wanted to install gem mailcatcher directly to the Rails container in my project. After some attempts I found that mailcatcher uses some old gems that are not compatible with ruby 3.2.
Obviously I just found a docker container and added it to my project.
  # docker/docker-compose.yml
  #
  mailcatcher:
    image: schickling/mailcatcher
    ports:
      - 1080:1080
Step 2
Now I should add launching of this new container in my bin/setup
  # Mailcatcher
  step_info "Launching Mailcatcher Container"
  system('docker compose -f docker/docker-compose.yml up mailcatcher -d')
  wait('to launch Mailcatcher Container')
Step 3
Now, when we have mailcatcher we should set up an address of the SMTP service.
For development we should modify: config/environments/development.rb
  config.action_mailer.delivery_method = :smtp
  config.action_mailer.smtp_settings = {
    address: "mailcatcher",
    port: 1025
  }
address: "mailcatcher" I use because it is a name of the container in docker/docker-compose.yml
Step 4
It is time to create Rails Mailer and implement our new email letter:
$ rails generate mailer demo
Step 5
In app/mailers/demo_mailer.rb we have to implement our email and default params.
class DemoMailer < ApplicationMailer
  default from: '[email protected]'

  # DemoMailer.welcome_email.deliver!
  def welcome_email
    mail(
      to: "[email protected]",
      subject: 'Welcome to Rails 7. StartKit'
    )
  end
end
And letter's content: app/views/demo_mailer/welcome_email.html.erb
<!DOCTYPE html>
<html>
  <head>
    <meta content='text/html; charset=UTF-8' http-equiv='Content-Type' />
  </head>
  <body>
    <h1>Welcome to Rails7. StartKit</h1>
    <p>Thanks for using this project!</p>
  </body>
</html>
Step 6
Time to check our mailer
We go to rails console
$ rails c
In rails console type
DemoMailer.welcome_email.deliver!
We see that email was sent
Step 7
Checking results in mailcatcher. Address: http://localhost:1080
Mailcatcher
Step 8
Also we can implement default ActionMailer::Preview
Just modify: test/mailers/previews/demo_mailer_preview.rb
# Preview all emails at http://localhost:3000/rails/mailers/demo_mailer
class DemoMailerPreview < ActionMailer::Preview
  # Accessible from  http://localhost:3000/rails/mailers/demo_mailer/welcome_email
  def welcome_email
    DemoMailer.welcome_email
  end
end
And now we can see the result
ActionMailer::Preview
Thank you for your interest to Rails 7. Start Kit Star/Subscribe to the project to know about most recent updates.
Happy coding!