Qdm12 Dns Save
Docker DNS server on steroids to access DNS-over-TLS from Cloudflare, Google, Quad9, Quadrant or CleanBrowsing
DNS over TLS upstream server Docker container
DNS over TLS upstream server connected to DNS over TLS (IPv4 and IPv6) servers with DNSSEC, DNS rebinding protection, built-in Docker healthcheck and fine grain IPs + hostnames blocking
Announcement: *You can now try :v2.0.0-beta with this documentation.
The :latest Docker image might break compatibility in the coming days/weeks

![]()


Features
-
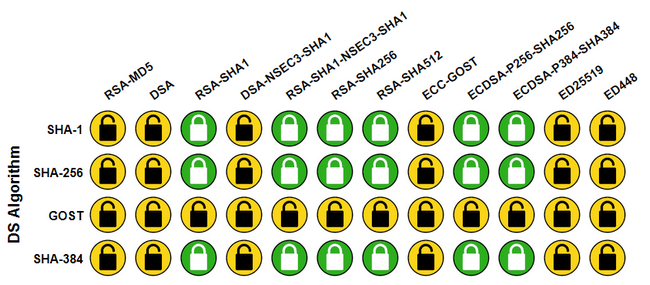
It can be connected to one or more of the following DNS-over-TLS providers:
-
Split-horizon DNS (randomly pick one of the DoT providers specified for each request)
-
Block hostnames and IP addresses for 3 categories: malicious, surveillance and ads
-
Block custom hostnames and IP addresses using environment variables
-
One line setup
-
Runs without root
-
Small 41.1MB Docker image (uncompressed, amd64)
- Alpine 3.14
- Unbound 1.13.1 from Alpine packages
- Files and lists built periodically
- Go static binary entrypoint built from this source
-
Resolves using IPv4 and IPv6 when available
-
Auto updates block lists and cryptographic files every 24h and restarts Unbound (< 1 second downtime)
-
Compatible with amd64, i686 (32 bit), ARM 64 bit, ARM 32 bit v7 and ppc64le 🎆
-
DNS rebinding protection
-
DNSSEC Validation
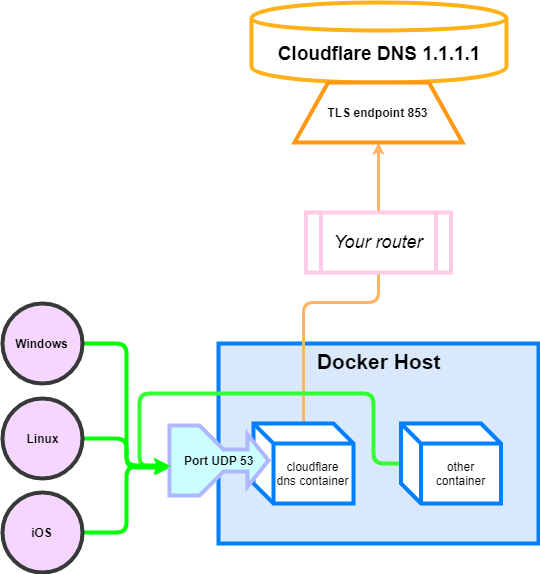
Diagrams are shown for router and client-by-client configurations in the Connect clients to it section.
Setup
-
⚠️ Raspberry Pi users running 32 bit systems, you need to do this on your host to run the container.
-
Launch the container with
docker run -d -p 53:53/udp qmcgaw/dnsYou can also use docker-compose.yml with:
docker-compose up -dMore environment variables are described in the environment variables section.
-
See the Connect clients to it section, you can also refer to the Verify DNS connection section if you want.
If you run an old Docker version or Kernel, you might want to run the container as root with --user="0" (see this issue for context).
Docker tags 🐳
| Docker image | Github release |
|---|---|
qmcgaw/dns:latest |
Master branch |
qmcgaw/dns:v1.5.1 |
v1.5.1 |
qmcgaw/dns:v1.4.1 |
v1.4.1 |
qmcgaw/dns:v1.2.1 |
v1.2.1 |
qmcgaw/dns:v1.1.1 |
v1.1.1 |
qmcgaw/cloudflare-dns-server:latest |
Master branch |
qmcgaw/cloudflare-dns-server:v1.0.0 |
v1.0.0 |
💁 qmcgaw/cloudflare-dns-server:latest mirrors qmcgaw/dns:latest
Environment variables
| Environment variable | Default | Description |
|---|---|---|
PROVIDERS |
cloudflare |
Comma separated list of DNS-over-TLS providers from cira family, cira private, cira protected, cleanbrowsing adult, cleanbrowsing family, cleanbrowsing security, cloudflare, cloudflare family, cloudflare security, google, libredns, quad9, quad9 secured, quad9 unsecured and quadrant |
VERBOSITY |
1 |
From 0 (no log) to 5 (full debug log) |
VERBOSITY_DETAILS |
0 |
From 0 to 4 (higher means more details) |
BLOCK_MALICIOUS |
on |
on or off, to block malicious IP addresses and malicious hostnames from being resolved |
BLOCK_SURVEILLANCE |
off |
on or off, to block surveillance IP addresses and hostnames from being resolved |
BLOCK_ADS |
off |
on or off, to block ads IP addresses and hostnames from being resolved |
BLOCK_HOSTNAMES |
comma separated list of hostnames to block from being resolved | |
BLOCK_IPS |
comma separated list of IPs to block from being returned to clients | |
UNBLOCK |
comma separated list of hostnames to leave unblocked | |
LISTENINGPORT |
53 |
UDP port on which the Unbound DNS server should listen to (internally) |
CACHING |
on |
on or off. It can be useful if you have another DNS (i.e. Pihole) doing the caching as well on top of this container |
PRIVATE_ADDRESS |
All IPv4 and IPv6 CIDRs private ranges | Comma separated list of CIDRs or single IP addresses. Note that the default setting prevents DNS rebinding |
CHECK_DNS |
on |
on or off. Check resolving github.com using 127.0.0.1:53 at start |
IPV4 |
on |
on or off. Uses DNS resolution for IPV4 |
IPV6 |
off |
on or off. Uses DNS resolution for IPV6. Do not enable if you don't have IPV6 |
UPDATE_PERIOD |
24h |
Period to update block lists and restart Unbound. Set to 0 to disable. |
Extra configuration
You can bind mount an Unbound configuration file include.conf to be included in the Unbound server section with
-v $(pwd)/include.conf:/unbound/include.conf:ro, see Unbound configuration documentation
Golang API
If you want to use the Go code I wrote, you can see tiny examples of DoT and DoH resolvers and servers using the API developed.
Connect clients to it
Option 1: Router (recommended)
All machines connected to your router will use the 1.1.1.1 encrypted DNS by default
Configure your router to use the LAN IP address of your Docker host as its primary DNS address.
- Access your router page, usually at http://192.168.1.1 and login with your credentials
- Change the DNS settings, which are usually located in Connection settings / Advanced / DNS server
- If a secondary fallback DNS address is required, use a dull ip address such as the router's IP 192.168.1.1 to force traffic to only go through this container
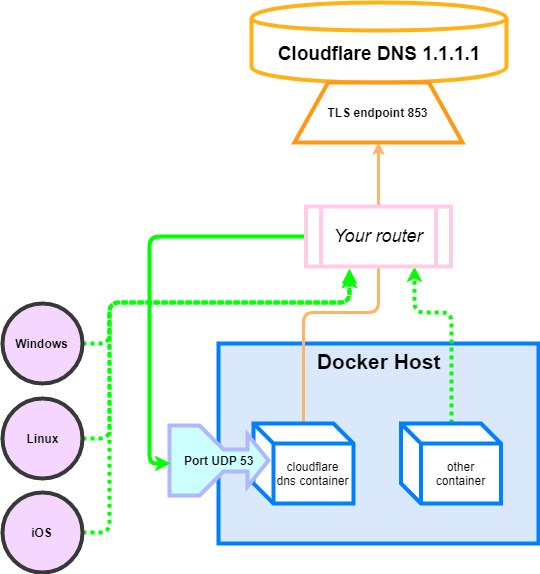
To ensure network clients cannot use another DNS, you might want to
- Block the outbound UDP 53 port on your router firewall
- Block the outbound TCP 853 port on your router firewall, except from your Docker host
- If you have Deep packet inspection on your router, block DNS over HTTPs on port TCP 443
Option 2: Client, one by one
You have to configure each machine connected to your router to use the Docker host as their DNS server.
Docker containers
Connect other Docker containers by specifying the DNS to be the host IP address 127.0.0.1:
docker run -it --rm --dns=127.0.0.1 alpine
For docker-compose.yml:
version: '3'
services:
  test:
    image: alpine:3.11
    network_mode: bridge
    dns:
      - 127.0.0.1
If the containers are in the same Docker network, you can simply set the dns to the LAN IP address of the DNS container (i.e. 10.0.0.5)
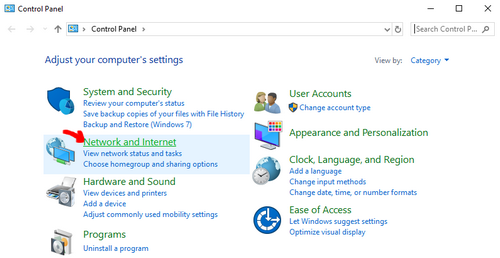
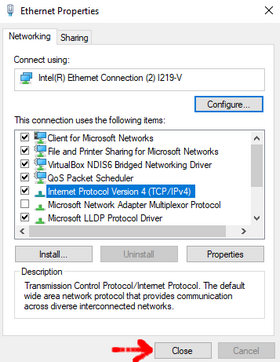
Windows
- Open the control panel and follow the instructions shown on the screenshots below.
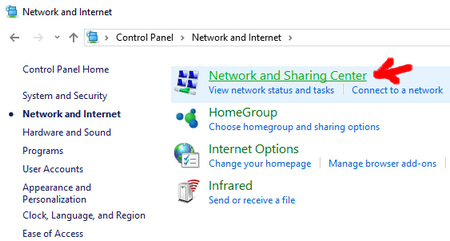
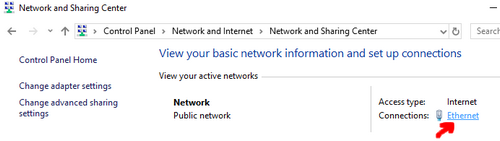
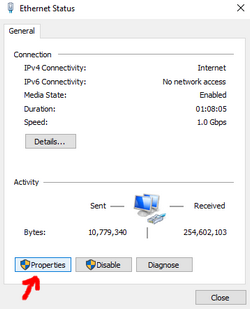
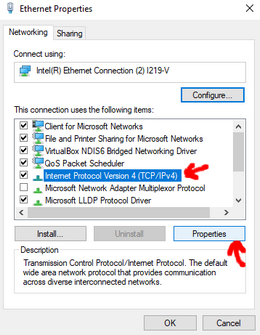
Enter the IP Address of your Docker host as the Preferred DNS server (192.168.1.210 in my case)
You can set the Cloudflare DNS server address 1.1.1.1 as an alternate DNS server although you might want to
leave this blank so that no domain name request is in plaintext.
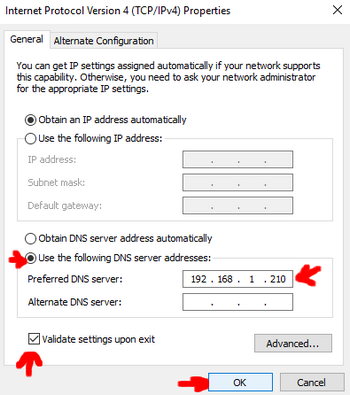
When closing, Windows should try to identify any potential problems. If everything is fine, you should see the following message:

Mac OS
Follow the instructions at https://support.apple.com/kb/PH25577
Linux
You probably know how to do that. Otherwise you can usually modify the first line of /etc/resolv.conf by changing the IP address of your DNS server.
Android
See this
iOS
See this
Firewall considerations
This container requires the following connections:
- UDP 53 Inbound (only if used externally)
- TCP 853 Outbound to 1.1.1.1 and 1.0.0.1
Verify DNS connection
- Verify that you use Cloudflare DNS servers: https://www.dnsleaktest.com with the Standard or Extended test
- Verify that DNS SEC is enabled: https://en.internet.nl/connection
Note that https://1.1.1.1/help does not work as the container is not a client to Cloudflare servers but a forwarder intermediary. Hence https://1.1.1.1/help does not detect a direct connection to them.
Go API
Some packages are exposed publicly through the pkg directory.
The API is at v1.x.x but (shame on me) is not stable and subject to change without changing major version. If you need it to be stable, please create an issue and I'll see what I can do.
For now, it is used by the gluetun project for its DNS over TLS usage.
Development
Development setup
Using VSCode and Docker
- Install Docker
- On Windows, share a drive with Docker Desktop and have the project on that partition
- On OSX, share your project directory with Docker Desktop
- With Visual Studio Code, install the remote containers extension
- In Visual Studio Code, press on
F1and selectRemote-Containers: Open Folder in Container... - Your dev environment is ready to go!... and it's running in a container :+1:
Locally
-
Install dependencies
go mod download -
Install golangci-lint
Commands available
# Build the binary
go build cmd/main.go
# Test the code
go test ./...
# Lint the code
golangci-lint run
# Build the Docker image
docker build -t qmcgaw/dns .
See Contributing for more information on how to contribute to this repository.
