Pytorch Implementation Of Yolov1 Save
yolov1,v2 a minimal tutorial-like implementation on PyTorch
Yolo-v1-pytorch-implementation
Dependency:
pytorch 0.4.0, torchvision, opencv3, numpy, pandas, argparse
I recommend to use anaconda for python virtual environment.
The code analysis and technical detail please see my note in my blog YoloV1
To simplely run this demo please enter the pytorch environment and run this command:
python train.py -parameters
or
nohup python train.py -parameters
The parameters have been preseted inside the py file. The training log will be saved in ./train/mname/xxx. And the Usage is as follows:
usage: train.py [-h] [--lr LR] [--resume] [--experimentname EXPERIMENTNAME]
                [--trainroot TRAINROOT] [--testroot TESTROOT]
                [--indexdir INDEXDIR] [--batch_size BATCH_SIZE]
                [--num_epochs NUM_EPOCHS] [--sgrid SGRID]
                [--bbxnumber BBXNUMBER] [--classnumber CLASSNUMBER]
                [--mname MNAME]

PyTorch Yolov1 Training DuanYiqun

optional arguments:
  -h, --help            show this help message and exit
  --lr LR               learning rate
  --resume, -r          resume from checkpoint
  --experimentname EXPERIMENTNAME
                        model name for save
  --trainroot TRAINROOT
                        for train images
  --testroot TESTROOT   for test images
  --indexdir INDEXDIR   log direction for save
  --batch_size BATCH_SIZE
                        batch size
  --num_epochs NUM_EPOCHS
                        training length
  --sgrid SGRID         grid number 7*7 for default
  --bbxnumber BBXNUMBER
                        bounding box number
  --classnumber CLASSNUMBER
                        class number default is 20
  --mname MNAME         experimentname
Same to most of other implementations, you should firstly run xml2txt.py to change xml annotaitons of VOC dataset to a txt file which contains bounding boxes and classes line by line.
This repository is writted as review, part of functions still under construction due to limited time, but the part for training has already completed and tested.
Part of the functions in dataset.py and yololoss.py referenced to several existed blogs.
Below are some
<script type="text/javascript" src="http://cdn.mathjax.org/mathjax/latest/MathJax.js?config=default"></script>YoloNet 原理简析和复现
Object detection有很多种深度学习的办法可以实现,其中yolo是一个比较快速的办法。文章主旨在于神经网络无需反复迭代某个区域进行特征提取而采取straight foward 的形式。 Yolo 仅仅使用卷基层,而没有down-sampling的过程即没有下采样池化过程这样决定了yolo对图片大小并不敏感。 在yolo中也采用了不少skip connection和上采样层。第一篇YOLO 自我介绍说是根据人眼只看图片一眼就可以识别出物体到底在哪里。 原文如下: Humans glance at an image and instantly know what objects are in the image, where they are, and how they interact。 论文中提出这样的结构主要针对这样的一个现状: 目前其他的obj-detection模型是用sliding window 找出哪里是带检测对象,然后不断的去调用一个相对独立的结构来检测对象是什么分类。比如说最近的R-CNN是先用region proposal mehtod 生成一些潜在的bounding box 然后再在这些bounding box 里面跑一个分类器。 这样的检测模式第一比较慢,第二对于物体分布很多的图片识别起来准确率不高。
yolo net 将obj-detection和分类一样变成了一个regression 问题。从而实现了end-end 训练的结果。一共就三步:
- resizesthe input image to 448 × 448,
- runs a single convolutional network on the image, and
- thresholds the resulting detections by the model’s confidence.
关于特征提取
这里 yolo V1 采用了划分训练网格的方法。每个图片被划分为S × S grid. 如下图:

定义置信度也就是训练目标为: Pr(Object) ∗ IOU_truth 如果没有任何的对象在一个cell 里那么confidence应该是0。 IOU是代表预测bonding box 和groud truth bounding box 的intersection。Pr(Object) 代表类别的条件概率。据此我们可以得出每类别的confidence如下:
Pr(Classi|Object) ∗ Pr(Object) ∗ IOUtruth = Pr(Classi) ∗ IOUtruth
在特征提取方面采用了 通道为*(B5 +C) 的卷积核,在最后预测结果被编码为S × S × (B ∗ 5 + C) 的向量。在模型结构方面基本继承了GoogleNet的结构如下:
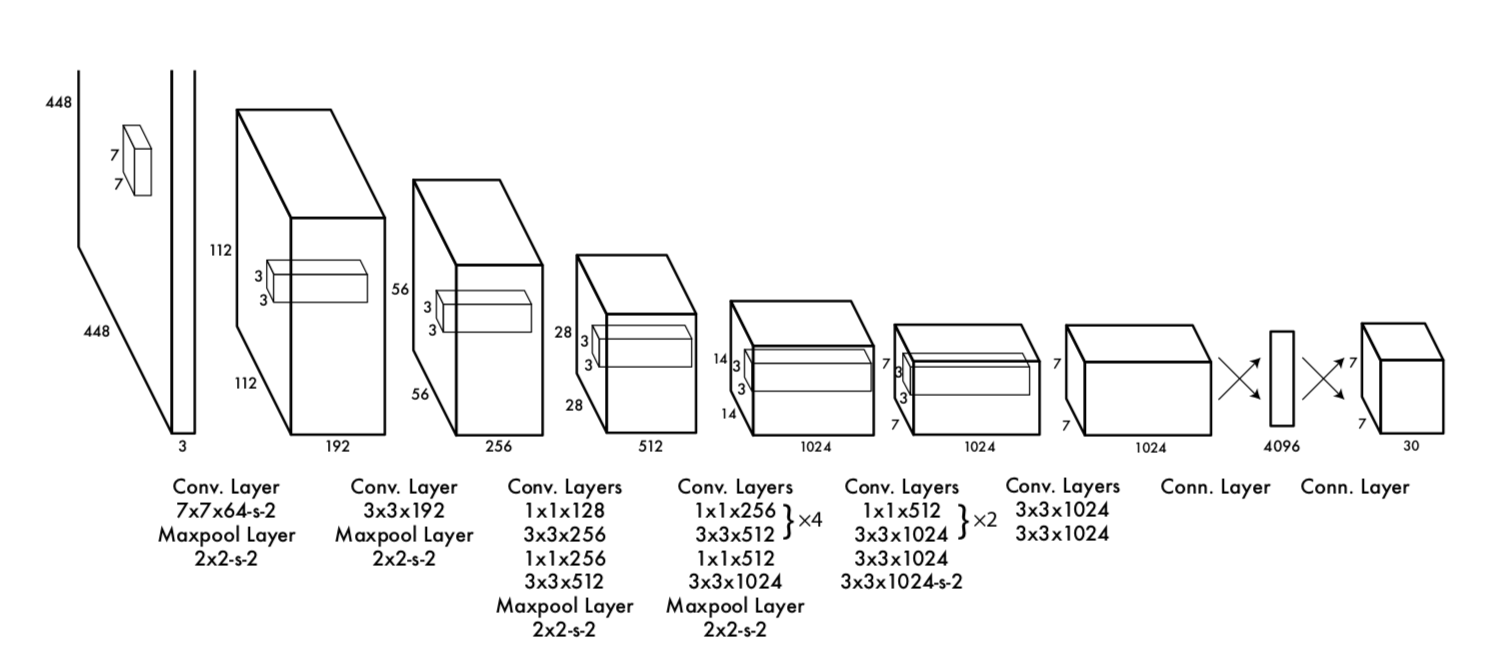
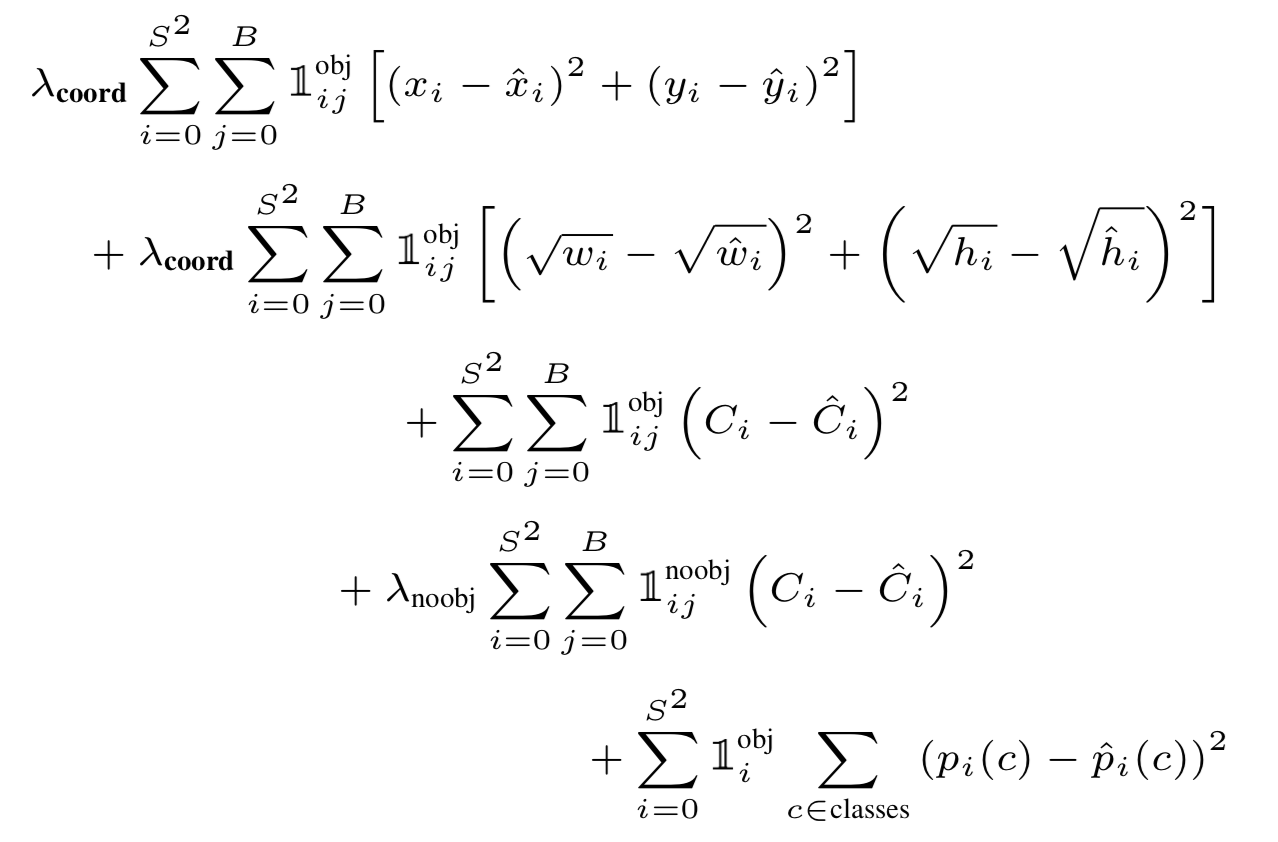
用1 * 1 和 3 * 3 的卷机和组合的方式提取特征。在训练时候用一个参数lambda 来结合 obj loss和bounding box 的loss。loss function 参数如下
训练代码如下,如此我们可以根据这些结构编写yolo的训练代码。训练yolo v1可以使用一个比较标准的数据集VOC。 其读写方法简介如下:
Implementation
因为pytorch 比较注重快速实现,所以我们这里可以使用pytorch 作为framework 实现yolo net 的部分功能。
数据集和数据加载
在object detection方面, 公开数据集主要有VOC和COCO 数据集两种。 可以采用VOC数据集。VOC是一个公开的 Object detection 数据集,里面也有人体动作和segmentation的标注数据。 VOC 数据来源于曾经的2007-2012年的公开竞赛。 虽然竞赛已经结束,但是数据还是可以下载到,链接如下:
里面文件夹结构非常清晰。对obj-detection比较有用的主要有两个文件夹。
- VOCdevkit/VOC2012/Annotations
- VOCdevkit/VOC2012/JPEGImages
其中Annotations存储了标注信息。 而JPEGImages 存储的是图片文件。因为我们是练习,所以不必在意Imageset里面的txt文件,直接手动按照自己的需求划分数据集即可。Annotation已经包含了我们需要的所有标注信息。
在Annotation 文件夹下面一个图片对应一个xml file
<annotation>
	<filename>2012_004331.jpg</filename>
	<folder>VOC2012</folder>
	<object>
		<name>person</name>
		<actions>
			<jumping>1</jumping>
			<other>0</other>
			<phoning>0</phoning>
			<playinginstrument>0</playinginstrument>
			<reading>0</reading>
			<ridingbike>0</ridingbike>
			<ridinghorse>0</ridinghorse>
			<running>0</running>
			<takingphoto>0</takingphoto>
			<usingcomputer>0</usingcomputer>
			<walking>0</walking>
		</actions>
		<bndbox>
			<xmax>208</xmax>
			<xmin>102</xmin>
			<ymax>230</ymax>
			<ymin>25</ymin>
		</bndbox>
		<difficult>0</difficult>
		<pose>Unspecified</pose>
		<point>
			<x>155</x>
			<y>119</y>
		</point>
	</object>
	<segmented>0</segmented>
	<size>
		<depth>3</depth>
		<height>375</height>
		<width>500</width>
	</size>
	<source>
		<annotation>PASCAL VOC2012</annotation>
		<database>The VOC2012 Database</database>
		<image>flickr</image>
	</source>
</annotation>
yolo 主要是识别物体的bounding box 还有物体的类别,所以只需要读取xml file 里面bndbox 和 两个目标即可。 在github上找到了读取XMLfile的代码,就偷懒不自己写了。出处请参见最后的reference link。代码如下:
def parse_rec(filename):
    """ Parse a PASCAL VOC xml file """
    tree = ET.parse(filename)
    objects = []
    for obj in tree.findall('object'):
        obj_struct = {}
        difficult = int(obj.find('difficult').text)
        if difficult == 1:
            # print(filename)
            continue
        obj_struct['name'] = obj.find('name').text
        bbox = obj.find('bndbox')
        obj_struct['bbox'] = [int(float(bbox.find('xmin').text)),
                              int(float(bbox.find('ymin').text)),
                              int(float(bbox.find('xmax').text)),
                              int(float(bbox.find('ymax').text))]
        objects.append(obj_struct)

    return objects
这里用了import xml.etree.ElementTree 作为解析xml的库 ET,并且把annotation下的xml 文件全部解析完成存成一个列表。
然后利用os库生成对应的文件地址列表。
with txt_file = open('yourname.txt','w') as txt_file
for xml_file in os.listdir(Annotations):
    count += 1
    if xml_file.split('.')[0] not in lines:
        continue
    image_path = xml_file.split('.')[0] + '.jpg'
    results = parse_rec(Annotations + xml_file)
    if len(results)==0:
        print(xml_file)
        continue
    txt_file.write(image_path)
    for result in results:
        class_name = result['name']
        bbox = result['bbox']
        class_name = VOC_CLASSES.index(class_name)
        txt_file.write(' '+str(bbox[0])+' '+str(bbox[1])+' '+str(bbox[2])+' '+str(bbox[3])+' '+str(class_name))
    txt_file.write('\n')
txt_file.close()
完成了文件读取,然后就是利用python逐行读区文件信息和label 然后送入到data loader 当中去。
这里其实有一个比较tricky的地方,正常训练网络所用的random flip randomm crop random scale 等,如果按照我平时的习惯利用torchvision 里面的transoform 包来做这件事的话,会造成只修改了图片size而没有对应修改boundingbox 的坐标。 所以这里经过资料查阅发现github上一大部分实现都没有加这样的data augmentation的步骤而是借用已经pretrained的base network parameters来提供一个baseline accuracy。 另一部分主要是用opencv的包来做的。 这里主要参考了xiongzihua 的工作来实现这部分功能。
直接给出重载_get_item_ 的方法。
class VOCDataset(data.Dataset):
	def __init__(self,root,list_file,train,transform,loader,snumber = 7,bnumber = 2,cnumber =20, image_size = 448):
这是初始化类里面yolodataset 里面比较重要的几个参数,其中S为划分grid 的数量,B为boundingbox 的数量。c为类别数量。 我主要是将文件名按照顺序读区一个list , annotation按照对应的顺序也读取一个list。然后利用idx 来一一读取。这里因为要用opencv处理图片所以还需要重载一下default img loader。 pytorch 默认的是PIL 这里改成cv imread就好了。 注意cv2 和PIL读区的RGB三个通道顺序不一样,所以要利用cv自己的库把图片变成RGB。 而且PIL读出来是( 通道,高度,宽度 ) 这样的结构,CV读出来是 (高度,宽度,通道)这样的顺序,也要注意。 代码如下
def __getitem__(self,idx):
        fname = self.fnames[idx]
        img = self.loader(os.path.join(self.root+fname))
        boxes = self.boxes[idx].clone()
        labels = self.labels[idx].clone()
        img,boxes,labels = self.cvtransform(img,boxes,labels) # 各种变换用torch 自带的的transform做不到,所以借鉴了xiongzihua 的git hub上的代码写了一点cv变换
        h,w,_= img.shape
        boxes /= torch.Tensor([w,h,w,h]).expand_as(boxes)
        target = self.make_target(labels,boxes)
        target = torch.tensor(target).float()

        img = self.BGR2RGB(img) #because pytorch pretrained model use RGB
        img = cv2.resize(img,(self.image_size,self.image_size))

        if self.transform is not None:
            img = self.transform(img)
        print(img)
这里两个关键的函数, 一个是self.cvtransform(img,boxes,labels) 另一个是 self.make_target(labels,boxes)
第一个是变换的函数。函数代码如下,每一个模块如何实现请参见,github dataset.py opencv部分参照了xiongzihua 的工作。
def cvtransform(self, img, boxes, labels):
        img, boxes = self.random_flip(img, boxes) #随机反转
        img,boxes = self.randomScale(img,boxes) #随机大小
        img = self.randomBlur(img) #高斯模糊
        img = self.RandomBrightness(img) #随即亮度
        img = self.RandomHue(img) #随机色调
        img = self.RandomSaturation(img) #随机色彩浓度,饱和度
        img,boxes,labels = self.randomShift(img,boxes,labels)  # 随机平移操作
        img,boxes,labels = self.randomCrop(img,boxes,labels) # 随机剪裁
        return img,boxes,labels
第二个函数是编码的操作。 即输入labels 和boundingbox 然后编码称为 [S,S, (B*5+C)] 的训练对象。 直接给出代码如下这个过程可以看作是一个编码的过程。 大概实现流程就是先根据boxes 这个list 看看有几个bounding box 再用np 库完成这个操作即可。 代码比较长,参见github dataset.py
最后dataset 的target 输出应该是 [batch, s,s, (B*5+C)]
损失函数和训练
因为yolo 采取特殊的loss,所以我们要根据输入输出自己计算出来损失函数,传递给optimizer 进行梯度下降。 损失函数已经在上面给出了数学定义。这里主要讲一下实现的细节。 在实现过程当中IOU 是一个比较重要的值,可以在class 下面生命一个函数来计算IOU:
IOU全称为检测框的交并比。可以给出公式如下:
$IOU = \frac{DetectionResult \bigcap Ground Truth }{DetectionResult \bigcup Ground Truth}$
难点主要在于计算交叉的部分的面积, torch可以利用torch.max来判断交叉部分的坐标然后计算loss 如下
def compute_iou(self, bbox1, bbox2):
        # transfer center cordinate to x1,y1,x2,y2
        b1x1y1 = bbox1[:,:2]-bbox1[:,2:]**2 # [N, (x1,y1)=2]
        b1x2y2 = bbox1[:,:2]+bbox1[:,2:]**2 # [N, (x2,y2)=2]
        b2x1y1 = bbox2[:,:2]-bbox2[:,2:]**2 # [M, (x1,y1)=2]
        b2x2y2 = bbox2[:,:2]+bbox2[:,2:]**2 # [M, (x1,y1)=2]
        box1 = torch.cat((b1x1y1.view(-1,2), b1x2y2.view(-1, 2)), dim=1) # [N,4], 4=[x1,y1,x2,y2]
        box2 = torch.cat((b2x1y1.view(-1,2), b2x2y2.view(-1, 2)), dim=1) # [M,4], 4=[x1,y1,x2,y2]
        N = box1.size(0)
        M = box2.size(0)
        # find cordinate of intersaction boxes.
        tl = torch.max(
            box1[:,:2].unsqueeze(1).expand(N,M,2),  # [N,2] -> [N,1,2] -> [N,M,2]
            box2[:,:2].unsqueeze(0).expand(N,M,2),  # [M,2] -> [1,M,2] -> [N,M,2]
        )
        br = torch.min(
            box1[:,2:].unsqueeze(1).expand(N,M,2),  # [N,2] -> [N,1,2] -> [N,M,2]
            box2[:,2:].unsqueeze(0).expand(N,M,2),  # [M,2] -> [1,M,2] -> [N,M,2]
        )
        #   width and height
        wh = br - tl  # [N,M,2]
        wh[(wh<0).detach()] = 0
        inter = wh[:, :, 0] * wh[:, :, 1]  # [N,M]

        area1 = (box1[:,2]-box1[:,0]) * (box1[:,3]-box1[:,1])  # [N,]
        area2 = (box2[:,2]-box2[:,0]) * (box2[:,3]-box2[:,1])  # [M,]
        area1 = area1.unsqueeze(1).expand_as(inter)  # [N,] -> [N,1] -> [N,M]
        area2 = area2.unsqueeze(0).expand_as(inter)  # [M,] -> [1,M] -> [N,M]

        iou = inter / (area1 + area2 - inter)
        return iou
其他部分就比较简单了, 唯一需要注意的是,在torch 中可以用一个mask来表示哪些7*7 的维度内包含了目标,在没有包含目标的那些维度,是不会计算最后的IOUloss等等的。以下是一个实例:
coord_mask = target_tensor[:,:,5] > 0
noobj_mask = target_tensor[:,:,5] == 0
最后只需要用两个常数lambda来拼合coordinate loss 和 obj loss 即可,祥情参见代码:Duan Yiqun 的 github
主程序
终于来到主程序这一趴了我一般喜欢用parser 直接做好接口,反复测试时候比较方便。 给一个示例:
parser = argparse.ArgumentParser(description='PyTorch Yolov1 Training DuanYiqun')
parser.add_argument('--lr', default=0.01, type=float, help='learning rate')
parser.add_argument('--resume', '-r', action='store_true', help='resume from checkpoint')
parser.add_argument('--experimentname',default='sdmnv5_vscommon', type=str, help='model name for save')
parser.add_argument('--trainroot',default='/home/claude.duan/data/VOCdevkit/VOC2012/JPEGImages/', type=str, help='for train images')
parser.add_argument('--testroot',default='/home/claude.duan/data/VOCdevkit/VOC2012/JPEGImages/', type=str, help='for test images')
parser.add_argument('--indexdir',default='./data/yolo_train_on_VOC2012.csv', type=str, help='log direction for save')
parser.add_argument('--batch_size',default=20, type=int, help='batch size')
parser.add_argument('--num_epochs',default=50, type=int, help='training length')
parser.add_argument('--sgrid',default=7, type=int, help='grid number 7*7 for default')
parser.add_argument('--bbxnumber',default=2, type=int, help='bounding box number')
parser.add_argument('--classnumber',default=20, type=int, help='class number default is 20')
parser.add_argument('--mname',default='train50', type=str, help='experimentname')
args = parser.parse_args()
然后只要给出train的代码, 就大功告成啦:
def train(epoch):
    print('\nEpoch: %d' % epoch)
    net.train()
    train_loss = 0
    correct = 0
    total = 0
    start_time=time.time()
    for batch_idx, (inputs, targets) in enumerate(train_loader):
        inputs, targets = inputs.to(device), targets.to(device)
        optimizer.zero_grad()
        pred = net(inputs)
        loss = criterion(pred,targets)
        loss.backward()
        optimizer.step()

        train_loss += loss.item()

        print('batch %s of total batch %s' % (batch_idx, len(train_loader)), 'Loss: %.3f ' % (train_loss/(batch_idx+1)))

    end_time=time.time()
    epoch_time=end_time-start_time
    data=[epoch,train_loss/(batch_idx+1),epoch_time]
    print('trainloss:{},time_used:{}'.format(train_loss/(batch_idx+1),epoch_time))
    return data
