OpenWeedLocator Save
An open-source, low-cost, image-based weed detection device for in-crop and fallow scenarios.

OpenWeedLocator
Welcome to the OpenWeedLocator (OWL) project, an opensource hardware and software weed detector that uses entirely off-the-shelf componentry, very simple green-detection algorithms (with capacity to upgrade to in-crop detection) and 3D printable parts. OWL integrates weed detection on a Raspberry Pi with a relay control board in a custom designed case so you can attach any 12V solenoid, relay, lightbulb or device for low-cost, simple and open-source site-specific weed control. Projects to date have seen OWL mounted on robots, vehicles and bicycles for spot spraying. For the latest ideas and news, check out the Discussion tab.
| Internal electronics | Fitted module - vehicle | Fitted module - robot |
|---|---|---|
 |
 |
 |
Official Publications
OpenWeedLocator (OWL): An open-source, low-cost device for fallow weed detection
This is the original OWL publication, released in Scientific Reports (open access). A range of green detection algorithms were tested including ExG (excess green 2g - r - b, developed by Woebbecke et al. 1995), a hue, saturation and value (HSV) threshold and a combined ExG + HSV algorithm. If you use the OWL in your research please consider citing this publication.
Investigating image-based fallow weed detection performance on Raphanus sativus and Avena sativa at speeds up to 30 km/h
The performance of the OWL from 5 - 30 km/h with different cameras and on broadleaf and grass 'weeds' was tested and published in Computers and Electronics in Agriculture. The current Raspberry Pi HQ Camera + latest software combination provided a recall of 74.8% at 5 km/h and 50.5 % at 30 km/h. Recall of up to 95.7% at 5 km/h was achieved by the global shutter Arducam AR0234.
Repository DOI: ![]()
NOTICE: Raspian Operating System Support
Important: The current software only functions correctly on Raspian Buster (with picamera support). We are working on updating the image to function correctly with Raspian Bookworm for Raspberry Pi 5 and Picamera2 support. This is expected to be released in May 2024. In the meantime, we recommend downloading the existing image and updating it with update_owl.sh.
NOTICE: Picamera2
Raspberry Pi has announced that they would be moving away from the current picamera software, towards the open-source and active libcamera-based picamera2. The picamera2 library is now in beta. We will be transitioning the OpenWeedLocator to picamera2, given it has much simpler integration of a wider array of cameras.
Overview
- OWL Use Cases
- Community Development
- Hardware Requirements
- Software Installation
- 3D Printing
- Updating OWL
- Troubleshooting
- Citing OWL
- Acknowledgements
- References
Manuals
If you prefer a hardcopy version of these instructions, you can view and download the PDF using one of the links below. These will be updated as major changes are made. All older versions will be retained within the docs folder.
Current
OWL Use Cases
Vehicle-mounted spot spraying
The first, and most clear use case for the OWL is for the site-specific application of herbicide in fallow. As part of the development and testing of the unit, the OWL team designed and assembled a 2 m spot spraying boom, using two OWLs to control four 12 V solenoids each. The boom was mounted on the back of a ute/utility vehicle with the spray tank located in the tray and powered by a 12V car battery. Indicator lights for each nozzle were used to highlight more clearly when each solenoid had been activated for demonstration and testing purposes.

| Parameter | Details | Notes |
|---|---|---|
| Mounting gap | 0 cm | Mounted directly to same bar as nozzles, just 32cm higher. |
| Forward Speed | 6 - 8 km/h | Image blur/activation time limiting forward speed. Moving the OWL unit forward would be a quick improvement for travel speed and large green weeds. |
| Solenoids | Goyen solenoid 3QH/3662 with Teejet body | Many alternatives exist as outlined in #2 |
| Spray tips | Teejet TP4003E-SS | 40 degree, flat fan nozzles, stainless steel |
| Strainer | TeeJet 50 mesh strainer | Protect spray tip from clogging/damage |
| Pump/tank | Northstar 12V 60L ATV Sprayer | 8.3 LPM 12V pump, 60L capacity, tray mounted |
Robot-mounted spot spraying
A second system, identical to the first, was developed for the University of Sydney's Digifarm robot, the Agerris Digital Farm Hand. The system is in frequent use for the site-specific control of weeds in trial areas. It is powered by the 24V system on the robot, using a 24 - 12V DC/DC converter.

Image data collection
An updated image sampling method was added on 14/07/2022, which allows whole-image, cropped-to-bounding-box and square images saved on a set frequency. This means the OWL can now be used for image data collection much more easily than before. Example images for each method are provided below.
| Method | Code | Example |
|---|---|---|
| Whole image | 'whole' |  |
| Crop to bounding box | 'bbox' |  |
| Crop to square around weed centre | 'square' |  |
| Deactivated (DEFAULT) | None |
Community development and contribution
As more OWLs are built and fallow weed control systems developed, we would love to share the end results here. Please get in contact and we can upload images of the finished systems on this page.
OWL now has a Discussion page too. Use this for any ideas, suggestions, comments, completed units or other points you'd like to raise. If there's a bug or improvement, please raise an issue.
Please review the contribution page for all the details on how to contribute and follow community guidelines.
Hardware Requirements
A complete list of components is provided below. Further details on 3D models and hardware assembly are provided in subsequent sections. The quantities of each item below are for one OWL detection unit.
List of hardware requirements
Please note links are provided to an example online retailer of each component for convenience only. There are certainly many other retailers that may be better suited and priced to your purposes and we encourage you to find local suppliers. Other types of connector, layout and design are also possible, which may change the parts required.
| Component | Quantity | Link |
|---|---|---|
| Enclosure | ||
| Main Case (single Bulgin connector) | 1 | STL File |
| Main Case (cable glands) | 1 | STL File |
| Main Cover | 1 | STL File |
| Raspberry Pi Mount | 1 | STL File |
| Relay Control Board Mount | 1 | STL File |
| Voltage Regulator Mount | 1 | STL File |
| Camera Mount | 1 | STL File |
| Enclosure Plug | 1 | STL File |
| Computing | ||
| Raspberry Pi 4 8GB | 1 | Link |
| *Green-on-Green ONLY - Google Coral USB Accelerator | 1 | Link |
| 64GB SD Card | 1 | Link |
| Camera | ||
| Raspberry Pi HQ Camera | 1 | Link |
| CCTV 6mm Wide Angle Lens | 1 | Link |
| Power | ||
| 5V 5A Step Down Voltage Regulator | 1 | Link |
| 4 Channel, 12V Relay Control Board | 1 | Link |
| M205 Panel Mount Fuse Holder | 1 | Link |
| Jumper Wire | 1 | Link |
| WAGO 2-way Terminal Block | 2 | Link |
| Bulgin Connector - Panel Mount | 1 | Link |
| Bulgin Connector - Plug | 1 | Link |
| Micro USB to USB-C adaptor | 1 | Link |
| Micro USB Cable | 1 | Link |
| Miscellaneous | ||
| 12V Chrome LED | 2 | Link |
| 3 - 16V Piezo Buzzer | 1 | Link |
| Brass Standoffs - M2/3/4 | Kit | Link |
| M3 Bolts/Nuts | 4 each or Kit | Link |
| Wire - 20AWG (red/black/green/blue/yellow/white) | 1 roll each | Link |
| Optional | ||
| Real-time clock module | 1 | Link |
Hardware Assembly
All components listed above are relatively "plug and play" with minimal soldering or complex electronics required. Follow these instructions carefully and triple check your connections before powering anything on to avoid losing the magic smoke and potentially a few hundred dollars. Never make changes to the wiring on the detection unit while it is connected to 12V and always remain within the safe operating voltages of any component.
Complete guide to hardware assembly
Before starting, have a look at the complete wiring diagram below to see how everything fits together. The LEDs, fuse and Bulgin connector are all mounted on the rear of the OWL unit, rather than where they are located in the diagram. If you prefer not to use or can't access a Bulgin connector, there is a separate 3D model design that uses cable glands instead.
Required tools
- Wire strippers
- Wire cutters
- Soldering iron/solder

Step 1 - enclosure and mounts
Assembling the components for an OWL unit requires the enclosure and mounts as a minimum. These can be 3D printed on your own printer or printed and delivered from one of the many online stores that offer a 3D printing service. Alternatively, you could create your own enclosure using a plastic electrical box and cutting holes in it, if that's easier. We'll be assuming you have printed out the enclosure and associated parts for the rest of the guide, but please share your finished designs however they turn out!
The first few steps don't require the enclosure so you can make a start right away, but while you're working on getting that assembled, make sure you have the pieces printing, they'll be used from Step 4. For a complete device, you'll need: 1 x base, 1 x cover, 1 x RPi mount, 1 x relay mount, 1 x regulator mount, 1 x camera mount and 1 x plug.
Step 2 - soldering
There are only a few components that need soldering, including the fuse and voltage regulator:
- Soldering of voltage regulator pins
- Soldering of 12V input wires to voltage regulator pins
- Soldering of 5V output wires to voltage regulator pins (micro USB cable)
- Soldering of red wire to both fuse terminals
Carefully check which pins on the voltage regulator correspond to 12V in, GND in, 5V out and GND out prior to soldering.
To solder the Micro USB cable to the voltage regulator output, you'll need to cut off the USB A end so you are left with approximately 10cm of cable. Using the wire strippers or a sharp box cutter/knife, remove the rubber sheath around the wires. If you have a data + charging cable you should see red, green, white and black wires. The charging only cables will likely only have the red and black wires. Isolate the red (+5V) and black (GND) wires and strip approximately 5mm off the end. Solder the red wire to the positive output on the voltage regulator and black wire to the GND pin. Once you have finished, it should look like the first panel in the figure below.
NOTE: Soldering can burn you and generates potentially hazardous smoke! Use appropriate care, fume extractors and PPE to avoid any injury. If you're new to soldering, read through this guide, which explains in more detail how to perfect your skills and solder safely.
NOTE: When soldering, it's best to cover the exposed terminals with glue lined heat shrink to reduce the risk of electrical short circuits.
| Voltage regulator | Voltage regulator pins | Fuse |
|---|---|---|
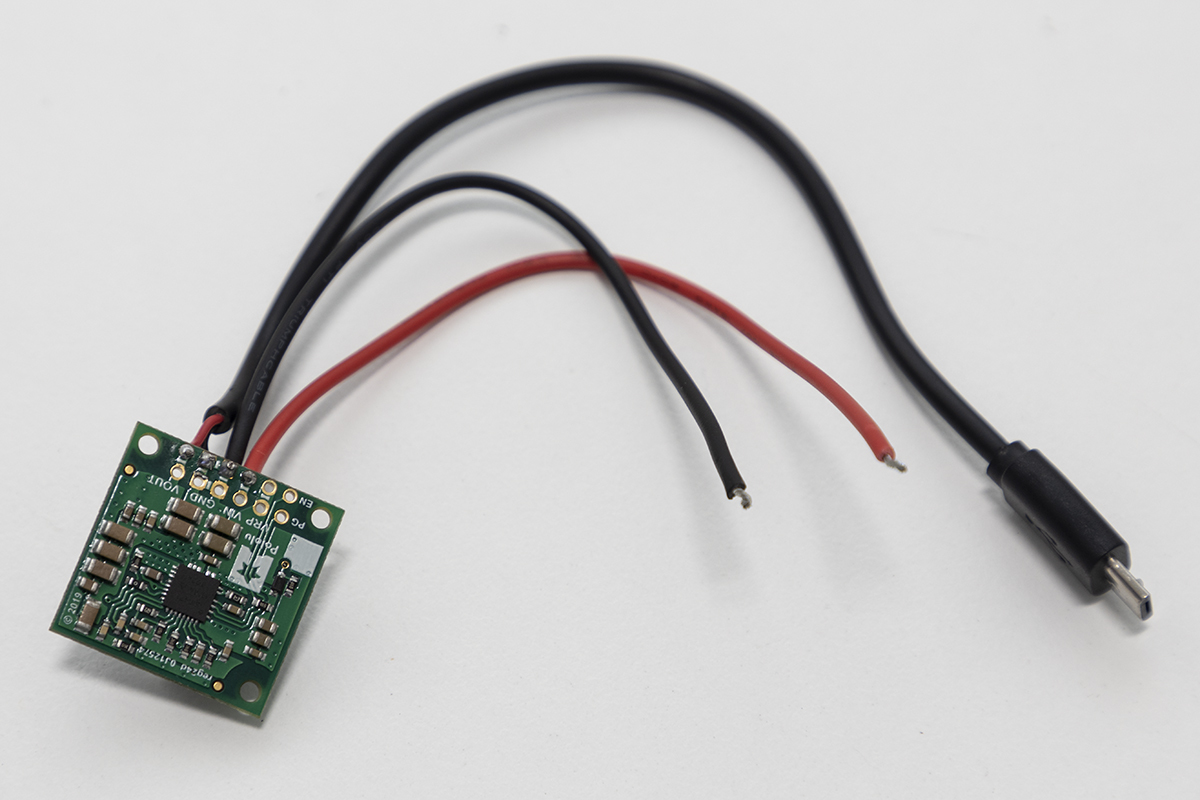 |
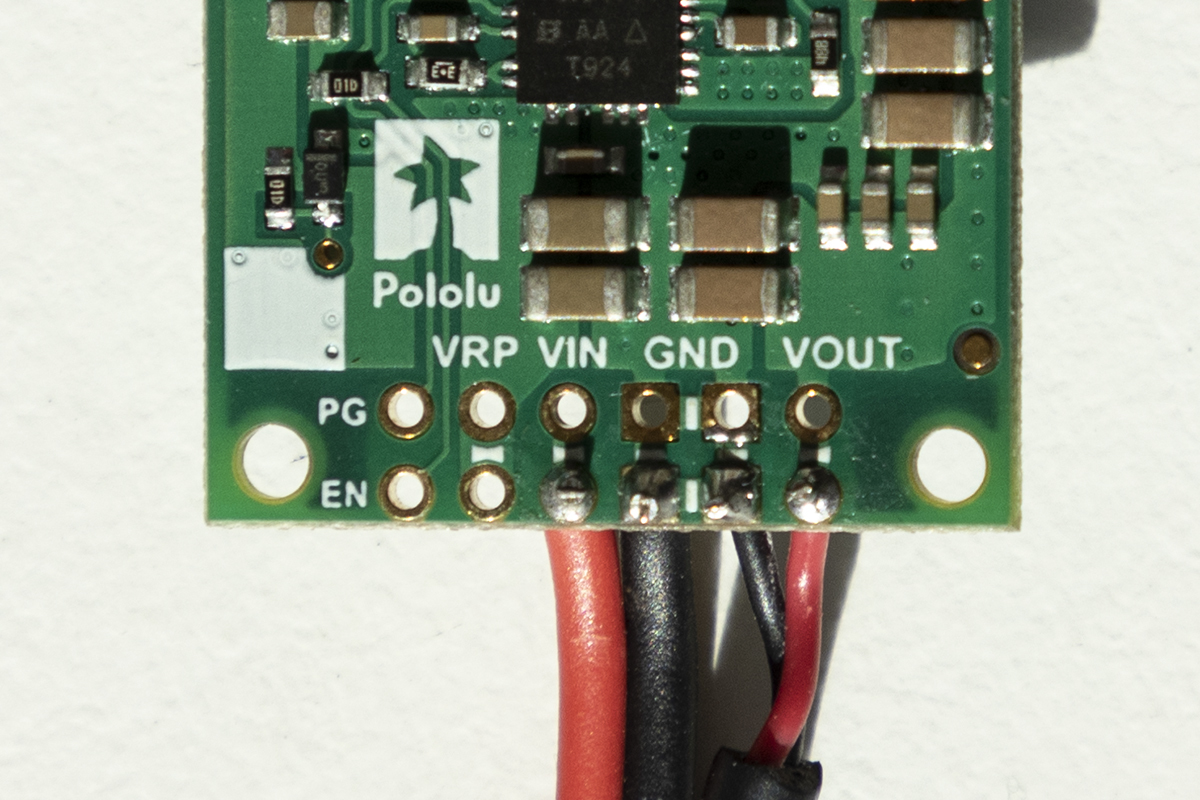 |
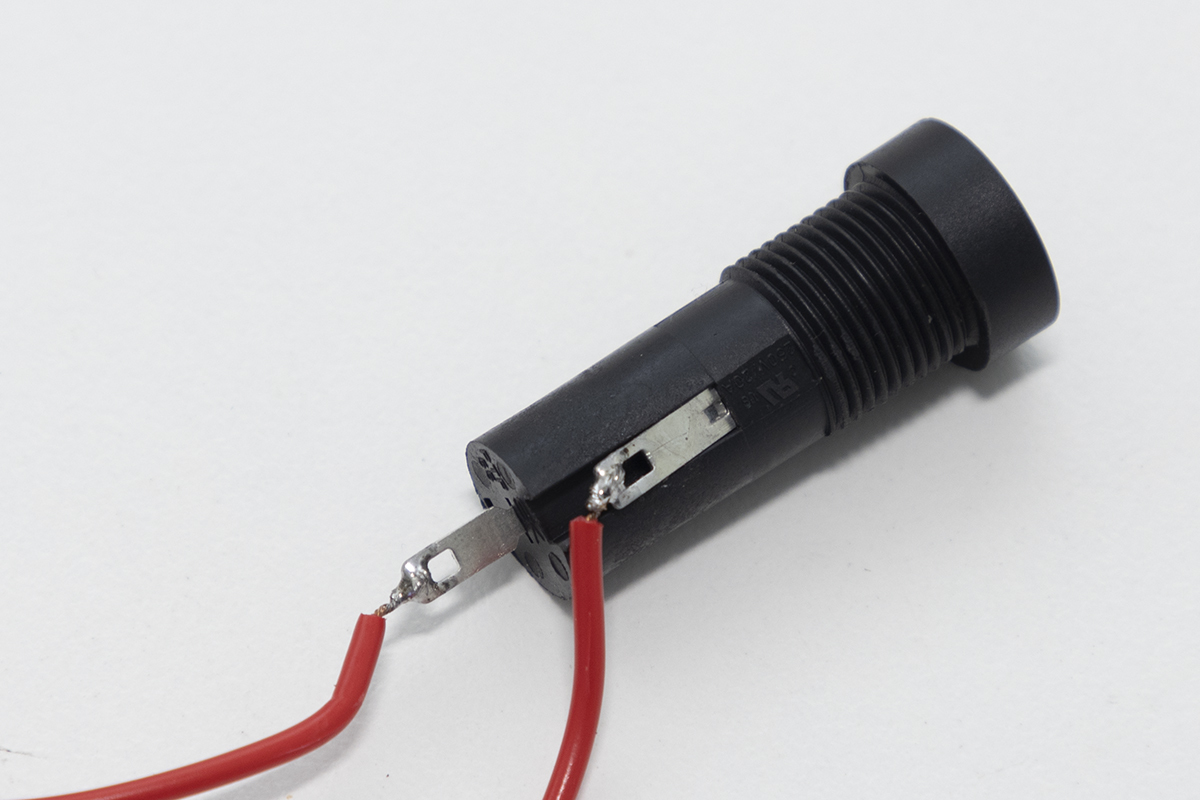 |
Once the two red wires are soldered to the fuse, the fuse can be mounted on the rear panel of the OWL base. One wire will be connected to the Bulgin plug (next step) and the other to the Wago 2-way block.
For neater wiring you can also solder jumpers between all the normally open (NO) pins on the base of the relay board, but this is optional. If you don't solder these connections, make sure you connect wire using the screw terminals instead. Photos of both are provided below.
| Soldered | Screw terminals |
|---|---|
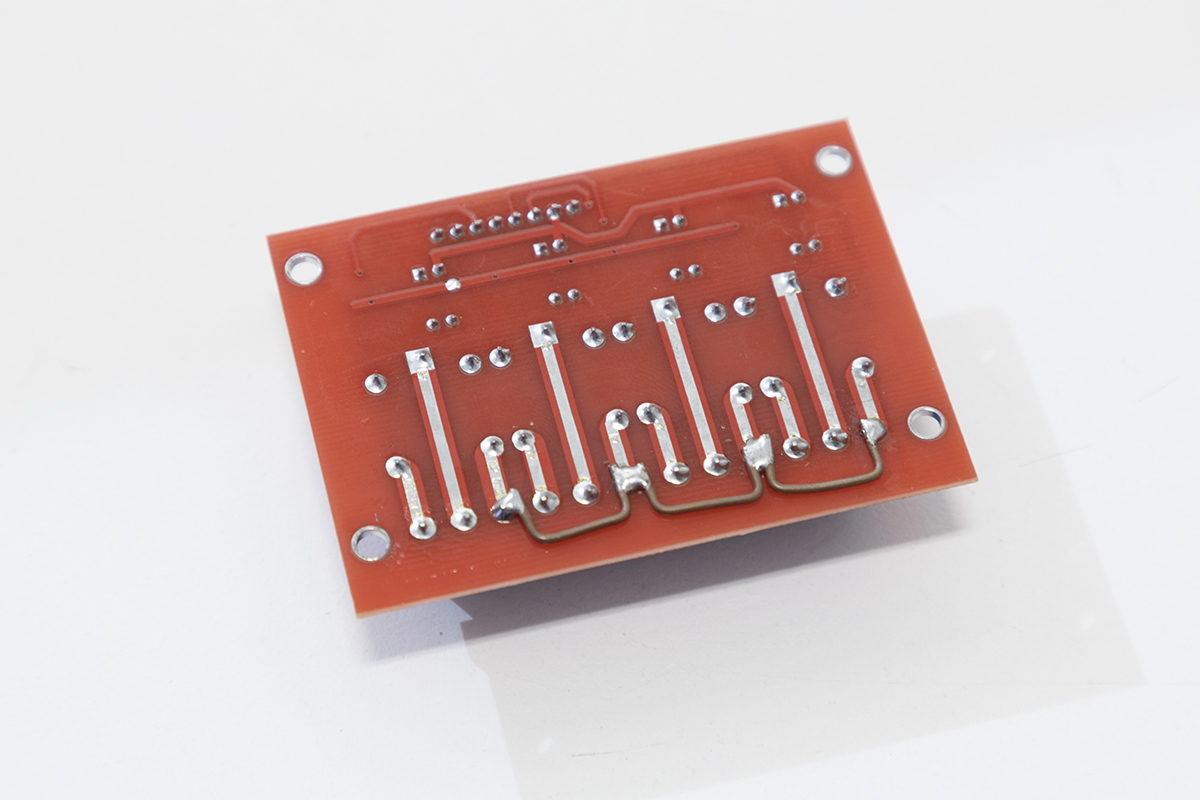 |
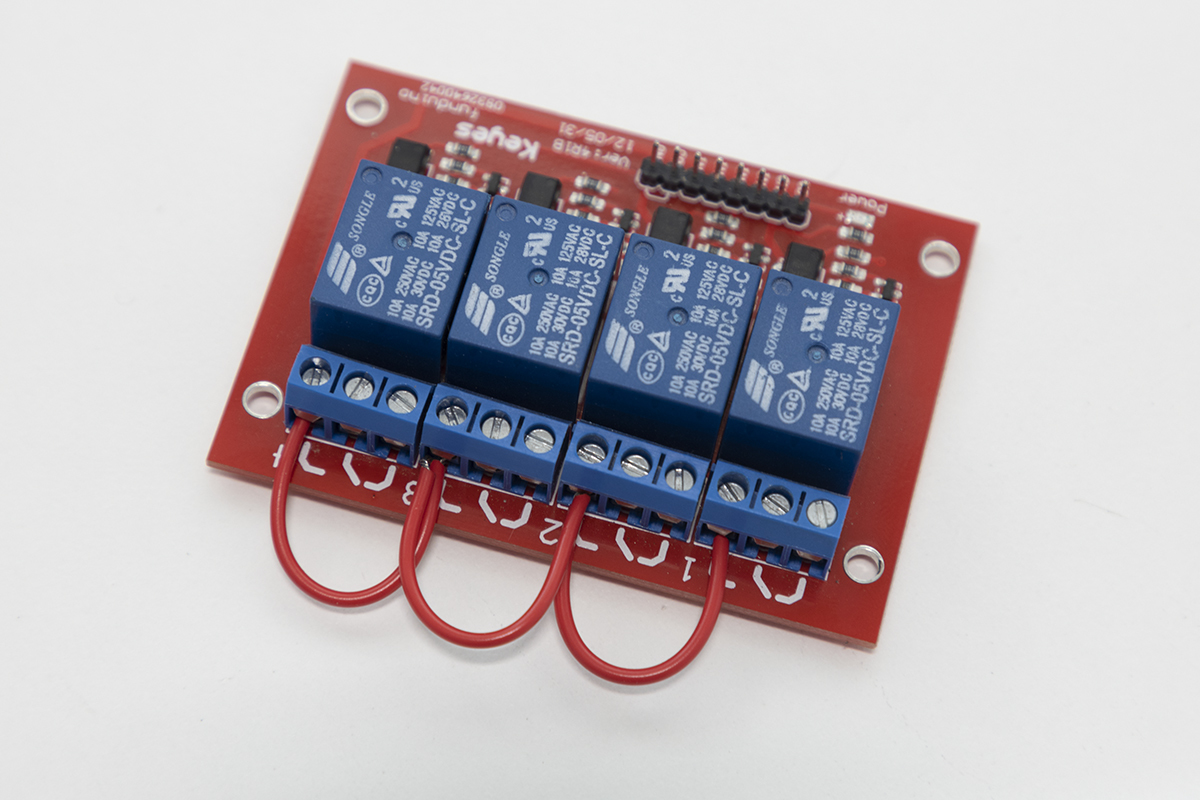 |
The other wires requiring soldering are joins between the buzzer and jumper wires for easy connection to the GPIO pins and from the LEDs to the power in/jumper wires.
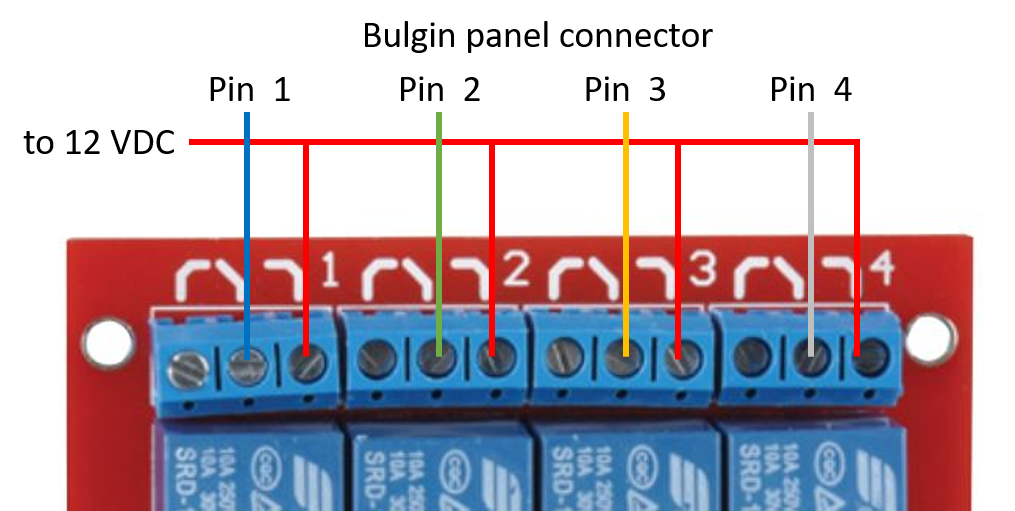
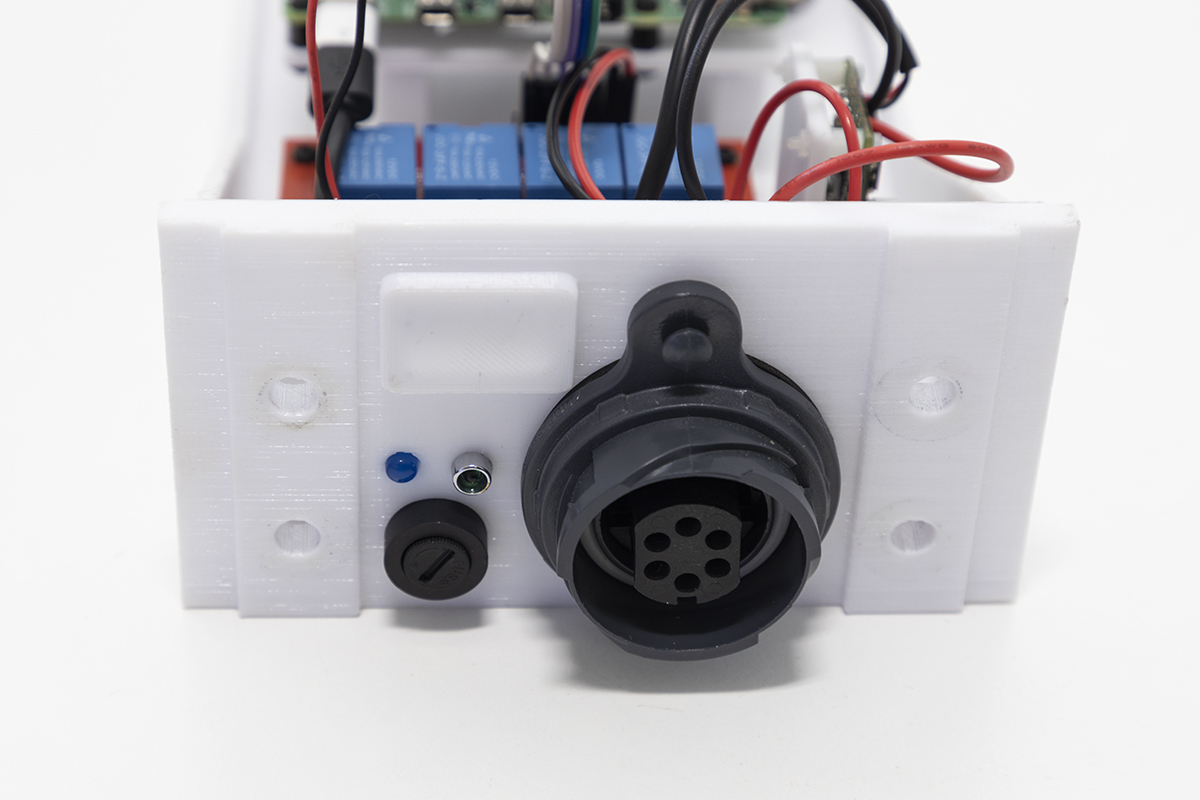
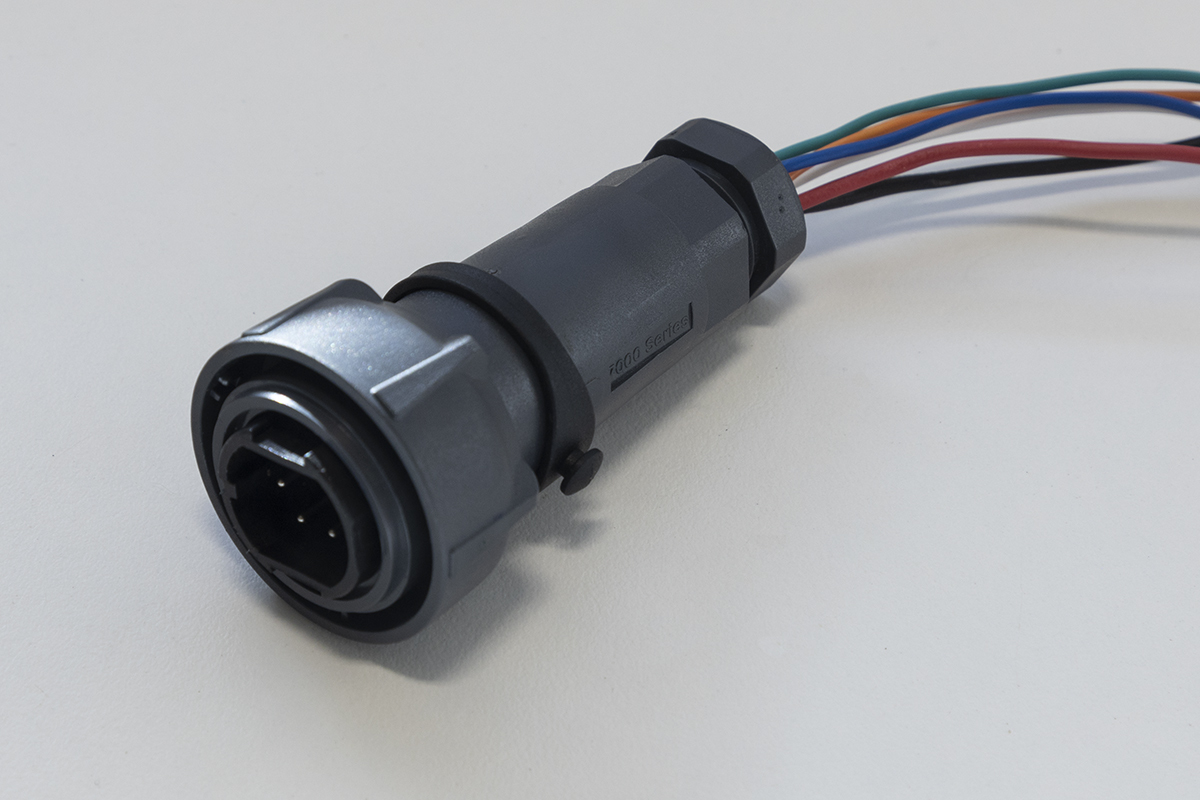
Step 3 - wiring up Bulgin connector
Next we'll need to wire the output relay control and input 12V wires to the Bulgin panel mount connector. Fortunately all pins are labelled, so follow the wire number table below. This will need to be repeated for the Bulgin plug as well, which will connect your solenoids or other devices to the relay control board.
The process is:
- Connect all wires to Bulgin connector using the screw terminals
- Mount the connector to the rear panel
- Leave at least 10cm of wire so it can be connected to the relay board and other connections later.
| Bulgin terminal number | Wire connection |
|---|---|
| 1 | Blue wire - connects to centre terminal (common) on relay 1 |
| 2 | Green wire - connects to centre terminal (common) on relay 2 |
| 3 | Orange wire - connects to centre terminal (common) on relay 3 |
| 4 | White wire - connects to centre terminal (common) on relay 4 |
| 5 | Red 12VDC - connects to fuse wire already soldered. Make sure wire is the right length when mounted. |
| 6 | Black GND - connects to Wago 2-way terminal |
NOTE: Skip this step if you're using cable glands.
Once all the wires have been connected you can now mount the Bulgin connector to the OWL base.
Step 4 - mounting the relay control board and voltage regulator
Attach the relay control board to the 3D printed relay control board mount using 2.5 mm standoffs. Attach the voltage regulator to the 3D printed voltage regulator mount with 2 mm standoffs. The mounted voltage regulator can then be mounted to one corner of the relay control board. The relay board and voltage regulator can then be installed in the raised slots in the OWL base.
NOTE: Use 2.5 mm standoffs for mounting the relay control board to its base. Use 2 mm standoffs to mount the voltage regulator to its base.
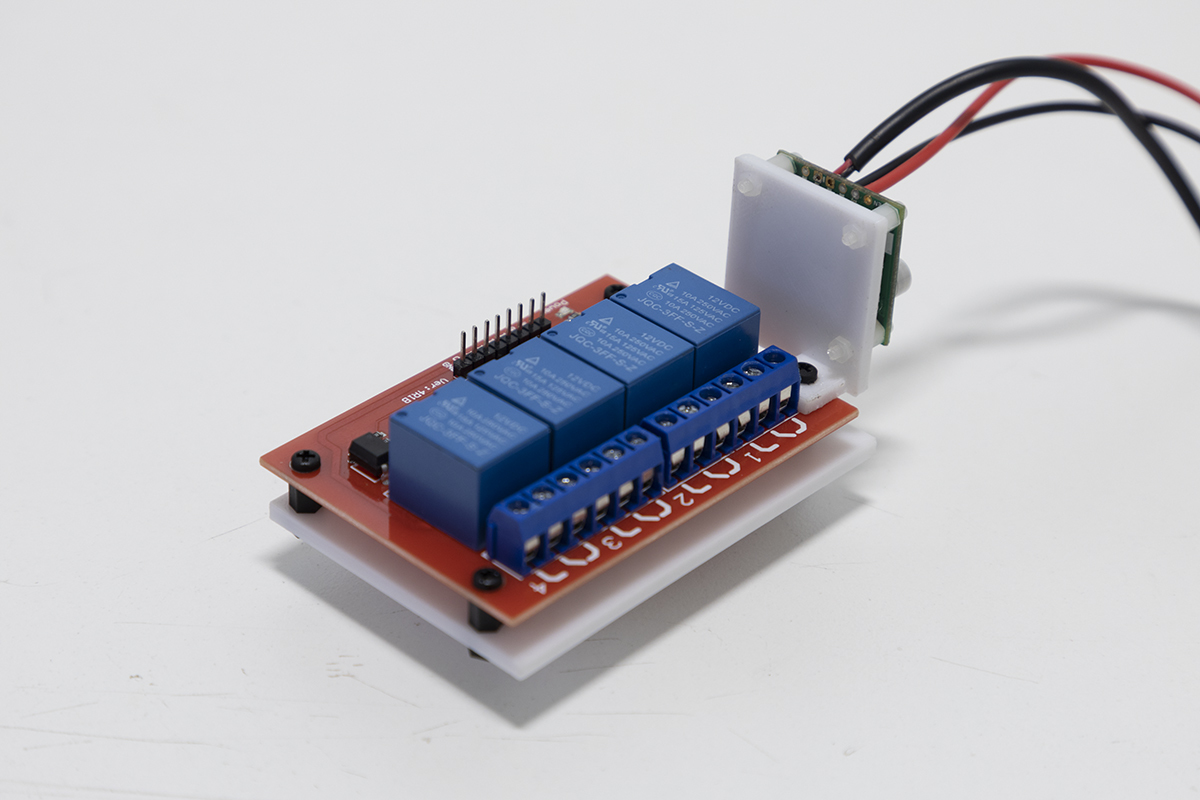
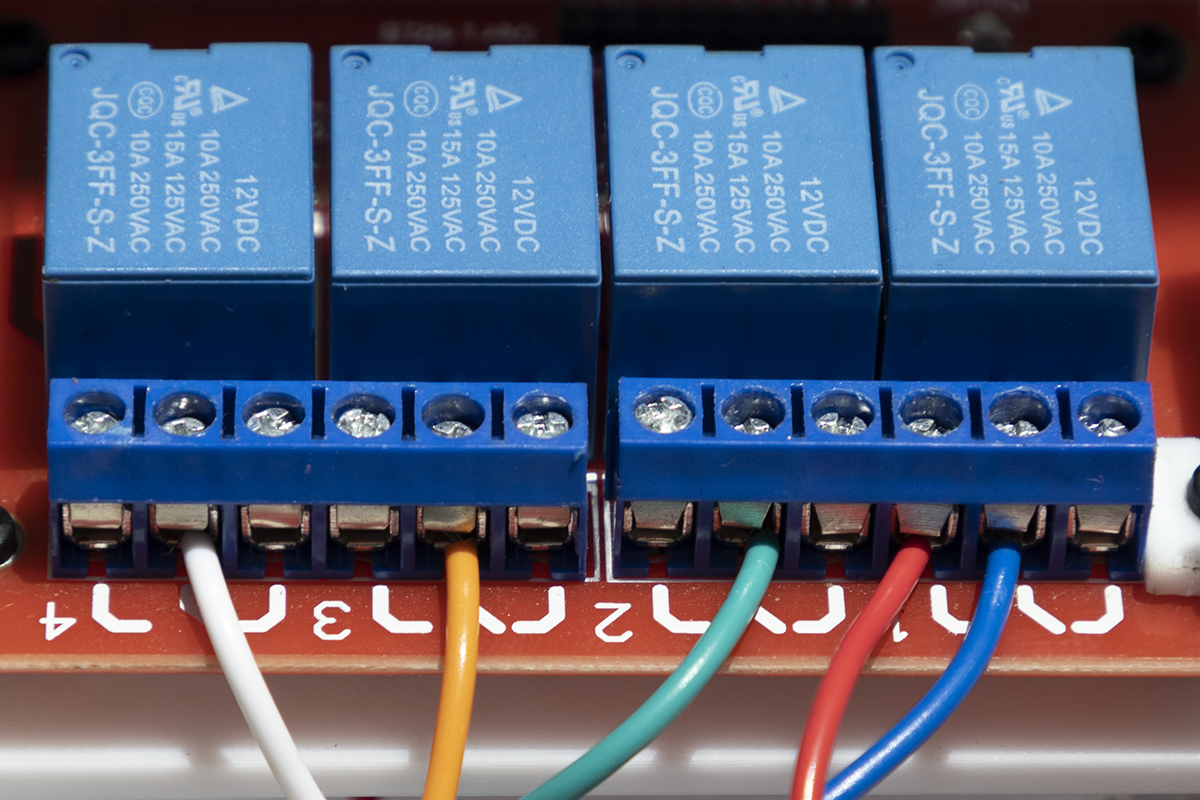
Step 5 - wiring the relay control board, voltage regulator, Wago 2-way blocks and Bulgin connector
Connect the relay control board to the Bulgin connector using the table in step 3 as a guide.
NOTE: Some relay control boards such as this on Amazon are ACTIVE on LOW. This means that the signal provided by the Raspberry Pi (a higher voltage) to activate a relay will instead turn the relay off. While this can be changed in the code, please consider purchasing HIGH level trigger (e.g the board specified in the parts list) or adjustable trigger (e.g. this board).
Next, connect red and black jumper wires to the VCC and GND header pins on the relay control board. Now choose one Wago block to be a 12V positive block and the second to be the negative or ground. To the positive block, connect the 12 V wire from the fuse (12V input from source), the 12 V input to the voltage regulator, the 12 V solenoid line from the relay board and the VCC line from the relay board to one of the two WAGO terminal blocks, twisting the wires together if necessary. Repeat with the second, negative WAGO terminal block, connecting the input ground line from the Bulgin connector, ground line from the voltage regulator and the GND black wire from the relay board.
| Installed relay board | Relay board wiring diagram | Relay board wiring |
|---|---|---|
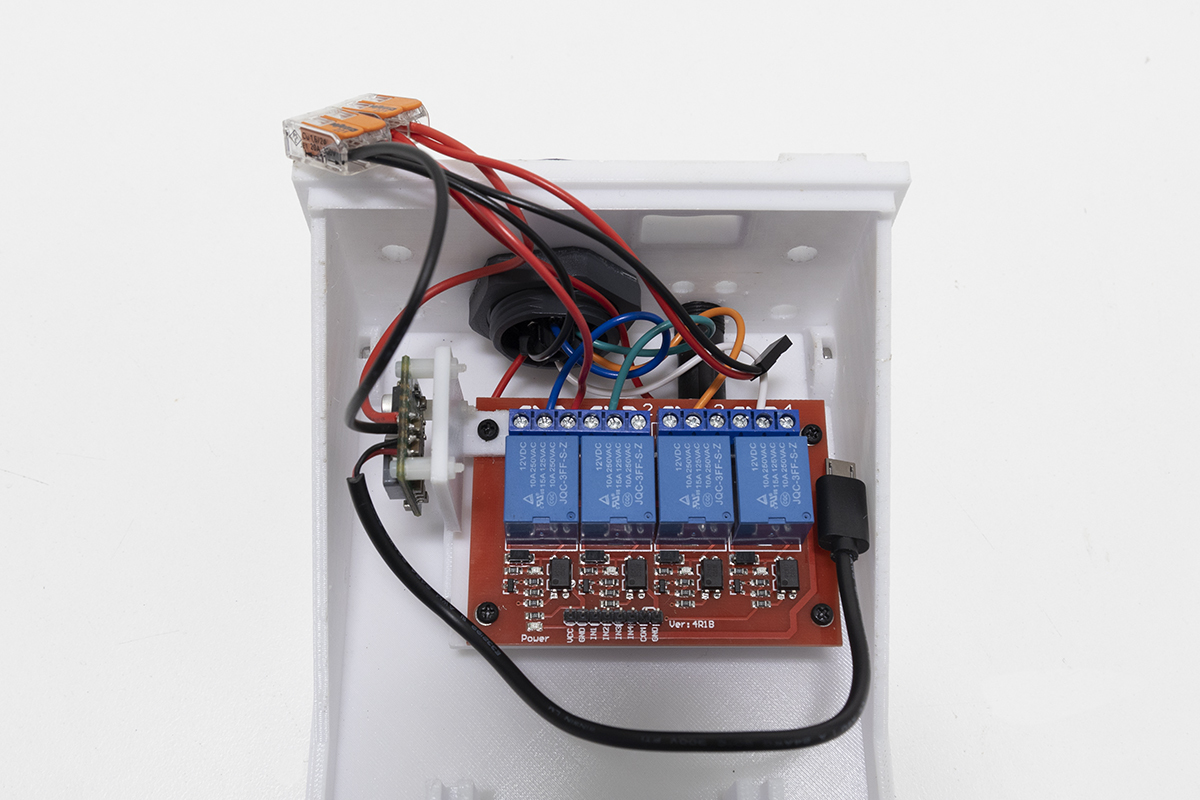 |
 |
 |
Step 6 - mounting Raspberry Pi and connecting power
Attach the Raspberry Pi to the 3D printed mount using 2.5 mm standoffs. Install in the raised slots in the OWL base. Connect to micro USB power from the voltage regulator, using a micro USB to USB-C adaptor. Alternatively, the Raspberry Pi can be powered over the GPIO, however, this has not yet been implemented.
| Raspberry Pi mount | Raspberry Pi in OWL base |
|---|---|
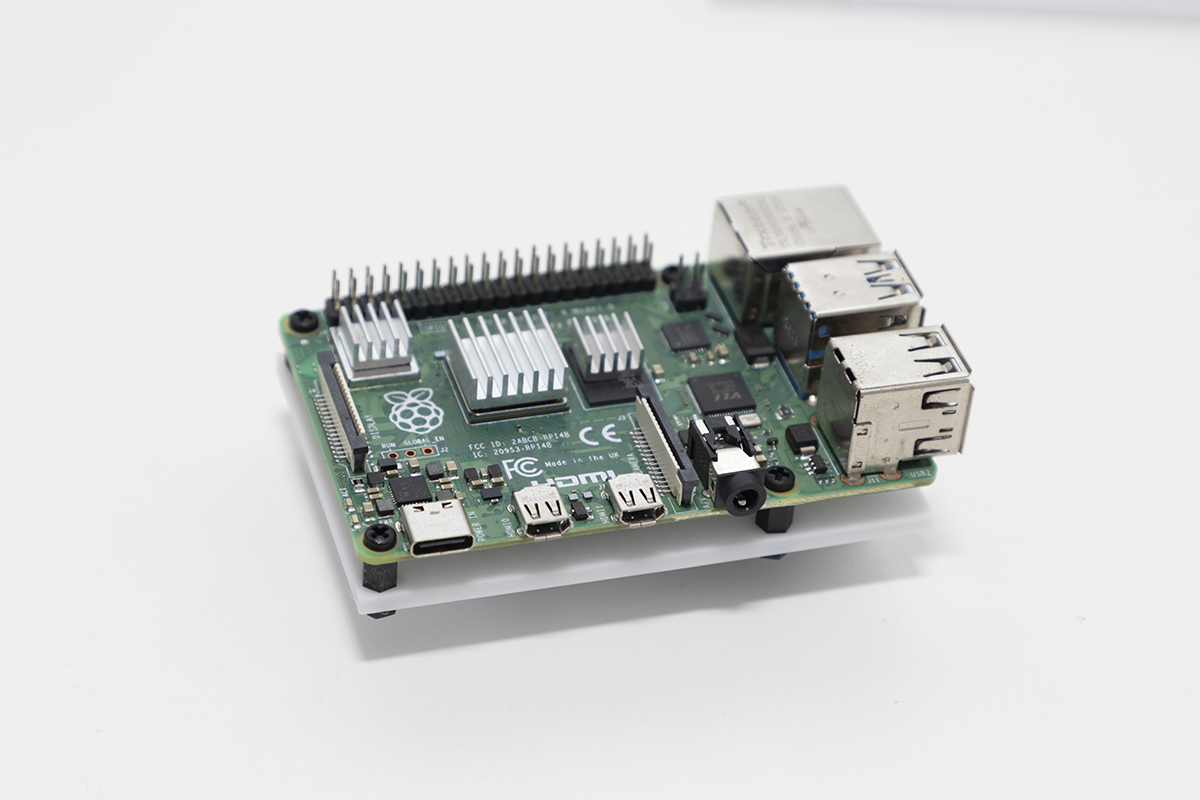 |
 |
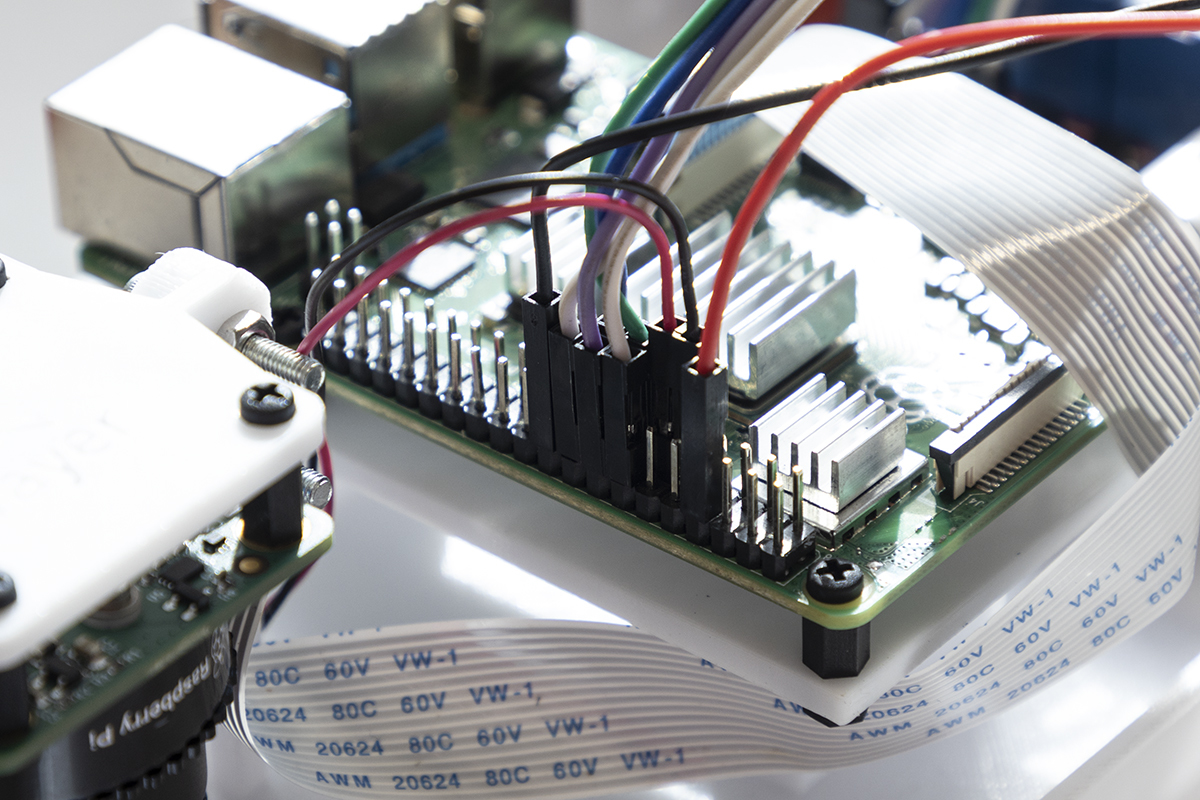
Step 7 - connecting GPIO pins
Connect the Raspberry Pi GPIO to the relay control board header pins, using the table below and the wiring diagram above as a guide:
The GPIO pins on the Raspberry Pi are not clearly labelled, so use this guide to help. Be careful when connecting these pins as incorrect wiring can shortcircuit/damage your Pi.

| RPi GPIO pin | Relay header pin |
|---|---|
| 13 | IN1 |
| 14 | COM |
| 15 | IN2 |
| 16 | IN3 |
| 18 | IN4 |
| Raspberry Pi GPIO pins | Relay control board header pins |
|---|---|
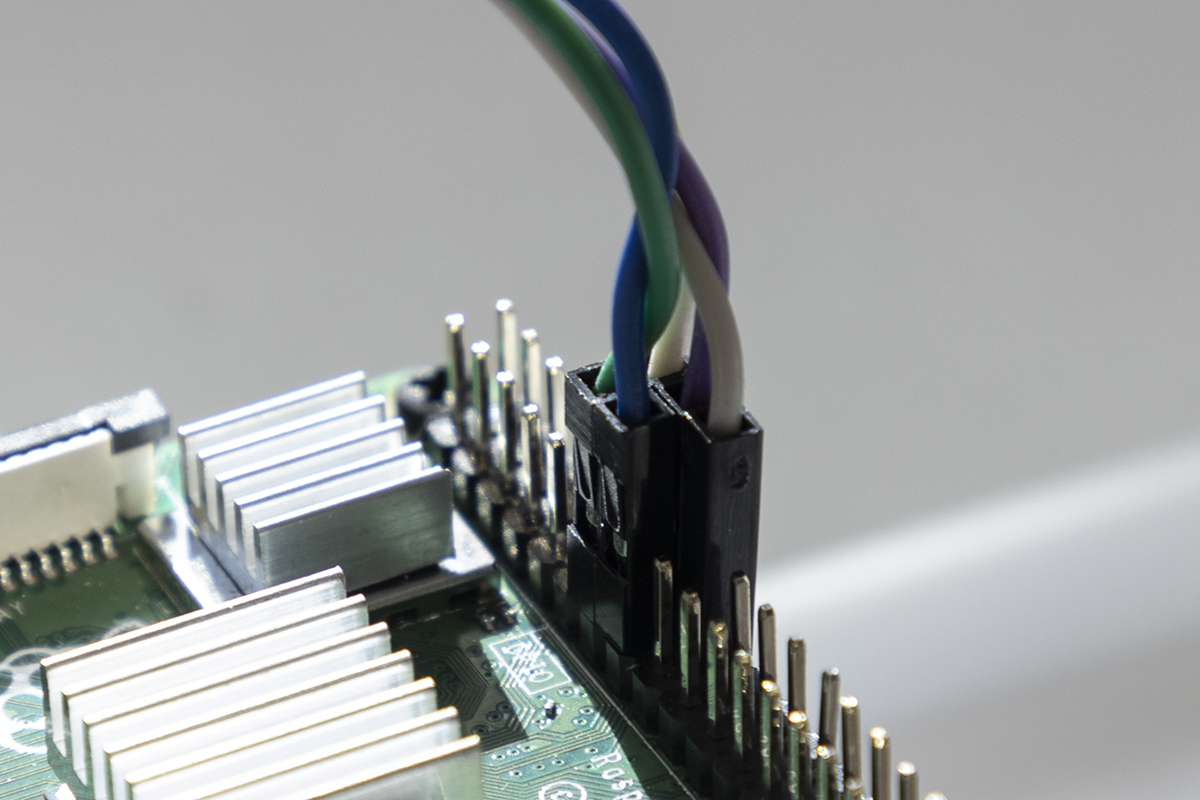 |
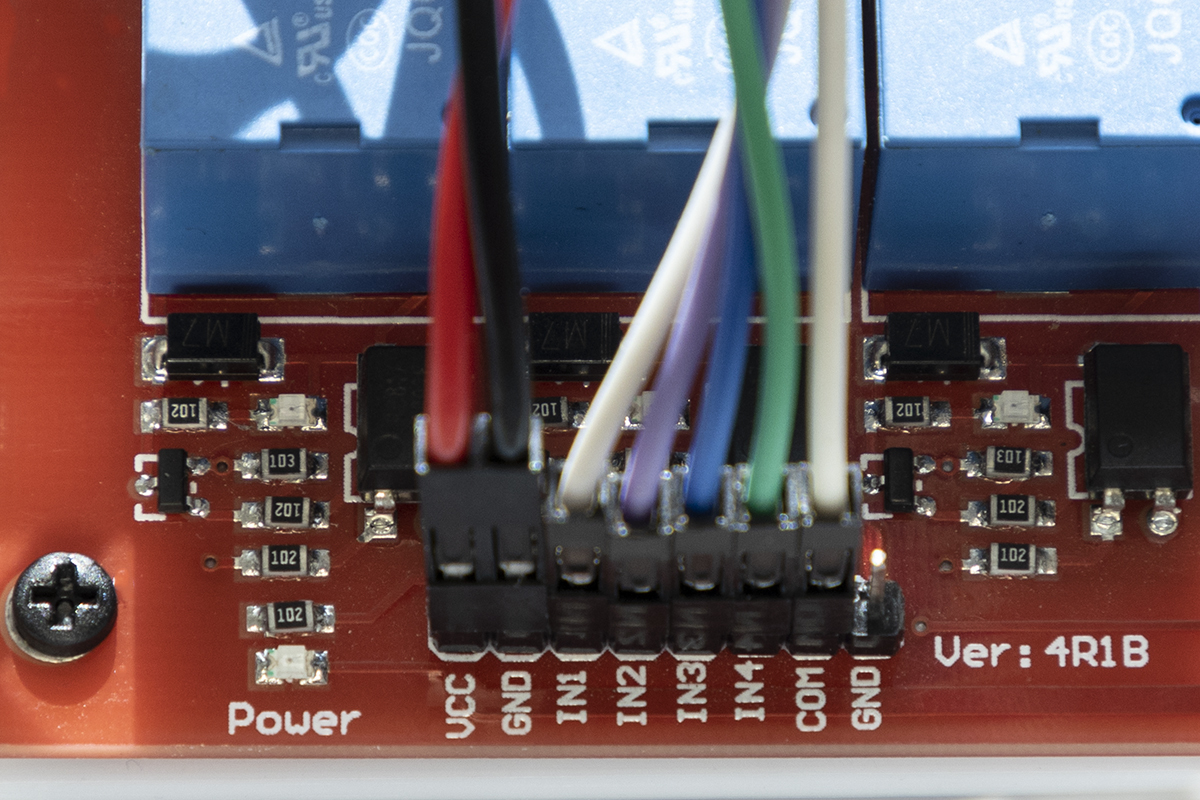 |

Step 8 - mounting and connecting camera
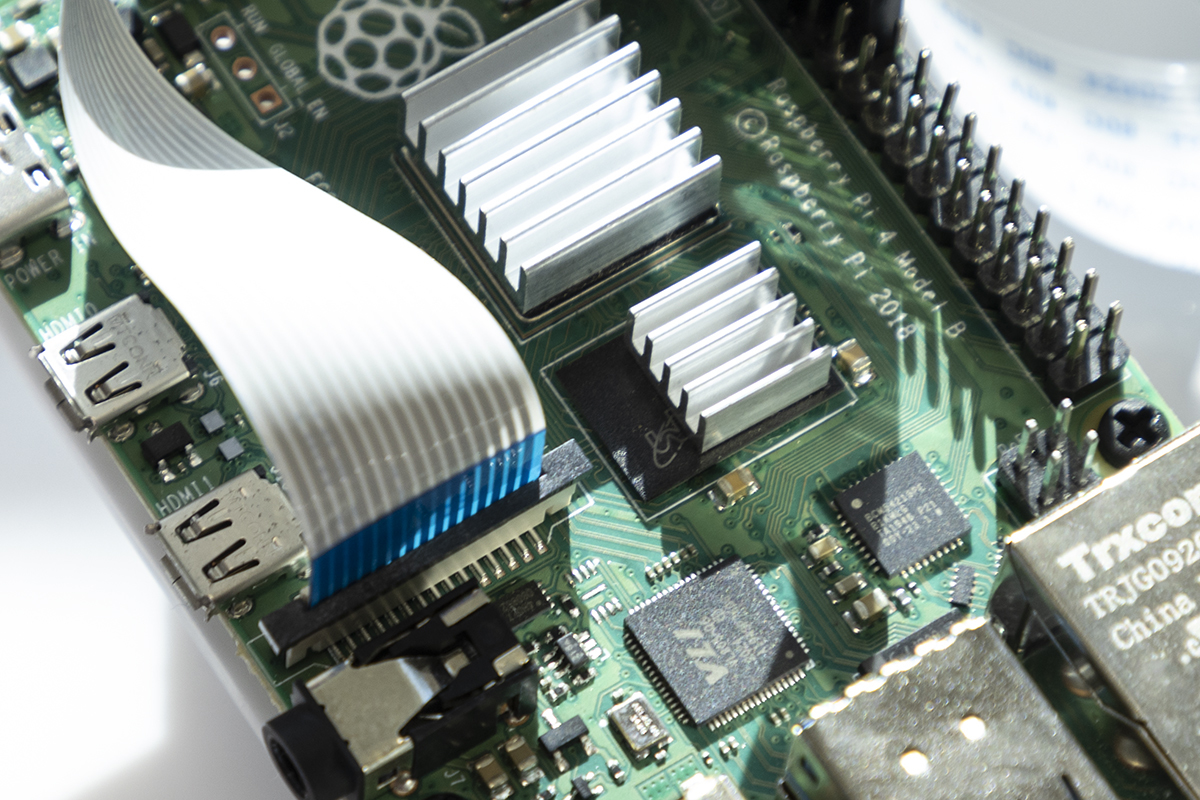
Connect one end of the CSI ribbon cable to the camera. We provide a mounting plate that can be used with both the HQ or V2 cameras, however, we recommend the use of the HQ camera for improved image clarity. Attach the HQ camera to the 3D printed mount using 2.5 mm standoffs (or 2 mm standoffs if using the V2 camera). Ensuring that the CSI cable port on the camera is directed towards the Raspberry Pi, mount the camera inside the OWL case using four M3 standoffs (50 mm long for HQ camera; 20 mm long for V2 camera). Connect the other end of the CSI cable to the Raspberry Pi CSI camera port.
Before connecting the lens, please be aware the HQ camera comes with fitted a C-CS mount adapter which needs to be removed before fitting the 6mm lens. The image won't focus unless the adapter is removed. More information is available below and in the HQ Camera Datasheet
How to remove the C-CS mount adapter:
| HQ camera C-CS mount adapter | Camera and adapter separated | Lens fitted without adapter |
|---|---|---|
Mounting the HQ camera to the 3D printed mount:
| HQ camera and mount | HQ camera mounted in case |
|---|---|
 |
 |
Mounting the V2 camera to the 3D printed mount:
| V2 camera and mount | V2 camera mounted in case | Raspberry Pi camera port |
|---|---|---|
 |
 |
 |
The HQ lens will need to be focused, details below, once the software is correctly set up.
Step 9 - adding buzzer and LEDs
Mount the buzzer inside the OWL base using double sided mounting tape and connect the 5 V and ground wires to Raspberry Pi GPIO pins 7 and 9, respectively.
For simplicity we have used two 12V LEDs (which are just normal LEDs with a current limiting resistor included) for both the 5V TX/GND connection for Raspberry Pi status indication and also the 12V power connection. While 12 V will work fine on both, the 5 V connection will be dimmer. If you want to use a non-prepackaged, 3 mm LED for the 5V connection, you should solder a current limiting resistor to the LED to prevent damage to either the LED or the Rasperry Pi as described here. Install the 5 V LED inside the OWL base and connect the 5V and ground wire to GPIO pins 8 (TX pin) and 20 (GND pin), respectively. Install the 12 V LED inside the OWL base and connect the 12 V and GND wires to their respective WAGO terminal blocks.
| Buzzer location | LEDs in OWL base | GPIO pins |
|---|---|---|
 |
 |
 |
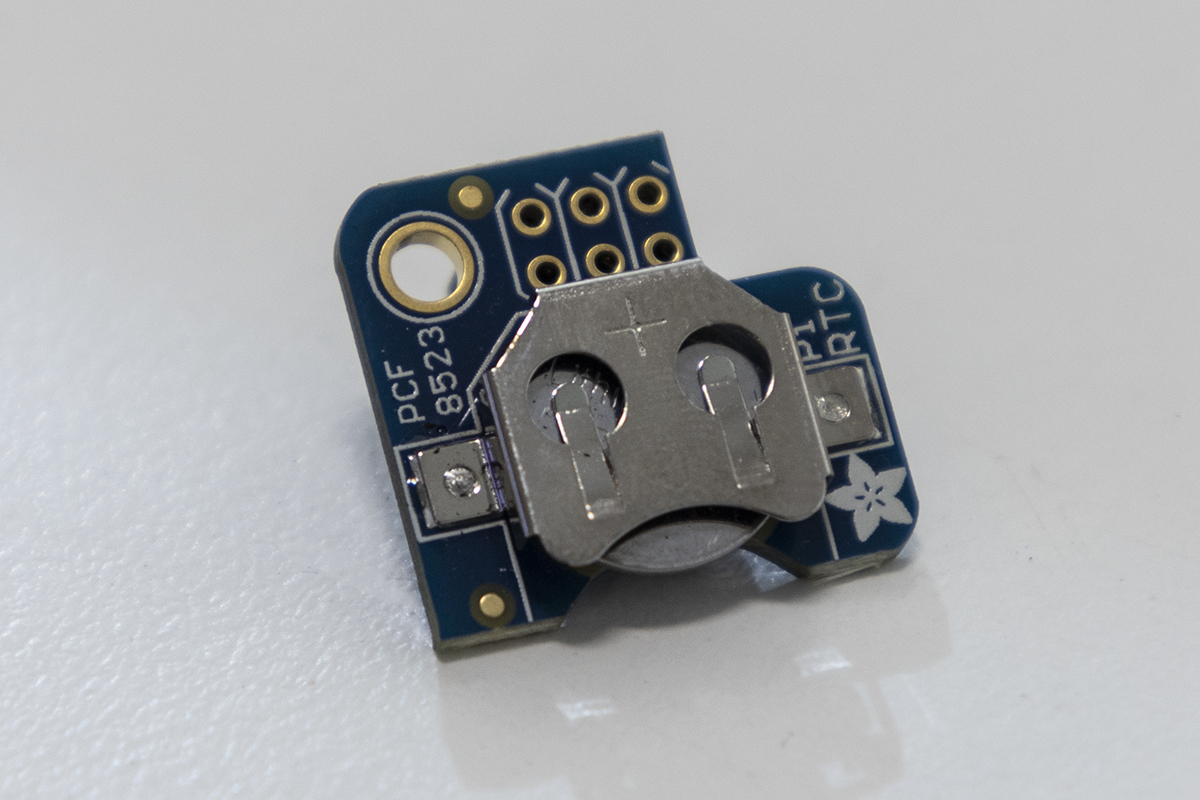
OPTIONAL STEP - adding real time clock module
Although optional, we recommend that you use a real time clock (RTC) module with the OWL system. This will enable the Raspberry Pi to hold the correct time when disconnected from power and the internet, and will be useful for debugging errors if they arise. The RTC uses a CR1220 button cell battery and sits on top of the Raspberry Pi using GPIO pins 1-6.
| PiRTC module | RTC installed on Raspberry Pi |
|---|---|
 |
 |
Step 10 - connecting mounting hardware and OWL cover
There are four 6.5 mm holes on the OWL base for mounting to a boom. Prior to installing the OWL cover, decide on a mounting solution suitable to your needs. In the photo below, we used 4 x M6 bolts. The cover of the OWL unit is secured with 4 x M3 nuts and bolts. Place M3 nuts into the slots in the OWL base. This can be fiddly and we suggest using tweezers, as shown below. Place the cover onto the base and secure using M3 bolts.
| Mounting hardware | Cover nuts | Completed OWL unit |
|---|---|---|
 |
 |
 |
Step 11 - connecting 12V solenoids
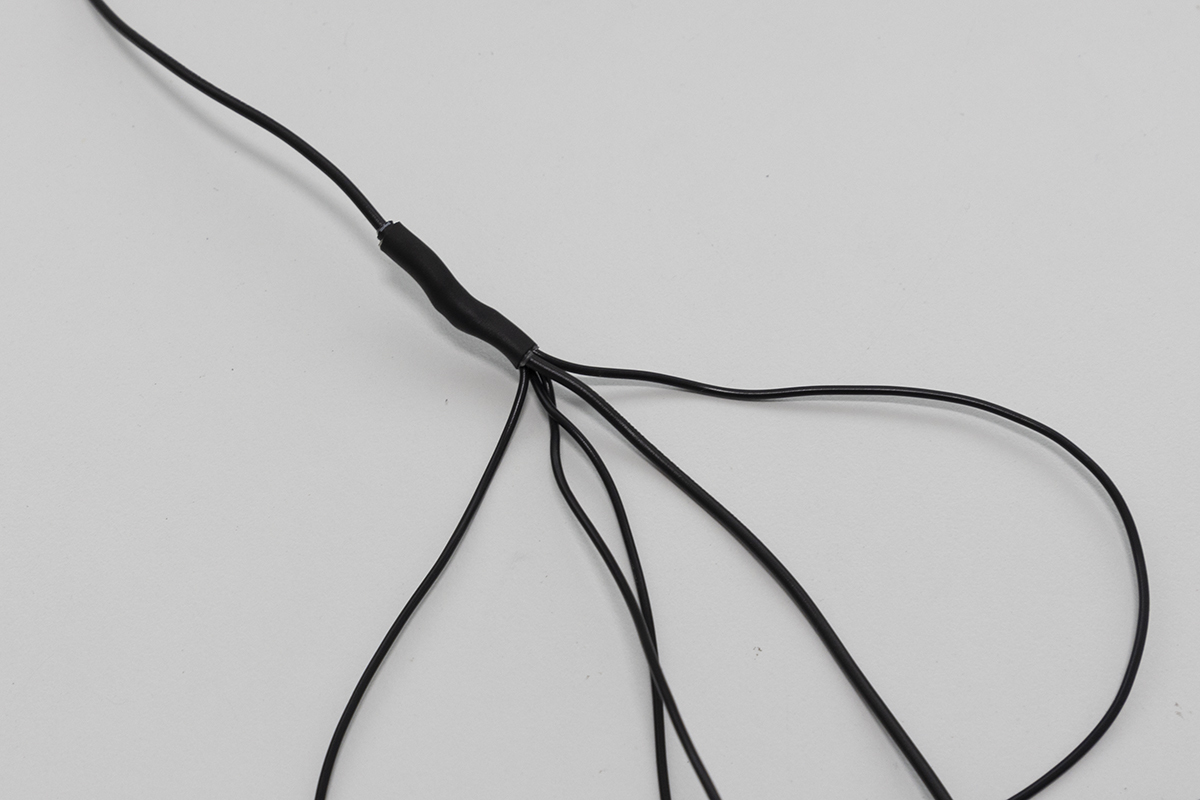
Once you have completed the setup, you now have the opportunity to wire up your own solenoids for spot spraying, targeted tillage, spot flaming or any other targeted weed control you can dream up. To do this, wire the GND wire of your device (it can be any wire if it's a solenoid) to the ground pin on the Bulgin plug (the same wire used for the GND from the 12V power source) and wire the other to one of the blue, green, orange or white wires on pins 1 - 4. A wiring diagram is provided below. The easiest way to wire them together to the same GND wire is to create a six-way harness, where one end is connected to the plug, one of the five other wires to the source power GND and the remaining four to the solenoids or whatever devices you are driving.

| Bulgin plug | Ground wiring harness |
|---|---|
 |
 |
SBC Options
A single board computer or SBC is the brains behind the OWL. It can do all the image processing and logic within a single, roughly credit card sized board without moving parts. These SBCs are the backbone of embedded computing or 'edge computing'. While the Raspberry Pi is arguably one of the most widely used and well supported SBCs there are many different options out there. Each has their strengths and weaknesses and may or may not be good fits with the OWL. We've providing a summary of some SBCs below, but this isn't an exhaustive list.
Currently, only Raspberry Pi 4 and 3B+ work with the OWL and have been tested in full. Early tests (alpha) have been made with the LibreComputer LePotato. We will update the 'Works with OWL' column as more boards are tested in the community.
A summary of possible single board computers (SBCs) to use with the OWL
| Name | CPU | RAM | CSI | USB | GPU | Pros | Cons | Dimensions | OWL? | Image |
|---|---|---|---|---|---|---|---|---|---|---|
| Raspberry Pi 4B | Broadcom BCM2711, quad-core Cortex-A72 | 1-8GB | 2 | 2x3.0, 2x2.0 | VideoCore VI | Large community, affordable | Limited GPU performance, no eMMC storage | 88 x 58 x 19.5mm | :heavy_check_mark: | OWL v1.0.0 |
| Raspberry Pi 3B+ | Broadcom BCM2837B0, quad-core Cortex-A53 | 1GB | 1 | 4x2.0 | VideoCore IV | Large community, affordable | Limited GPU performance, no eMMC storage | 85 x 56 x 17mm | :heavy_check_mark: | OWL v1.0.0 |
| Raspberry Pi CM4 | Broadcom BCM2711 quad-core Cortex-A72 | 1-8GB | 0 | 0 | VideoCore IV | Integration into custom carrier boards, EMMC | Needs carrier board | 55 x 40 x 4.7mm | - | - |
| Libre Computer LePotato | Amlogic S905X | 1/2GB | 0 | 4x2.0 | Mali-450 @ 750MHz | Affordable | Limited community support, no onboard Wi-Fi | 85 x 56mm | :warning: alpha (full report here) | TBA |
| Libre Computer Renegade | Rockchip RK3328, 4 Core Cortex-A53 | 1-4GB | 0 | 1x3.0, 2x2.0 | Mali-450 @ 500MHz | 4K HDR support | Limited community support, no onboard Wi-Fi | 85 x 56mm | - | - |
| Libre Computer Renegade Elite | Rockchip RK3399, 2 Core Cortex-A72 + 4 Core Cortex-A53 | 4GB | 2 | 4x3.0 | 4 Core Mali-T860 | PCIe, highest performance Libre Computer | Higher cost compared to other options | 128 x 64mm | - | - |
| Rock Pi 4B | Rockchip RK3399, 2 Core Cortex-A72 + 4 Core Cortex-A53 | 4GB | 1 | 2x2.0 2x3.0 | 4 Core Mali-T860 | PCIe, M.2 slot | Limited community support, no onboard Wi-Fi | 85 x 54mm | - | - |
| ODROID-XU4 | Samsung Exynos5422 ARM Cortex-A15 Quad 2Ghz and Cortex-A7 Octa | 2GB | 0 | 2x3.0, 1x2.0 | Mali-T628 MP6 | eMMC module support | Higher cost compared to Raspberry Pi options | 83 x 58 x 20mm | - | - |
| NVIDIA Jetson Nano | 4 Core ARM Cortex-A57 | 2/4GB | 2 | 4x3.0 | 128-core Maxwell | Powerful GPU, CSI camera | Higher cost compared to Raspberry Pi options | 100 x 79 x 30.2mm | - | - |
Want to help fill in this table? Find one of the untested platforms and give the OWL a go!
NVIDIA has released numerous powerful, embedded computers such as the Jetson Orin series (and previously the Jetson Xavier NX). These would likely be good options for the OWL, but are substantially more expensive than the options listed above.
Software
The project will eventually support the use of the two major embedded computing devices, the Raspberry Pi (models 3B+ and 4) and the Jetson Nano/Jetson Xavier NX for possible green-on-green detection with deep learning algorithms. At present, just the details on setting up the Raspberry Pi 3B+/4 are provided below. There are two options for installation. For the first, all you'll need to do is download the disk image file (vX.X.X-owl.img) and flash it to an SD card. The second method is more in depth, but takes you through the entire process from beginning to end. If you're looking to learn about how everything works, take some time to work through this process.
NOTE In the major update on 17/03/2023 running of the OWL changed from using greenonbrown.py to owl.py. This ensures better cross compatibility with GoG algorithms. It improves the modularity of the system.
Quick Method
For this method you'll need access to:
- Desktop/laptop computer
- Micro SD card reader
- Internet with large data capacity and high speed (WARNING: the image file is large, and downloading will take time and use up a substantial quantity of your data allowance if you have are on a limited plan)
Quick method for software installation
Step 1 - download the disk image file
Download the entire disk image file (v1.0.0-owl.img) here: OWL disk image
NOTE The v1.0.0-owl.img file contains the original software and we strongly recommend updating using the process below. It also includes the deprecated naming of greenonbrown.py instead of owl.py. If you do not update the software, be aware that you will need to run greenonbrown.py instead.
The latest, stable version will be linked above, however, all other older versions or versions with features being tested are available here.
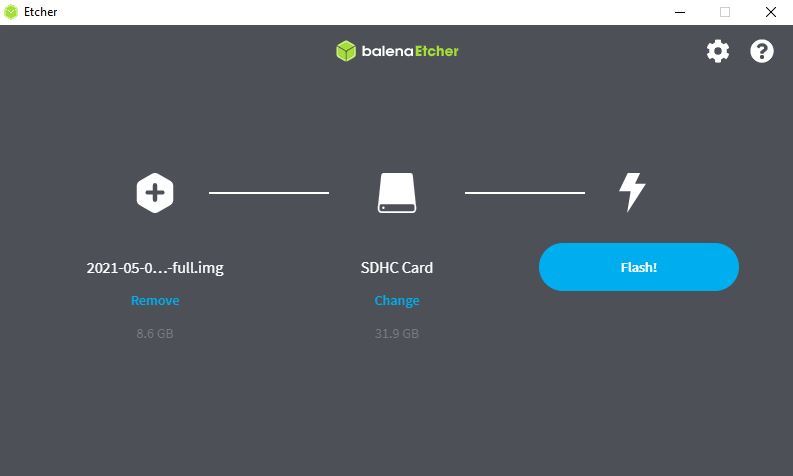
Step 2 - flash owl.img to SD card
The easiest way to flash (add the vX.X.X-owl.img file to the SD card so it can boot) the SD card is to use Balena Etcher or any other card flashing software. Instructions for Balena Etcher are provided here. Navigate to the website and download the relevant version/operating system. Install Balena Etcher and fire it up.
- Insert the SD card using your SD card reader.
- Select
Flash from fileon the Balena Etcher window and navigate to where you downloaded the vXX-XX-XX-owl.dmg file. This can be a zip file (compressed) too. - Select the target, the SD card you just inserted.
- Click
Flash
If this completes successfully, you're ready to move to the next step. If it fails, use Balena Etcher documentation to diagnose the issue.
Step 3 - power up
Once the SD card is inserted into the slot of the Raspberry Pi, power everything up and wait for the beep. If you hear the beep, you're ready to go and start focusing the camera.
Step 4 - updating the disk image
The disk image that you downloaded is likely to be a few versions behind the most recent. We only provide images of the most major updates. So to update the OWL software, just run the follow these steps.
- Have the OWL powered on with screen, keyboard and mouse connected. You should see a desktop with the OWL logo.
- Press CTRL + ALT + T to open a Terminal window or click the black icon with blue line and >_ symbol.
- Once the Terminal window is open, make sure you are working in the
owlvirtual environment by running:
pi@raspberrypi:~ $ workon owl
(owl) pi@raspberrypi:~ $
Notice that (owl) now appears before the line in the Terminal window. This indicates you are in the owl virtual environment. This is critical to make sure you install everything in the requirements.txt file into the right spot.
- Once you are in the
owlenvironment, enter these commands on each new line:
(owl) pi@raspberrypi:~ $ cd ~
(owl) pi@raspberrypi:~ $ mv owl owl-old      # this renames the old 'owl' folder to 'owl-old'
(owl) pi@raspberrypi:~ $ git clone https://github.com/geezacoleman/OpenWeedLocator        # download the new software
(owl) pi@raspberrypi:~ $ mv OpenWeedLocator owl      # rename the download to 'owl'
(owl) pi@raspberrypi:~ $ cd ~/owl
(owl) pi@raspberrypi:~/owl $ pip install -r requirements.txt                # installs the necessary software into the (owl) environment
(owl) pi@raspberrypi:~/owl $ chmod a+x owl.py                  # changes owl.py to be executable
(owl) pi@raspberrypi:~/owl $ chmod a+x owl_boot.sh                     # changes owl_boot.sh to be executable
Once this is complete your software will be up to date and you can move on to focusing the camera.
Step 5 - focusing the camera
The final step in the process is to make sure the camera is correctly focused for the mounting height. With the latest software, when you run owl.py --focus a sharpness (i.e. least blurry) estimation is provided on the video feed. The algorithm determines how sharp an image is, so the higher the value the better. A single script is provided to make focusing as easy as possible. Simply run:
(owl) pi@raspberrypi:~ $ cd ~/owl
(owl) pi@raspberrypi:~/owl $ bash focus_owl.sh
This will automate all the steps below. If this doesn't work, follow the steps below. If you would like to focus the OWL again, you can always run ./owl.py --focus.
| Blurry Image | Clear Image |
|---|---|
Legacy focusing
With the older versions of the software, you need to stop all owl.py or greenonbrown.py background processes before you can restart the software with the video feed viewable on the screen. Enter the following into the terminal:
(owl) pi@raspberrypi:~ $ ps -C owl.py # or ps -C greenonbrown.py if you still have the older version.
After pressing ENTER, you should receive the following output:
(owl) pi@raspberrypi:~ $ ps -C owl.py
PID TTY              TIME CMD
515 ?            00:00:00 owl.py
The PID is the important part, it's the ID number for the owl.py program. In this case it is 515, but it is likely to be different on your OWL.
IMPORTANT: If the headings PID TTY TIME CMD appear but a PID/line for owl.py doesn't appear it could mean two things. Firstly make sure you've typed owl.py correctly. If it doesn't have the right program to look for, it won't find it. The other option is that owl.py isn't running, which may also be the case. If you're certain it's not running in the background, skip the stop program step below, and move straight to launching owl.py.
If a PID appears, you'll need to stop it operating. To stop the program, enter the following command:
(owl) pi@raspberrypi:~ $ sudo kill enter_your_PID_number_here
The program should now be stopped
Now you'll need to launch owl.py manually with the video feed visible. To do this use the Terminal window and type the following commands:
(owl) pi@raspberrypi:~ $ ~/owl/./owl.py --show-display
This will bring up a video feed you can use to visualise the OWL detector and also use it to focus the camera. Once you're happy with the focus, press Esc to exit.
OPTIONAL Step 6 - enabling UART for status LED
This is just the cherry on top and non-essential to correct operation of the OWL but to make sure the status LED you connected earlier blinks correctly the GPIO UART needs to be enabled.
Open up a terminal console by pressing Ctrl + T. Type:
(owl) pi@owl :-$ sudo nano /boot/config.txt
This will open up the config.txt file. Scroll down to the bottom by holding the down arrow key and add the following line to the very last line of the file:
enable_uart=1
Press ctrl + x to exit, then type y to save and then enter.
You're now ready to run!
OPTIONAL Step 7 - running original greenonbrown.py
If you are using the v1.0.0-owl.img file and don't update the OWL software as above, you will be using the original greenonbrown.py Python script. Running it from the command line will require slightly different commands. Please follow this guide if this is you.
In the greenonbrown.py file there is a parameter headless which determines if a video is shown. If set to True a video feed is NOT displayed and the system will operate whenever it is powered on. If it is set to False a video feed will be displayed. To change this parameter, scroll to the bottom of greenonbrown.py and find the line headless=True. Change as desired.
NOTE headless must be set to True for operation without a screen. If a screen is not attached but headless=False the Raspberry Pi will not boot correctly and the OWL software will not run.
To run the software from the command line (assuming it is not currently running), follow these steps:
pi@raspberrypi:~ $ workon owl
(owl) pi@raspberrypi:~ $ cd owl
(owl) pi@raspberrypi:~ /owl $ ./greenonbrown.py
BUG ALERT There is a known bug with this version where the script will not run if you are running it outside of the owl directory. If you enocunter this error, cd into the owl directory and run the code again.
Detailed Method
This setup approach may take a little longer (about 1 hour total) than the quick method, but you'll be much better trained in the ways of OWL and more prepared for any problem solving, upgrades or changes in the future. You'll also download and use the latest software that hasn't been saved in the .img file yet. In the process you'll learn about Python environments, install Python packages and set it all up to run on startup. To get this working you'll need access to:
- Raspberry Pi
- Empty SD Card (SanDisk 32GB SDXC ideally)
- Your own computer with SD card reader
- Power supply (if not using the OWL unit)
- Screen and keyboard
- WiFi/Ethernet cable
Detailed OWL installation procedure
Step 1 - Raspberry Pi setup
Before powering up the Raspberry Pi, you'll need to install the Raspian operating system (just like Windows/MacOSX for laptops) on the new SD card. This is done using the same process as the quick method used to flash the premade owl.img file, except you'll be doing it with a completely new and untouched version of Raspbian. To get the Raspberry Pi to the stage at which we can start installing OWL software, follow these instructions from Adrian Rosebrock at PyImageSearch. They are very well written, detailed and if you're interested in computer vision, the rest of the PyImageSearch blog posts are very useful.
NOTE 1:
At PyImageSearch Step 3 make sure to create a virtual environment owl (it must be named owl otherwise the software will not load) instead of cv as written in the guide.
$ mkvirtualenv owl -p python3
NOTE 2:
At PyImageSearch Step 4 you do not need to compile OpenCV from scratch, the pip install method (Step 4a) will be a LOT faster and perfectly functional for this project. Make sure you're in the owl virtual environment for this step by looking for (owl) at the start of the line, if it's not there type: workon owl
(owl) pi@raspberrypi:~ $ pip install opencv-contrib-python==4.5.5.62
Step 2 - enable camera
We now need to enable the connection to the Raspberry Pi camera. This can be enabled in raspi-config:
(owl) pi@raspberrypi:~ $ sudo raspi-config
Select 3 Interface Options, then select P1 Camera. Select Yes to enable the camera. You can now exit raspi-config and reboot.
Step 3 - downloading the 'owl' repository
Now you should have:
- A virtual environment called 'owl'
- A working version of OpenCV installed into that environment
- a Terminal window open with the 'owl' environment activated. If it is active (owl) will appear at the start of a new line in the terminal window. If you're unsure, run:
workon owl
The next step is to download the entire OpenWeedLocator repository into your home directory on the Raspberry Pi.
(owl) pi@raspberrypi:~ $ cd ~
(owl) pi@raspberrypi:~ $ git clone https://github.com/geezacoleman/OpenWeedLocator
(owl) pi@raspberrypi:~ $ mv OpenWeedLocator owl
Double check it is there by typing (owl) (owl) pi@raspberrypi:~ $ ls and reading through the results, alternatively open up the Home folder using a mouse. If that was sucessful, you can now move on to Step 4.
Step 4 - installing the OWL Python dependencies
Dependencies are Python packages on which the code relies to function correctly. With a range of versions and possible comptibility issues, this is the step where issues might come up. There aren't too many packages, but please make sure each and every module in the requirements.txt file has been installed correctly. These include:
- OpenCV (should already be in 'owl' virtual environment from Step 1)
- numpy
- imutils
- gpiozero
- pandas (for data collection only)
- glob (for data collection only)
- threading, collections, queue, time, os (though these are included as standard Python modules).
NOTE: Before continuing make sure you are in the owl virtual environment. Check that (owl) appears at the start of each command line, e.g. (owl) pi@raspberrypi:~ $. Run workon owl if you are unsure. If you are not in the owl environment, you will run into errors when starting owl.py.
To install all the requirements.txt, simply run:
(owl) pi@raspberrypi:~ $ cd ~/owl
(owl) pi@raspberrypi:~/owl $ pip install -r requirements.txt
It's very important that you're in the owl virtual environment for this, so double check that (owl) appears on the far left of the command line when you type the command in. Check these have been installed correctly by importing them in Python in the command prompt and check the package version. To do this:
(owl) pi@owl :-$ python
Python should start up an interactive session; type each of these in and make sure you don't get any errors.
>>> import cv2
>>> import numpy
>>> import gpiozero
>>> import pandas
Version numbers can be checked with:
>>> print(package_name_here.__version__) ## this is a generic example - add the package where it says package_name_here
>>> print(cv2.__version__)
If any errors appear, you'll need to go back and check that the modules above have (1) been installed into the owl virtual environment, (2) that Python was started in the owl environment, and/or (3) they all installed correctly. Once that is complete, exit Python and continue with the installation process.
>>> exit()
Step 5 - starting OWL on boot
Now that these dependencies have been installed into the owl virtual environment, it's time to make sure it runs on startup! The first step is to make the Python file owl.py executable using the Terminal window.
(owl) (owl) pi@raspberrypi:~ $ chmod a+x ~/owl/owl.py
After it's been made executable, the file needs to be launched on startup so each time the Raspberry Pi is powered on, the detection systems starts. The easiest way to do this
by using cron, a scheduler for starting code. So you'll need to add the owl_boot.sh file to the schedule so that it launches on boot. The owl_boot.sh file is fairly straightforward. It's what's known as a bash script which is just a text file that contains commands we would normally enter on the command line in Terminal.
#!/bin/bash

source /home/pi/.bashrc
workon owl
lxterminal
cd /home/pi/owl
./owl.py
In the file, the first two commands launch our owl virtual environment, then lxterminal creates a virtual terminal environment so outputs are logged. Finally we change directory cd into the owl folder and run the python program.
To add this to the list of cron jobs, you'll need to edit it as a root user:
(owl) pi@raspberrypi:~ $ sudo crontab -e
Select 1. /bin/nano editor, which should bring up the crontab file. At the base of the file add:
@reboot /home/pi/owl/owl_boot.sh
Once you've added that line, you'll just need to save the file and exit. In the nano editor just press Ctrl + X, then Y and finally press Enter to agree to save and exit.
Finally you just need to make owl_boot.sh executable so it can be run on startup:
(owl) pi@raspberrypi:~ $ chmod a+x ~/owl/owl_boot.sh
If you get stuck, this guide or this guide both have a bit more detail on cron and some other methods too.
Step 6 - focusing the camera
The final step in the process is to make sure the camera is correctly focused for the mounting height. With the latest software, when you run owl.py --focus a sharpness (i.e. least blurry) estimation is provided on the video feed. The algorithm determines how sharp an image is, so the higher the value the better. A single script is provided to make focusing as easy as possible. Simply run:
(owl) pi@raspberrypi:~ $ cd ~/owl
(owl) pi@raspberrypi:~/owl $ bash focus_owl.sh
This will automate all the steps below. If this doesn't work, follow the steps below. If you would like to focus the OWL again, you can always run ./owl.py --focus.
| Blurry Image | Clear Image |
|---|---|
Legacy focusing
With the older versions of the software, you need to stop all owl.py or greenonbrown.py background processes before you can restart the software with the video feed viewable on the screen. Enter the following into the terminal:
(owl) pi@raspberrypi:~ $ ps -C owl.py # or ps -C greenonbrown.py if you still have the older version.
After pressing ENTER, you should receive the following output:
(owl) pi@raspberrypi:~ $ ps -C owl.py
PID TTY              TIME CMD
515 ?            00:00:00 owl.py
The PID is the important part, it's the ID number for the owl.py program. In this case it is 515, but it is likely to be different on your OWL.
IMPORTANT: If the headings PID TTY TIME CMD appear but a PID/line for owl.py doesn't appear it could mean two things. Firstly make sure you've typed owl.py correctly. If it doesn't have the right program to look for, it won't find it. The other option is that owl.py isn't running, which may also be the case. If you're certain it's not running in the background, skip the stop program step below, and move straight to launching owl.py.
If a PID appears, you'll need to stop it operating. To stop the program, enter the following command:
(owl) pi@raspberrypi:~ $ sudo kill enter_your_PID_number_here
The program should now be stopped
Now you'll need to launch owl.py manually with the video feed visible. To do this use the Terminal window and type the following commands:
(owl) pi@raspberrypi:~ $ ~/owl/./owl.py --show-display
This will bring up a video feed you can use to visualise the OWL detector and also use it to focus the camera. Once you're happy with the focus, press Esc to exit.
Step 8 - reboot
The moment of truth. Shut the Raspberry Pi down and unplug the power. This is where you'll need to reconnect the camera and all the GPIO pins/power in the OWL unit if they have been disconnected. Once everything is connected again (double check the camera cable is inserted or this won't work), reconnect the power and wait for a beep!
If you hear a beep, grab something green and move it under the camera. If the relays start clicking and lights come on, congratulations, you've successfully set the OWL up! If not, check the troubleshooting chart below and see if you can get it fixed.
NOTE The unit does not perform well under office/artificial lighting. The thresholds have been set for outdoor conditions.
Optional Step - installing RTC and setting the time
The optional real time clock module can be set up by following the [detailed instructions](https://learn.adafruit.com/adding-a-real-time-clock-to-raspberry-pi/set-up-and-test-i2c) provided by Adafruit. This is a quick process that should take less than 10 minutes. Note that an internet connection is required to set the time initially, however after this the time will be held on the clock module.
Changing detection settings
Instructions to change detection settings
If you're interested in changing settings there are now two ways to do this: 1. Using command line flags 2. Opening the owl.py file and changing threshold values
Command line flags
Command line flags are let you specify options on the command line within the Terminal window. It means you don't have to open up the code and make changes directly. OWL now supports the use of flags for some parameters. To read a description of all flags available type:
(owl) pi@raspberrypi:~ $./owl.py --help
usage: owl.py [-h] [--input] [--show-display] [--focus] [--recording] [--algorithm {exg,nexg,exgr,maxg,exhsv,hsv}] [--framerate [10-120]]
                       [--exposure-mode {off,auto,nightpreview,backlight,spotlight,sports,snow,beach,verylong,fixedfps,antishake,fireworks}]
                       [--awb-mode {off,auto,sunlight,cloudy,shade,tungsten,fluorescent,incandescent,flash,horizon}] [--sensor-mode [0-3]]

optional arguments:
  -h, --help            show this help message and exit
  --input               path to image directory, single image or video file
  --show-display        show display windows
  --focus               focus the camera
  --recording           record video
  --algorithm {exg,nexg,exgr,maxg,exhsv,hsv}
  --framerate [10-120]  set camera framerate between 10 and 120 FPS. Framerate will depend on sensor mode, though setting framerate takes precedence over sensor_mode, For example sensor_mode=0 and framerate=120 will reset the
                        sensor_mode to 3.
  --exp-mode {off,auto,nightpreview,backlight,spotlight,sports,snow,beach,verylong,fixedfps,antishake,fireworks}
                        set exposure mode of camera
  --awb-mode {off,auto,sunlight,cloudy,shade,tungsten,fluorescent,incandescent,flash,horizon}
                        set the auto white balance mode of the camera
  --sensor-mode [0-3]   set the sensor mode for the camera between 0 and 3. Check Raspberry Pi camera documentation for specifics of each mode
  --exp-compensation [-24 to 24]
                        set the exposure compensation (EV) for the camera between -24 and 24. Raspberry Pi cameras seem to overexpose images preferentially.
| Flag | Usage | Description |
|---|---|---|
| --input | Specify the path to an image directory, single image or video file. | Use this if you want to run the software on images or videos. Useful when testing new algorithms or setting up the software without a camera connection. |
| legacy --video-file | NOTE: this has been replaced by --input fag. Specify the path to the video file. |
This is used when a video file is run instead of the live feed from a camera. It is mostly used in testing new algorithms. If this is not included, a connected camera will be used instead. |
| --show-display | If flag is present, this will return True | When this flag is included, video feeds and threshold adjustments will appear. Without the flag, the OWL will run headless with no display. This flag replaces the Headless=True variable in the owl.py file. |
| --focus | If the flag is present, focusing mode is activated. | WHen the flag is included, a Fast Fourier Transform is used to estimate image blurriness. The mean of this value is displayed on the video feed. High values mean it is in focus, low values mean it is blurry. |
| --algorithm | gog, exg, nexg, exgr, maxg, exhsv, hsv | Select from the list of algorithms to use. Defaults to exhsv. GoG will enable the Google Coral and import 'pycoral' and related libraries. Only use if you have followed the instructions under the Green-on-Green section. |
| --recording | If flag is present, this will return True | Record video to a file |
| --framerate | between 10 and 120 FPS, default=40 | sets the framerate for the camera. |
| --exp-mode | off, auto, nightpreview, backlight, spotlight, sports, snow, beach, verylong, fixedfps, antishake, fireworks | Select from the list of exposure modes available on the Picamera. Defaults to 'sports' for faster shutter speed. |
| --awb-mode | off, auto, sunlight, cloudy, shade, tungsten, fluorescent, incandescent, flash, horizon | set the automatic white balance mode from Picamera options. |
| --sensor-mode | 0: default - automatic; modes 1, 2 and 3 are defined in the picamera documentation. | the sensor mode is specific to the camera. The Raspberry Pi v2 camera has 7 modes, whereas the HQ camera has only 4. Framerate is prioritised over sensor mode. WARNING: high framerates and larger resolutions may 'brick' the SD card. Always backup your SD card before testing new settings, or update from this repository if settings are lost. |
| --exp-compensation | Default: -4, use even values between between -24 and 24. | This sets the target brightness level for the camera. Typically it defaults to being overexposed in bright sun conditions so lower values will improve performance. |
Changing threshold values in owl.py
Other parameters such as selecting or modifying sensitivity settings can be adjusted in the owl.py file itself.
To edit this file, connect a screen, keyboard and mouse and boot up the OWL. Navigate to the owl directory and open up greenonbrown.py in an editor. If it's an executable file, it will ask you if you want to "Execute", "Execute in Terminal" or "Open" (see image below). Make sure to select the Open option.
Navigate to the owl directory |
Open the owl.py file |
|---|---|
 |
 |
Once you have opened the file in an editor (this can be a text editor, Thonny, Geany or other code editors), scroll down to the very bottom and you should come across values you can change, such as in the image or written out below.

Editable values for sensitivity:
if __name__ == "__main__":
    owl = Owl(input_file_or_directory=args.input,
              show_display=args.show_display,
              focus=args.focus,
              recording=args.recording,
              exgMin=25,
              exgMax=200,
              hueMin=39,
              hueMax=83,
              saturationMin=50,
              saturationMax=220,
              brightnessMin=60,
              brightnessMax=190,
              framerate=args.framerate,
              resolution=(416, 320),
              exposure_mode=args.exposure_mode,
              awb_mode=args.awb_mode,
              sensor_mode=args.sensor_mode)

    # start the targeting!
    owl.hoot(sprayDur=0.15,
             delay=0,
             sampleMethod=None,
             sampleFreq=60,
             saveDir='/home/pi/owl-images',
             algorithm=args.algorithm,
             selectorEnabled=False,
             camera_name='hsv',
             minArea=10)
Here's a summary table of what each parameter does. Run ./owl.py --show-display to view the output results. Without this --show-display flag the video will not appear on the screen.
NOTE In older versions ONLY, ff you change the now defunct parameter of headless to False, you'll be able to see a real time feed of what the algorithm is doing and where the detections are occurring. This will need to be switched back to headless=True if you decide to run it without the screen connected. Note that the owl program will not run on startup if headless=False.
| Parameter | Options | Description |
|---|---|---|
| Owl() | All options when the sprayer class is instantiated | |
exgMin |
Any integer between 0 and 255 | Provides the minimum threshold value for the exg algorithm. Usually leave between 10 (very sensitive) and 25 (not sensitive) |
exgMax |
Any integer between 0 and 255 | Provides a maximum threshold for the exg algorithm. Leave above 180. |
hueMin |
Any integer between 0 and 128 | Provides a minimum threshold for the hue channel when using hsv or exhsv algorithms. Typically between 28 and 45. Increase to reduce sensitivity. |
hueMax |
Any integer between 0 and 128 | Provides a maximum threshold for the hue (colour hue) channel when using hsv or exhsv algorithms. Typically between 80 and 95. Decrease to reduce sensitivity. |
saturationMin |
Any integer between 0 and 255 | Provides a minimum threshold for the saturation (colour intensity) channel when using hsv or exhsv algorithms. Typically between 4 and 20. Increase to reduce sensitivity. |
saturationMax |
Any integer between 0 and 255 | Provides a maximum threshold for the saturation (colour intensity) channel when using hsv or exhsv algorithms. Typically between 200 and 250. Decrease to reduce sensitivity. |
brightnessMin |
Any integer between 0 and 255 | Provides a minimum threshold for the value (brightness) channel when using hsv or exhsv algorithms. Typically between 10 and 60. Increase to reduce sensitivity particularly if false positives in shadows. |
brightnessMax |
Any integer between 0 and 255 | Provides a maximum threshold for the value (brightness) channel when using hsv or exhsv algorithms. Typically between 190 and 250. Decrease to reduce sensitivity particularly if false positives in bright sun. |
resolution |
Tuple of (w, h) resolution | Changes output resolution from camera. Increasing rapidly decreased framerate but improves detection of small weeds. |
| hoot() | All options when the sprayer.start() function is called | |
sprayDur |
Any float (decimal) | Changes the length of time for which the relay is activated. |
sampleMethod |
Choose from None, 'bbox', 'square', 'whole' | If sampleMethod=None, sampling is deactivated. Do not leave on for long periods or SD card will fill up and stop working. |
sampleFreq |
Any positive integer | Changes how often (after how many frames) image sampling will occur. If sampleFreq=60, images will be sampled every 60 frames. |
saveDir |
Path to save directory | Set where you want the images saved. If you insert a USB and would like to save images to it, put the path for that here. |
algorithm |
Any of: gog,exg,exgr,exgs,exhu,hsv |
Changes the selected algorithm. Most sensitive: 'exg', least sensitive/most precise (least false positives): 'exgr', 'exhu', 'hsv'. gog will activate a provided Green-on-Green detection algorithm, a .tflite model in the models folder. Ensure you have connected and installed a Google Coral using the procedure here. |
selectorEnabled |
True or False |
Enables algorithm selection based on a rotary switch. Only enable if switch is connected. |
cameraName |
Any string | Changes the save name if recording videos of the camera. Ignore - only used if recording data. |
minArea |
Any integer | Changes the minimum size of the detection. Leave low for more sensitivity of small weeds and increase to reduce false positives. |
Green-on-Green
How to detect in-crop weeds with the OWL
OWL Integration
Green-on-Green capability is here!
Deep learning object detection algorithms for in-crop or 'Green-on-Green' (GoG) require much more processing power than the green detection algorithms we have used previously. If we ran these GoG algorithms directly on the Raspberry Pi, the frame rate would be prohibitively slow. To overcome this, you can use more powerful computers with GPUs (i.e. any of NVIDIA's Jetson series), alternatively you can connect a third party processor such as Google Coral's TPU through the USB3.0 ports of the Raspberry Pi 4. This means increased performance without needing to purchase another embedded computer.
The Google Coral USB accelerator is only $59.99, so it provides performance upgrades without substantial cost increases. With the added hardware, there are some additional software installation details that you should follow. And you will need to connect the Google Coral to the Raspberry Pi USB3.0 port too. At the moment, this won't fit neatly in the case, but we are continuing to work on improving this.
For all the details on how to install the Google Coral, please head over to the models directory. We have provided an installation script to make it as straightforward as possible.
Model Training
Effective models need training data, so if you're interested in using the Green-on-Green functionality, you will need to start collecting and annotating images of relevant weeds for training. Alternatively, head over to Weed-AI to see if any image data may be relevant for your purposes.
NOTE There do appear to be some issues with the exporting functionality of YOLOv5/v8 to .tflite models for use with the Coral. The issue has been raised on the Ultralytics repository and should hopefully be resolved soon. You can follow the updates here.
YOLOv8 and YOLOv5 currently provide the most user friendly methods of training, optimisation and exporting as .tflite files for use with the Google Coral. There is also a Weed-AI Google Colab Notebook
![]() which can be used to train models from Weed-AI data directly.
which can be used to train models from Weed-AI data directly.
Non-Raspberry Pi Installation
Installing OWL software on a non-Raspberry Pi system
Using OWL software on your laptop/desktop or other non-Raspberry Pi system is a great way to test, develop and learn more about how it works. To start using the software, just follow the steps below. You will need access to virtual environments and your IDE/editor of choice. This method has been successfully tested on PyCharm with Anaconda environments.
> git clone https://github.com/geezacoleman/OpenWeedLocator
> cd OpenWeedLocator
For the next part, make sure you are in the virtual environment you will be working from. If you're unsure about virtual environments, read through this PyImageSearch blog on configuring an Ubuntu environment for deep learning - just skip to the virtual environment step. FreeCodeCamp has a great blog describing them too.
Assuming the virtual environment is working and is activated, run through these next couple of steps:
> pip install -r non_rpi_requirements.txt # this will install all the necessary packages, without including the Raspberry Pi specific ones.
It may take a minute or two for those to complete installing. But once they are done you are free to run the owl.py software.
> python owl.py --show-display
From there you can change the command line flags (as described above) or play around with the settings to see how it works.
Image Processing
Image processing details and in-field results
So how does OWL actually detect the weeds and trigger the relay control board? It all starts by taking in the colour image from the camera using OpenCV and splitting it into its component channels: Red (R), Green (G) and Blue (B) (RGB) or loading and converting into the hue, saturation and value (HSV) colourspace. Following that, computer vision algorithms such as Excess Green `ExG = 2 * G - R - B` or thresholding type approaches on the HSV colourspace can be used to differentiate green locations from the background.

Once the green locations are identified and a binary (purely black/white) mask generated, a contouring process is run to outline each detection. If the detection pixel area is greater than the minimum area set in minArea=10, the central pixel coordinates of that area are related to an activation zone. That zone is connected to a specific GPIO pin on the Raspberry Pi, itself connected to a specific channel on the relay (one of IN1-4). When the GPIO pin is driven high (activated) the relay switches and connects the solenoid for example to 12V and activates the solenoid. It's all summarised below.

Results
The performance of each algorithm on 7 different day/night fields is outlined below. The boxplot shows the range, interquartile range and median performance for each algorithm. Whilst there were no significant differences (P > 0.05) for the recall (how many weeds were detected of all weeds present) and precision (how many detections were actually weeds), trends indicated the ExHSV algorithm was less sensitive (fewer false detections) and more precise, but did miss more smaller/discoloured weeds compared to ExG.

The image below gives a better indication of the types of weeds that were detected/missed by the ExHSV algorithm. Large, green weeds were consistently found, but small discoloured or grasses with thin leaves that blurred into the background were missed. Faster shutter speed would help improve this performance.

3D Printing
3D printing instructions and files
There are seven total items that need printing for the complete OWL unit. All items with links to the STL files are listed below. There are two options for OWL base:
- Single connector (Bulgin) panel mount
- Pros: of this method are easy/quick attach/detach from whatever you have connected, more water resistant.
- Cons: more connections to make, more expensive
- Cable gland
- Pros: fewer connections to make, cheaper, faster to build.
- Cons: more difficult to remove, more water resistant.
We also provide a link to the 3D models on Tinkercad, an online and free 3D modelling software package, allowing for further customisation to cater for individual user needs.
| Description | Image (click for link) |
|---|---|
| OWL base, onto which all components are mounted. The unit can be fitted using the M6 bolt holes on the rear panel. |  |
| OPTIONAL: OWL base with cable glands instead of single Bulgin connector. |  |
| OWL cover, slides over the base and is fitted with 4 x M3 bolts/nuts. Provides basic splash protection. |  |
| OWL base port cover, covers the cable port on the rear panel. | 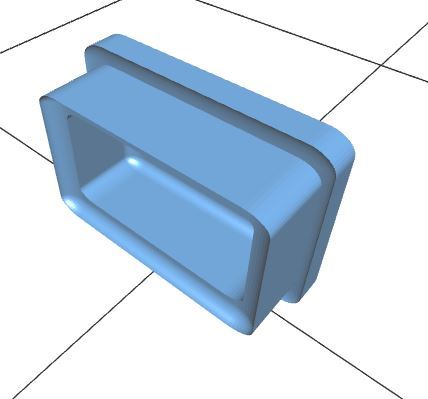 |
| Raspberry Pi mount, fixes to the Raspberry Pi for easy attachment to OWL base. | 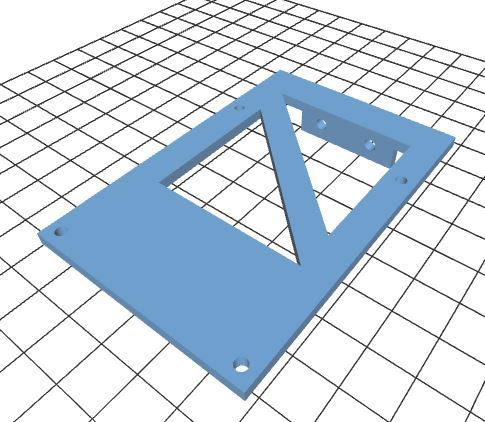 |
| Raspberry Pi Camera mount, fixes to the HQ or V2 Camera for simple attachment to the base. |  |
| Relay board mount, fixes to the relay board for simple attachment to the base. | 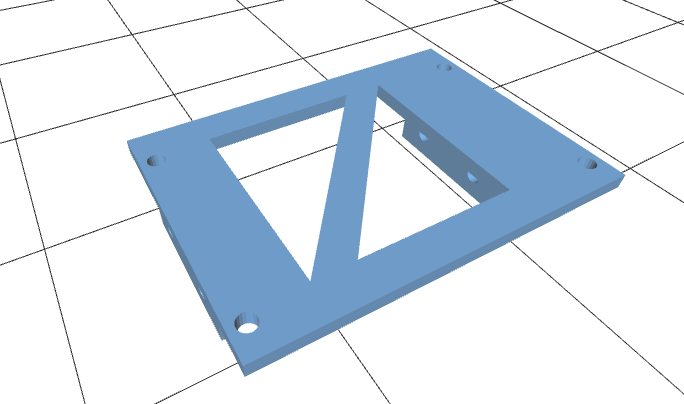 |
| Voltage regulator mount, fixes to the voltage regulator and onto the relay board for simple attachment to the base. | 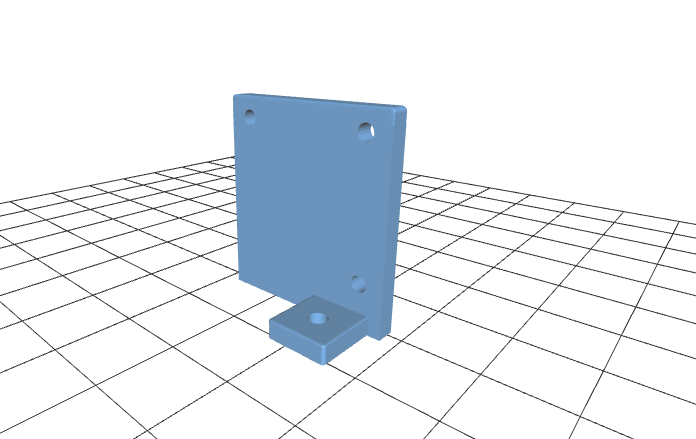 |
All .stl files for the 3D printed components of this build are available in the 3D Models directory. Ideally supports should be used for the base, and were tested at 0.2mm layer heights with 15% infill on a Prusa MK3S.
Update 02/05/2022
- improved camera mounts
- space for 40mm lens cover
- more compact design
- version tracking
Updating OWL
Updating OWL software
We and others will be continually contributing to and improving OWL as we become aware of issues or opportunities to increase detection performance. Once you have a functioning setup the process to update is simple. First, you'll need to connect a screen, keyboard and mouse to the OWL unit and boot it up. Navigate to the existing owl directory in /home/owl/ and either delete or rename that folder. Remember if you've made any of your own changes to the parameters/code, write them down. Then open up a Terminal window (Ctrl + T) and follow these steps:
IMPORTANT: Before continuing make sure you are in the owl virtual environment. Check that (owl) appears at the start of each command line, e.g. (owl) pi@raspberrypi:~ $. Run workon owl if you are unsure. If you are not in the owl environment, you will run into errors when starting owl.py.
(owl) pi@raspberrypi:~ $ cd ~
(owl) pi@raspberrypi:~ $ mv owl owl-old      # this renames the old 'owl' folder to 'owl-old'
(owl) pi@raspberrypi:~ $ git clone https://github.com/geezacoleman/OpenWeedLocator        # download the new software
(owl) pi@raspberrypi:~ $ mv OpenWeedLocator owl      # rename the download to 'owl'
(owl) pi@raspberrypi:~ $ cd ~/owl
(owl) pi@raspberrypi:~/owl $ pip install -r requirements.txt
(owl) pi@raspberrypi:~/owl $ chmod a+x owl.py
(owl) pi@raspberrypi:~/owl $ chmod a+x owl_boot.sh
And that's it! You're good to go with the latest software.
If you have multiple units running, the most efficient method is to update one and then copy the SD card disk image to every other unit. Follow these instructions here. ADD INSTRUCTIONS
Version History
All versions of OWL can be found here. Only major changes will be recorded as separate disk images for use.
| Version | File |
|---|---|
| v1.0.0-owl.img | https://www.dropbox.com/s/ad6uieyk3awav9k/owl.img.zip?dl=0 |
Troubleshooting
Troubleshooting OWL issues
Here's a table of some of the common symptoms and possible explanations for errors we've come across. This is by no means exhaustive, but hopefully helps in diagnosing any issues you might have. If you come across any others please contact us so we can improve the software, hardware and guide.
NOTE If you are using the original disk image without updating, there are a number of issues that will appear. We recommend updating to the latest software by following the procedure detailed in the Updating OWL section above.
| Symptom | Explanation | Possible solution |
|---|---|---|
| Raspberry Pi won't start (no green/red lights) | No power getting to the computer | Check the power source, and all downstream components. Such as Bulgin panel/plug connections fuse connections and fuse, connections to Wago 2-way block, voltage regulator connections, cable into the Raspberry Pi. |
| Raspberry Pi starts (green light flashing) but no beep | OWL software has not started | This is likely a configuration/camera connection error with many possible causes. To get more information, boot the Raspberry Pi with a screen connected, open up a Terminal window (Ctrl + T) and type ~/owl/./owl.py. This will run the program. Check any errors that emerge. |
| Beep heard, but no relays activating when tested with green | Relays are not receiving (1) 12V power, (2) a signal from the Pi, (3) the Pi is not sending a signal | Check all your connections with a multimeter if necessary for the presence of 12V. Make sure everything is connected as per the wiring diagram. If you're confident there are no connection issues, open up a Terminal window (Ctrl + T) and type ~/owl/./owl.py. This will run the program. Check any errors that emerge. |
Citing OWL
Citing OWL
OpenWeedLocator has been published in Scientific Reports. Please consider citing the published article using the details below.
@article{Coleman2022,
author = {Coleman, Guy and Salter, William and Walsh, Michael},
doi = {10.1038/s41598-021-03858-9},
issn = {2045-2322},
journal = {Scientific Reports},
number = {1},
pages = {170},
title = {{OpenWeedLocator (OWL): an open-source, low-cost device for fallow weed detection}},
url = {https://doi.org/10.1038/s41598-021-03858-9},
volume = {12},
year = {2022}
}
Acknowledgements
Acknowledgements
This project has been developed by Guy Coleman and William Salter at the University of Sydney, Precision Weed Control Lab. It was supported and funded by the Grains Research and Development Corporation (GRDC) and Landcare Australia as part of the University of Sydney's Digifarm project in Narrabri, NSW, Australia. We would like to thank all the farmers that assisted in data collection, validation and feedback on the initial design.
Disclaimer and License
Disclaimer and License
While every effort has been made in the development of this guide to cover critical details, it is not an exhaustive nor perfectly complete set of instructions. It is important that people using this guide take all due care in assembly to avoid damage, loss of components and personal injury, and are supervised by someone experienced if necessary. Assembly and use of OWL is entirely at your own risk and the license expressly states there is no warranty.
MIT License

Copyright (c) 2020 Guy Coleman

Permission is hereby granted, free of charge, to any person obtaining a copy
of this software and associated documentation files (the "Software"), to deal
in the Software without restriction, including without limitation the rights
to use, copy, modify, merge, publish, distribute, sublicense, and/or sell
copies of the Software, and to permit persons to whom the Software is
furnished to do so, subject to the following conditions:

The above copyright notice and this permission notice shall be included in all
copies or substantial portions of the Software.

THE SOFTWARE IS PROVIDED "AS IS", WITHOUT WARRANTY OF ANY KIND, EXPRESS OR
IMPLIED, INCLUDING BUT NOT LIMITED TO THE WARRANTIES OF MERCHANTABILITY,
FITNESS FOR A PARTICULAR PURPOSE AND NONINFRINGEMENT. IN NO EVENT SHALL THE
AUTHORS OR COPYRIGHT HOLDERS BE LIABLE FOR ANY CLAIM, DAMAGES OR OTHER
LIABILITY, WHETHER IN AN ACTION OF CONTRACT, TORT OR OTHERWISE, ARISING FROM,
OUT OF OR IN CONNECTION WITH THE SOFTWARE OR THE USE OR OTHER DEALINGS IN THE
SOFTWARE.
References
References
Journal Papers Woebbecke, D. M., Meyer, G. E., Von Bargen, K., Mortensen, D. A., Bargen, K. Von, and Mortensen, D. A. (1995). Color Indices for Weed Identification Under Various Soil, Residue, and Lighting Conditions. Trans. ASAE 38, 259–269. doi:https://doi.org/10.13031/2013.27838.
Blog Posts How to run a Raspberry Pi script at startup
How to Run a Script at Boot on Raspberry Pi (with cron)
