Open Jobboard Save
🚀 Open source React.js Headless CMS to easily build customisable job board
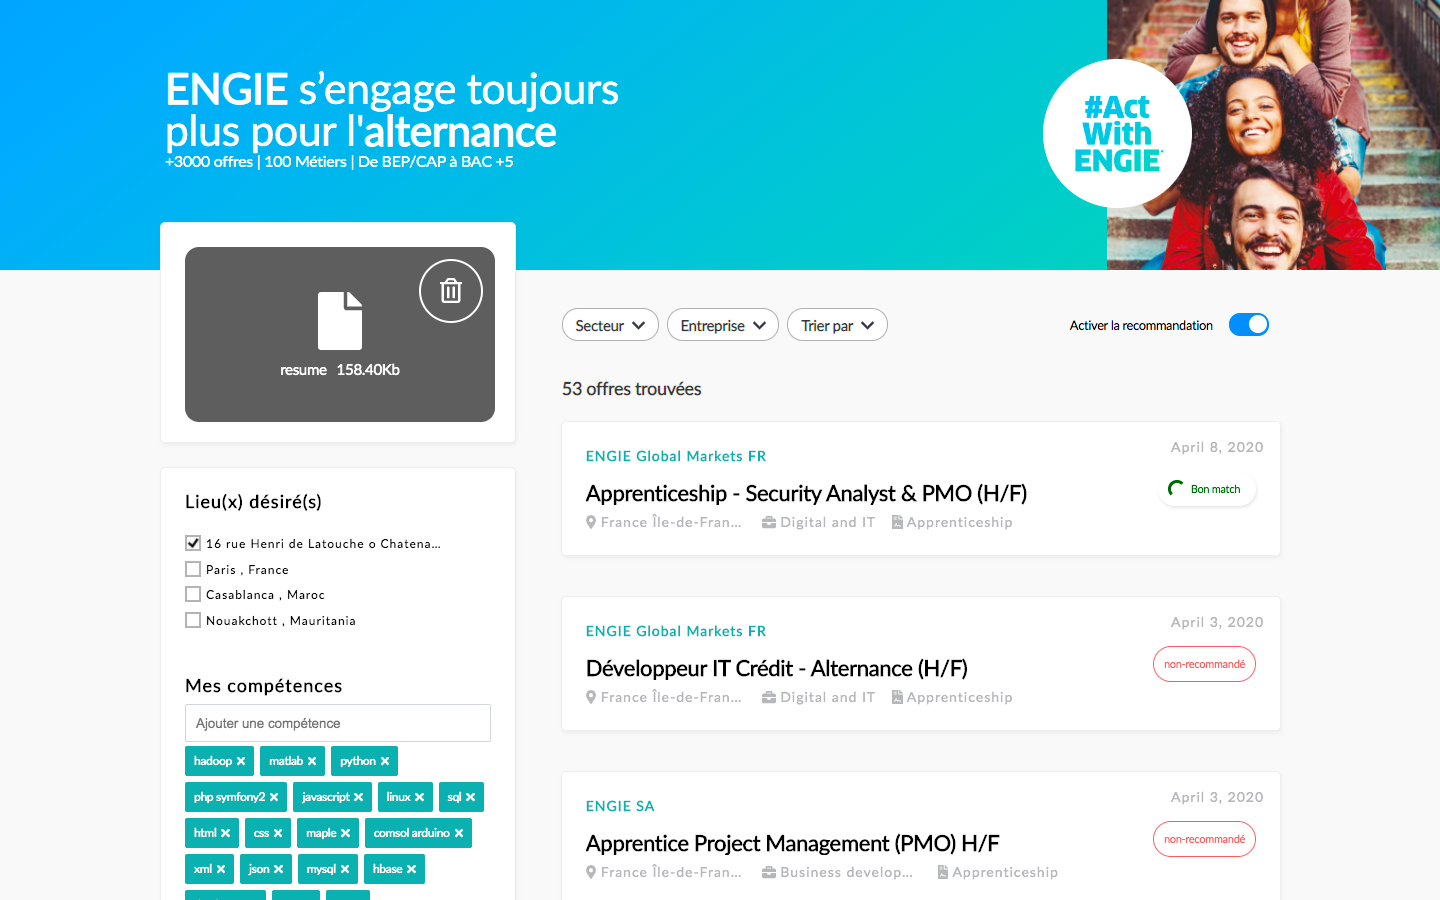
![]()
Open source job board


open-jobboard is an open source jobboard created by HrFlow.ai to allow developers to build easily AI powered job listing platforms and job matching applications.
About HrFlow.ai
https://www.HrFlow.ai is an API first company that provides the most sophisticated AI Powered JOB & PROFILE API. Corporates and Software vendors can leverage our technology layers to Parse, Enrich and Score both job and candidate data. The platform supports +200 apps, pipelines and code integrations so you can automate workflows with your favorite tools.
- Our Developers documentation : https://developers.hrflow.ai/
- Our API list (Parsing, Revealing, Embedding, Searching, Scoring, Reasoning) : https://www.hrflow.ai/api
- Our cool demos labs : https://labs.hrflow.ai
🙈 Demo of open-jobboard
Vidéo demo: https://hrflow.wistia.com/medias/gvf4u3fe48
🚀 Quick start
- Clone this repository.
git clone https://github.com/Riminder/open-jobboard.git
- Start developing.
Navigate into your new site’s directory and start it up.
cd open-jobboard/
npm install
npm start
- Add environment variables
The project environment variables must be defined in the .env.developement and .env.production files in the root directory of the project.
Please note that you shouldn’t commit .env.* files to your source control and rather use options given by your Continuous Deployment (CD) provider. An example is Netlify with its build environment variables.
Here is an exemple of the .env files:
- .env.development
  API_URL=https://api.hrflow.ai/v1
  API_KEY=Your team api key
  BOARD_KEYS=Your team list of board keys for development
  SOURCE_KEY=Your team source key for development
  AGENT_KEY=Your team agent key for development
  GOOGLE_API_KEY=Your google api key (used for places searching)
- .env.production
  API_URL=https://api.hrflow.ai/v1
  API_KEY=Your team api key
  BOARD_KEYS=Your team list of board keys for production
  SOURCE_KEY=Your team source key for production
  AGENT_KEY=Your team agent key for production
  GOOGLE_API_KEY=Your google api key (used for places searching)
- Open the source code and start editing!
Your site is now running at `http://localhost:8000`!
:wrench: Configure and customize the job board
- Colors and images:
The project uses sass preprocessor for css, the variables and mixing are defined in src/styles/helpers.scss. You can change the images and logos directly in the src/assets directory.
- Website metadata, information, SEO and description: This project uses the react helmet pluging that provides drop-in support for server side rendering, and let you control your document head using a simple react component
with this plugings you can add attributes like website title, meta attributes, description, etc... and will get added to the static html build.
This attributes can be added to the file gatsby-config.js
module.exports = {
  siteMetadata: {
    title: 'Your job board title',
    description: `
      Your job board description
    `,
    siteUrl: 'https://example.com',
    image: 'your og image url',
    author:  'HrFlow.ai',
    organization: {
      name: 'Hrflow.ai',
      url: 'https://hrflow.ai',
      logo: 'https://img.riminder.net/logo/Logo.svg',
    },
  },
  plugins: [
    'gatsby-plugin-sass',
    '@bumped-inc/gatsby-plugin-optional-chaining',
    `gatsby-plugin-react-helmet`,
    'gatsby-plugin-root-import',
    {
      resolve: `gatsby-plugin-s3`,
      options: {
        bucketName: "your s3 bucket name",
      },
    },
  ],
}
And you can personalize the attributes to be added to the head of each page by editing the component src/components/seo
import React from "react"
import PropTypes from "prop-types"
import { Helmet } from "react-helmet"
import { useStaticQuery, graphql } from "gatsby"

function SEO({ description, lang, meta, title }) {
  const { site } = useStaticQuery(
    graphql`
      query {
        site {
          siteMetadata {
            title
            description
            author
            organization {
              name
              url
              logo
            }
          }
        }
      }
    `
  )

  const metaDescription = description || site.siteMetadata.description

  return (
    <Helmet
      htmlAttributes={{
        lang,
      }}
      title={title}
      titleTemplate={`%s | ${site.siteMetadata.title}`}
      meta={[
        {
          name: `description`,
          content: metaDescription,
        },
        {
          property: `og:title`,
          content: title,
        },
        {
          property: `og:description`,
          content: metaDescription,
        },
        {
          property: `og:type`,
          content: `website`,
        },
        {
          name: `twitter:card`,
          content: `summary`,
        },
        {
          name: `twitter:creator`,
          content: site.siteMetadata.author,
        },
        {
          name: `twitter:title`,
          content: title,
        },
        {
          name: `twitter:description`,
          content: metaDescription,
        },
        {
          name: `organization`,
          content: site.siteMetadata.organization.name,
        },
        {
          name: `organization url`,
          content: site.siteMetadata.organization.url,
        },
        {
          name: `organization logo`,
          content: site.siteMetadata.organization.logo,
        },
      ].concat(meta)}
    />
  )
}

SEO.defaultProps = {
  lang: `en`,
  meta: [],
  description: ``,
}

SEO.propTypes = {
  description: PropTypes.string,
  lang: PropTypes.string,
  meta: PropTypes.arrayOf(PropTypes.object),
  title: PropTypes.string.isRequired,
}
export default SEO
🧐 What's inside?
A quick look at the top-level files and directories you'll see in a Gatsby project.
.
├── node_modules
├── src
│   ├── assets
│   ├── components
│   ├── hooks
│   ├── pages
│   ├── store
│   ├── styles
│   └── utiles
├── .gitignore
├── .prettierrc
├── gatsby-browser.js
├── gatsby-config.js
├── gatsby-node.js
├── gatsby-ssr.js
├── LICENSE
├── package-lock.json
├── package.json
└── README.md
-
/node_modules: This directory contains all of the modules of code that your project depends on (npm packages) are automatically installed. -
/src: This directory will contain all of the code related to what you will see on the front-end of your site (what you see in the browser) such as your site header or a page template.srcis a convention for “source code”.This directory contains:
assetsAll your assets files like images, fonts, icons... goes here.
componentsContains all the app functional components.
hooksContains some custom hooks.
pagesContains the app main containers (website pages).
storeContains actions and reducers of our app, it holds the whole state tree of your application. The only way to change the state inside it is to dispatch an action on it.
utilsContains app configuration and utilities. -
.gitignore: This file tells git which files it should not track / not maintain a version history for. -
.prettierrc: This is a configuration file for Prettier. Prettier is a tool to help keep the formatting of your code consistent. -
gatsby-browser.js: This file is where Gatsby expects to find any usage of the Gatsby browser APIs (if any). These allow customization/extension of default Gatsby settings affecting the browser. -
gatsby-config.js: This is the main configuration file for a Gatsby site. This is where you can specify information about your site (metadata) like the site title and description, which Gatsby plugins you’d like to include, etc. (Check out the config docs for more detail). -
gatsby-node.js: This file is where Gatsby expects to find any usage of the Gatsby Node APIs (if any). These allow customization/extension of default Gatsby settings affecting pieces of the site build process. -
gatsby-ssr.js: This file is where Gatsby expects to find any usage of the Gatsby server-side rendering APIs (if any). These allow customization of default Gatsby settings affecting server-side rendering. -
LICENSE: This Gatsby starter is licensed under the 0BSD license. This means that you can see this file as a placeholder and replace it with your own license. -
package-lock.json(Seepackage.jsonbelow, first). This is an automatically generated file based on the exact versions of your npm dependencies that were installed for your project. (You won’t change this file directly). -
package.json: A manifest file for Node.js projects, which includes things like metadata (the project’s name, author, etc). This manifest is how npm knows which packages to install for your project. -
README.md: A text file containing useful reference information about this project.
💫 Deploy
The project is pre-configured to be deployed to aws s3, you just need to add and configure your aws cridentials using aws-cli locally. And run the following command:
npm run build
npm run deploy
Otherwise you can take a look on this alternatives:

:octocat: Contributions
Please feel free to contribute to the quality of this content by submitting PRs for improvements to code, architecture, etc. While typo fixes are welcomed, they will likely be caught through normal editing/publishing processes, so please don't worry about them right now.
Any contributions you make to this effort are of course greatly appreciated.
