Nostr Keyx Save
A NIP-07 browser extension that uses the OS's keychain or YubiKey to protect your private keys.
nostr-keyx: Nostr Key Management Extension


A NIP-07 browser extension that uses the OS's keychain or YubiKey to protect your private keys.
- OS's native keychain application support (macOS, Windows, Linux)
- YubiKey OpenPGP support (YubiKey 5 Series)
- Minimal dependencies (
@noble/secp256k1and@scure/base)
There are already great extensions like nos2x or Alby for NIP-07. Unlike these existing extensions, nostr-keyx uses the OS's native keychain application or YubiKey to store your private key instead of the web browser's local storage. Your private keys are encrypted by the operating system or by YubiKey. In addition, all of the NIP-07 functions (signEvent, encrypt, decrypt, etc.) are executed outside of the web browser's memory. So it might be less risky than other extensions. I hope this extension helps you too.
Download
- There are 2 options to download
nostr-keyx.
Option 1: Download zip file
- Download the latest zip file from Releases.
- Unzip it.
nostr-keyx-{version}.zipwill be extracted tonostr-keyx-{version}folder.
Option 2: Download with git and build from source
Note: For Windows, install Git for Windows, start
git-bashand runnpm config set script-shell /usr/bin/bash. Otherwise, you will get error atnpm run build.
# install latest stable version of Node.js
node -v  # I have tested on v18.16.0
git clone https://github.com/susumuota/nostr-keyx.git
cd nostr-keyx
npm ci
npm run build
Install
- You need to install a Chrome extension, Node.js and a Chrome native messaging host to run
nostr-keyx.
Install Chrome extension
- Open Chrome's extensions setting page
chrome://extensions. - Turn
Developer modeon. - Click
Load unpacked. - Specify the extension folder
/path/to/dist/extension. - You will see error messages but it's OK for now.
- Copy the
idof the extension. e.g.jhpjgkhjimkbjiigognoefgnclgngklh. We will use it later.
Install Node.js
-
nostr-keyxuses Node.js to provide NIP-07 functions and access the OS's native keychain application. - Install Node.js and make sure
nodecommand is available in your terminal (typewhich nodeto confirm).
Install Chrome native messaging host
- This Chrome extension uses Chrome Native Messaging to communicate with a native Node.js script.
- You need to install a native messaging host file which is a JSON file that specifies the absolute path of the Node.js script.
For macOS and Linux
Note: I recommend that you should check the content of
install.shbefore you run it. I have tested it in my environment, but I cannot guarantee anything. Basically,install.shperforms the steps on this page inbashscript.
- Run
install.shto install the native messaging host.
cd /path/to/dist/macos  # or linux
cat ./install.sh        # confirm before you run it
bash ./install.sh       # or bash ./install.sh <extension_id>
- Paste the
idof the extension. e.g.jhpjgkhjimkbjiigognoefgnclgngklh. You can find theidof the extension in Chrome's extensions setting pagechrome://extensions. - If you want to uninstall the native messaging host, run
uninstall.sh.
cat ./uninstall.sh      # confirm before you run it
bash ./uninstall.sh
For Windows
- First, you need to allow PowerShell to run scripts.
- Open PowerShell as an Administrator.
- Run the following command to allow executing script. See details here.
Set-ExecutionPolicy -ExecutionPolicy RemoteSigned
- Exit PowerShell of Administrator.
- Open PowerShell as a normal user.
- Run
Unblock-Fileto unblock PowerShell script files that were downloaded from the internet so you can run them. See details here.
cd C:\path\to\dist\windows
Unblock-File .\install.ps1
Unblock-File .\uninstall.ps1
Unblock-File .\add_privatekey.ps1
Unblock-File .\get_privatekey.ps1
Note: I recommend that you should check the contents of PowerShell script files before you run them. I have tested them in my environment, but I cannot guarantee anything. Basically,
install.ps1performs the steps on this page in PowerShell.
- Run
install.ps1to install the native messaging host.
cat .\install.ps1    # confirm before you run it
.\install.ps1
- Paste the
idof the extension. e.g.jhpjgkhjimkbjiigognoefgnclgngklh. You can find theidof the extension in Chrome's extensions setting pagechrome://extensions. - If you want to uninstall the native messaging host, run
uninstall.ps1.
cat .\uninstall.ps1  # confirm before you run it
.\uninstall.ps1
Setup
- Save your private key to the OS's native keychain application.
- You need to specify the private key with account name and service name to switch between multiple private keys.
- The default account name must be
default. You can add other account names, but they must consist of alphanumeric characters, underscores, periods or hyphens. - At the moment, the service name must be
nostr-keyx.
Note: If you need private keys for test, you can generate them with
npm run genkey(needs source, see option 2 above).
For macOS: Option 1: Using command security
- Here, I show you how to save your private key on Terminal. You can also use Keychain Access. I will show you later.
- Copy private key (e.g.
nsec1...) to clipboard. - Open Terminal.
- Run
security add-generic-passwordcommand to create a new entry for your private key. Here,-aspecifies the account name e.gdefault,-sspecifies the service name (service MUST benostr-keyx), and-wmeans the password will be asked.
security add-generic-password -a default -s nostr-keyx -w
# paste your private key (e.g. nsec1....)
# paste it again
- Confirm that the entry is created.
find-generic-passwordsub command will show the password.
security find-generic-password -a default -s nostr-keyx -w
- If you want to delete the entry, run
delete-generic-passwordsub command.
security delete-generic-password -a default -s nostr-keyx
- You can create multiple accounts for multiple private keys. e.g.
default,bot,test, etc. But service name MUST benostr-keyx.
Note: Right now,
securitycommand can access the private key without password. But you can revoke that by Keychain Access application. See the next section.
For macOS: Option 2: Using Keychain Access
- Open spotlight search and type
Keychain Accessand open it. -
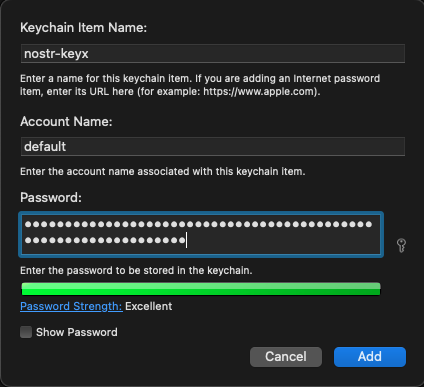
Filemenu >New Password Item... - Type
nostr-keyxtoKeychain Item Name(the first text field). - Type
defaulttoAccount Name(the second text field). - Copy private key (e.g.
nsec1...) to clipboard. - Paste it to
Password(the third text field). - Click
Add.
- You can create multiple accounts for multiple private keys. But make sure that the service name is
nostr-keyx. - Open Terminal and run
securitycommand to confirm that the private key can be accessed viasecuritycommand.
security find-generic-password -a default -s nostr-keyx -w
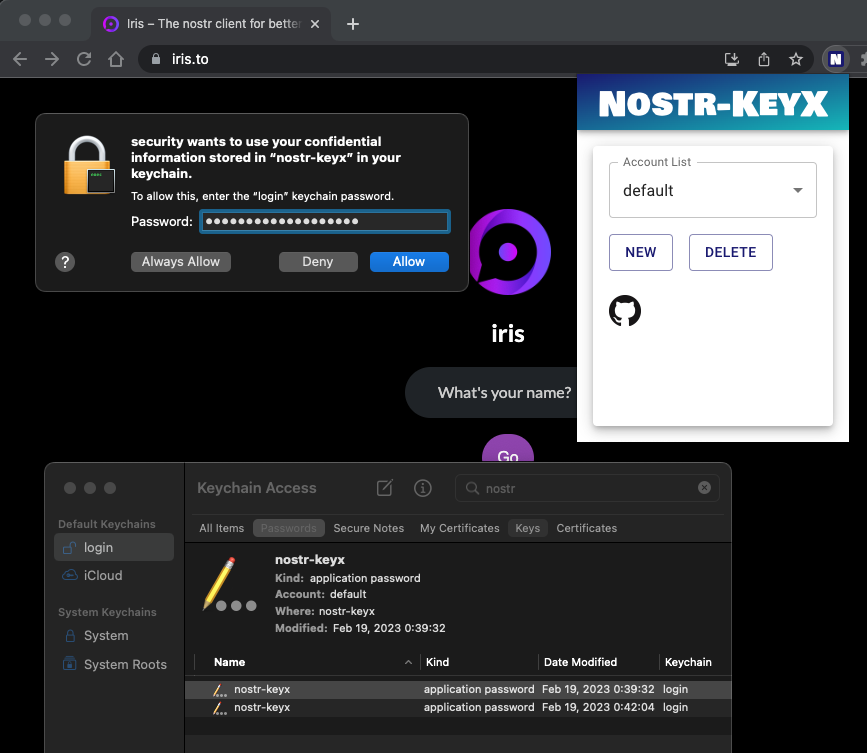
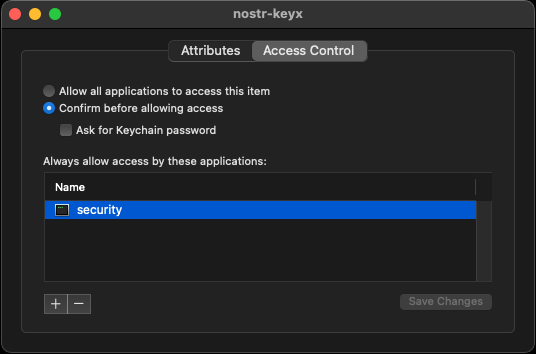
Note: When you try to access private key, you will be asked to enter your password. You can click
Always Allowto allow the access without password. When you want to revoke that, you can change the access control of the entry. Right click the entry and selectGet Info. Then, clickAccess Controltab and clicksecurityonAlways allow access by these applications:area then click-button to remove it. Now you will be asked to enter your password when you try to access the private key viasecuritycommand.
For Windows: Using command add_privatekey.ps1
- Confirm content of
add_privatekey.ps1whether it is safe to run. See details here and here. - Copy private key (e.g.
nsec1...) to clipboard. - Run
add_privatekey.ps1to create a new entry for your private key. You MUST passnostr-keyxas an argument.
cat .\add_privatekey.ps1           # confirm before you run it
.\add_privatekey.ps1 "nostr-keyx"
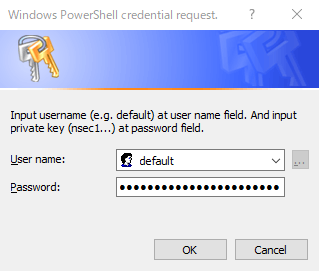
- Dialog will be shown. Type
defaulttoUser namefield, paste your private key toPasswordfield, then clickOK.
- Confirm content of
get_privatekey.ps1whether it is safe to run. See details here and here. - Run
get_privatekey.ps1to get your private key.
cat .\get_privatekey.ps1           # confirm before you run it
.\get_privatekey.ps1 "default" "nostr-keyx"
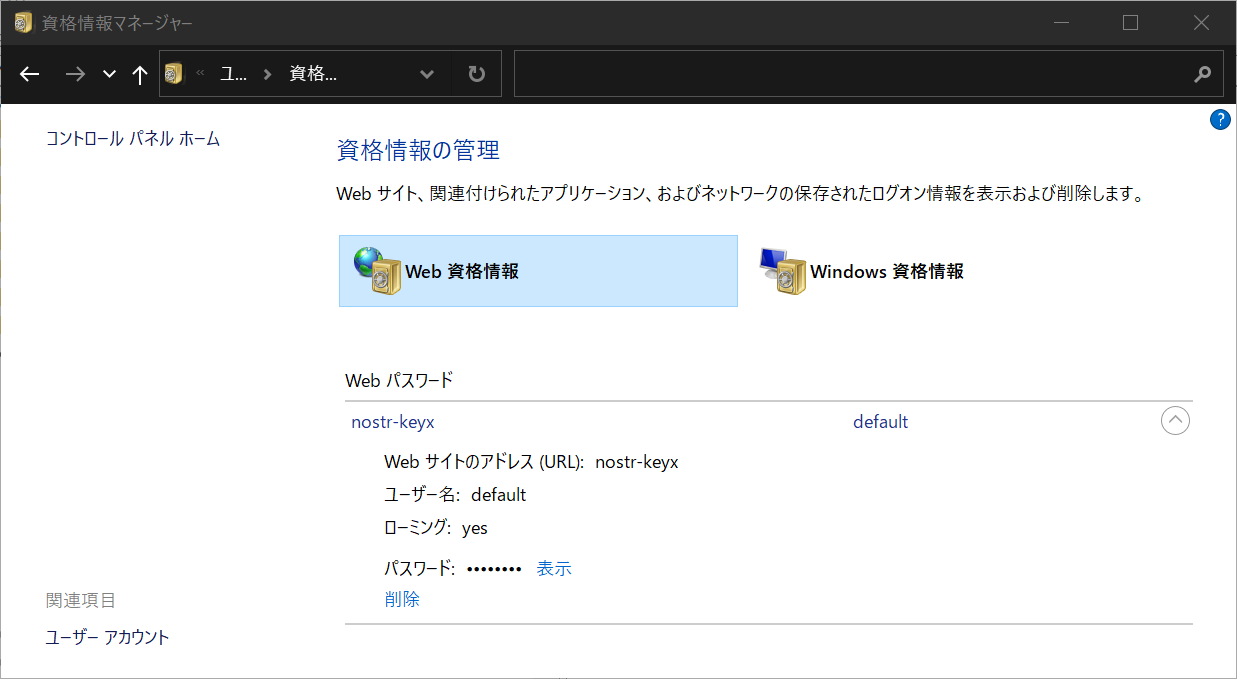
- Type
credential managerin the search box on the taskbar and select Credential Manager Control panel. - Click
Web Credentialsand you will see the entry for your private key.
For Linux: Using command pass
- Setup
pass. See this page. - Copy private key (e.g.
nsec1...) to clipboard. - Run
pass insertcommand to create a new entry for your private key.
pass insert nostr-keyx/default
# paste your private key (e.g. nsec1....)
# paste it again
For YubiKey: Using command gpg
- Setup OpenPGP with YubiKey. Follow my setup memo or this article.
- Install
pinentry-mac(for macOS) or GUI-basedpinentry(for Linux).
brew install pinentry-mac
- Encrypt (and sign) the Nostr private key with gpg and YubiKey.
cd /path/to/dist/macos  # or linux
gpg -sea --default-recipient-self > nostr_privatekey.asc
# paste the private key, enter, and Ctrl+D
- Try to decrypt it.
gpg -d nostr_privatekey.asc
- Unplug YubiKey and try again, it should fail
gpg -d nostr_privatekey.asc
- Plug YubiKey again.
- Run
yubikey.shscript.
/bin/sh -c ./yubikey.sh 2> /dev/null
- It should decrypt the private key successfully.
- Don't forget to add an account
yubikeyon extension popup settings. SeeUsagesection below.
Test it on Iris or Snort
- Open Chrome and go to
chrome://extensions/. - Disable similar NIP-07 extensions, e.g. nos2x, Alby, etc. On Alby, you only need to disable
NIP-07section on the settings. - Clear errors of the extension.
- Reload the extension.
- Click
Service Workerto open dev console of the extension. - If you have used previous versions of this extension, you should clear the extension's cache. Type the following commands in the extension's dev console.
await chrome.storage.local.clear();
await chrome.storage.sync.clear();
await chrome.storage.session.clear();
- Enable log level
Verboseto show debug logs. - Go to Iris or Snort.
- Logout if you already logged in.
- Click
Nostr extension loginfor Iris orLogin with Extension (NIP-07)for Snort. It should usewindow.nostr.getPublicKeyto get public key. - Post some notes. It should use
window.nostr.signEventto sign events with private key. - Send/receive direct messages. It should use
window.nostr.nip04.encrypt/decryptto encrypt/decrypt messages.
Usage
- You can change account (private key) by popup UI of the extension.
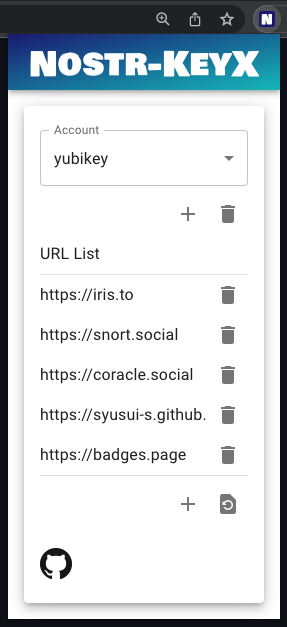
- You can add an account. This account name must match the account name in the OS Keychain application. e.g.
default,yubikey,bot, etc. - To use YubiKey, you need to add an account
yubikey. - Press
+button and enter your account name, then pressADD. - You can switch accounts by selecting list items on the popup UI.
- You can also add a URL to allow the web page to use the extension.
- Press
+button and enter a new URL, then pressADD.
Experimental features
- The popup icon shows the number of API calls accessing the private key (
signEvent,encryptanddecrypt). You should keep your eyes on the growth of this number in order to monitor the behavior of web-based Nostr clients. The number is reset to zero when it reaches 10 due to space limitations in the popup icon.

Potential risks
- This extension passes your private key to secp256k1.schnorr.sign and secp256k1.getSharedSecret. The security of this extension depends heavily on these functions.
- Let me know if you find any other potential risks.
TODO
- Prepare a zip file for easy installation.
- Find a way to store the private key securely.
- Find a way to store the AES key securely.
- Find a way to access OS's Keychain app or Chrome's password manager from the Chrome extension.
- Minimal UI.
- Add profiles to switch multiple accounts.
- Add Windows keychain applications support.
- GitHub Actions to build and publish the zip file.
- Add installer script.
- UI to guide users to install the native messaging host.
- Add preliminary YubiKey support.
- Add biometric authentication support. e.g. fingerprint sensor for MacBook Pro.
- Add a stats page to show the number of API calls accessing the private key.
- Support NIP-46.
- Better error handling.
- Test
relays. - Chrome Web Store?
- Add YubiKey native support. At the moment, it looks hard. Related information: here, here and here.
Source code
Related Links
-
NIP-07:
window.nostrcapability for web browsers. - nos2x: Chrome Extension for NIP-07.
- nostr-tools: Tools for developing Nostr clients.
- noble-secp256k1: JavaScript implementation of secp256k1.
- scure-base: Secure implementation of base64, etc.
- Iris: Web-based Nostr client.
- Snort: Web-based Nostr client.
License
MIT License, see LICENSE file.
Author
S. Ota
- nostr:
npub1susumuq8u7v0sp2f5jl3wjuh8hpc3cqe2tc2j5h4gu7ze7z20asq2w0yu8 - GitHub: susumuota
- Twitter: @susumuota
