Neural Texture Extraction Distribution Save
The PyTorch implementation for paper "Neural Texture Extraction and Distribution for Controllable Person Image Synthesis" (CVPR2022 Oral)
Neural-Texture-Extraction-Distribution
The PyTorch implementation for our paper "Neural Texture Extraction and Distribution for Controllable Person Image Synthesis" (CVPR2022 Oral)
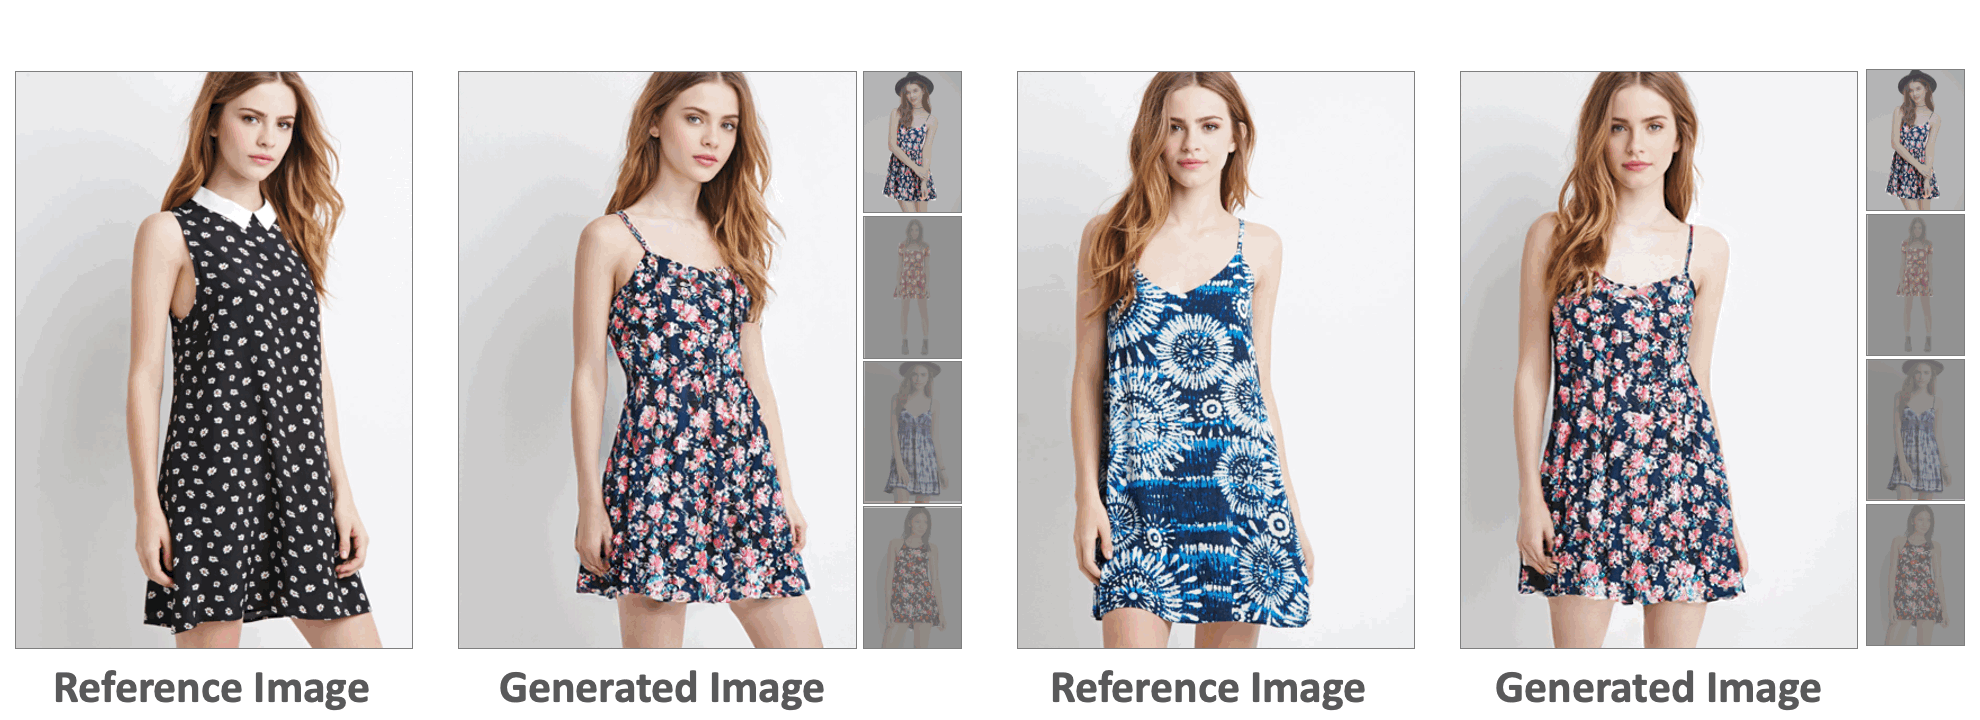
We propose a Neural-Texture-Extraction-Distribution operation for controllable person image synthesis. Our model can be used to control the pose and appearance of a reference image:
- Pose Control

- Appearance Control
News
-
2022.6.25 Web demo available through Replicate:
:rocket: Demo and Docker image on Replicate
-
2022.4.30 Colab demos are provided for quick exploration.
-
2022.4.28 Code for PyTorch is available now!
Installation
Requirements
- Python 3
- PyTorch 1.7.1
- CUDA 10.2
Conda Installation
# 1. Create a conda virtual environment.
conda create -n NTED python=3.6
conda activate NTED
conda install -c pytorch pytorch=1.7.1 torchvision cudatoolkit=10.2

# 2. Clone the Repo and Install dependencies
git clone --recursive https://github.com/RenYurui/Neural-Texture-Extraction-Distribution.git
pip install -r requirements.txt

# 3. Install mmfashion (for appearance control only)
pip install mmcv==0.5.1
pip install pycocotools==2.0.4
cd ./scripts
chmod +x insert_mmfashion2mmdetection.sh
./insert_mmfashion2mmdetection.sh
cd ../third_part/mmdetection
pip install -v -e .
Demo
Several demos are provided. Please first download the resources by runing
cd scripts
./download_demos.sh
Pose Transfer
Run the following code for the results.
PATH_TO_OUTPUT=./demo_results
python demo.py \
--config ./config/fashion_512.yaml \
--which_iter 495400 \
--name fashion_512 \
--file_pairs ./txt_files/demo.txt \
--input_dir ./demo_images \
--output_dir $PATH_TO_OUTPUT
Appearance Control
Meanwhile, run the following code for the appearance control demo.
python appearance_control.py \
--config ./config/fashion_512.yaml \
--name fashion_512 \
--which_iter 495400 \
--input_dir ./demo_images \
--file_pairs ./txt_files/appearance_control.txt
Colab Demo
Please check the Colab Demos for pose control and appearance control.
Dataset
-
Download
img_highres.zipof the DeepFashion Dataset from In-shop Clothes Retrieval Benchmark. -
Unzip
img_highres.zip. You will need to ask for password from the dataset maintainers. Then rename the obtained folder as img and put it under the./dataset/deepfashiondirectory. -
We split the train/test set following GFLA. Several images with significant occlusions are removed from the training set. Download the train/test pairs and the keypoints
pose.zipextracted with Openpose by runing:cd scripts ./download_dataset.shOr you can download these files manually:
- Download the train/test pairs from Google Drive including train_pairs.txt, test_pairs.txt, train.lst, test.lst. Put these files under the
./dataset/deepfashiondirectory. - Download the keypoints
pose.rarextracted with Openpose from Google Driven. Unzip and put the obtained floder under the./dataset/deepfashiondirectory.
- Download the train/test pairs from Google Drive including train_pairs.txt, test_pairs.txt, train.lst, test.lst. Put these files under the
-
Run the following code to save images to lmdb dataset.
python -m scripts.prepare_data \
--root ./dataset/deepfashion \
--out ./dataset/deepfashion
Training
This project supports multi-GPUs training. The following code shows an example for training the model with 512x352 images using 4 GPUs.
CUDA_VISIBLE_DEVICES=0,1,2,3 python -m torch.distributed.launch \
--nproc_per_node=4 \
--master_port 1234 train.py \
--config ./config/fashion_512.yaml \
--name $name_of_your_experiment
All configs for this experiment are saved in ./config/fashion_512.yaml.
If you change the number of GPUs, you may need to modify the batch_size in ./config/fashion_512.yaml to ensure using a same batch_size.
Inference
-
Download the trained weights for 512x352 images and 256x176 images. Put the obtained checkpoints under
./result/fashion_512and./result/fashion_256respectively. -
Run the following code to evaluate the trained model:
# run evaluation for 512x352 images
python -m torch.distributed.launch \
--nproc_per_node=1 \
--master_port 12345 inference.py \
--config ./config/fashion_512.yaml \
--name fashion_512 \
--no_resume \
  --which_iter 495400 \
--output_dir ./result/fashion_512/inference

# run evaluation for 256x176 images
python -m torch.distributed.launch \
--nproc_per_node=1 \
--master_port 12345 inference.py \
--config ./config/fashion_256.yaml \
--name fashion_256 \
--no_resume \
--which_iter 495400 \
--output_dir ./result/fashion_256/inference
The result images are save in ./result/fashion_512/inference and ./result/fashion_256/inference.
