Minimu9 Ahrs Save
Program for reading data from the Pololu MinIMU-9 over I²C. Works on the Raspberry Pi and other embedded ARM Linux boards.
minimu9-ahrs
minimu9-ahrs is a program for reading sensor data from the Pololu MinIMU-9 and similar boards over I²C. It supports the following sensor chips:
- LSM6DS33 accelerometer and gyro
- LSM6DSO accelerometer and gyro
- LIS3MDL magnetometer
- LSM303D magnetometer and accelerometer
- LSM303DLHC magnetometer and accelerometer
- LSM303DLM magnetometer and accelerometer
- LSM303DLH magnetometer and accelerometer
- L3GD20H gyro
- L3GD20 gyro
- L3G4200D gyro
This program works with any board that has a magnetometer, acceleromter, and a gyro from the list above. This includes the following Pololu products:
The program can output the raw sensor data from the magnetometor, accelerometer, and gyro or it can use that raw data to compute the orientation of the IMU. This program was designed and tested on the Raspberry Pi, but it will probably work on any embedded Linux board that supports I²C.
Getting started
Enabling I²C
First, you need to make sure your system supports I²C. Try typing
ls /dev/i2c*: if you don't see a device there named something like
/dev/i2c-1 then your I²C is not enabled properly.
On a Raspberry Pi running Raspbian, you should run sudo raspi-config
and browse its menus to find the option to enable I²C.
Here are some other related resources that might be useful for you when figuring out how to enable I²C:
- Configuring Your Pi for I²C by Adafruit
- Guide to interfacing a Gyro and Accelerometer with a Raspberry Pi
Managing device permissions
After enabling the I²C devices, you should set them up so that your user has
permission to access them. That way, you won't have to run sudo.
First, run groups to see what groups your user belongs to. If i2c is on the
list, then that is good. If you are not on the i2c group, then you should add
yourself to it by running sudo usermod -a -G i2c $(whoami), logging out, and
then logging in again. If your system does not have an i2c group, you can
create one or use a different group like plugdev.
Next, run ls -l /dev/i2c* to make sure that your I²C devices have their group
set to i2c. The group name is shown in the fourth column, and will usually be
root or i2c. If the devices are not in the i2c group, then you should fix
that by making a file called /etc/udev.d/rules.d/i2c.rules with the following
line in it:
SUBSYSTEM=="i2c-dev" GROUP="i2c"
After making this file, you can make it take effect by running
sudo udevadm trigger (or rebooting).
If you get an error about permission being denied, double check that you have done these steps correctly.
Soldering
The MinIMU-9 and AltIMU-9 boards come with male header pins, and you will need to solder these into the board in order to make a solid connection.
Wiring
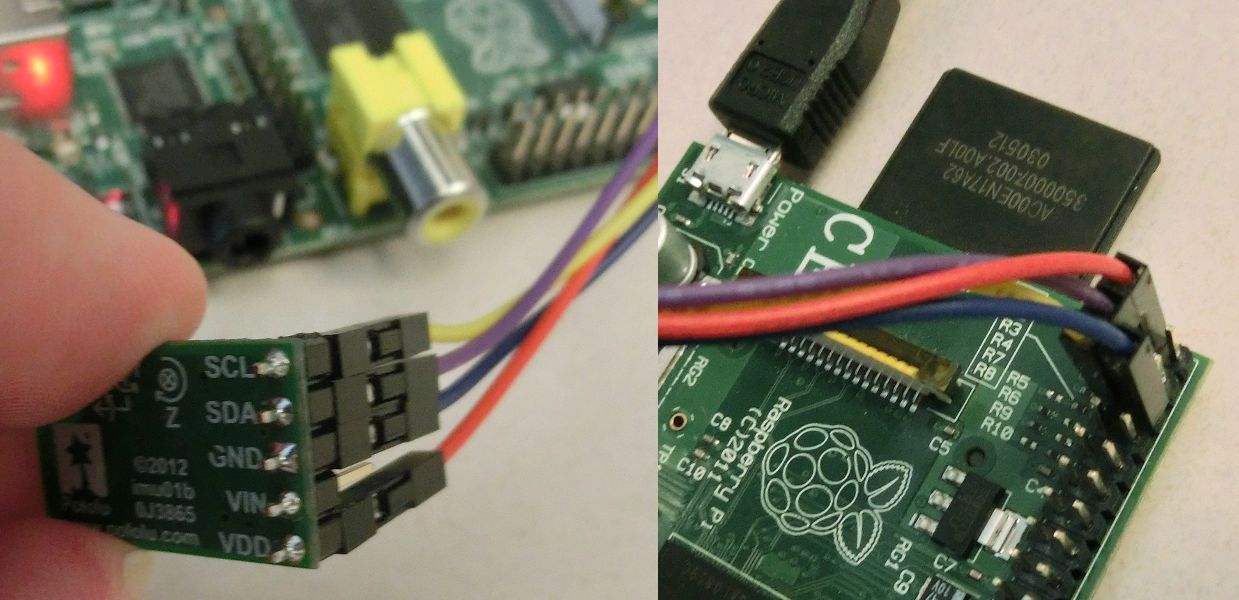
You will need to power your IMU board and connect it to the I²C bus of your embedded computer board. The correct connections for the Raspberry Pi and a MinIMU-9 are listed below:
| Raspberry Pi pin | MinIMU-9 pin |
|---|---|
| GND | GND |
| 3V3 Power | VDD |
| GPIO 2 (SDA) | SDA |
| GPIO 3 (SCL) | SCL |
Below is a picture with a MinIMU-9 v2 showing how to make those connections.
You will need four female-female jumper wires designed for 0.1"-spaced pins. Pololu's Female-Female Premium Jumper Wires work well.
Determining which bus to use
The default I²C bus used by this program is /dev/i2c-1.
On most Raspberry Pi boards, this bus is accessible on the GPIO connector.
If you want to use a different bus, you should make a configuration file
in your home directory named
~/.minimu9-ahrs with a single line of the form i2c-bus=BUSNAME, where
BUSNAME is the full path to the bus you want to use.
For example, to use /dev/i2c-0 by default, the config file should read:
i2c-bus=/dev/i2c-0
If you are not sure which bus to use, you could try running i2cdetect on each
available bus as described below.
Checking your setup
After you have enabled I²C, given yourself the proper permissions, soldered the
MinIMU-9, and connected it to the Raspberry Pi, you should check your setup by
running i2cdetect. Try running i2cdetect -y N, where N is the number of
the I²C bus you want to use (typically 1 or 0). The output should look similar
to this:
$ i2cdetect -y 1
     0  1  2  3  4  5  6  7  8  9  a  b  c  d  e  f
00:          -- -- -- -- -- -- -- -- -- -- -- -- --
10: -- -- -- -- -- -- -- -- -- -- -- -- -- 1d -- --
20: -- -- -- -- -- -- -- -- -- -- -- -- -- -- -- --
30: -- -- -- -- -- -- -- -- -- -- -- -- -- -- -- --
40: -- -- -- -- -- -- -- -- -- -- -- -- -- -- -- --
50: -- -- -- -- -- -- -- -- -- -- -- -- -- -- -- --
60: -- -- -- -- -- -- -- -- -- -- -- 6b -- -- -- --
70: -- -- -- -- -- -- -- --
The exact output will depend on the type of IMU you are using, but the important thing is that the body of the printed table should contain a few hex numbers representing the addresses of I²C devices that were detected on the bus.
If the i2cdetect command is not recognized, you should install the i2c-tools
package. On Raspbian, you can run sudo apt-get install i2c-tools to install
it.
If you do not see a few hex numbers in the body of the table, then make sure
your soldering and wiring are correct and try selecting a different bus by
changing the bus number argument N.
If you get a permission denied error, make sure you have configured the device permissions properly as described above.
If you get a "No such file or directory" error referring to your I²C device, make sure that you have properly enabled I²C as described above.
Building from source
To build minimu9-ahrs, you first need to install some libraries that it
depends on. On Raspbian, you can install these dependencies by running:
sudo apt-get install libi2c-dev libeigen3-dev libboost-program-options-dev
Then, to build minimu9-ahrs, navigate to the top-level directory of the source
code and then run this command:
make
Finally, to install minimu9-ahrs onto your system, run:
sudo make install
Looking at raw values
As a first test, you should look at the raw readings from the sensors on your
IMU to make sure it is OK. Run minimu9-ahrs --mode raw. The output should
look something like this:
  -1318   -3106   -1801     1896    1219    3679        5      18       3
  -1318   -3106   -1801     1898    1200    3681        0      24      -1
  -1318   -3106   -1801     1899    1200    3688       15      17       2
  -1309   -3105   -1799     1874    1201    3671       17      20      -1
  -1309   -3105   -1799     1898    1214    3663       11      15      -2
Yes, there will be noise in all the readings, even if your IMU is not moving at all. That is totally normal.
This output consists of three vectors. From left to right they are the raw magnetometer reading, the raw accelerometer reading, and the raw gyro reading. Each vector consists of three integers, in X-Y-Z order. You should turn the device and make sure that the raw readings change correspondingly. For example, when the X axis of the board is pointing straight up, the accelerometer's X reading (the 4th number on each line) should be positive and the other two components of the acceleration should be close to zero.
Calibrating
The magnetometer will need to be calibrated to create a mapping from the
ellipsoid shape of the raw readings to the unit sphere shape that we want the
scaled readings to have. The calibration feature for the minimu9-ahrs assumes
that the shape of the raw readings will be an ellipsoid that is offset from the
origin and stretched along the X, Y, and Z axes. It cannot handle a rotated
ellipsoid. It can be informative to run minimu9-ahrs --mode raw > output.tsv
while moving the magnetometer and then make some scatter plots of the raw
magnetometer readings in a spreadsheet program to see what shape the readings
have.
To calibrate the magnetometer, run minimu9-ahrs-calibrate and follow the
on-screen instructions when they tell you to start rotating the IMU through as
many different orientations as possible. Once the script has collected enough
data, it saves the data to ~/.minimu9-ahrs-cal-data and then runs a separate
Python script (minimu9-ahrs-calibrator) to create a calibration.
The Python script previously had a complicated algorithm powered by SciPy that would take about 20 minutes to run and was not reliable. Currently, the script just uses a very simple algorithm that finds the minimum and maximum values of each axis of the magnetometer and uses those as the calibration values. This is probably not the best way to calibrate your magnetometer; there are more advanced ways that might work better.
The minimu9-ahrs-calibrate script saves the calibration file to
~/.minimu9-ahrs-cal. The calibration file is simply a one-line file with 6
numbers separated by spaces: minimum x, maximum x, minimum y, maximum y, minimum
z, maximum z. These numbers specify the linear mapping from the raw ellipsoid
to the unit sphere. For example, if "minimum x" is -414, it means that a
magnetometer reading of -414 on the X axis will get mapped to -1.0 when the
readings are scaled.
Looking at Euler angles
Run minimu9-ahrs --output euler. It will print a stream of floating-point
numbers, nine per line. The first three numbers are the yaw, pitch, and roll
angles of the board in degrees. All three Euler angles should be close zero
when the board is oriented with the Z axis facing down and the X axis facing
towards magnetic north. From that starting point:
- A positive
yawcorresponds to a rotation about the Z axis that is clockwise when viewed from above. - A positive
pitchcorrespond to a rotation about the Y axis that would cause the X axis to aim higher into the sky. - A positive
rollwould correspond to a counter-clockwise rotation about the X axis.
The way you should think about it is that board starts in the neutral position, then the yaw rotation is applied, then the pitch rotation is applied, and then the roll rotation is applied to get the board to its final position.
Look at the Euler angle output as you turn the board and make sure that it looks good.
Man page
For more information about minimu9-ahrs, including all the options it supports
and a precise description of its output format, view the man page by running
man minimu9-ahrs.
Related projects
-
ahrs-visualizer - another program by me that provides a 3D display of
the orientation output from
minimu9-ahrs. - Pololu MinIMU-9 Step-by-Step - an alternative tutorial by Mike Kim that explains how to use minimu9-ahrs and ahrs-visualizer.
- RTIMULib2 - another project that works with the MinIMU-9 and the Raspberry Pi.
Version history
- 4.0.0 (2023-07-11):
- Added support for the MinIMU-9 v6 (LSM6DSO and LIS3MDL).
- Changed the default I²C bus to /dev/i2c-1 to better serve Raspberry Pi users.
- Updated the minimu9-ahrs-calibrator script to use Python 3.
- 3.0.0 (2017-04-15):
- Added support for the MinIMU-9 v5 (LSM6DS33 and LIS3MDL).
- Added support for a configuration file at
~/.minimu9-ahrs. - Fixed a bug that resulted in corrections from the accelerometer always being applied even if the acceleration magnitude was not close to 1 g (thanks nxdefiant).
- Use a Linux timerfd for more accurate timing (thanks to nxdefiant for the idea).
- Made the
minimu9-ahrs-calibratescript store the raw data in~/.minimu9-ahrs-cal-data. - Changed the minimu9-ahrs-calibrator Python script to just do simple minima/maxima because the fancy optimization algorithm was not reliable.
- Fixed the way boost_program_options is linked.
- Expanded the README so it can replace the wiki.
- 2.0.0 (2014-07-08):
- Added support for the MinIMU-9 v3 (LSM303D and L3GD20H)
- Removed the right-shifting of raw accelerometer outputs; the raw readings are now signed 16-bit numbers that can range from -32768 to 32767. Previously the readings were signed 12-bit numbers, so this new version effectively gives readings that are greater by a factor of 16.
- Changed the minimu9-ahrs-calibrator Python script to use SciPy instead of the old optimization algorithm.
- Changed the minimu9-ahrs-calibrator script to print a warning if there are fewer than 300 input vectors instead of exiting.
- Changed the minimu9-ahrs-calibrator script to print a warning if the calibration looks wrong.
- 1.1.1 (2012-10-17)
- 1.1.0 (2012-10-15)
- 1.0.0 (2012-10-06)
