MIDItoOBS Save Abandoned
(Pre obs-ws 5!!) A python script to use one or multiple midi input device(s) to control OBS-Studio functions without wasting keyboard hotkeys (including some sort of macro support) from anywhere in the network. "Waiting for a nativ implementation since 2017."
Attention!
As of this commit, miditoobs is officially deprecated and will be/is publicly archived.
miditoobs started in 2017 in a gutefrage.net thread (a german version of quora) with a very basic but functional first commit on Sep 17, 2017. Back then there were basically no tools to do what miditoobs did, this sparked the initial development. Now the codebase (mostly the setup) is fairly outdated and a big patchwork of years of adding stuff. Also the complete lack of any abstraction would make migrating to obs-websocket 5 a complete rewrite of everything, which would also break every single config file out there.
A big thanks to every single person who relied on it over the years and everyone who contributed to the project in any form.
If you are looking for alternatives have a look at the Resources List in the OBS forum. The current version of miditoobs will continue to work as long as the OBS project provides obs-websocket v4 compat versions of the websocket plugin (Which probably is still a few months as of writing this).
Original Readme from here on
Midi OBS what???
This script lets you use one or multiple MIDI controllers (like the Novation Launchpad, Ableton Push, Akai LPD or the Korg nanoPAD to mention a few) to switch scenes, start/stop recording/streaming, control volume/filter settings/gain/opacity/t-bar/delay/transition time and more in obs-studio.
If you want to play it safe, use the latest release. If you want to use the latest features then just clone the master branch.
Requirements
- Obviously a (USB) MIDI controller
- Python 3
- A few pip packages
- obs-websocket plugin:
- If you're using OBS < 28: obs-websocket plugin version 4.9.1
- If you're using OBS >= 28: The obs-websocket plugin version 4.9.1-compat as long as it's still available
Setup Part 1
- Install Python 3.x.x (whatever the latest version is)
- On Windows: Make sure you tick "Add Python 3.x to PATH" in the setup
- Make sure you also install pip
- For instructions how to install TinyDB click here
- For instructions how to install mido and python-rtmidi click here
- For instructions how to install websocket-client click here or here for 4.9.1-compat
- For instructions how to install dbj click here
If you want to install all packages in one go, run pip install -r requirements.txt
Setup Part 2 OBS Websocket
- Download the installer and run it
- Start OBS, open the "Tools" menu and select "WebSockets Server Settings"
- Make sure that "Enable WebSockets server" is checked, "Server Port" is 4444, "Enable authentication" is unchecked and "Enable System Tray Alerts" is unchecked (trust me, you don't want that on)
Setup Part 3
- Download the latest Release or clone it if you want to test the bleeding edge features and bugfixes
- Connect your MIDI controller
- Launch OBS Studio
- Run
setup.py - If you are on Windows, double click or the "Run Setup.bat"
- If you are on MacOS, run
python3 setup.pyfrom your Terminal in the MIDItoOBS folder (ensuring you have activated whatever Python/venv you installed the packages in) - If you run the setup for the first time and have not setup a device yet, it will automatically start the device configuration:
- You will get a list of available MIDI devices. Type the number you want to select and press Enter
- You will be asked if you want to ad another device.
- If you only have a single device choose 2 and press Enter, otherwise select 1 and you will get a list with remaining devices.
- Now you will be asked to press a button or move a fader on your MIDI controller, do that
- If your MIDI controller sends control change messages, you will also be asked for the type of the input (fader or button)
- Select an action from the list and press enter. The names represent the request-type in obs-websocket
- Depending on the action, you will also be asked for the scene and source name (selecting always works by typing in the number and pressing enter). If no source of that type is available and you are prompted to "select 0--1:" then you know that is no such source available in obs and the script will crash trying to select anything. Just add the required object and restart the setup script in this case. (This is already on the todo list for a further update)
Available for buttons:
- SetCurrentScene: Switches to the scene
- SetPreviewScene: Puts a scene into preview when in studio mode
- TransitionToProgram: Transitions the current preview scene to program
- SetCurrentTransistion: Sets the transition that is used with SetCurrentScene
- SetSourceVisibility: Hides or unhides a source
- ToggleSourceVisibility: Toggles the visibility of a source
- ToggleMute: Toggles the mute status from a source
- SetMute: Mutes or unmutes a source
- StartStopStreaming: Toggles the Streaming
- StartStreaming: Starts streaming
- StopStreaming: Stops streaming
- StartStopRecording: Toggles the Recording
- StartRecording: Starts recording
- StopRecording: Stops recording
- StartStopReplayBuffer: Toggles the replay buffer
- StartReplayBuffer: Starts the replay buffer
- StopReplayBuffer: Stops the replay buffer
- SaveReplayBuffer: Save the replay buffer
- PauseRecording: Pauses the recording
- ResumeRecording: Resume the recording that was previously paused
- SetTransitionDuration: Sets the length of the currently selected transition if supported(fade)(in ms) to a predefined value
- SetCurrentProfile: Changes to the selected obs profile
- SetCurrentSceneCollection: Changes to the selected obs scene collection
- ResetSceneItem: Resets a scene item
- SetTextGDIPlusText: Sets the text of a GDI text sourc
- SetBrowserSourceURL: Sets the url of a BrowserSource
- ReloadBrowserSource: Reloads a BrowserSource
- TakeSourceScreenshot: Don't be fooled by the name; Takes a screenshot of the selected source or complete scene and saves it inside the MIDItoOBS folder as a png image
- EnableSourceFilter: Enables a filter that is on a source (Works with "Audio Filters" and Video "Effect Filters")
- DisableSourceFilter: Disables a filter that is on a source (Works with "Audio Filters" and Video "Effect Filters")
- ToggleSourceFilter: Toggles the status of a filter on a source for each button press
- SetAudioMonitor: Sets the audio monitor option on a source
- EnableStudioMode: Enables Studio Mode
- DisableStudioMode: Disables Studio Mode
- ToggleStudioMode: Toggles Studio Mode
- TriggerHotkeyByName: Triggers an obs event, see the obs-websocket wiki for details
- TriggerHotkeyBySequence: Triggers an obs event based on the configured keyboard combination, see the obs-websocket wiki for details
- PlayPauseMedia: Start or Pause Media/VLC Source playback
- ToggleMediaState: Toggle Media/VLC Source playback
- RestartMedia: Restart Media/VLC Source playback
- StopMedia: Stop Media/VLC Source playback
- NextMedia: Jump to the next playlist item. Only works with the vlc source.
- PreviousMedia: Jump to the previous playlist item. Only works with the vlc source.
Available for faders/knobs:
- SetVolume: Sets the volume of a source (unlike other solutions this will actually make the fader move in a visual linear way inside obs(Like a % slider))
- SetSyncOffset: Sets the sync offset of a source [in ns]
- SetSourcePosition: Sets the x or y position of a source [in px]
- SetSourceCrop: Set the crop from any edge (left/right/top/bottom) [in px]
- SetSourceRotation: Sets the rotation of a source [in degree]
- SetSourceScale: Sets the scale for x/y OR both of a source (For the scaling 1 = original scale). You can also select around which position the source will be scaled(align).
- SetTransitionDuration: Sets the length of the currently selected transition if supported (fade) [in ms]
- SetGainFilter: Sets the volume gain value inside the gain filter of a source (For the scaling -30 to 30 is a valid range you can work in). This will automatically default to the first gain filter found in a source!
- MoveTbar: This will move the transition T-Bar. Make sure you always completely finish a T-Bar move by going to one end to the other otherwise obs will stay in the "a transition is currently happening"-state. Be careful because the state might go "out of sync" with the physical fader if you use any other tools that move the t-bar.
- Filter/Chroma Key - Contrast: This controls the "Contrast" value for a "Chroma Key" Filter [-1 - 1]
- Filter/Chroma Key - Brightness: This controls the "Brightness" value for a "Chroma Key" Filter [-1 - 1]
- Filter/Chroma Key - Gamma: This controls the "Gamma" value for a "Chroma Key" Filter [-1 - 1]
- Filter/Chroma Key - Opacity: This controls the "Opacity" value for a "Chroma Key" Filter [0 - 100]
- Filter/Chroma Key - Spill Reduction: This controls the "Key Color Spill Reduction" value for a "Chroma Key" Filter [0 - 1000]
- Filter/Chroma Key - Similarity: This controls the "Similarity" value for a "Chroma Key" Filter [0 - 1000]
- Filter/Luma Key - Luma Max: Opacity: This controls the "Luma Max" value for a "Luma Key" Filter [0 - 1]
- Filter/Luma Key - Luma Max Smooth: This controls the "Luma Max Smooth" value for a "Luma Key" Filter [0 - 1]
- Filter/Luma Key - Luma Min: Opacity: This controls the "Luma Min" value for a "Luma Key" Filter [0 - 1]
- Filter/Luma Key - Luma Min Smooth: This controls the "Luma Min Smooth" value for a "Luma Key" Filter [0 - 1]
- Filter/Color Correction - Saturation: This controls the "Saturation" value for a "Color Correction" Filter [-1 - 5]
- Filter/Color Correction - Contrast: This controls the "Contrast" value for a "Color Correction" Filter [-2 - 2]
- Filter/Color Correction - Brightness: This controls the "Brightness" value for a "Color Correction" Filter [-1 - 1]
- Filter/Color Correction - Gamma: This controls the "Gamma" value for a "Color Correction" Filter [-3 - 3]
- Filter/Color Correction - Hue Shift: This controls the "Gamma" value for a "Color Correction" Filter [-180 - 180] (Replaces the old SetColorCorrectionHueShift)
- Filter/Color Correction - Opacity: This controls the "Opacity" value for a "Color Correction" Filter [0 - 100] (Replaces the old SetOpacity)
- Filter/Color Key - Similarity: This controls the "Similarity" value for a "Color Key" Filter [1 - 1000]
- Filter/Color Key - Smoothness: This controls the "Smoothness" value for a "Color Key" Filter [1 - 1000]
- Filter/Color Key - Brightness: This controls the "Brightness" value for a "Color Key" Filter [-1 - 1]
- Filter/Color Key - Contrast: This controls the "Contrast" value for a "Color Key" Filter [-1 - 1]
- Filter/Color Key - Gamma: This controls the "Gamma" value for a "Color Key" Filter [-1 - 1]
- Filter/Sharpen - Sharpness: This controls the "Sharpness" value for a "Sharpen" Filter [0 - 1]
- Filter/Scroll - Horizontal Speed: This controls the "Horizontal Speed" value for a "Scroll" Filter [-500 - 500]
- Filter/Scroll - Vertical Speed: This controls the "Vertical Speed" value for a "Scroll" Filter [-500 - 500]
- Filter/Video Delay (Async) - Delay: This controls the "Delay" value (in ms) for a "ideo Delay (Async)" Filter [-0 - 20000]
- Filter/Render Delay - Delay: This controls the "Delay" value (in ms) for a "Render Delay" Filter [0 - 500]
- Filter/Generic Filter - Generic Setting: This can control every property of any filter, even filters added by plugins or on (global) audio sources. You have to specify what the setting property is called ,either by manually calling GetSourceFilterInfo via obs-websocket or by changing the default value via obs which then shows up in a list in the setup. You also have to specify if the data should be a Int (Whole Number) or Float (Floating Point Number)
- Now you can either setup another button/fader by repeating the steps above(except starting the script again) or just close the window to exit the configuration
Important note about all controls that involve a scene:
In OBS, scenes are also sources, so all the filter controls and TakeSourceScreenshot will also work on scenes. They will be part of the list that you are prompted with in the setup. For a detailed description of most of the commands see the obs-websocket protocol documentation
Device Management
If you run the setup another time after the initial configuration you will get a dialog at startup where you can select if you want to go to the device management (1) or just continue adding new button/fader assignments with the already configured devices (2). If you select 1, you have a few options:
- 1: Move the assignments from one device over to another. This can help when you plug the controller into another USB port and then shows up under a different name (e.g., "Devicename 1" instead of "Devicename")
- 2: Delete all devices from the database without removing their mapping. This does exactly that and be warned, will cause a device mixup when you add more devices later. You'll be better of using option 3
- 3: Remove a single device and their assignments.
- 4: Add a new device. This allows you do add more devices.
- 5: Skip device configuration. This exits the device management without changing anything and continues with the assignment dialog.
Understanding input scaling
A MIDI value can be something between 0-127. That is a very limited number.
You will only be asked for Input Scale setup if it's required for the function(SetSourcePosition, SetSourceRotation, SetSourceScale, SetSyncOffset, SetTransitionDuration, SetGainFilter).
The first value you have to enter(lower output value) is the value that will be sent when the fader is sending a 0. The second value you have to enter(higher output value) is the value that will be sent when the fader is sending a 127. The range between the 2 numbers will be interpolated linearly.
Some limitations might apply to the range you can use (see the comments above in the action list above).
"Bidirectional mode" !!ADVANCED/EXPERIMENTAL
THIS IS ONLY FOR ADVANCED USERS THAT ARE COMFORTABLE EDITING CONFIG FILES
If you enable the "bidirectional" mode while setting up SetCurrentScene or SetPreviewScene the script will try to open the input device as an output device and listen for Preview or Program scene change events. It will then send out a note_on or control_change event on midi channel 0 to the same note or control channel that is setup for the specific scene.
The bidirectional mode for the ToggleMute function sends out a note_on with velocity 0 or 2 depending on the mute state and might only work on the AKAI APC mini.
This default approach might not work for some devices like the X-Touch Mini that have different notes/cc values for the same button depending if the data is coming in or going out. In this case you have to add a value named "out_msgNoC" to the config.json file for the button you want to light up with the right note/cc number. To change the default channel you need to add a value named "out_channel" to config.json file.
If the midi out port for your device has a different name then the input port this will also not work without modifying the config.json file. For that first use the device configuration as mentioned above to add another device (could be one with a completely different name, this only saves you the work of manually adding the whole device which you could also do). Then add a value called "out_deviceID" to the button mapping entry with the value set to the id of the output device you just created. Also make sure that the output device name is the right one.
To manually check which MIDI device are available for input/output, run python then paste:
import mido
mido.get_ioport_names()
mido.get_input_names()
mido.get_output_names()
If you want to know more, take a look at the original pull request
Updating MIDItoOBS
As MIDItoOBS is just running from the folder you move/download it into, updating the program itself is (most of the time) as easy as downloading it again like mentioned in Setup Part 3.
I highly recommend that you do not overwrite your existing files but rather backup the folder as is (including the config.json) and start with the freshly downloaded files in a new folder. Then just copy your config.json from the old backup folder into the new folder. Then try to run it.
It can and will happen from time-to-time that I introduce some changes that make the config no longer work with the new program version. As I don't have a changelog yet (which is definitely on the todo list) there is not really any way for you to know. Sometimes I announce such changes on the very top of this readme file. If it no longer works, feel free to open an issue or contact me (See Troubleshooting).
Running MIDItoOBS on another computer in the network
- You can change the IP and Port of the device running obs and obs-websocket by modifying the
main.py(line 5/6) andsetup.py(line 6/7) with a text editor. You might have to create some firewall exceptions for the websocket port on the device running obs-websocket.
Setting up "macros" (optional)
You can assign unlimited different actions to the same button. There is no guided GUI way to do this right now so this requires editing the config. (Sounds harder then it is)
- Setup the functions as described above on different buttons
- Now stop the
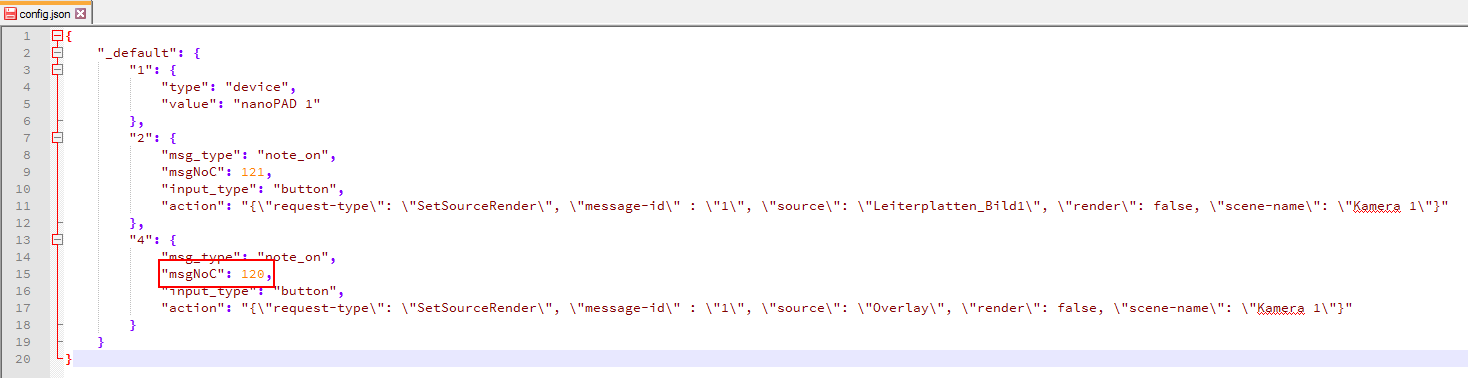
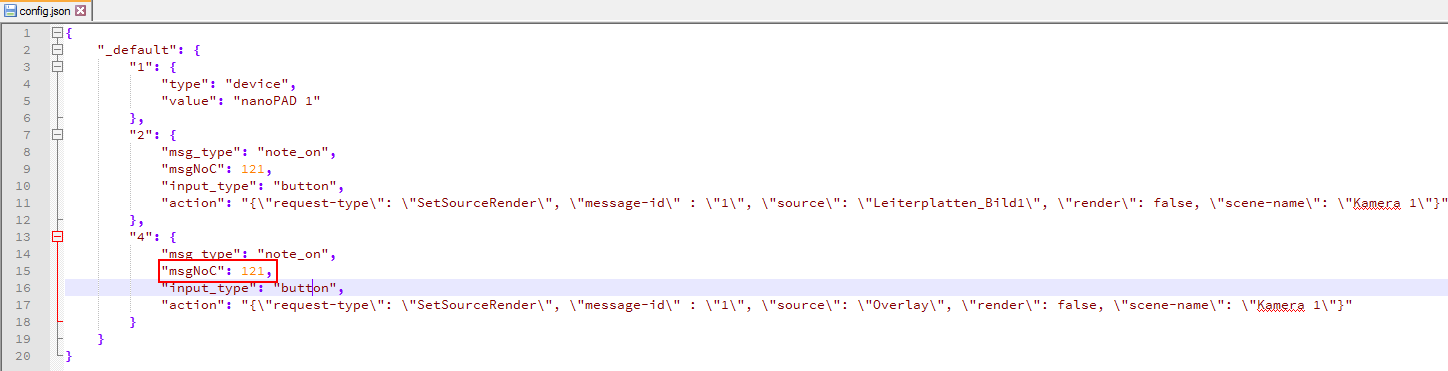
setup.pyand open the config (config.json) with a text editor. - Change the "msgNoC" value of the buttons you want to combine to the value of the button you want to use. Make sure you have the entry with the right device ID.
- Here are some pictures for better understanding: Step 1 Step 2
- Now save and close the config file
- Run
main.pyand verify that it works
Using it (!Very important!)
- If you're a first-time user, make sure to follow setup steps 1-3
- You can launch
setup.pyanytime (as long asmain.pyis not running) to change the configuration of a single button/fader without reconfiguring the whole controller. - Always make sure that obs is running before launching any of the scripts
- Launch the
main.pyfile (Try double click or the "Run Main.bat" if you are on Windows) - The console gives you information when it successfully connects to OBS
- Also, if there is an error it will be printed out (If you ignore case-sensitive fields or the scene doesn't exist)
- Third, it prints out a message every time you press a button that is setup
- Now just leave it running in the background
- To stop the program simply close the window (or press CTRL + C)
Command line options
You can call the main.py and the setup.py with the following command line options:
-
--config <path/to/config/file.json>(Default: "config.json") -
--port <obs-websocket port>(Default: "4444") -
--host <obs-websocket hostname/ip>(Default: "localhost")
Troubleshooting/Support
A user has reported that under certain circumstances the script(setup and main) will crash after start on Windows with "ImportError: DLL load failed: The specified module could not be found". If this happens to you, please install the Visual C++ Redistributable from Microsoft. Make sure you get the x86 version if you are using python 32-bit (Which is default) (Download)
Contributors
I had never imagined that so many people would contribute something to the project. Thanks to everyone who submitted a bug report or pull request.
Special thanks to:
- ptitodd (Adding program_change message handling)
- asquelt (making it work in python2)
- Alex-Dash (make the volume control linear)
- imcrazytwkr (completely refactoring the main.py)
- juliscrazy (fix typo in readme)
- houz (midi feedback back to the controller)
- cpyarger (midi feedback for faders)
- juandelacruz-calvo (Audio Monitoring command)
- jberentsson (command line options)
- Sprinterfreak (bidi mode for ToggleMute)
- spessoni (Bidirectional mode for visibility changes)
Tested on/with
- Windows 10 21H1
- Ubuntu 18.04
- Python 3.8.3:6f8c832
- obs-studio 27.0.1
- obs-websocket 4.9.1
- KORG nanoPAD
- KORG nanoKONTROL 2 (tested by thatGuyStrike and houz)
- KORG padKONTROL (tested by jberentsson)
- Behringer FCB-1010 + ESI MidiMate eX (tested by thatGuyStrike)
- Hercules DJ Control MP3
- Behringer X-Touch Mini (tested by me-vlad)
- Behringer X-Touch Compact
- Arturia MiniLab MKII (tested by moops44). See Issue #17 for notes!
- Native Instruments Maschine Mk3 (tested by moops44). See Issue #18 for notes!
- Novation LaunchControl XL (tested by lannonbr)
- TYST TY-1500HD Switcher (tested by spessoni). Works well, however DSK, PGM, PVW, TRANS EFFECT, and DSK SELECT only really allow one LED to illuminate per group when setting up bidirectional mode. This is generally fine, because you would only be using one button on those groups. Also, you will need to manually update
config.jsonbecause the MIDI input/output are separate ports. - Allen & Heath Xone K2
- AKAI APC mini
- AKAI MPK Mini II
- loopMIDI
- Pocket MIDI (for debug)
- StreamDeck Midi Plugin
Let me know if you had success with your device.
This project is not affiliated with the OBS Project or obs-websocket
