M8HeadlessStaging Save
This is a DIY project to push the Dirtywave M8 Headless into a PCB and make it handheld.
M8 Headless Staging
 This is a DIY project to push the Dirtywave M8 Headless into a PCB and make it handheld.
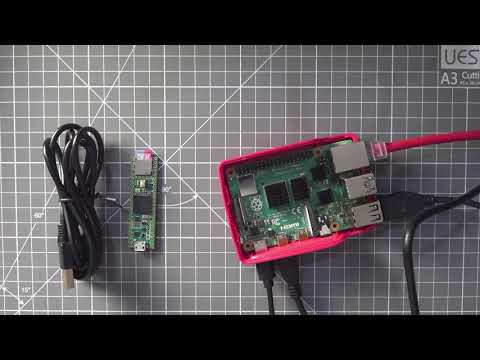
Test build was done on the fabricated PCB. MIDI I/O AUDIO OUT seems to be working well.
Kicad data has been withheld from the public due to criticism that it would damage the market. Please contact.
This is a DIY project to push the Dirtywave M8 Headless into a PCB and make it handheld.
Test build was done on the fabricated PCB. MIDI I/O AUDIO OUT seems to be working well.
Kicad data has been withheld from the public due to criticism that it would damage the market. Please contact.
Now progress
- Idea sketch
- Draw proto Schematics
- Design proto PCB
- Proto type
- Design PCB
- Fabrication PCB
- Test Build
Latest Status


Build
- It works almost perfectly, except for the audio input. I carefully researched Dirtywave's Discord, but could not figure it out. I gave up on it.
- Some wiring must be done by hand. This means that some wiring is not included on the PCB. For example, it is necessary to connect the key switch to the GPIO pins of the RSPi, and to connect the shutdown button to the GPIO pins.
Parts list
- Raspberry Pi 3 Model B+(Raspberry Pi 4 Model B is better) *1
- Teensy 4.1 *1
- 90 deglee USB cable(You can find them at Aliexpress) *1
- Display for the Raspberry Pi (You can find them at Aliexpress) *1
- PCM5102dac decorder (You can find them at Aliexpress) *1
- Kailh Low profile key switch with cap (You can find them at Aliexpress) *8
- 3.7V Litium poly battery (You can find them at Aliexpress) *1
- Ajustable battery module (You can find them at Aliexpress) *1
- Slide switch (2.54mm pich) *1
- Tact switch (6mm*6mm) *1
- 30mm long hex spacer *4
- 15mm long hex spacer *4
- 6N138 optocoupler *1
- other resistors and capacitor (STM assenbly use by JLCPCB)
Setup Teensy
Be sure to follow the official manual. The version you install must be 2.0.5. Otherwise, the midi i/o will not work. https://github.com/DirtyWave/M8Docs/blob/main/docs/M8HeadlessSetup.md
Setup Raspberry Pi
- Setup m8c
- Setup full screen
- Setup autostart
- Setup shutdown key(Use Tact switch)
- Setup key switches
Setup m8c
The client software for Headless is m8c, which is published by laamaa. The setup for using the m8c and Raspberry Pi can be seen in detail in the littlescale video.
Setup full screen
You can set the fullscreen in the config in the m8c installation folder.
Setup autostart
Put in a general autostart program.It's probably faster to ask Google than to ask me. Then KICK The m8c startup command, ". /m8c".
Setup shutdown key(Use Tact switch)
This one also plants a commonly used shutdown program. We connected the GND of the tact switch and the "shutdown button" pad on the PCB to GPIO5 (PIN29) and GND (PIN30) respectively. This is because pins 1 to 28 are blocked by the display. https://www2.quartoknows.com/page/raspberry-pi-shutdown-button
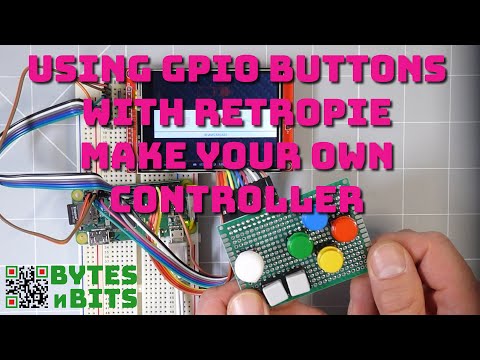
Setup key switches
Key mapping is done using a program called "GPIONext", which is often used in RetroPi. The GND must be connected to PIN39 or PIN34, but the other pins can be configured as you like. Use a wire to arrange the wires. https://github.com/mholgatem/GPIOnext
The key layout to be set should follow the m8c manual.
Keys for controlling the progam:
- Up arrow = up
- Down arrow = down
- Left arrow = left
- Right arrow = right
- a / left shift = select
- s / space = start
- z / left alt = opt
- x / left ctrl = edit
Other Parts
Other parts, such as the DAC module, simply need to be soldered as shown in the image to function.
The following is a memorandum for development, but I leave it here just in case.
Design Outline

- M8 Headless will be installed on teensy4.1.
- The client software for Headless is m8c, which is published by laamaa.
- The client computer will be a Raspberry Pi3 Model B+.
- For the display, we will use a third party display for the Raspberry Pi. (You can find them at Aliexpress)
- We will implement MIDI IN & OUT.
- We will use the GPIO pins of the Raspberry pi to perform key emulation and try to get close to the original key layout.
- Sandwich the above various devices on two PCBs.
- If there is enough room, I would like to implement a battery module as well.
Task1 Client and Display
The setup for using the m8c and Raspberry Pi can be seen in detail in the littlescale video.
Since this video shows video and audio output from the HDMI port, we will assume that audio output is available using a 3.5mm stereo jack if you use a touch display with audio output, available from Aliexpress. Or I'm thinking of getting the sound through a DAC module.
hacked together a quick teensy 4.1 midi i/o and audio out board for making it a bit easier to use the #m8tracker headless version in my dawless setup pic.twitter.com/O24RRRLSRL
— Jonne Kokkonen (@laamaa) June 13, 2021
Practical notes
- Use Headless version 2.0.5, because MIDI I/O does not work well.
Task2 MIDI IN&OUT
As has been discussed several times on Dirtywave's Discord, it seems possible to implement MIDI IN and OUT in a Headless environment. The developer, trash80, commented "MIDI in is pin 28, MIDI out is pin 1, it's enabled". I plan to implement them as shown in the schematic below.

Task3 Key Switch
Key emulation (key mapping) using the GPIO pins of the Raspberry Pi is also currently in the hypothetical stage. There are plenty of people practicing something similar with the Retropi! For the keyswitch itself, I will use the same one as the M8 original.
Task4 Battery Module
I'd like to use the tiny little battery charging modules that Aliexpress sells so that I can seamlessly connect the power supply, PSU, and charging. I think I will agonize over where to put the batteries!
Reference data
James' work has addressed some of the concerns of this project!


