Kube Notary Save
A Kubernetes watchdog for verifying image trust with Codenotary (www.codenotary.com)
kube-notary
A Kubernetes watchdog for verifying image trust with Codenotary Cloud.
How it works
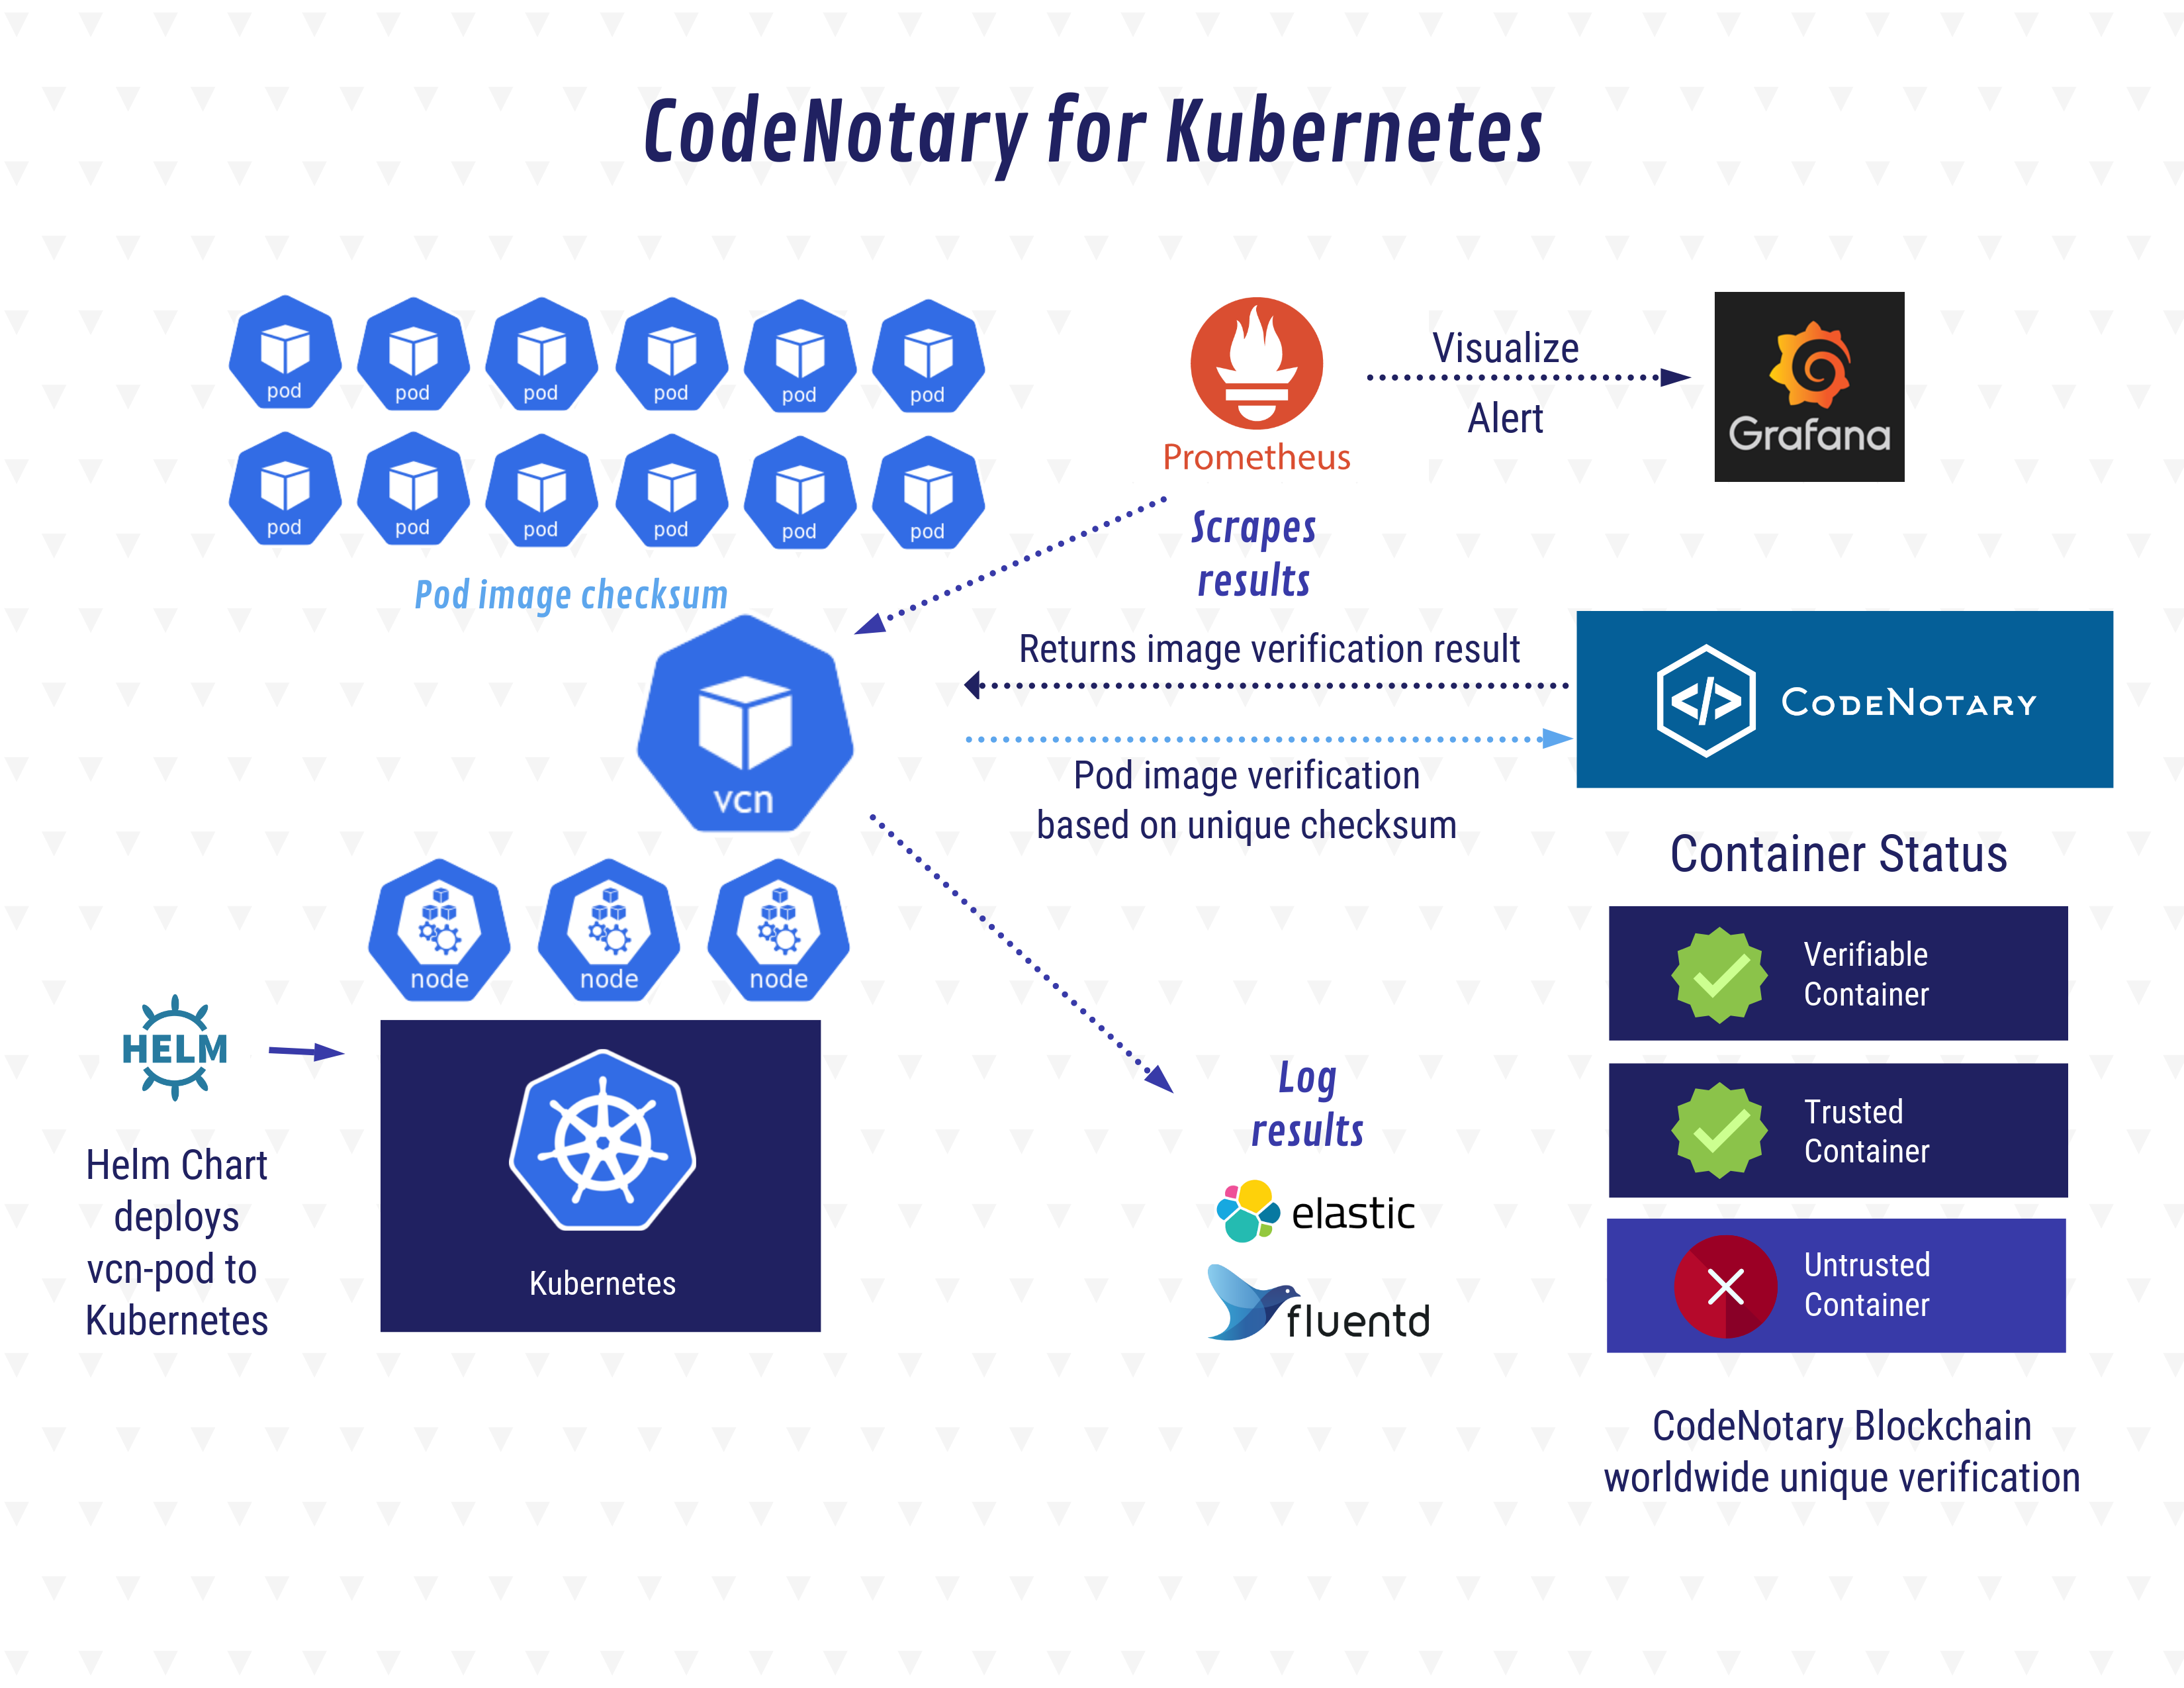
kube-notary is a monitoring tool for Continuous Verification (CV) via Codenotary Cloud. The idea behind CV is to continuously monitor your cluster at runtime and be notified when unknown or untrusted container images are running.
Once kube-notary is installed within your cluster, all pods are checked every minute (interval and other settings can be configured).
For each of the running containers in each pod, kube-notary resolves the ImageID of the container's image to the actual image's hash and finally looks up the hash's signature in the Codenotary's Cloud.
Furthermore, kube-notary provides a built-in exporter for sending verification metrics to Prometheus, which can then that can be easily visualized with the provided grafana dashboard.
Images you trust can be signed by using the Codenotary vcn CLI tool.
https://infograph.venngage.com/ps/ex4ECrROPCQ/codenotary-for-kubernetes
Install
kube-notary is installed using a Helm chart.
Kubernetes 1.9 or above, and Helm 2.8 or above need to be installed in your cluster.
First, make sure your local config is pointing to the context you want to use (ie. check kubectl config current-context).
Then, to install kube-notary:
- Clone this repository locally: https://github.com/vchain-us/kube-notary
- Change directory into
kube-notary.
To run the following steps are required:
- Be sure to have an api-key secret
Note: You can obtain an api-key from CodeNotary Cloud.
- Install helm chart with following parameters:
helm install \
    -n kube-notary ../../helm/kube-notary \
    --set image.repository=$KUBE_NOTARY_IMAGE --set image.tag=$KUBE_NOTARY_TAG \
    --set image.pullPolicy=Always \
    --set cnc.host={CNC ip address, default nil} \
    --set cnc.port={CNC port address, default 3324} \
    --set cnc.cert={CNC certificate, default nil} \
    --set cnc.noTls={CNC enable unsecure connections, default true} \
    --set cnc.skipTlsVerify={CNC skip tls verification, default false} \
    --set cnc.signerID={CNC parameter used to filter results on a specific signer ID, default nil} \
    --set cnc.ledgerName={CNC used when a cross-ledger key is provided in order to specify the ledger on which future operations will be directed. Default nil} \
    --set cnc.apiKey={API Key from CNC} \
    --wait
To sign an image use vcn CLI. Please contact CodeNotary support for more information.
See the Configuration paragraph for detailed instructions.
Namespaced
If you do not have cluster-wide access, you can still install kube-notary within a single namespace, using:
helm install -n kube-notary helm/kube-notary --set watch.namespace="default"
When so configured, a namespaced Role will be created instead of the default ClusterRole to accommodate Kubernetes RBAC for a single namespace. kube-notary will get permission for, and will watch, the configured namespace only.
Manual installation (without Helm)
Alternatively, it is possible to manually install kube-notary without using Helm. Instructions and templates for manual installation are within the kubernetes folder.
Uninstall
You can uninstall kube-notary at any time using:
helm delete --purge kube-notary
Usage
kube-notary provides both detailed log output and a Prometheus metrics endpoint to monitor the verification status of your running containers. After the installation you will find instructions on how to get them.
Examples:
  # Metrics endpoint
  export SERVICE_NAME=service/$(kubectl get service --namespace default -l "app.kubernetes.io/name=kube-notary,app.kubernetes.io/instance=kube-notary" -o jsonpath="{.items[0].metadata.name}")
  echo "Check the metrics endpoint at http://127.0.0.1:9581/metrics"
  kubectl port-forward --namespace default $SERVICE_NAME 9581

  # Results endpoint
  export SERVICE_NAME=service/$(kubectl get service --namespace default -l "app.kubernetes.io/name=kube-notary,app.kubernetes.io/instance=kube-notary" -o jsonpath="{.items[0].metadata.name}")
  echo "Check the verification results endpoint at http://127.0.0.1:9581/results"
  kubectl port-forward --namespace default $SERVICE_NAME 9581

  # Stream logs
  export POD_NAME=$(kubectl get pods --namespace default -l "app.kubernetes.io/name=kube-notary,app.kubernetes.io/instance=kube-notary" -o jsonpath="{.items[0].metadata.name}")
  kubectl logs --namespace default -f $POD_NAME

  # Bulk sign all running images
  export POD_NAME=$(kubectl get pods --namespace default -l "app.kubernetes.io/name=kube-notary,app.kubernetes.io/instance=kube-notary" -o jsonpath="{.items[0].metadata.name}")
  kubectl exec --namespace default -t $POD_NAME sh /bin/bulk_sign > vcn_bulk_sign.sh
  chmod +x vcn_bulk_sign.sh && ./vcn_bulk_sign.sh
Metrics
If a Prometheus installation is running within your cluster, metrics provided by kube-notary will be automatically discovered.
Furthermore, you can find an example of a preconfigured Grafana dashboard here.
Configuration
By default, kube-notary is installed into the current namespace (you can change it by using helm install --namespace) but it will watch to pods in all namespaces.
At install time you can change any values of helm/kube-notary/values.yaml by using the Helm's --set option.
For example, to instruct kube-notary to check only the kube-system namespace, just use:
helm install -n kube-notary helm/kube-notary --set watch.namespace="kube-system"
Runtime configuration
The following options within helm/kube-notary/values.yaml have effect on the kube-notary runtime behavior.
# Runtime config
log:
  level: info # verbosity level, one of: trace, debug, info, warn, error, fatal, panic
watch:
  namespace: "" # the namespace name to watch
  interval: 60s # duration of the watching interval
   - ...
   - ...
During the installation, they are stored in a configmap. Configuration hot-reloading is supported, so you can modify and apply the configmap while kube-notary is running.
For example, to change the watching interval from default to 30s:
kubectl patch configmaps/kube-notary \
    --type merge \
    -p '{"data":{"config.yaml":"log:\n  level: debug\nwatch: \n  namespace: \n  interval: 30s"}}'
FAQ
Why Continuous Verification ?
Things change over time. Suppose you signed an image because you trust it. Later, you find a security issue within the image or you just want to deprecate that version. When that happens you can simply use vcn to untrust or unsupport that image version. Once the image is not trusted anymore,
thanks to kube-notary you can easily discover if the image is still running somewhere in your cluster.
In general, verifying an image just before its execution is not enough because the image's status or the image that's used by a container can change over time. Continuous Verification ensures that you will always get noticed if an unwanted behavior occurs.
How can I sign my image?
You can easily sign your container's images by using the vcn CLI we provide separately.
vcn supports local Docker installations out of the box using docker:// prefix, followed by the image name or image reference.
Furthermore, if you want to bulk sign all images running inside your cluster, you will find below instructions to generate a script that automates the process.
Export POD_NAME setting it to the kube-notary's pod name, then run:
kubectl exec --namespace default -t $POD_NAME sh /bin/bulk_sign > vcn_bulk_sign.sh
chmod +x vcn_bulk_sign.sh && ./vcn_bulk_sign.sh
Note that a CodeNotary account and a local installation of vcn are needed. Also, make sure your
kubectlis pointing to the context you want to use.
How can I be notified when untrusted images are runnig?
First, Prometheus and Grafana need to be installed in your cluster.
Then it's easy to create alerts using the provided Grafana dashboard
Why my image cannot be signed? (manifest v2 schema 1)
The image manifest v2 schema 1 format is deprecated in favor of the v2 schema 2 format.
Please, move to v2 schema 2 as soon as possible. Usually, you can fix that simply by pushing your image again on the registry.
Cannot create resource "clusterrolebindings"
Recent versions of Kubernetes employ a role-based access control (or RBAC) system to drive authorization decisions. It might be possible that your account does not have enough privileges to create the ClusterRole needed to get cluster-wide access.
Please use a high privileged account to install kube-notary. Alternatively, if you don't have cluster-wide access, you can still install kube-notary to work in a single namespace which you can access. See the namespaced installation paragraph for further details.
Helm error: release kube-watch failed: namespaces "..." is forbidden
It might be possible that tiller (the Helm's server-side component) does not have permission to install kube-notary.
When working within a role-based access control enabled Kubernetes installation, you may need to add a service account with cluster-admin role for tiller.
The easier way to do that is just to create a rbac-config.yaml copying and pasting the provided example in the Helm documentation, then:
$ kubectl create -f rbac-config.yaml
serviceaccount "tiller" created
clusterrolebinding "tiller" created
$ helm init --service-account tiller --history-max 200
ServiceMonitor for Prometheus Operator
See #11.
Testing
make test/e2e
Developing
To launch a debug environment with kubernetes it's possible to use the make utilities with:
make image/debug
make kubernetes/debug
It launches a kubernetes cluster with kind . A dlv debug server is launched inside the pod and it's possible to execute a remote debugging.
License
This software is released under GPL3.
