Jmwilson Ollie Save
Voice control for digital oscilloscopes using Snips
ollie
Voice control for oscilloscopes using Snips
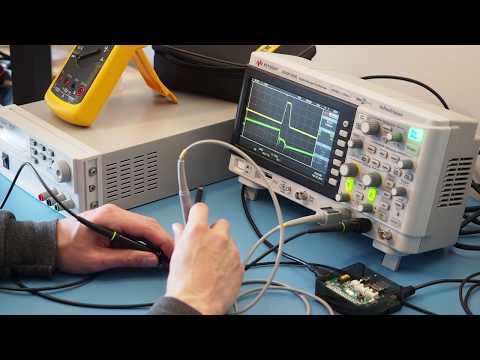
Ollie is a voice control assistant for digital oscilloscopes. Frequently I would be probing a board with both hands and wished I could speak to the scope to pause the capture. Keysight does offer voice control for its oscilloscopes — starting on the 6000-X series. For those of us on a more modest budget, a Raspberry Pi and the Snips platform can be an excellent substitute.
(January 2020) Following the acquisition of Snips and shuttering of public access to its technology, Ollie is on hiatus until a substitute voice platform is found. Snips functions completely on-device, so the installer images below and existing Ollie instances will continue to work indefinitely.
Supported oscilloscopes:
- Keysight MSO-X and DSO-X 1000-6000 series
- Rigol MSO and DS 1000-7000 series, excluding the new MSO 5000
Using your voice, you can control the oscilloscope to do:
- start and stop capture:
- "run" or "start"
- "stop" or "pause"
- "single"
- show and hide analog and digital channels:
- "show channel two"
- "hide the external trigger"
- "show reference one"
- "show digital zero"
- adjust the timebase (horizontal scale):
- "zoom in" or "zoom narrower" or "decrease timebase"
- "zoom out" or "zoom wider" or "increase timebase"
- "change the horiztonal scale to 50 nanoseconds"
- "set timebase to 100 nanoseconds"
- "timebase 2 microseconds"
- adjust the vertical scale and units:
- "make channel one bigger" or "magnify channel one" or "zoom in channel one" or "decrease channel one vertical scale"
- "make channel two smaller" or "reduce channel two" or "zoom out channel two" or "increase channel two vertical scale"
- "set channel one vertical scale to 2 volts"
- "set channel two vertical scale to 500 milliamps"
- add and clear measurements:
- "show me the frequency for channel one"
- "what's the duty cycle for channel one?"
- "add a rise time measurement for channel two"
- "measure peak-to-peak voltage on digital three"
- "clear all measurements"
- Recognized measurements: duty cycle, rise time, fall time, preshoot, overshoot, pulse width, negative pulse width, frequency, period, amplitude, average, minimum, maximum, base, top, and P-P voltage
- set trigger source and slope:
- "set trigger source to external"
- "trigger on digital zero"
- "trigger on the rising edge"
- "set trigger slope to negative"
- set trigger value:
- "set trigger value to minus 150 millivolts"
- "set trigger value on channel 3 to 5 volts" (changing trigger on a different channel only supported on Keysight)
- auto set trigger voltages (only on Keysight):
- "auto set trigger values"
- "reset trigger values"
- set trigger coupling:
- "set trigger coupling to AC"
- "make the trigger DC coupled"
- set trigger holdoff:
- "set trigger holdoff to 100 nanoseconds"
- set trigger sweep mode:
- "set trigger mode to normal"
- "set sweep mode to auto"
- force trigger and acquisition:
- "force trigger"
- save screen captures to a USB drive (only on Keysight):
- "take a screen shot"
- change probe attenuation ratio and coupling
- "set probe one ratio to 100"
- "set probe two coupling to AC"
ollie uses natural language understanding and has been trained to be flexible in understanding phrasing instead of requiring exactly-worded commands. For a full list of its trained examples, visit https://console.snips.ai/store/en/skill_E3eq8QB0Ae.
Getting started
Things you'll need:
- Raspberry Pi model 3A+ or 3B+, 4B support with preview release (see below)
- Respeaker 2 Pi Hat
- microSD card (4 GB or larger)
Ready-to-use images are available for the Raspberry Pi. These images include a base Raspbian lite installation, with all drivers, Snips, and the Ollie assistant installed. The image is generated using a fork of pi-gen (https://github.com/jmwilson/pi-gen-ollie).
Download the latest image (SHA-256: 16aa3c44d50c8abc2ad40437bb8c54063c602c7a572ad03d56cdcefd26de121b)
Preview release (SHA-256: 2a364e4d56af7c0941d242713c1a529345f9b50ddaeb416211d6d6ea2d2de037). This image has been built on Debian 10 ("buster") with support for the Pi 4. As Snips support for buster is still in progress, this is a preview release that will see updates.
Instructions for flashing a Raspbian image
This image does not have Wi-fi or SSH enabled. To enable wireless networking and remote access, it is necessary to connect a monitor and keyboard and login through the console to run raspi-config. The default username/password is pi/raspberry; it is recommended to change this if you enable remote access.
Once the image is installed, connect the Pi to the device USB port on the oscilloscope, typically located on the rear panel. The LEDs on the Respeaker hat will briefly flash green when the Pi is connected to a recognized device. The LEDs turn red when the Pi is disconnected from an oscilloscope. To make a voice command, get Ollie's attention by saying "Hey Snips", followed by a command (for example, "Hey Snips, single" or "Hey Snips, what's the frequency on channel one?").
Manual installation steps:
- Install Raspbian lite
- Install Seeedstudio drivers for the Respeaker 2: http://wiki.seeedstudio.com/ReSpeaker_2_Mics_Pi_HAT/
- Install Snips for Raspberry Pi: https://docs.snips.ai/articles/raspberrypi/manual-setup
- Create an assistant on the Snips console that uses the Oscilloscope control app: https://console.snips.ai/store/en/skill_E3eq8QB0Ae. Train the assistant and download the .zip image, and expand it under
/usr/share/snips. - Install the ollie code on the Raspberry Pi, and run using
python <path-to-ollie>
Video demo: