Heat O Matic Save
Proportional Integral Derivative controller using pi pico


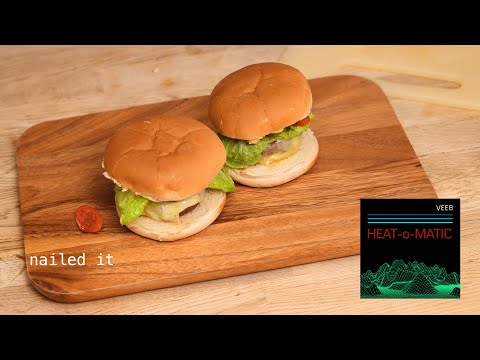
Heat-o-matic
A proportional integral derivative (PID) controller that will be used to run a home-made precision heater and can be useful for various applications.There are some example applications in the video section, but there are of tons other possible use-cases.
PID is a fancy way of saying that the code plays a game of 'Warmer', 'Colder' to get something to a particular value (in our example, a particular temperature). The internet is littered with examples of these things, so it is primarily a didactic exercise that will use a few bits of code we've previously developed, and hopefully it will make us a little smarter along the way.
(You can use the PID controller to regulate other things, depending on the sensor and device being powered. It just needs to measure X, and then to be able to influence X. People have used PID controllers to make robots follow lines, self-balance, maintain mosture content in soil, and loads of other things I can't think of right now)
Hardware
- Raspberry Pi Pico (Pico W not needed here)
- SSD1351 Waveshare OLED
- WGCD KY-040 Rotary Encoder
- DS18B20 Stainless Steel Temperature Sensor (with 5K1 pull-up resistor)
- A relay switch (seeed 103020005)
- A plug socket for the heating device. For cooking, we use one of these
- Wires Galore
Warning: Don't generate heat using something that dislikes being power-cycled a lot. This is GPL code, ie NO WARRANTY
Installing Heat-o-matic onto a Pico
First flash the board with the latest version of micropython.
Then clone this repository onto your computer
git clone https://github.com/veebch/heat-o-matic
and move into the repository directory
cd heat-o-matic
There are a few files to copy to the pico, ampy is a good way to do it.
sudo ampy -p /dev/ttyACM0 put ./
substitute the device name to whatever the pico is on your system.
Wiring
The data lines of the peripherals are assigned to GPIO as follows:
| Pico GPIO | OLED |
|---|---|
| 19 | DIN/MOSI |
| 18 | CLK/SCK |
| 17 | CS |
| 20 | DC |
| 21 | RST |
| Rotary Encoder | |
| 2 | CLK |
| 3 | DT |
| Temp. Sensor | |
| 22 | Data |
| Relay Switch | |
| 15 | Data |
VCC and GND must also be connected for each. Note that the temperature sensor needed a pull-up resistor on the signal. Also, the switch on the roatary encoder (that was being used as a means to toggle the UI) is unused as it was being triggered by the relay.... If you decide you need it, this can probably be fixed with a capacitor or a flyback diode.
Using heat-o-matic
Plug it in, pop the temperature probe into the medium you are going to heat, plug the heat-providing device into the plug socket, pick a setpoint using the dial. That's it!
Video
A brief explainer and a burger cooking application is in this video (we omitted to mention that we also deep fried the burger after the water bath cooking)
Contributing to the code
If you look at this and feel like you can make it better, please fork the repository and use a feature branch. Pull requests are welcome and encouraged.
Licence
GPL 3.0
