GPU Kubernetes Guide Save Abandoned
How to setup a production-grade Kubernetes GPU cluster on Paperspace in 10 minutes for $10
[WIP] How to setup a production-grade Kubernetes GPU cluster on Paperspace in 10 minutes for $10 🌈
note: This guide accompanies an upcoming blog post here and is heavily derived from the fantastic guide here
Table of Contents
- Why Kubernetes
- Step 1: Create a Paperspace Account
- Step 2: Create a private network
- Step 3: Prepare master node (CPU)
- Step 4: Install Kubernetes on the master node (CPU)
- Step 5: Prepare GPU worker node
- Step 6: Deploy a Jupyter-notebook with GPU-support
- Step 7: Assign a public IP to Worker node
- Step 8: All done! Woooo!
- Acknowledgements
- License
Why Kubernetes
If you are a startup or individual interested in getting a production-grade ML/Datascience pipeline going, Kubernetes can be extremely valuable. It is without a doubt one of the best tools for orchestrating complex deployements and managing specific hardware interdependencies.
Unlike the web development world, the ML/AI/Datascience community does not yet have entirely established patterns and best practices. We at Paperspace believe that Kubernetes could play a big part in helping companies get up and running quickly and with the best performance possible.
Step 1: Create a Paperspace Account
Head over to Paperspace to create your account (it only takes two seconds). You will need to confirm your email and then log back in. Once in there you will need to add a credit card on file. This tutorial should only cost about $5 to get going (plus any additional usage after).
Step 2: Create a private network
You will need a private network for this tutorial which is currently only available to our "teams" accounts. Shoot an email to support [@] paperspace [dot] com to request a team account (there is no charge).
Once confirmed, head over to the network page to create a private network in your regions (note: Private networks are region-specific so you will need to keep everything in the same region).
You might need to refresh the page if the network doesn't show up after about 20 seconds.

Step 3: Prepare master node (CPU)
OK, so now you have a Paperspace team account and a private network. Now go to create your first machine on this private network. On the machine create page you can create a Paperspace C3 instance running Ubuntu 18.04; make sure it is on your private network.

Once this machine is created (i.e. it is no longer "provisioning" and has transitioned to the "ready" state) you will be emailed a temporary password.
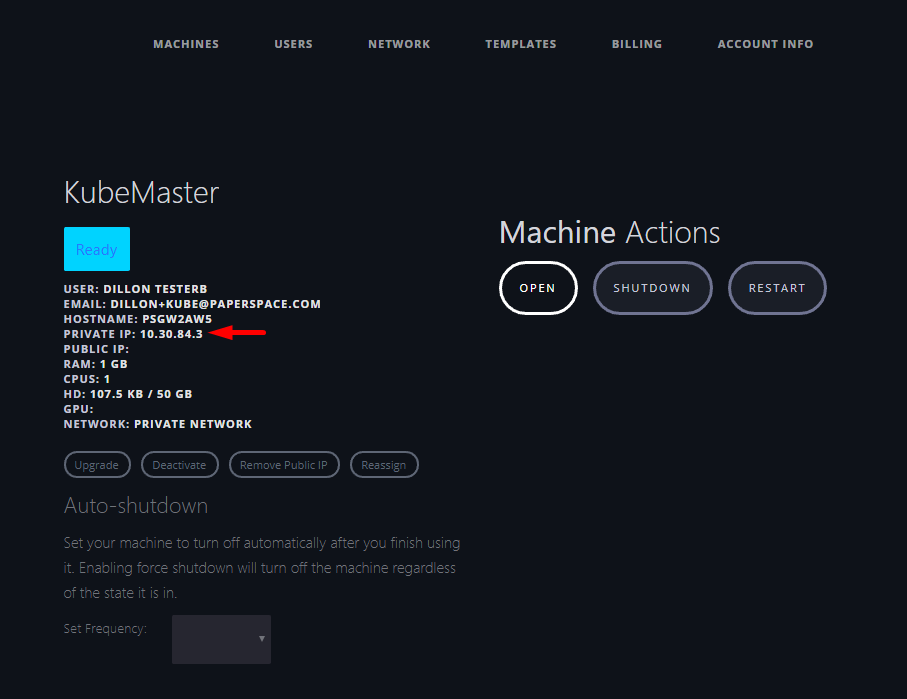
Go to your Paperspace Console and open the machine. It will ask you for your password. Type CTRL+SHIFT+V on windows to paste the password. You can change the password if you would like by typing passwd and then confirming a new password.
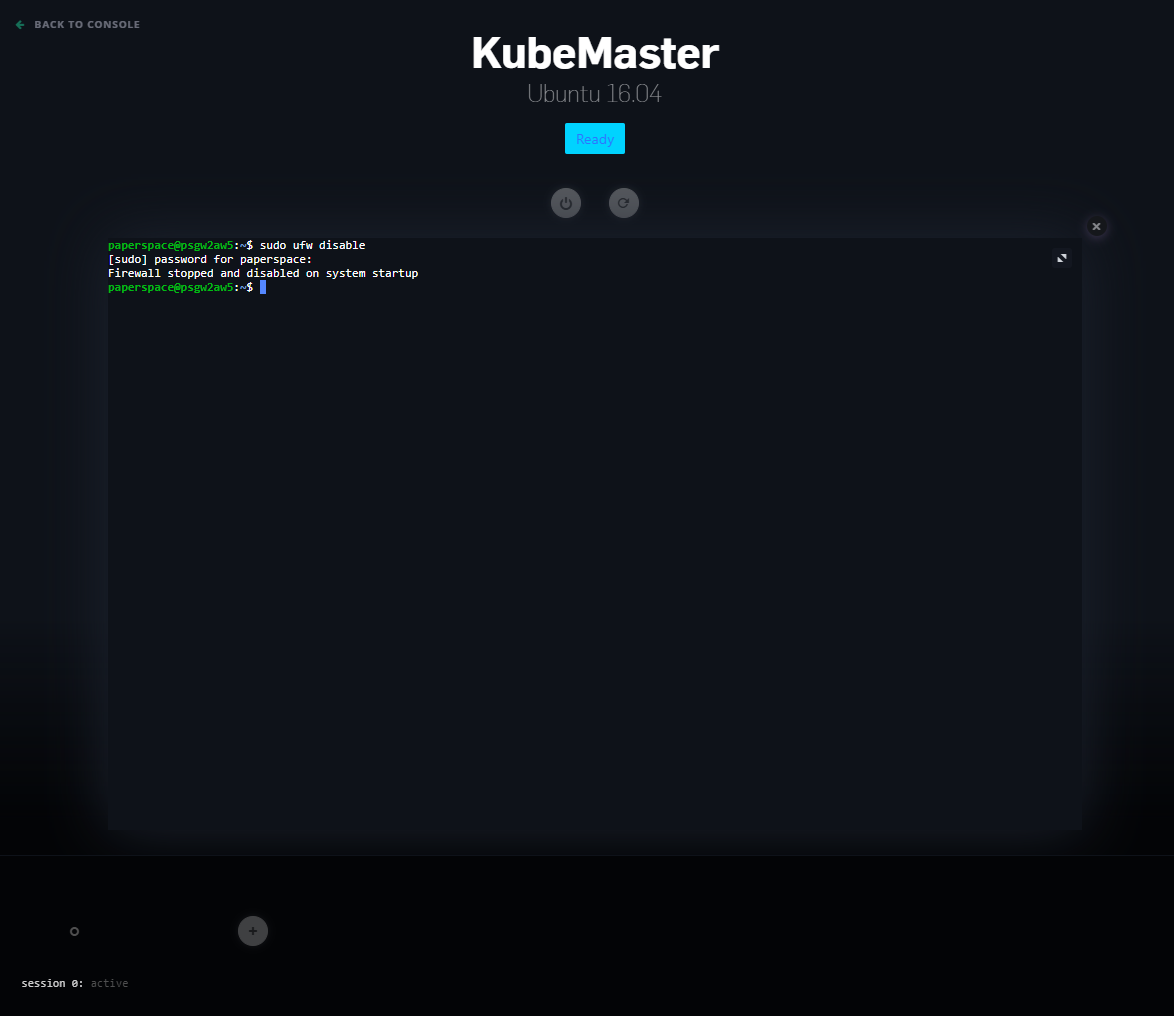
You are now in the web terminal for your master node. First, disable the existing UFW firewall by typing the following:
sudo ufw disable
(note: We do this for testing only, you will want to reenable it later for security. That said, on Paperspace before you add a public IP, your machines are fully isolated)
Step 4: Install Kubernetes on the master node (CPU)
Now, download and execute the initialization script which will set up the Kubernetes master. It is very helpful to go through this short (<40 LOC) script to see what it is doing. At a high level, it downloads Kubernetes, Docker, and a few required packages, installs them, and initiates the Kubernetes process using the kubeadm tool.
Note: Because we are building our cluster on an isolated private network we can safely assume that all nodes can talk to one another, but are not yet publicly addressable
wget https://raw.githubusercontent.com/Paperspace/GPU-Kubernetes-Guide/master/scripts/init-master.sh
chmod +x init-master.sh
sudo ./init-master.sh
This will return a join command in the format kubeadm join xxxx:6443 --token u328wq.xxxxx --discovery-token-ca-cert-hash sha256:xxxxx. Copy those parameter values for joining new nodes. You can regenerate a new join command with kubeadm token create --print-join-command.
Step 5: Prepare GPU worker node
Yes! We have a Kubernetes master node up and running. The next step is to add a GPU-backed worker node and join it to the network. Luckily we have a script for this too (but again, it is a really good practice to go through the script to see what it is doing).
First, create a Paperspace GPU+ instance running Ubuntu 16.04 and make sure it is on your private network. We could use the ML-in-a-box template for this, but really we only need the NVIDIA driver and CUDA installed which our script will download and install for us. This worker node will be used to run GPU-backed Docker containers that are assigned to it by the Kubernetes master node.
Execute the initialization script with the correct parameter values that you copied from above. (ProTip: For this type of work it is best to open two browser tabs and have two Paperspace terminals running one for the master and one for the worker).
wget https://raw.githubusercontent.com/Paperspace/GPU-Kubernetes-Guide/master/scripts/init-worker.sh
chmod +x init-worker.sh
sudo ./init-worker.sh <ip:port> <token> <ca cert hash>
Once it has joined, you will need to reboot the machine. The nvidia driver is installed but it needs a reboot to work. If you do not do this then the node will not appear to be GPU-enabled to our Kubernetes cluster.
Step 6: Deploy a Jupyter-notebook with GPU-support
Awesome! We now have a worker and master node joined together to form a bare-bones Kubernetes cluster. You can confirm this on the master node with the following command:
kubectl get nodes
You should see the hostname of your GPU+ paperspace machine (the worker node) on this list.
In Kubernetes language, a deployment is a yaml file which defines an application that you would like to run on your Kubernetes cluster. The deployment defines which Docker container is used and what its features/specs are. Additionally, the yaml file contains a service description which is responsible for assigning an addressable port to the deployment. We are using the Kubernetes NodePort service type which will choose a port to assign to the container and make it available on all worker nodes. For now, all you need to know is that Kubernetes will find our GPU-backed worker node and send the Jupyter notebook to it.
Download the yaml file from this github repo (you could also copy/paste it using Vim, Nano, Emacs, etc)
wget https://raw.githubusercontent.com/Paperspace/GPU-Kubernetes-Guide/master/deployments/tf-jupyter.yaml
Have Kubernetes deploy it:
kubectl apply -f tf-jupyter.yaml
Step 7: Assign a public IP to Worker node
Ok, so this is not a best practice, but it will quickly let us see if everything is working. We will apply a public IP to our worker node. Because this has all been done in our private network nothing is publicly accessible from the outside world.

Step 8: All done! Woooo!
That's it. You have done what very few people have accomplished -- a GPU-backed Kubernetes cluster in just a few minutes. Go to your new public IP address and port and you should now have a Jupyter notebook running!

Now, in Part 2 (coming soon) we will cover adding storage, and building out a real ML pipeline.
Next Steps (Coming Soon)
-
Part 2: Distributed ML on a GPU cluster
- Using small dataset (MNIST?) and TensorFlow Distributed
-
Part 3: Real-world use-case
- Kubernetes Persistent Volumes
- Introducing Helm
- Real-dataset (Distributed CNN)
- similar:
Acknowledgements
Most of the heavy lifting here came from the guide here: https://github.com/Langhalsdino/Kubernetes-GPU-Guide which was enormously helpful! A huge shoutout to Langhalsdino.
Additional improvements were suggested by azlyth specifically getting some of the networking to work on Paperspace.
License
This project is licensed under the MIT License - see the LICENSE.md file for details
