Gogrow Save Abandoned
The GoGrow planning, homesteading, and image annotation app
GoGrow: Your Homestead Management and Image Annotation Tool
GoGrow is a Flask application written in HTML, CSS, JS, and Python. It's designed to assist gardeners, farmers, project managers, drone operators, preppers, planners, or anyone in need of an efficient mapping or image annotation tool to mark a place, feature, or thing.
Purpose of GoGrow
GoGrow is an open-source application that provides a thoughtful UI to annotate, mark, and keep track of images or projects. It empowers users to plan and track their changes to projects, whether on a large scale or on a more personal level. With modern access to high-resolution camera drones and satellite imagery, users can leverage a vast array of public and private imagery to upload and work with in GoGrow - from expansive territories, to personal homesteads, to backyard square-foot gardens. GoGrow prioritizes user privacy and data ownership, offering a user-friendly workflow for local annotation and collaboration on PNG and JPG images. Its versatility and modularity make it suitable for diverse industries and individuals seeking precise image annotation and marking. With GoGrow, you can seamlessly place and plan projects, structures, and associated information while enjoying a user-centric experience.
Privacy and Data Ownership
GoGrow prioritizes privacy and data ownership. The application operates completely offline, with all essential components like icons and scripts embedded within it. Your data stays on your device and is not logged, sent to third parties, or used for any other purpose.
Open Source and Ad-Free and Self-Hostable
GoGrow is open source, ad-free, and easily self-hosted. It provides access to annotation, editing, and mapping functions without the distraction of ads and contains no geolocation or tracking.
Collaborative and Flexible
GoGrow supports collaborative mapping and image annotation by LAN access, making it a useful tool for team projects that require detailed visual data feedback. You can annotate logos, art pieces, or character designs - pretty much anything in PNG or JPG format (RAW and DNG support is experimental at this time).
Features
-
Interactive Map: Visualize and navigate your homestead, garden, or farm with an intuitive and user-friendly map interface. Upload any image to annotate and add markers, from high-resolution drone aerial photos to simple overhead pictures taken from your smartphone. It's versatile for planning and building campsites, worksites, gardens, orchards, structures, and more.
-
Customizable Markers: Create, edit, and delete markers or lines to represent planting zones, fences, orchards, electric lines, water sources, and other vital points of interest. You can even use your own SVG icons!
-
Track your progress over time: Keep track of your work progress by adding notes to markers you place and lines you draw. Record your experiences, observations, or any insights that may help you in the future about a particular place or feature on an image.
-
Organized Categories: GoGrow automatically sorts your uploaded images (and a database with all of your marker and line data) into "image folders" to efficiently organize the different features you want to mark and keep notes on. Switch between these image folders with just one click. or tap.
-
Custom Backgrounds & Themes: Personalize the app with a variety of available background textures and themes, or include your own background for more personalization.
-
Responsive Design: Seamlessly plan and manage your image-based projects across various devices, and pick up where you left off.
-
Extensible: Built on open-source technologies, GoGrow is adaptable and ready for future expansion and updates.
-
Data Security: Export your data whenever needed. GoGrow does not send your data to any third parties.
-
Docker and Multi-Platform Support: GoGrow is easy to install with docker or by simple command line commands. Instructions are provided for running the app on your LAN, enabling collaboration on maps with others, even on mobile devices and tablets (through the device's web browser) with GoGrow's responsive web design and user interface.
-
Extensive rich text journal system: GoGrow provides a comprehensive journal system that allows you to create and manage detailed journal entries. The rich text editor (Quill) enables you to format text, add images, create lists, and apply styles to your journal content seamlessly. Journal entries are organized into image folders, just like the data for markers and lines - making it easy to navigate and manage your journal entries. The interface allows you to view and modify the title, content, linked items, and favorite status of each journal entry, and includes a powerful journal search function.
-
Linked Items: GoGrow supports linking journal entries to markers and lines on the map. You can associate specific journal entries with markers or lines you place on your uploaded image or map to provide additional context and reference relevant information. Click on the "Show on Map" button, and a popup showing the position of the linked marker or line appears for easy reference
Warning / Disclaimer
GoGrow is an actively developed application, and as such, occasional bugs or frequent changes may occur. We kindly request that you exercise caution and be aware of this fact before entrusting your data to the application. The author(s) and developer(s) of GoGrow cannot be held responsible for any damages, whether tangible or intangible, that may arise from the use or misuse of the application.
We strongly advise against using the application for any harmful or malicious activities. GoGrow, its developers, owners, and related parties make no guarantees or assumptions regarding the security or safety of the application. It is your responsibility to ensure the appropriate usage and protection of your data while using GoGrow.
Please proceed with caution and make informed decisions when using the application.
Install & Getting Started
Installation
Install with Docker Compose (recommended):
Docker compose and Docker run are the easiest ways to get up and running with GoGrow.
Ensure Docker and Docker Compose are installed and running correctly, and you can follow the below steps:
-
Clone the GoGrow repository or download the zip file from the repository.
-
Navigate to the directory where you've saved GoGrow in your terminal (there should be a Dockerfile and docker-compose.yml file present).
-
Use the included, or make/edit your own version of the
docker-compose.ymlfile in the same app directory as the Dockerfile. Below is an exampledocker-compose.yml- it maps only the img and backup folders, and makes the app available on port 5000:version: '3' services: gogrow: build: . ports: - "5000:5555" volumes: - ./img:/app/gogrow_app/img - ./backups:/app/gogrow_app/backups -
In your terminal, type
docker-compose up -dto build and run the GoGrow app as a Docker service. -
Navigate to the IP address and port you've set (default is localhost:5555), and enjoy the app!
These Docker Compose commands spin up a new GoGrow service using Docker on port 5000 and makes the "backups" and "img" subdirectories easy to access. You may also decide to map the icons or textures folders if you wish to use your own icons and textures in GoGrow!
Install as flask web app:
You may also choose to run GoGrow as a flask web app directly - you can follow the below instructions to accomplish this.
- Make sure you have Python 3.11 installed on your machine. If not, you can download it from the official Python website.
- Clone the GoGrow repository or download the zip file from the repository.
- Navigate to the directory where you've saved GoGrow in your terminal.
- Run
pip install -r requirements.txtto install the necessary dependencies. - Once all dependencies are installed, you can start the application by running
python runserver.pyin your terminal.
How to Use GoGrow
Initial App Startup
If using Docker, GoGrow should be started automatically and available at the specified port used in the docker compose, or docker run command.
If using GoGrow as a Flask app, on startup GoGrow will ask if you want to use the default settings (port 5555) - you can enter "yes" here to use these settings, or "no" to specify the port and other settings that GoGrow should use when it launches.
Index Page
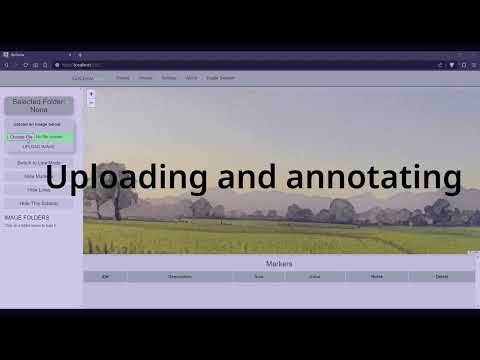
- Upon opening GoGrow for the first time, you'll see a blank Leaflet map container, a table at the bottom of the page for displaying the marker/line information that has been added, and a sidebar with various controls and buttons.
- To begin, upload an image using the upload button in the sidebar to select an image to upload. This can be any image you wish to annotate, such as a high-resolution drone photo or a simple overhead picture taken from your smartphone.
- Once your image(s) are uploaded by clicking or tapping the upload button, select the image you want to annotate by clicking or tapping on it in the sidebar.
- Your selected image will load, along with any associated database containing marker and line data. If you haven't created any markers or lines yet, don't worry, we'll do that next!
Adding Markers and Lines
- To add a marker, ensure that the "mode" button is in "Marker Mode."
- Click on the location on your map where you want to place the marker. A popup will appear.
- Fill out the popup form to add details for your marker, such as notes, a description, the color of the icon, and the icon itself. You can choose from the included icons or add your own to the
/iconsfolder in the app's root directory. - To add a line, switch the "mode" button to "Line Mode."
- Click once to place the start point of the line, then click again to set the end point. A popup will appear, similar to the marker popup.
- Fill out the form in the popup to add details for your line, such as a description, notes, and color. Your line will then appear on the map and in the marker list table at the bottom of the screen. You can make polygons or complex shapes from multiple lines - GoGrow will "snap" the starting point of a new line to a nearby line if it is close enough.
- Click or tap on the marker or line ID in the marker table and the map will jump to that location - you can also click or tap on the notes for that marker or line, and a popup for viewing notes in detail will display in a journal-like fashion.
Details Page
- On the details page, use the dropdown at the top to select which image folder you want to load and edit marker or line data from.
- Once you've selected a directory, the details marker list table populates with all of the markers and lines associated with that directory.
- To edit a marker or line, click or tap on its row in the table. The marker or row you just selected will be highlighted, and a modal will pop up below the details marker table with the current information for the chosen marker or line for editing.
- Edit the marker or line's description, notes, color, and, in the case of markers, their icon type.
- If you want, you can click the "Export info as CSV" button to download all marker and line information for the chosen directory into a .CSV spreadsheet for editing or printing out outside of the app.
- You can click on several of the table headers on the details page to sort the markers and lines by column, and you can also utilize the search bar to easily search through all of your marker and line descriptions to find the one you want to interact with seamlessly.
Settings Page
- On the settings page, you can change the theme to one of the various included themes, and you can also change the Leaflet map background "texture" to any image you want. You can add your own background texture images to the
/static/texturesdirectory and they will be selectable in this dropdown whenever the settings page is accessed next. - To back up your image folder/database, select it in the dropdown menu and hit "Backup." This creates a tar.gz copy of the image folder/database and stores it in the
/backupsfolder. - To restore a backup, choose it from the "Restore Backup" dropdown and click the "Restore" button. This will restore a copy of the chosen backup to the
/imgfolder, but only if there isn't already an existing image folder with the same name. This is for security reasons - please delete the image folder in/imgbefore attempting to restore a backup for that image folder.
Journals Page
- On the journals page, you can create, edit, and manage your journal entries associated with uploaded image folders.
- Select the desired image folder from the "Image Folder" dropdown menu ("Select a journal:". This will load the journal and all entries for the selected image folder.
- The journal entries will be displayed in a list format, showing the entry date and title in the sidebar on the right or bottom of the screen, depending on if you are using desktop, tablet, or a smaller device.
- To view the details of a journal entry, click or tap on the corresponding entry in the journal entries list on the sidebar. The entry's title and content will appear, along with any linked items. You can use the "Star" checkbox near the journal title to mark a journal as a favorite, so that it will always appear at the top of the journal entries list for easy access.
- You can edit a journal entry by modifying the title, content, linked items, or favorite status. Changes will be saved when you submit the edits using the "Submit Journal Edits" button at the bottom of the journal editor.
- To delete a journal entry, click or tap on the "Delete" button. A confirmation prompt will appear, and upon confirmation, the entry will be permanently removed.
- Use the search bar to search for specific journal entries based on titles, contents, dates, linked item notes, or linked item descriptions. The search results will update in real-time as you type.
- You can export all journal entries for the selected image folder as a CSV file by clicking or tapping the "Export as CSV" button. This allows you to backup or work with the data outside of the app.
- Journal entries are backed up using the Settings page "backup" feature, and can be restored via the restore dropdown if the image folder is deleted.
config.cfg
GoGrow includes a custom theme option that's easy to edit via the included config.cfg file - just open it up in a text editor, and you should see a section towards the bottom of the config file for making your own custom theme. You can change each hex color value to the color of your choice, and then restart the gogrow app after saving your changes to the config file. You should be able to select the custom theme on the settings page, and then you should see your new theme color changes across the app.
Contributions
Contributions, collaboration, pull requests - We welcome all of these. If you have a good idea that's in the scope of the GoGrow project, please open a pull request or jump into a discussion with us. We'd love your feedback on how GoGrow can be even more useful and functional!
To-do
GoGrow is a work in progress - please keep this in mind, though I'll try my best not to introduce any major breaking changes or backward-compatibility issues. Export and save your data often!
To do list:
- general bug fixes
- general UI/UX improvements
- implement feedback gathered from users
- a feature to show/pick from most used icons when adding a new marker using the pop up modal
- thoroughly fix/test DNG and RAW support
- rewrite/swap SQLite based backend for mariaDB (also separate the marker/lines database from the journal database to allow for better performance) This may break compatibility with previous databases, etc. so I am carefully considering this
- fix automatically generated timestamps for journals and backups (should accurately reflect system time)
- provide Windows executable so people can simply download and run as a portable app with no installation, docker, or command line commands
Possible features I might add at a later date:
- Increased icon variety support (right now GoGrow only works well with SVG icons like the included Font Awesome free set)
- Ability to set the size of, and resize icons
- Make it easier for people to add custom icons and textures to GoGrow (an import icon or texture button in settings?)
- Other things I haven't thought of yet (I'm open for suggestions!)
Support
As the sole developer on this project, I (DaytimeLobster) work on it in my spare time and fund all related expenses out of my own pocket. If you find this project useful and want to show appreciation, you can donate to my coffee fund on Patreon. You can also check out my blog at gogrow.io, where I share updates about the GoGrow app and write about various tech and homesteading topics.
Any support is greatly appreciated and will be used to help me continue development and maintain this project!
Thanks for checking this project out - please give the project a star if you like it, and check back for updates!
Acknowledgements & Attributions
GoGrow acknowledges the invaluable contributions of the following projects and their maintainers:
Leaflet.js
Leaflet.js, an incredible open-source JavaScript library for interactive maps. You can find the Leaflet.js repository at https://github.com/Leaflet/Leaflet. Please review the Leaflet.js license for licensing details.
Font Awesome
Font Awesome for its wonderful icons. The free version of Font Awesome (Version 6.4.0) utilized in GoGrow (as of GoGrow version 0.4.4) is under an open-source license. More information can be found at https://fontawesome.com/ and their repository on GitHub: https://github.com/FortAwesome/Font-Awesome. Please review the Font Awesome license for licensing details.
Quill
- Powerful and open source rich text editor. It enables the rich text formatting on the GoGrow journal, and it is a superb and lightweight project for this kind of use-case and I highly recommend it! More information can be found at https://quilljs.com/ and their repository on GitHub: https://github.com/quilljs/quill
- Also a huge thank you to the creator of the Quill image uploader module that made my life a bit easier making GoGrow. The github repo for that project is at: https://github.com/NoelOConnell/quill-image-uploader and the MIT license is included in the app's file directory "/static/scripts/QuillImageUploaderLicense.txt" along with the embedded files
The GoGrow App Copyright and Authorship
copyright 2023 Firespawn Studios, LLC - Digital and Physical Arts Studio
