Feel The Kern Save
Generating proportional fonts with deep learning
Feel The Kern - Generating fonts with kerning
What is this?
This is the code relating to my blog post on generating proportional fonts with kerning using deep learning. People have previously generated plenty of characters that can be used as monospaced fonts, but as far as I am aware, none with kerning.
The above is similar what to previously has been done; generating smooth interpolations between the characters of generated fonts, but disregarding the inter-character spacing used in most fonts used in practise.
So I generated bigrams of fonts, as this would force the model to also learn a notion of proper kerning of the proportional fonts which we use for most purposes.
These bigrams were then overlapped using simulated annealing to create words and sentences from the randomly generated fonts:
Ultimately, this allowed me to generate smooth interpolations between different styles of fonts that incorporate kerning:
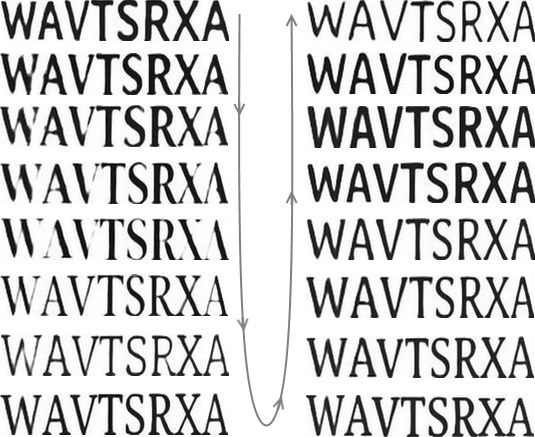
Note how "X" and "A" for some of the generated fonts touch, but for others are quite far apart. This goes to show that the model did learn to kern fonts according to their style.
How to get this running
In short, the process to generate sentences in generated fonts is the following:
- Map the fonts you have to z-dimensional vectors expressing their "style" (using t-SNE or whatever you prefer. It would be interesting to see if using an autoencoder would yield better results)
- Train a convolutional neural network to take a vector describing the font-style and one-hot encoding of bigrams and output the corresponding bigram
- Generate bigrams of new styles, and use simulated annealing to overlap the bigrams to full words
Batteries not included - The missing parts
This won't quite work out of the box as a few parts are intentionally left out. Sort this out and you can follow the instructions up next
- an implementation of t-SNE in the directory "/1-font-to-vector/src/tsne/". Go fetch the Python implementation of t-SNE from the author's website and dump it in that directory.
-
fonts under the path "/shared-data/fonts/". Go fetch some of in the
.ttfformat and put them there. - a JSON-file, "/shared-data/font_infos.json", which is a list of dicts with the fields "font_name", "font_path", "id", e.g. [ {"font_name": "Aclonica.ttf", "font_path": "RELATIVE_PATH_TO_FONTS_DIR/FONT_NAME.ttf", "id": "rTT3NMUL"} ]
Installation requirements
Further to the few missing bits, this requires the following to be installed:
I ran this on AWS EC2 p2.xlarge and g2.2xlarge instances, Ubuntu 16.04.1 LTS, with the following installed:
- Python (2.7.12), CUDA (8.0.44), Numpy (1.12.0), Theano (0.7.0), Lasagne (0.2.dev1), Pillow (3.1.2), Matplotlib
How to actually run it
Now that you have installed and gotten the missing parts, it is time to run this thing.
Steps 1 and 2 are mapping fonts to a style-vector, steps 3 and 4 are on training a convnet to generate bigrams, and generate these, while steps 5 and 6 are matching the bigrams and merging them into a final image.
-
Run "/1-font-to-vector/src/generate_imgs.py" to generate images of fonts for t-SNE to map to a low-dimensional space. It will dump
.pngs under "/1-font-to-vector/data/text-imgs/" -
Run "/1-font-to-vector/src/tsne/tsne_main.py". It will map the images generated of the fonts to a 10-dimensional space (or whatever you set it to), and store this mapping under "/shared-data/tsne_dump_10d_48px.json"
-
Run "/2-generating-bigrams/src/supervised_learner.py" to train a convnet to generate bigrams, and store the network under "/2-generating-bigrams/data/networks/" during training
-
Run "/2-generating-bigrams/src/visualiser.py" to generate bigrams of the sentence "MACHINE-LEARNING" and dump these under "/visualisations/sentence-bigrams/MACHINE-LEARNING/"
-
Run "/3-matching-bigrams/src/match-imgs.py" to match the generated bigrams. The results from this will be used in the next and final step to create images of the full sentence
-
Run "/3-matching-bigrams/src/generate-sentence.py" to combine the matched bigrams into a single image like the one below:

And that's it!
