Emacs4cl Save
A tiny DIY kit to set up vanilla Emacs for Common Lisp programming
Emacs For Common Lisp (Emacs4CL)
This repository provides a tiny .emacs file to set up Emacs quickly
for Common Lisp programming. This document provides a detailed
description of how to set it up and get started with Common Lisp
programming.
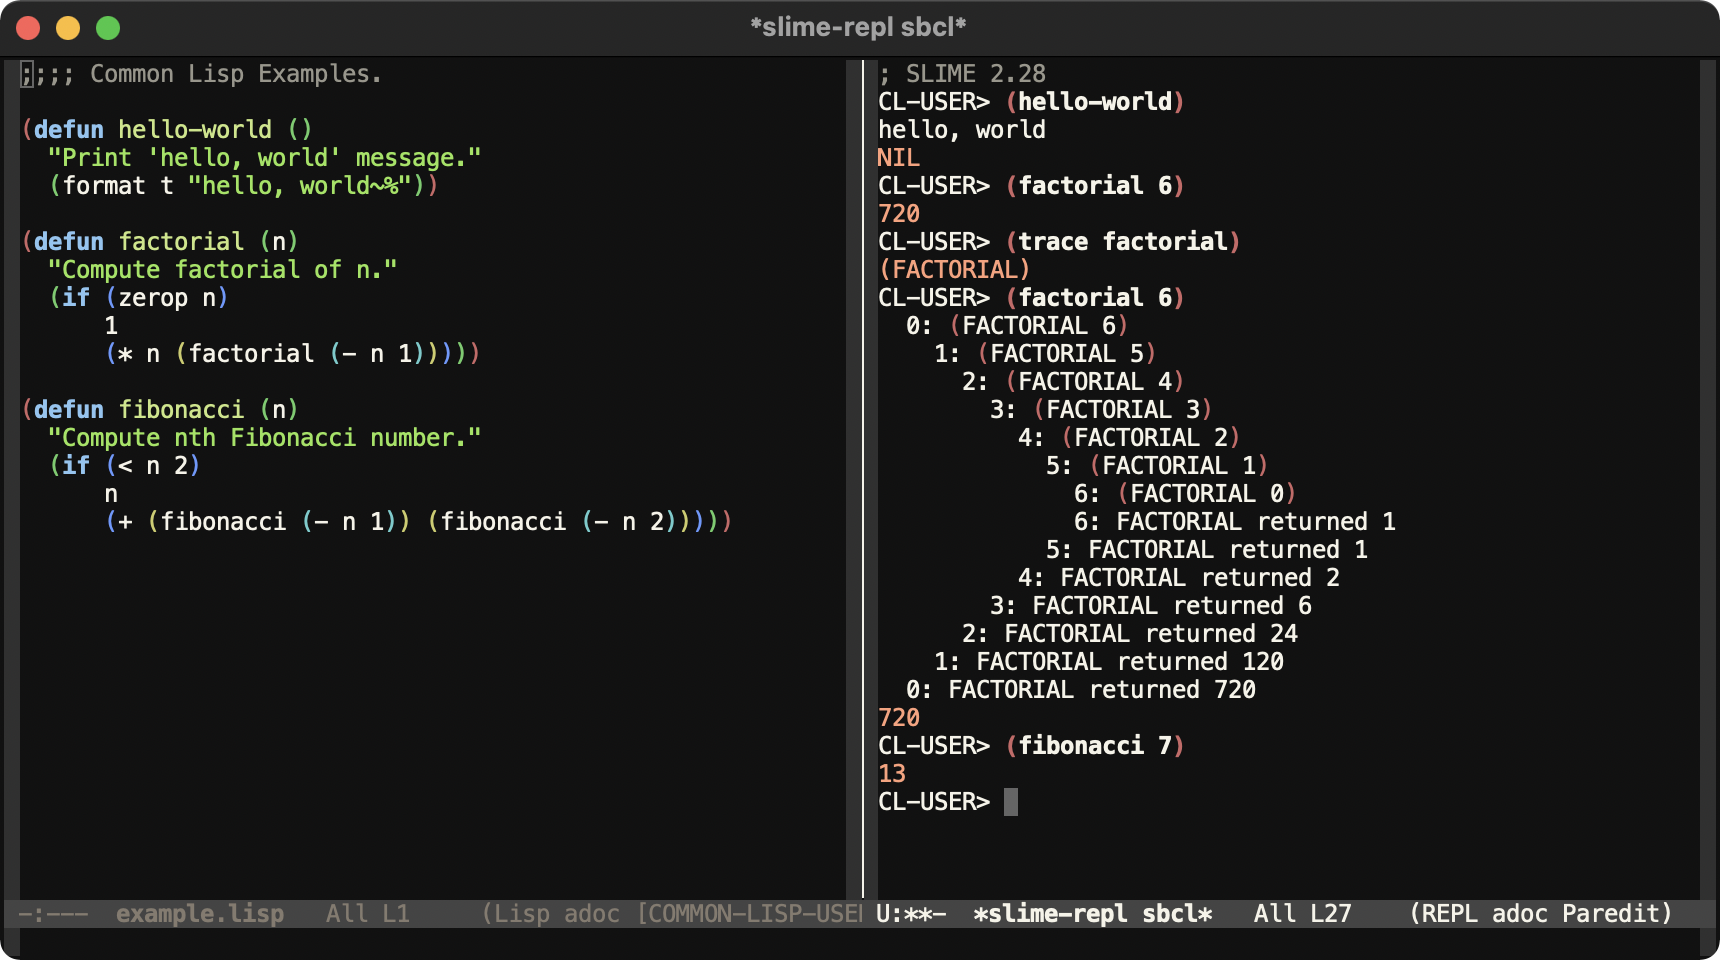
This repository provides a good middle ground between configuring Emacs
manually by installing SLIME, Paredit, etc. yourself with M-x package-install commands and installing Portacle. It promotes a
do-it-yourself approach to automate customizing Emacs for Common Lisp
programming. Here is how the development environment is going to look
like:
If you are already comfortable with Emacs and only want to understand
the content of the .emacs file, you can skip ahead directly to the
Line-by-Line Explanation section that
describes every line of this Emacs initialization file in detail.
Contents
- Who Is This For?
- Get Started
- Step-by-Step Usage
- Line-by-Line Explanation
- More Emacs Customization
- Alternatives
- Opinion References
- Channels
- License
Who Is This For?
Are you an absolute beginner to Emacs? Are you so new to Emacs that
you do not even have ~/.emacs or ~/.emacs.d on your file system?
Have you considered learning Common Lisp but when you picked up a book
like Practical Common Lisp, you learnt that it recommends Emacs
and SLIME for development environment and it seemed like a significant
additional learning curve for you? If you answered "yes" to most of
these questions, then this project is for you.
The .emacs file in this project provides you a quick way to get
started with setting up your development environment. This document
explains how to do so in a step-by-step manner. This document also
explains the content of .emacs file in a line-by-line manner.
Get Started
This section helps you to set up Emacs for Common Lisp development quickly and see what the end result looks like. Perform the following steps to get started:
-
Install SBCL and Emacs.
On macOS, enter the following command if you have Homebrew:
brew install sbcl
brew install --cask emacs
On Debian, Ubuntu, or another Debian-based Linux system, enter the following command:
sudo apt-get install sbcl emacsFor other environments, download SBCL and Emacs from http://www.sbcl.org/platform-table.html and https://www.gnu.org/software/emacs/ respectively.
-
Copy the Emacs initialization file
.emacsprovided here to your home directory. Here is an examplecurlcommand that copies the initialization file to its traditional location:curl -L https://github.com/susam/emacs4cl/raw/main/.emacs >> ~/.emacsHere is another alternative that copies the initialization file to a more convenient location:
mkdir ~/.emacs.d
curl -L https://github.com/susam/emacs4cl/raw/main/.emacs >> ~/.emacs.d/init.el
Yet another popular alternative is to copy the initialization file to an XDG-compatible location as follows:
mkdir -p ~/.config/emacs
curl -L https://github.com/susam/emacs4cl/raw/main/.emacs >> ~/.config/emacs/init.el
Emacs can automatically load the Emacs initialization file from any of the paths used above. See section The Emacs Initialization File of the Emacs manual for more details about this. Most users these days prefer one of the last two locations because it allows all Emacs configuration to conveniently remain in one directory.
-
Start Emacs:
emacsOn macOS, you may receive the following error message in a dialog box: '“Emacs.app” can’t be opened because Apple cannot check it for malicious software.' To resolve this issue, go to Apple menu > System Preferences > Security & Privacy > General and click 'Open Anyway'.
It may take a minute or so for Emacs to start the very first time. When it starts the first time with the new Emacs initialization file obtained in the previous step, it installs the packages specified in it. This is only a one-time activity. The next time you start Emacs, it will start instantly. We will see how
.emacstakes care of it in the line-by-line guide later. -
Within Emacs, start SLIME by typing the following key sequence:
M-x slime RETIn the Emacs world (and elsewhere too), the prefix
M-denotes the meta modifier key. It does not exist on most modern keyboards. Use the alt key or the option key as a modifier key or esc as a prefix key to enterM-.For example,
M-xis going to be alt + x or option + x or esc x on a modern keyboard.Similarly,
RETdenotes the enter key or the return key. -
After SLIME REPL starts, enter the following expression at the
CL-USER>prompt and type enter.(format t "hello, world~%")If the output
"hello, world"appears in SLIME REPL, the development environment setup is complete. -
Optionally, install Quicklisp with the following commands:
curl -O https://beta.quicklisp.org/quicklisp.lisp
sbcl --load quicklisp.lisp --eval "(quicklisp-quickstart:install)" --quit
sbcl --load ~/quicklisp/setup.lisp --eval "(ql:add-to-init-file)" --quit
Quicklisp helps in installing Common Lisp libraries from its repository. You do not need it when you have just begun learning Common Lisp. But as you grow more experienced with Common Lisp and begin developing real world applications, sooner or later, you will need Quicklisp to install libraries that help you solve your problems.
The first command in the code block fetches
quicklisp.lisp. The second command installs Quicklisp to~/quicklisp. The third command adds some code to SBCL's initialization file at~/.sbclrc, so that Quicklisp is automatically loaded when SBCL starts.
Now that your environment is setup, read the next section to learn how to use this environment in more detail.
Step-by-Step Usage
Use SBCL
Steel Bank Common Lisp (SBCL) is a high performance Common Lisp compiler. It runs on several Unix and Unix-like systems such as Linux, FreeBSD, macOS, etc. It also runs experimentally on Windows. It is the most popular free and open source implementation of Common Lisp as of December 2020. See the Opinion References section for survey results related to this.
The steps provided below show how to run SBCL independently. This is not a typical way to run SBCL because most of the time we interact with SBCL via SLIME right from within Emacs. However running it independently once helps one appreciate that it is an independent program that compiles and executes Common Lisp code. Here are the steps:
-
Open your favourite editor, type this code, and save it as
hello.lisp:(format t "hello, world~%") -
Then enter this command in the shell to run the program:
sbcl --script hello.lisp -
Now start the SBCL Read-Eval-Print Loop (REPL) with the following command in the shell:
sbcl -
An asterisk prompt appears. Enter a Common Lisp expression at the asterisk prompt like this and type enter:
(+ 1 2)The result should appear as the output.
-
Similarly, enter the following expression at the SBCL prompt and type enter:
(format t "hello, world~%") -
Finally, enter the following expression and type enter to exit the SBCL REPL:
(exit)
Use Emacs
Emacs is a very powerful and extensible editor. It comes with over 10,000 built-in commands. A small section like this can barely scratch the surface of Emacs. Yet, this section makes a modest attempt at getting you started with Emacs and then provides more resources to learn further. Perform the following steps to get started:
-
Start Emacs:
emacs -
Within Emacs, enter the following command to open a file, say,
hello.txt:C-x C-f hello.txt RETA new buffer to edit
hello.txtis created. If a file with that name already exists on your file system, then it loads the content of the file into the buffer.Note that in the Emacs world (and elsewhere too), the notation
C-denotes the ctrl modifier key. ThusC-xdenotes ctrl + x.The notation
RETdenotes the enter or return key.Typing consecutive
C-key sequences can be optimized by pressing and holding down the ctrl key, then typing the other keys, and then releasing the ctrl key. For example, to typeC-x C-f, first press and hold down ctrl, then type x, then type f, and then release ctrl. In other words, think ofC-x C-fasC-(x f). This shortcut works for other modifier keys too. -
Now type some text into the buffer. Type out at least 3-4 words. We will need it for the next two steps.
-
Move backward by one word with the following key sequence:
M-bRemember from the previous section that
M-denotes the meta modifier key. The above command can be typed with alt + b or option + b or esc b.If you face any issue with the alt key or the option key, read Emacs Wiki: Meta Key Problems.
-
Now move forward by one word with the following key sequence:
M-f -
The
C-gkey sequence cancels the current command. This can be used when you mistype a command and want to start over or if you type a command partially, then change your mind and then you want to cancel the partially typed command. Try out these examples:C-x C-f C-gC-x C-g -
Save the buffer to a file on the file system with this command:
C-x C-s -
Quit Emacs:
C-x C-c
Now you know how to start Emacs, open a file, save it, and quit. Improve
your Emacs knowledge further by taking the Emacs tutorial that comes
along with Emacs. In Emacs, type C-h t to start the tutorial.
The key bindings to perform various operations like creating file, saving file, quitting the editor, etc. may look arcane at first, but repeated usage of the key bindings develops muscle memory soon and after having used them for a few days, one does not even have to think about them. The fingers do what the mind wants effortlessly due to muscle memory.
While you are getting used to the Emacs key bindings, keep this GNU Emacs Reference Card handy.
Use SLIME
Superior Lisp Interaction Mode for Emacs (SLIME) is a very popular Emacs mode that adds support for interacting with a running Common Lisp process for compilation, debugging, document lookup, etc. while developing Common Lisp applications. Perform the following steps to get started with it:
-
Start Emacs:
emacs -
Within Emacs, start SLIME by typing the following key sequence:
M-x slime RETRemember that
M-xtranslates to alt + x or esc x on a modern keyboard. -
A new buffer named
*slime-repl sbcl*should have now appeared with the following prompt:CL-USER>This is a Read-Eval-Print-Loop (REPL) where you can evaluate Common Lisp expressions.
-
Enter the following expression in the REPL:
(+ 1 2)The following result should appear when you type enter:
3 -
We will now see how to work on a Lisp source file and send expressions to the REPL for evaluation using SLIME commands without having to leave Emacs. First, create a buffer for a new file, for example:
C-x C-f foo.lisp -
Now enter this Lisp code into the buffer for
foo.lisp:(+ 1 2) -
While the cursor is placed after the closing parenthesis (not on it, but after it), type the following command:
C-x C-eThe result
3should appear in a minibuffer at the bottom.
There is a lot more to SLIME than what is described above. To learn more about SLIME, see Slime User Manual. Also, keep this Slime Quick Reference Card handy.
Use Paredit
Paredit helps in keeping parentheses balanced and also in performing structured editing of S-expressions in Lisp code. It provides a powerful set of commands to manipulate S-expressions in various ways. Perform the following steps to get started with Paredit:
-
Run Emacs:
emacs -
Open a Common Lisp source file:
C-x C-f foo.lisp -
Type the following code only:
(defun square (xAt this point, Paredit should have inserted the two closing parentheses automatically. The code should look like this:
(defun square (x))
                -
The cursor should be situated just after the parameter
x. The underbar shows where the cursor should be. -
Type the closing parentheses now. Yes, type it even if the closing parenthesis is already present. The cursor should now skip over the first closing parenthesis like this:
(defun square (x))
                 -
Of course, there was no need to type the closing parenthesis because it was already present but typing it out to skip over it is more efficient than moving over it with movement commands. This is, in fact, a very nifty feature of Paredit. We can enter code with the same keystrokes as we would without Paredit.
-
Now type
enterto create a new line just before the last parenthesis. A newline is inserted like this:(defun square (x) ) - -
Now type only this:
(* x xAgain, Paredit would have inserted the closing parenthesis automatically. The code should look like this now:
(defun square (x)
  (* x x))
        -
There is a lot more to Paredit than this. To learn more, see The Animated Guide to Paredit.
Note: While many Lisp programmers find Paredit very convenient and powerful while manipulating S-expressions in Lisp code, there are a few people who do not like Paredit because they find the Paredit behaviour intrusive. See the Opinion References section for more discussion on this topic.
Use Rainbow Delimiters
There is not much to learn about using Rainbow Delimiters. In the previous sections, you must have seen that as you type nested parentheses, each parenthesis is highlighted with a different color. That is done by Rainbow Delimiters. It colors each parenthesis according to its nesting depth level.
Note: Not everyone likes Rainbow Delimiters. Some people find parentheses in multiple colors distracting. See the Opinion References section for more discussion on this topic.
Use Quicklisp
This is an optional section for beginners to Common Lisp. Quicklisp helps in installing Common Lisp libraries from its repository. You would not need it when you are just learning Common Lisp as a beginner. But as you grow more experienced with Common Lisp and begin developing real world applications, sooner or later, you will need Quicklisp to install libraries that help you solve your problems.
Ensure that you have installed Quicklisp as specified in the Get Started section. Then follow these steps to become familiar with Quicklisp:
-
Start Emacs:
emacs -
Within Emacs, start SLIME by typing the following key sequence:
M-x slime RET -
Open a new file, say
server.lispwith the following key sequence:C-x C-f server.lisp -
Enter the following code into the buffer for the new file:
(ql:quickload "hunchentoot")
(hunchentoot:start (make-instance 'hunchentoot:easy-acceptor :port 4242))
The first line fetches and loads Hunchentoot from Quicklisp. Hunchentoot is a popular Common Lisp web server toolkit for building dynamic websites. The second line uses Hunchentoot to start a web server listening on TCP port 4242.
-
Evaluate the whole buffer with the following key sequence:
M-x slime-eval-buffer RET -
Visit http://127.0.0.1:4242/ with your web browser. A web page with a welcome message from Hunchentoot should appear.
Line-by-Line Explanation
This section explains the .emacs file provided here line-by-line.
Tweak UI
The first few lines in our .emacs merely tweak the Emacs user
interface. These are of course not essential for Common Lisp
programming. However, many new Emacs users often ask how to customize
the user interface to add a good color scheme and make it look minimal,
so this section indulges a little in customizing the user interface. The
actual Common Lisp related customization begins in the next section:
Highlight Parentheses.
Here is a line-by-line explanation of the UI tweaks in .emacs:
-
When Emacs runs in a GUI window, by default, it starts with a menu bar, tool bar, and scroll bar. Many (but not all) users like to hide them in order to make the Emacs frame look clean and minimal. The following lines disable the tool bar and scroll bar. The menu bar is left enabled.
(when (display-graphic-p)
  (tool-bar-mode 0)
  (scroll-bar-mode 0))
The
whenexpression checks if Emacs is running with graphic display before disabling the tool bar and scroll bar. Without thewhenexpression, we get the following error on Emacs without graphic display support:Symbol's function definition is void: tool-bar-mode. An example of Emacs without graphics support isemacs-noxon Debian 10. Note that this is only an author's preference. You may comment out one or more of these lines if you want to retain the tool bar or scroll bar.Some users like to hide the menu bar as well. To disable the menu bar, include
(menu-bar-mode 0)as top-level-expression (i.e., outside thewhenexpression) in the initialization file. Even with the menu bar disabled, the menu can be accessed anytime by typing<f10>. For beginners to Emacs, it is advisable to keep the menu bar enabled because it helps in discovering new features. -
Inhibit the startup screen with the
Welcome to GNU Emacsmessage from appearing:(setq inhibit-startup-screen t)If you are a beginner to Emacs, you might find the startup screen helpful. It contains links to tutorial, manuals, common tasks, etc. If you want to retain the startup screen, comment this line out.
-
Load a beautiful dark color theme known as
wombat:(load-theme 'wombat)If you want to check the other built-in themes, type
M-x customize-themes RET. A new window with a buffer named*Custom Themes*appear. In this buffer, select any theme you want to test. After you are done testing, you can close this new window withC-x 0. -
Choose a darker shade of gray for the background color to improve the contrast of the theme:
(set-face-background 'default "#111")Although Wombat is a pretty nice theme that comes with Emacs, in this theme, the cursor, search matches, and comments can often be difficult to spot because they are all colored with different shades of gray while the background is also gray. The above line of Emacs Lisp code chooses a darker shade of gray for the background in order to improve the contrast and make the other elements that are colored with a lighter shade of gray easier to spot.
Use Spaces for Indentation
The following point shows how to configure Emacs to insert spaces, not tabs, for indenting code.
-
Use spaces, not tabs, for indentation:
(setq-default indent-tabs-mode nil)Emacs uses a mix of tabs and spaces by default for indentation and alignment. To verify the default behaviour, first comment out the above line of Emacs Lisp code, save it, then restart Emacs, then open a new Common Lisp source file, say,
C-x C-f foo.lisp RETand type the following three lines of Common Lisp code:(defun foo () (concat "foo" "bar"))While typing the above code, do not type tab or space to indent the second and third lines. When you type enter at the end of each line, Emacs automatically inserts the necessary tabs and spaces to indent the code. After entering this code, type
M-x whitespace-mode RETto visualize whitespace characters. This mode displays each space with a middle dot (·) and each tab with a right pointing guillemet (»). With whitespace mode enabled, you should find that the second line of code is indented with two spaces but the third line is indented with a single tab followed by two spaces. Emacs has atab-widthvariable that is set to8by default. For everytab-widthcolumns of indentation, Emacs inserts a tab to indent the code. The third line requires 10 leading spaces for alignment, so Emacs inserts one tab character followed by 2 spaces to make the third line look aligned. However, this code would look misaligned on another editor with a differenttab-widthsetting. That's why we configure Emacs to use only spaces to indent and align code.Now to verify that the above line of Emacs Lisp code works as expected, uncomment the function call to set
indent-tabs-modetonil, save it, then restart Emacs, and then perform the above experiment involving the three lines of Emacs Lisp code again. This time, you should see that no tabs are used for indentation. Only spaces are used for indentation.In some type of files, we must use literal tabs. For example, in
Makefile, the syntax of target rules require that the commands under a target are indented by a literal tab character. In such files, Emacs is smart enough to always use literal tabs for indentation regardless of the above variable setting.Mixing tabs and spaces for indenting source code can be problematic, especially, when the author of code or Emacs inadvertently uses tabs for alignment (as opposed to using tabs for indentation only which would be fine) and another programmer views the file with an editor with a different tab width setting. In fact, in the experiment above, Emacs did use a literal tab character to align code which would cause the code to look misaligned on another editor with a different tab width setting. See Tabs Are Evil for more details on this topic.
Highlight Parentheses
The following points describe how we enable highlighting of parentheses:
-
The next point shows how to enable highlighting of matching pair of parentheses. By default, there is a small delay between the movement of a cursor and the highlighting of the matching pair of parentheses. The following line of code gets rid of this delay:
(setq show-paren-delay 0)This line of code must come before the one in the next point for it to be effective.
-
Highlight matching parentheses:
(show-paren-mode)A pair of parenthesis is highlighted when the cursor is on the opening parenthesis of the pair or just after the closing parenthesis of the pair.
Install Packages
The following points describe how we automate the installation of Emacs packages we need. These points are essential to Common Lisp programming with Emacs:
-
The following code disables TLS 1.3 to work around a known bug in GNU Emacs versions 26.1 and 26.2:
(when (and (version< emacs-version "26.3") (>= libgnutls-version 30603))
  (setq gnutls-algorithm-priority "NORMAL:-VERS-TLS1.3"))
See https://debbugs.gnu.org/34341 for more details on the bug. This code is not required while using GNU Emacs version 26.3 or 27.1 or a later version although leaving this code intact should do no harm because this code checks whether the Emacs version is less than 26.3 before applying the workaround.
-
When we install packages using
package-install(coming up soon in a later point), a few customizations are written automatically into the Emacs initialization file (~/.emacsin our case). This has the rather undesirable effect of our carefully handcrafted~/.emacsbeing meddled bypackage-install. To be precise, it is thecustompackage invoked bypackage-installthat intrudes into our Emacs initialization file. To prevent that, we askcustomto write the customizations to a separate file with the following code:(setq custom-file (concat user-emacs-directory "custom.el"))Note that this line of code must occur before the
package-installcall. -
Emacs does not load the custom-file automatically, so we add the following code to load it:
(load custom-file t)It is important to load the custom-file because it may contain customizations we have written to it directly or via the customize interface (say, using
M-x customize RET). If we don't load this file, then any customizations written to this file will not become available in our Emacs environment.The boolean argument
tensures that no error occurs when the custom-file is missing. Without it, when Emacs starts for the first time with our initialization file and there is no custom-file yet, the following error occurs:File is missing: Cannot open load file, No such file or directory, ~/.emacs.d/custom.el. Setting the second argument totprevents this error when Emacs is run with our initialization file for the first time. -
This is necessary for defining the
package-archiveslist we will use in the next point.(require 'package) -
Add Milkypostman's Emacs Lisp Package Archive (MELPA) to the list of archives to fetch packages from:
(add-to-list 'package-archives '("melpa" . "https://melpa.org/packages/") t)By default only GNU Emacs Lisp Package Archive (ELPA) is in the list of archives to fetch from. The above line adds MELPA too to the list. If you are curious to see what the original value of
package-archiveswas and what it is now due to the above line, typeC-h o package-archives RET. -
Initialize the package system:
(package-initialize)While initializing the package system, this call also initializes the
package-archive-contentsvariable used in the next point. -
Download package descriptions from package archives only if they have not been downloaded before:
(unless package-archive-contents
  (package-refresh-contents))
The first line checks whether package descriptions from package archives have been fetched. See the
~/.emacs.d/elpa/archivesor~/.config/emacs/elpa/archivesdirectory for archive contents in case you are curious. If the archive contents have not been fetched then the second line fetches them. Thus the second line executes only when the Emacs initialization is loaded for the first time. The first time Emacs starts with the .emacs file of this repository, it takes a while to fetch the package archives. However, once the package archives have been fetched and Emacs is started again later, it starts instantly because the code above takes care not to fetch package archives again when it is already cached locally. -
Install SLIME, Paredit, and Rainbow Delimiters only if they are not installed already:
(dolist (package '(slime paredit rainbow-delimiters))
  (unless (package-installed-p package)
    (package-install package)))
This loops iterates over each package name in a list of packages. For each package, it checks whether the package is installed with the
package-installed-pfunction. If it is not installed, then it is installed with thepackage-installfunction. You can modify the list of packages in the first line to add other packages that you might need in future or remove packages that you do not want.The first time Emacs starts with this initialization file, it takes a while to install the packages we need. However, once the packages are installed and Emacs is started again later, it starts instantly because the code above takes care to not attempt installing packages that are already installed.
Inferior Lisp Program
The following steps describe setting up the inferior-lisp-program
variable so that Emacs can use SBCL to load and execute SLIME:
-
Emacs uses a variable named
inferior-lisp-programto start SLIME. The use of this variable can be seen in the next point. This variable specifies the program to be invoked for loading and executing SLIME. We will set this to justsbcl, i.e., just the program name without the complete path. Avoiding absolute path of SBCL in Emacs initialization file has the advantage that the same initialization file can work well on other systems too where the location of SBCL may be different.On macOS, when we install SBCL using
brew install sbcl, the compiler binary executable is written to/usr/local/bin/sbcl. The path/usr/local/binis generally available in the shell's$PATHenvironment variable, so when Emacs is launched from the shell, itsexec-pathvariable contains/usr/local/bin. As a result, it can findsbcland start SLIME successfully.However, when Emacs is launched from the desktop (say, from macOS Dock), it does not have
/usr/local/binin itsexec-path, so it fails to start SLIME with this error:Searching for program: No such file or directory, sbcl. The following line of code works around this issue by adding/usr/local/binto theexec-pathvariable:(add-to-list 'exec-path "/usr/local/bin")Now there are several other ways to resolve this issue. A popular way is to specify the absolute path of SBCL as the
inferior-lisp-program. Yet another way is to configure macOS desktop such that when a program is launched from GUI, it contains/usr/local/binin itsPATH.The workaround shown above is recommended in this document for two reasons. Firstly, we don't want to hard-code absolute path of SBCL in the Emacs initialization file, so that the same initilization file can work well on other systems where the location of SBCL may be different. Secondly, we want to keep the workaround minimally invasive, so that we don't have to go around meddling with the desktop settings only for the sake of Emacs.
-
Specify the program to be invoked for loading and executing SLIME:
(setq inferior-lisp-program "sbcl")
Add Hooks
This section describes how to enable Paredit and Rainbow Delimiters. These are not absolutely essential for having an interactive programming environment for Common Lisp. However many programmers find them useful while some do not.
In case you decide not to use either Paredit or Rainbow Delimiters,
then you may skip this section. In that case, you might also want to
remove these packages from the dolist expression of .emacs.
-
Enable Paredit while editing Emacs Lisp code:
(add-hook 'emacs-lisp-mode-hook 'enable-paredit-mode)Paredit helps in keeping parentheses balanced and in performing structured editing of S-expressions. While we configure it to be used for Common Lisp programming, we might as well configure it for editing Emacs Lisp code too. Then the experience of editing Emacs Lisp code and that of editing Common Lisp code will be consistent with each other.
To test that Paredit is enabled for editing Emacs Lisp code, open a new Emacs Lisp file, say,
foo.el. Then type(. Paredit should automatically insert the corresponding). -
Enable Paredit in eval-expression minibuffer:
(add-hook 'eval-expression-minibuffer-setup-hook 'enable-paredit-mode)To test this, enter
M-:to bring up the eval-expression minbuffer and type(. Paredit should automatically insert the corresponding). -
Enable Paredit while interactively evaluating Emacs Lisp expressions in inferior-emacs-lisp-mode (IELM):
(add-hook 'ielm-mode-hook 'enable-paredit-mode)To test this, enter
M-x ielm RET. When the*ielm*buffer appears, type(. Paredit should automatically insert the corresponding). -
Enable Paredit in Lisp interaction mode:
(add-hook 'lisp-interaction-mode-hook 'enable-paredit-mode)To test this, first open a non-Lisp file, say,
C-x C-f foo.txt RET. Now type(. Note that no corresponding)is inserted because we are not in Lisp interaction mode yet. Delete(. Then start Lisp interaction mode with the commandM-x lisp-interaction-mode RET. Type(again. Paredit should now automatically insert the corresponding). -
Enable Paredit while editing Common Lisp code:
(add-hook 'lisp-mode-hook 'enable-paredit-mode)To test this, open a new Common Lisp source file, say,
C-x C-f foo.lisp RET. Then type(. Paredit should automatically insert the corresponding). -
Enable Paredit in SLIME REPL:
(add-hook 'slime-repl-mode-hook 'enable-paredit-mode)To test this, start SLIME with
M-x slime RET. Then type(in SLIME REPL. Paredit should automatically insert the corresponding). -
When we type backspace or delete to delete a parenthesis in the SLIME REPL, Paredit fails to keep the parentheses balanced because SLIME interferes with Paredit by grabbing the delete key. To fix this issue, use the following code:
(require 'paredit)
(defun override-slime-del-key ()
  (define-key slime-repl-mode-map
    (read-kbd-macro paredit-backward-delete-key) nil))
(add-hook 'slime-repl-mode-hook 'override-slime-del-key)
To test this, start SLIME with
M-x slime RET. Then type(+ 1 (+ 2 (+ 3 4))). Even though, the closing parentheses)))will be automatically inserted, type them out to advance the cursor to the end of the line. When you type)even if it is already present, Paredit just skips over the already present). Once you are at the end of the line, type backspace or delete multiple times. Paredit will keep the parentheses balanced at all times. -
Enable Rainbow Delimiters while editing Emacs Lisp code:
(add-hook 'emacs-lisp-mode-hook 'rainbow-delimiters-mode)Rainbow Delimiters color nested parentheses with different colors according to the depth level of each parenthesis. To test this open a new Emacs Lisp file, say,
foo.el. Then type((((. Rainbow Delimiters should color each parenthesis differently. -
Enable Rainbow Delimiters while interactively evaluating Emacs Lisp expressions in inferior-emacs-lisp-mode (IELM):
(add-hook 'ielm-mode-hook 'rainbow-delimiters-mode)To test this, enter
M-x ielm RET. When the*ielm*buffer comes up, type((((. Rainbow Delimiters should color each parenthesis differently. -
Enable Rainbow Delimiters in Lisp interaction mode:
(add-hook 'lisp-interaction-mode-hook 'rainbow-delimiters-mode)To test this, first open a non-Lisp file, say,
foo.txt. Now type((((. Then start Lisp interaction mode with the commandM-x lisp-interaction-mode RET. Rainbow Delimiters should now color each parenthesis differently. -
Enable Rainbow Delimiters while editing Common Lisp code:
(add-hook 'lisp-mode-hook 'rainbow-delimiters-mode)To test this, open a new Common Lisp source file, say,
foo.lisp. Then type((((. Rainbow Delimiters should color each parenthesis differently. -
Enable Rainbow Delimiters in SLIME REPL:
(add-hook 'slime-repl-mode-hook 'rainbow-delimiters-mode)To test this, start SLIME with
M-x slime RET. Then type((((at the REPL prompt. Rainbow Delimiters should color each parenthesis differently.
You may have noticed that we did not enable Rainbow Delimiters for eval-expression. That is because it does not work as expected as of Dec 2020. See https://github.com/Fanael/rainbow-delimiters/issues/57 for more details.
Colorful Parentheses
The default colors that the Rainbow Delimiters package chooses for the nested parentheses are too subtle to easily recognize the matching pair of parentheses. Some Lisp programmers like to customize the colors to make the parentheses look more colorful. This section shows one way to do this.
-
This is necessary to use the various Rainbow Delimiters faces that appear in the next point.
(require 'rainbow-delimiters) -
Set different colors for parentheses at different nesting level.
(set-face-foreground 'rainbow-delimiters-depth-1-face "#c66")  ; red
(set-face-foreground 'rainbow-delimiters-depth-2-face "#6c6")  ; green
(set-face-foreground 'rainbow-delimiters-depth-3-face "#69f")  ; blue
(set-face-foreground 'rainbow-delimiters-depth-4-face "#cc6")  ; yellow
(set-face-foreground 'rainbow-delimiters-depth-5-face "#6cc")  ; cyan
(set-face-foreground 'rainbow-delimiters-depth-6-face "#c6c")  ; magenta
(set-face-foreground 'rainbow-delimiters-depth-7-face "#ccc")  ; light gray
(set-face-foreground 'rainbow-delimiters-depth-8-face "#999")  ; medium gray
(set-face-foreground 'rainbow-delimiters-depth-9-face "#666")  ; dark gray
More Emacs Customization
This project focusses primarily on setting up a Common Lisp development environment. If you want to enhance your Emacs setup from being a Common Lisp development environment to being a more general purpose editing and programming environment, please see my new project Emfy. Emfy is similar to this project, however, Emfy offers more customization to make Emacs easier to use for general purpose editing and programming.
Alternatives
There are two popular alternatives to Emacs4CL:
- Portacle: Portacle is an Emacs-based fully featured integrated development environment (IDE) for Common Lisp. Portacle consists of Emacs customized heavily with custom configuration and a rich selection of packages and tools that make it suitable for Common Lisp programming.
- Lem: Lem is an Emacs-like editor and Common Lisp IDE written from scratch using Common Lisp itself.
Both are good alternatives to Emacs4CL. Since Lem is a completely different editor, there is not much to compare between Lem and Emacs4CL. Lem offers an appealing option for those who prefer to engage in Common Lisp development activities using an editor that is written in Common Lisp itself.
Portacle, however, is Emacs packaged with custom packages, configuration, and Common Lisp tools. Portacle tucks away the underlying details of what goes into making Emacs ready for Common Lisp development in its rather large configuration directory. Since Portacle is still Emacs, to use Portacle effectively, you have to learn Emacs and SLIME anyway. If you are going to learn Emacs and SLIME anyway, you might as well set it up yourself. Then you can add only those customizations to Emacs that you need instead of Portacle deciding what your Emacs experience should be like.
Emacs4CL provides a good middle ground between setting up Emacs from scratch manually and installing Portacle. It promotes a do-it-yourself approach to setting up Emacs for Common Lisp programming. More importantly, it helps you understand each step of the work that goes into customizing Emacs as an environment for Common Lisp programming.
Opinion References
- State of Common Lisp Survey 2020
- Displaying line numbers is an Emacs anti-pattern
- Give paredit mode a chance
- Never warmed up to paredit
- Coloring each paren differently only adds noise
Channels
The following channels are available for asking questions, seeking help and receiving updates regarding this project:
- GitHub: emacs4cl/issues
- Mastodon: @[email protected]
- Matrix: #susam:matrix.org
- Libera: #susam
You are welcome to follow or subscribe to one or more of these channels to receive updates and ask questions about this project.
License
This is free and open source software. You can use, copy, modify, merge, publish, distribute, sublicense, and/or sell copies of it, under the terms of the MIT License. See LICENSE.md for details.
This software is provided "AS IS", WITHOUT WARRANTY OF ANY KIND, express or implied. See LICENSE.md for details.
