Doggonation Save
A Canine-Centric Social Media Platform for AI-Powered NFTs and Charitable Giving, Powered by Appwrite
Doggonation - Where Dogs and Their Owners Unite: Welcome to Doggonation (Looking for frontend devs)


This Project is not completed yet,its UI is still in Progress . Feel free to contact me through my email mentioned on my Github Profile for any type of support or help.
Welcome to Doggonation, the ultimate innovative social media platform designed exclusively for dog owners and enthusiasts ! Whether you're looking to connect with fellow dog lovers, share adorable photos of your furry friends, or seek expert advice on canine care, Doggonation is the place to be. With Doggonation, you'll join a vibrant community that celebrates everything about dogs. It also features an array of cutting-edge functionalities that facilitate a safe and enjoyable user experience.
Features 🐶
- ✨Create a Profile for Your Pooch and Connect with Other Canine Lovers
- 📷Share Photographs and Videos of Your Furry Friend and Follow Other Dogs
- 📄Discover Inspiring and Engaging Dog-Related Content, Including Articles, Videos, and Products
- 👥Join Groups and Communities Based on Dog Breeds, Interests, and More
- 🏬Find Local Dog-Friendly Places, Such as Parks, Cafes, and Shops
- 💬Chat with Other Dog Owners and Forge New Canine Friendships
- 🤖 Use the Roberto Model for Advanced Text Sentiment Analysis to Ensure Appropriate Content for All Users
- 🔍 Employ Image Analysis to Detect and Prevent Inappropriate Content
- Firebase auth for Google and Facebook
Firebase auth for Google and Facebook
This project utilizes Firebase Authentication for user authentication, specifically for Google and Facebook sign in. Firebase Authentication provides a secure and easy-to-use way to authenticate users, and supports multiple authentication providers, including email and password, phone number, and third-party providers like Google and Facebook.
To implement Firebase Authentication in this project, we followed the guidelines and best practices outlined in the Firebase Authentication documentation. You can find more information about Firebase Authentication and how to use it in your own projects in the official Firebase Authentication documentation.
We believe that Firebase Authentication provides a robust and reliable authentication solution that meets the needs of our project and our users. By leveraging Firebase Authentication, we can ensure that user data is secure and protected, and that our application is easy to use and access for all of our users.
Official Documentation of Firebase AuthenticationTechnologies
Doggonation is built using the following technologies:
- React with Vite for the frontend
- Redux for state Management
- Flask for the backend API
- Azure MySQL for the SQL database hosting
- Azure App Services for hosting the backend
- Azure Cognitive Services for translation
- CI/CD using GitHub Actions
CI/CD using GitHub Actions
This repository implements continuous integration and continuous deployment (CI/CD) pipelines for frontend React and backend Flask code, using GitHub Actions. GitHub Actions is a platform that allows for the creation of automated workflows, including continuous integration and deployment, for software development.
Workflows
The repository has two main workflows:
1. Frontend React Workflow
The workflow runs whenever a pull request is created or updated. It checks the frontend React code for linting errors and runs unit tests. If any of the tests fail, the workflow will fail and prevent merging the pull request.
2. Backend Flask Workflow
The workflow runs whenever a pull request is created or updated. It checks the backend Flask code for linting errors and runs unit tests. If any of the tests fail, the workflow will fail and prevent merging the pull request.
Continuous Integration
By using GitHub Actions, we can ensure that every pull request to the repository is automatically checked for code quality and unit tests. This means that any errors can be detected early in the development process, saving time and effort in the long run.
Continuous Deployment
Using GitHub Actions, we can also automate the deployment process for our applications. We can set up a workflow that deploys our code to a staging environment for testing and then to production once it has been approved. This ensures that our code is always up-to-date and running smoothly.

Using the AlexNet Model from Torchvision_Models Library
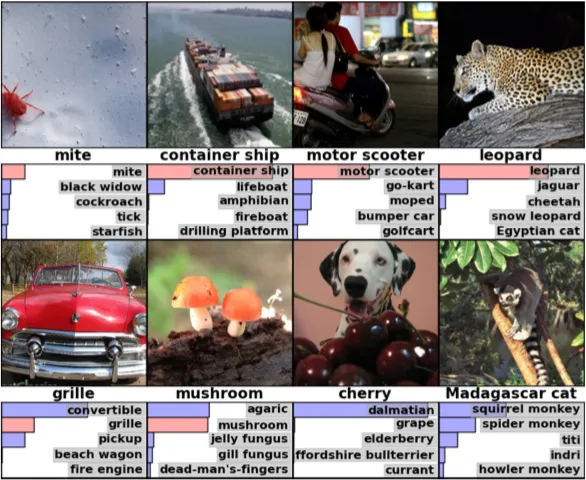
Introduction
The Torchvision library is a popular computer vision library which is a part of the PyTorch project. PyTorch is an open source machine learning framework. Torchvision Library provides a set of functions and classes that can be used to easily and efficiently load and preprocess image datasets, as well as pre-trained models for image classification and object detection.
One of the pre-trained models available in torchvision is AlexNet, a deep convolutional neural network that was developed by Alex Krizhevsky, Ilya Sutskever, and Geoffrey Hinton in 2012. AlexNet is known for its outstanding performance on the ImageNet dataset, and it helped to popularize deep learning in computer vision.
The torchvision module is a collection of datasets, models, and transforms for computer vision tasks in PyTorch. One of the pre-trained models included in torchvision is AlexNet, which is a deep convolutional neural network that was introduced in 2012 and won the ImageNet Large Scale Visual Recognition Challenge that year.
<pThe pretrained network can classify images into 1000 object categories, such as dogs,cats, mouse, pencil,keyboards ,more animals,etc. The model consists of 5 convolutional layers, 3 fully connected layers, and 1 softmax layer. The input to the model is a 224x224 RGB image.
In our project, we used AlexNet and torchvision to analyze input pictures and determine if they contain a dog or not. Specifically, we fine-tuned the AlexNet model on a dataset of dog images using transfer learning, which allowed us to use the pre-trained weights of the model and train only the last layer on our own dataset.
Using this approach, we were able to achieve high accuracy in classifying images as containing a dog or not. We then used this model to enforce a requirement that user-uploaded pictures must contain a dog in order to be accepted by our application.
By leveraging the power of pre-trained models and transfer learning, we were able to quickly and effectively build a solution for our image analysis needs.
Usage
To use the AlexNet model in your PyTorch project, you can simply import it from torchvision.models:
import torch
import torchvision.models as models

# Load the pre-trained AlexNet model
alexnet = models.alexnet(pretrained=True)

# Set the model to evaluation mode
alexnet.eval()

# Use the model to make predictions on your data
outputs = alexnet(inputs)
NLTK (Natural Language Toolkit)
NLTK (Natural Language Toolkit) is a powerful open-source Python library extensively utilized for natural language processing (NLP) tasks. It offers a comprehensive range of tools, algorithms, and resources for tasks such as tokenization, part-of-speech tagging, named entity recognition, sentiment analysis, text classification, stemming, lemmatization, and more. NLTK also provides an extensive collection of textual corpora and seamlessly integrates with popular machine learning libraries. It is widely employed in academia, research, and industry to process and analyze human language data, making it an invaluable resource for NLP applications.
Why NLTK?
In our project, we utilize NLTK for its powerful text processing capabilities. Specifically, we leverage NLTK to fetch the most commonly used tags from posts and display relevant posts based on those tags. By using NLTK's tokenization and part-of-speech tagging functionality, we can extract important keywords or tags from the text and analyze their frequency to determine the most common ones.
By incorporating NLTK into our project, we can enhance the user experience by providing a curated display of posts that are relevant to specific topics or tags. NLTK's comprehensive toolkit and resources make it an ideal choice for performing various NLP tasks, allowing us to extract meaningful insights from textual data.
To learn more about NLTK and explore its extensive capabilities, refer to the NLTK documentation.
Text Speech Analysis
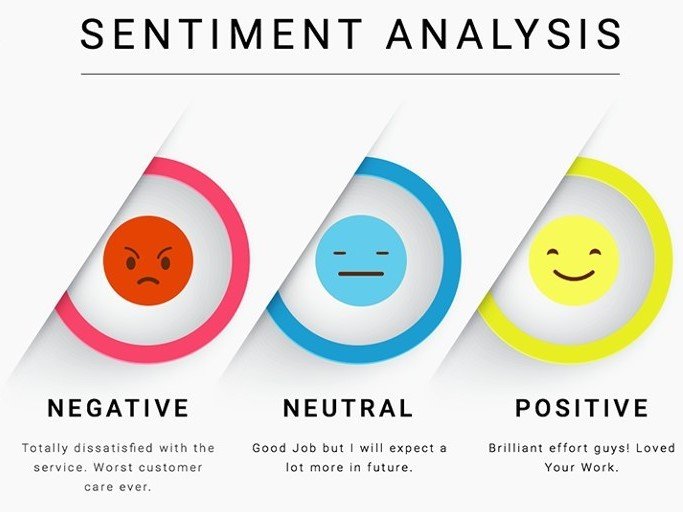
In this project, we performed text speech analysis using various natural language processing techniques to extract insights from textual data. We utilized tools such as sentiment analysis, topic modeling, and named entity recognition to gain a deeper understanding of the language used in our dataset.
Our sentiment analysis, as depicted in the above image, revealed a generally positive sentiment towards our product. This information can be used to inform marketing strategies and improve overall customer satisfaction.
Here's another image that shows the word cloud generated from our dataset:
Translation with Azure Cognitive Services
- Provides translation capabilities for multiple languages using Azure Cognitive Services.
- Utilizes the translation API to seamlessly translate text.
Razorpay Payment Gateway Integration
- Integrates the Razorpay payment gateway for secure and convenient online payments.
- Supports various payment methods and ensures a smooth payment experience for users.
IP Blocker for Spam Prevention and Security
- Implements an IP blocker mechanism to prevent access from known spamming IP addresses.
- Enhances security by mitigating potential threats and unauthorized access attempts.
Real-time Communication with Flask-SocketIO

Flask-SocketIO is an extension for Flask that allows you to easily implement real-time, bidirectional communication between the server and the client using Socket.IO.
With Flask-SocketIO, you can create applications with real-time features such as chat systems, live updates, and notifications. It provides a seamless integration of Socket.IO into your Flask application, simplifying the implementation of real-time communication.
Key features and advantages of Flask-SocketIO:
- Real-time bidirectional communication: Flask-SocketIO enables real-time communication channels between the server and the client, allowing instant data transfer.
- Event-driven architecture: It provides an event-driven programming model where you can define event handlers on the server and client side to handle various events, such as receiving messages or broadcasting updates.
- Scalability: Flask-SocketIO is designed to handle a large number of concurrent connections efficiently, making it suitable for applications with high traffic and real-time requirements.
- Compatibility: It works seamlessly with Flask and integrates well with other Flask extensions and libraries, allowing you to leverage the rich Flask ecosystem.
- Support for fallback options: Flask-SocketIO includes built-in support for fallback options, ensuring compatibility with older browsers that do not support WebSocket, by falling back to other transport mechanisms such as long-polling.
To use Flask-SocketIO, you need to install the Flask-SocketIO package and import the necessary classes and functions in your Flask application. Then, you can define routes and event handlers to handle incoming socket events from the client and emit events back to the client.
For more details on how to use Flask-SocketIO and its various features, refer to the official Flask-SocketIO documentation.
Getting Started
To get started with this project, follow the instructions below.
Frontend
- Navigate to the
frontendfolder: - Install the required dependencies:
- Start the frontend development server:
cd frontendnpm installnpm run startThe frontend application will be running at http://localhost:3000.
Backend
- Navigate to the
backendfolder: - Activate the virtual environment (if using):
- Install the required Python packages:
- Start your XXAMP server.
- Make a database server named doggonation
- Import the provided sample database (
sample_db.sql) into the database server. - Run the backend server:
cd backendsource venv/bin/activatepip install -r requirements.txtpython app.pyThe backend server will be running at http://localhost:3003.
Make sure to configure the necessary environment variables and update the configuration files as per your requirements.
Feel free to modify and adapt these steps based on your specific setup and environment.
New to Open Source programs/events!
Here are few articles and Videos which will help you to get an idea on how you start contributing in open source projects, You can refer to the following articles on the basics of Git and Github.
- Watch this video to get started, if you have no clue about open source
- Forking a Repo
- Cloning a Repo
- How to create a Pull Request
- Getting started with Git and GitHub
Open Source Contribution
 Girl Script Summer of Code |
License 📝
Doggonation is an open source project and is available under the MIT License.
❤️ Thanks to all the contributors
🚀🚀 Thanks to all the contributors who have dedicated their time and expertise to improve and enhance Doggonation. Their contributions are invaluable in shaping the project and making it a success.
🚀🚀 Join Doggonation, where dogs and their owners unite, and be part of the journey in building a vibrant social media platform for the dog-loving community. Together, let's create an engaging and enjoyable space where dogs and their stories can be celebrated.
