Data Lake As Code Save
Data Lake as Code, featuring ChEMBL and OpenTargets
Data Lake as Code
There are three primary branches for this repo.
- mainline - You are here. Allows you to use the Data Lake as Code architecture and constructs in your own enviornment. It excludes the RODA data sets and 'baseline' stack documented in the blog.
- roda - This branch tracks new Heathcare or Life Sciences AWS Registry of Open Data (RODA) data sets enrolled by the Data Lake as Code architecture.
- roda-fintech - This branch tracks new Fintech-centric AWS Registry of Open Data (RODA) data sets enrolled by the Data Lake as Code architecture.
- roda-ml - This branch tracks new ML-centric AWS Registry of Open Data (RODA) data sets enrolled by the Data Lake as Code architecture.
- blog - This branch tracks the 'Data Lake as Code' blog post
What is this?
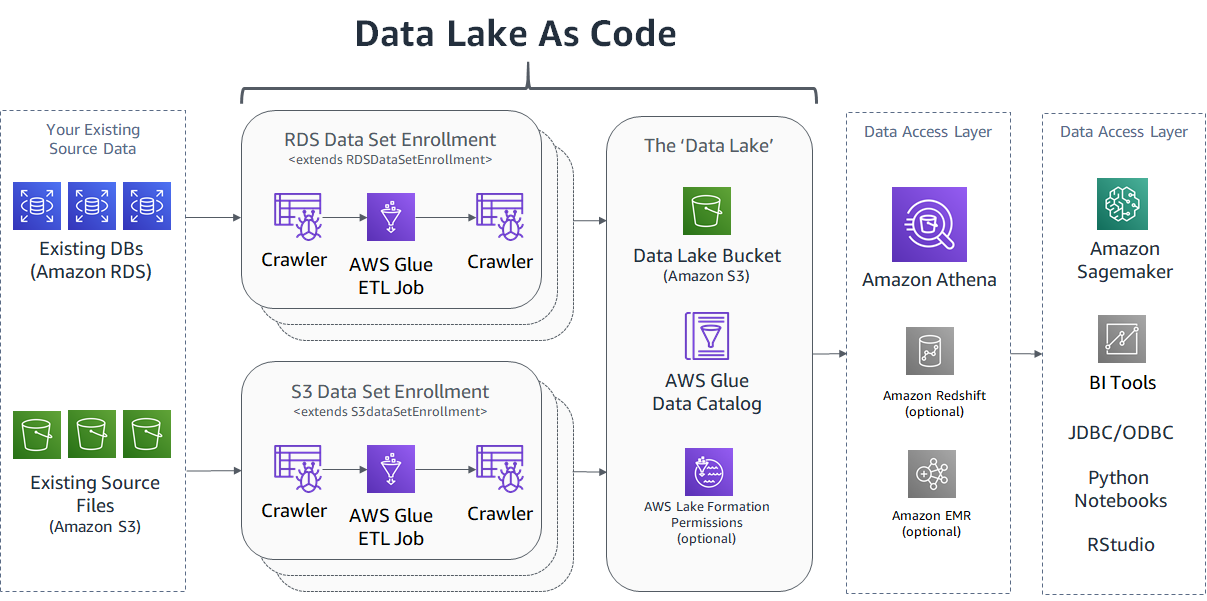
Data Lake as Code is an extendable AWS CDK application that builds a data lake in your AWS account, allows you to enroll your own data sets, and gives you the ability to precisely control access to your data. Because this is a CDK based architecture, your entire data lake will be implemented as infrastructure as code. This creates a self-documenting data lake that you check-in to your preferred code repository to maintain over time. That includes the grants/permissions you give to your data.
Here is a high-level diagram of what this CDK application creates for you. Check out the 'Data Lake as Code' blog post if any of these services are unfamiliar or if you want to learn more about the architectural concepts.
To install this in your own AWS account:
Your local machine needs to have the AWS CLI installed on your machine along with IAM permissions setup (through IAM role or .aws/credentials file). I like to use Cloud9 as my IDE as it comes with both of those already setup for me.
Run the following commands
git clone -b mainline https://github.com/aws-samples/data-lake-as-code
cd data-lake-as-code
./InstallCdkDependencies.sh
./DeployOrUpdateDataLake.sh
This will install the CDK into your environment and create the core resources for you data lake. Should only take a few minutes.
This includes the 'Data Lake' bucket where your enrolled datasets will reside in perpetuity along with some Lake Formation setup.
Enroll your own S3 data sets
Organize your source S3 location
The Glue crawler expects your data to be organized into folders based on the table. In the example below, the Glue Crawler will create tables called orders, products, customers, etc and automatically detect the table specific schemas based on the the data it samples in each folder. Note that the file types can be different between the different tables.
s3://source-bucket
│   ...
└───folder1/
│   │   ...
│   └───SupplierData/
│       └─── orders/
|       │   │   ordersFile.csv
│       └─── products/
|       │   │   productsDump.json
│       └─── customers/
|       │   │   part000-customerDataFile.parquet
|       │   │   part001-customerDataFile.parquet
|       │   │   ...
│       └───table3/
|       │   │   table3File.gz
│       └───...
Its likely that many of your tables may just be one file. However, in the event your data set is broken up across multiple files, just keep those parts in the same shared table parent folder. See the customers/ folder above as an example.
Create a new CDK stack for you data set
Create a new file by copying the lib/ExampleS3DataSet-stack.ts file. Note we are using 'SupplierData' just as a placeholder name, use something that describes your data set.
cp lib/ExampleS3DataSet-stack.ts lib/SupplierDataSet-stack.ts
Open up the new SupplierDataSet-stack.ts file.
Update the ExampleS3DataSet and exampledataset_v1 lines below with a more meaningful name to your data set. To keep the example from above going, I'm calling the class SupplierDataSet and setting the dataSetName to supplier_data.
...
export class ExampleS3DataSet extends DataSetStack{
...
const dataSetName = "exampledataset_v1"; // NO CAPS!!!!
...
You will also want to update the sourceBucketDataPrefixes property with paths to your tables. Using the folder structure from the above example, it would look like this:
            sourceBucketDataPrefixes: [
                `${props.sourceBucketDataPrefix}orders/` ,
                `${props.sourceBucketDataPrefix}products/`,
                `${props.sourceBucketDataPrefix}customers/`,
                `${props.sourceBucketDataPrefix}table3/`
            ],
Optionally create a new AWS Glue script
You will notice the following line in your lib/SupplierDataSet-stack.ts file
...
GlueScriptPath: "scripts/glue.s3import.fullcopy.s3.py",
...
The scripts/glue.s3import.fullcopy.s3.py file is a ~45 line Spark script that will download the data from your source bucket, and copy every table and every column, convert them to parquet, and write the results into your data lake bucket ready for crawling and querying. It is a 'full copy'.
In the event you want to change your source data before its enrolled into the data lake, for example to enrich, transform, feature engineer, drop tables or columns, etc, you will want to create your own Glue script. Glue scripting is easier than you think, based on Spark, is serverless, and can scale large and small. Review the scripts/glue.s3import.fullcopy.s3.py and see how simple it really is. Fun fact, the RDS full copy equivalent scripts/glue.s3import.fullcopy.rds.py is identical to the S3 version even though they use fundamentally different access protocols!
Instantiate the Data Set Stack
We've now created your DataSetStack class, now we need to instantiate it to make it real. Open the bin/aws.ts file. Add the import to your new stack into the top of the file and instantiate your new data set. In the example below, sourceBucketDataPrefix is set to /folder1/SupplierData/ as an example that would match S3 folder structure above.
//Add import to the top of the file
import { SupplierDataSet } from '../lib/SupplierDataSet-stack'; // Add this!
...
// Leave this alone
const coreDataLake = new DataLakeStack(app, 'CoreDataLake', {...});
const exisitingResourceImportStack = new Stack(app, 'resourceImportStack', {
    description: "Used to import existing resources created outside of this CDK application",
});
...
// Instantiate Data Set!
const supplierDataSet= new SupplierDataSet(app, 'SupplierDataSet', {
     sourceBucket: s3.Bucket.fromBucketName(exisitingResourceImportStack, 'SupplierDataSetSourceBucket', '--- YOUR EXISTING BUCKET NAME GOES HERE ---'),
     sourceBucketDataPrefix: '/folder1/SupplierData/',
     DataLake: coreDataLake
 });
Now lets build the application and deploy the stack. Run the following from the root of the data-lake-as-code directory.
npm run build && cdk deploy SupplierDataSet
The CDK will compile, deploy, and let you watch the CloudFormation templates getting deployed. It should only take a minute or two. While that's underway, I recommend opening the /DeployOrUpdateDataLake.sh file and adding a cdk deploy SupplierDataSet --require-approval-never line to the bottom. That way you can just run the ./DeployOrUpdateDataLake.sh whenever you make changes to the code and ensure that everything is up to date.
Once the deployment finishes, kick off the enrollment workflow in glue.
Enrolling an RDS Data Set
Create a new CDK stack for you RDS data set
Create a new file by copying the lib/ExamplePgRdsDataSet-stack.ts file. Note we are using 'SalesData' just as a placeholder name, use something that describes your data set.
cp lib/ExamplePgRdsDataSet-stack.ts lib/SalesDataSet-stack.ts
Open up the new SalesDataSet-stack.ts file.
Update the ExamplePgRdsDataSet and example_rds lines below with a more meaningful name for your data set. To keep the example from above going, I'm calling the class SalesDataSet and setting the dataSetName to sales_data.
...
export class ExamplePgRdsDataSet extends DataSetStack{
...
const dataSetName = "example_rds"; // NO CAPS!
...
We also need to update the following two parameters with your database service name (or sid) and the JdbcTargetIncludePath. If you are using a postgres these values are usually the same.
	this.Enrollments.push(new RDSPostgresDataSetEnrollment(this, `${dataSetName}-enrollment`, {
		...
    	databaseSidOrServiceName: "database_sid",
    	JdbcTargetIncludePaths: ["database_name/%"],
		...
Optionally create a new AWS Glue script
You will notice the following line in your lib/SalesDataSet-stack.ts file
	this.Enrollments.push(new RDSPostgresDataSetEnrollment(this, `${dataSetName}-enrollment`, {
		...
	   	GlueScriptPath: "scripts/glue.s3import.fullcopy.rds.py",
	   	...
The scripts/glue.s3import.fullcopy.rds.py file is a ~45 line Spark script that will download all of the data from your source database that match the include path, and copy every table and every column, convert them to a parquet format, and write the resulting table data into your data lake bucket ready for crawling and querying. It is a 'full copy'.
In the event you want to change your source data before its enrolled into the data lake, for example to enrich, transform, feature engineer, drop tables or columns, etc, you will want to create your own Glue script. Glue scripting is easier than you think, based on Spark, is serverless, and can scale large and small. Review the scripts/glue.s3import.fullcopy.rds.py and see how simple it really is. Fun fact, the RDS full copy equivalent scripts/glue.s3import.fullcopy.s3.py is identical to the S3 versioneven though they use fundamentally different access protocols!
Instantiate the Data Set Stack
We've now created your DataSetStack class, now we need to instantiate it to make it real. Open the bin/aws.ts file. Add the import to your new stack into the top of the file and instantiate your new data set.
You will also need to supply the following IDs/ARNs/Addresses to the constructor's parameters.
-
instanceEndpointAddress- You can get this from the RDS console. -
instanceIdentifier- You can get this from the RDS Console -
databaseSecret- Create a AWS Secrets Manager secret for RDS where you supply the username and password. Use the ARN that secret here. -
accessSecurityGroup- The ID of an existing security group that allows inbound access to the database. -
subnetIdandavailabilityZone- The subnet id and it's corresponding AZ id (ex us-west-2b) where the Crawlers and Glue jobs will run. This subnet needs to be able to route to the source database as well as to a NAT gateway and/or an S3 endpoint. It will not work if you supply a public subnet (one that routes to an Internet Gateway) .
//Add import to the top of the file
import { SalesDataSet } from '../lib/SalesDataSet-stack'; // Add this!
...
// Leave this alone
const coreDataLake = new DataLakeStack(app, 'CoreDataLake', {...});
...
// Instantiate Data Set!
const salesDataSet = new SalesDataSet (app, 'SalesDataSet', {

    database: rds.DatabaseInstance.fromDatabaseInstanceAttributes(coreDataLake, 'sourceDatabase', {
        instanceEndpointAddress: '--- RDS INSTANCE ENDPOINT ADDRESS GOES HERE ---',
        instanceIdentifier: '--- RDS INSTANCE IDENTIFIRE GOES HERE ---',
        port: 5432,
        securityGroups: []}) as rds.DatabaseInstance,
    databaseSecret: rds.DatabaseSecret.fromSecretArn(coreDataLake, 'databaseSecret',
        '---SECRET ARN GOES HERE ---') as rds.DatabaseSecret,
    accessSubnet: ec2.Subnet.fromSubnetAttributes(coreDataLake, 'accessSubnet', {
        subnetId: '--- SUBNET ID THAT CAN ROUTE TO BOTH THE SOURCE DATABASE AND OUTBOUND TO INTERNET ---',
        availabilityZone: '--- AVAILABILITY ZONE ASSOCIATED WITH THIS SUBNET ---'}) as ec2.Subnet,
    accessSecurityGroup: ec2.SecurityGroup.fromSecurityGroupId(coreDataLake, 'accessSecurityGroup',
        '---SECURITY GROUP ID THAT ALLOWS INBOUND ACCESS TO DATABASE GOES HERE ---') as ec2.SecurityGroup,
    DataLake: coreDataLake
});
Now lets build the application and deploy the stack. Run the following from the root of the data-lake-as-code directory.
npm run build && cdk deploy SalesDataSet
The CDK will compile, deploy, and let you watch the CloudFormation templates getting deployed. It should only take a minute or two. While that's underway, I recommend opening the /DeployOrUpdateDataLake.sh file and adding a cdk deploy SupplierDataSet --require-approval-never line to the bottom. That way you can just run the ./DeployOrUpdateDataLake.sh whenever you make changes to the code and ensure that everything is up to date.
Once the deployment finishes, kick off the enrollment workflow.
Kick off the Enrollment
At this point, everything required to enroll your data set has been deployed. To kick off the enrollment, log into the AWS Glue Console, and select the 'Workflows' section on the left side, and select the radio button next to the new enrollment workflow.
You can see below the 'crawler-job-crawler' pattern visualized in the Graph. We crawl the source first, then perform the transform via job, then crawl the transformed data to pick up any new schema changes.
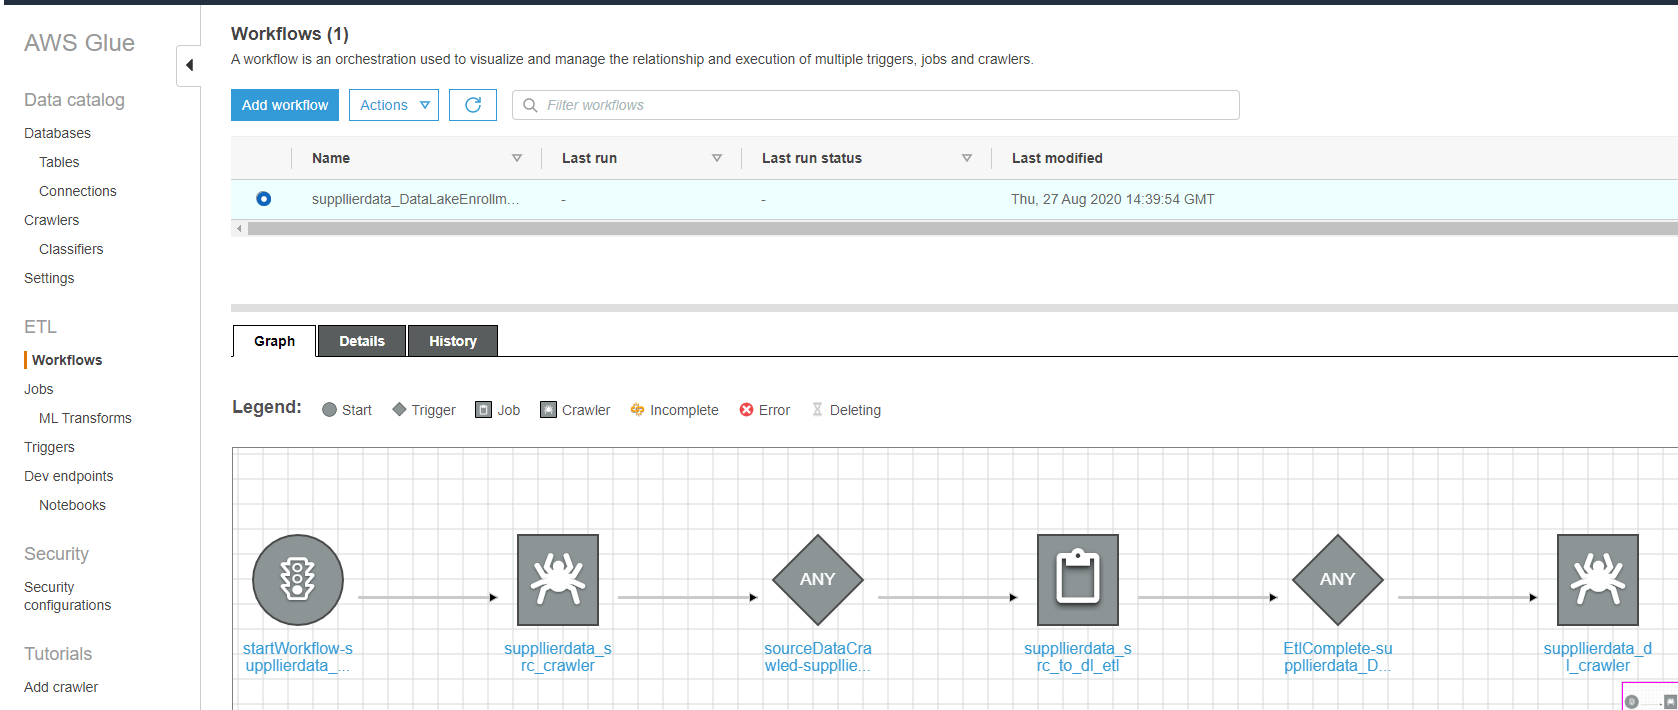
Click the Actions drop down and select "Run".
You can watch the overall run by visiting the "History" tab. If you want to watch the individual parts running you can go to the Crawlers and Jobs tabs to see more information about each step.
Here you can see the source crawler has just finished, it ran for a minute and found 3 tables.

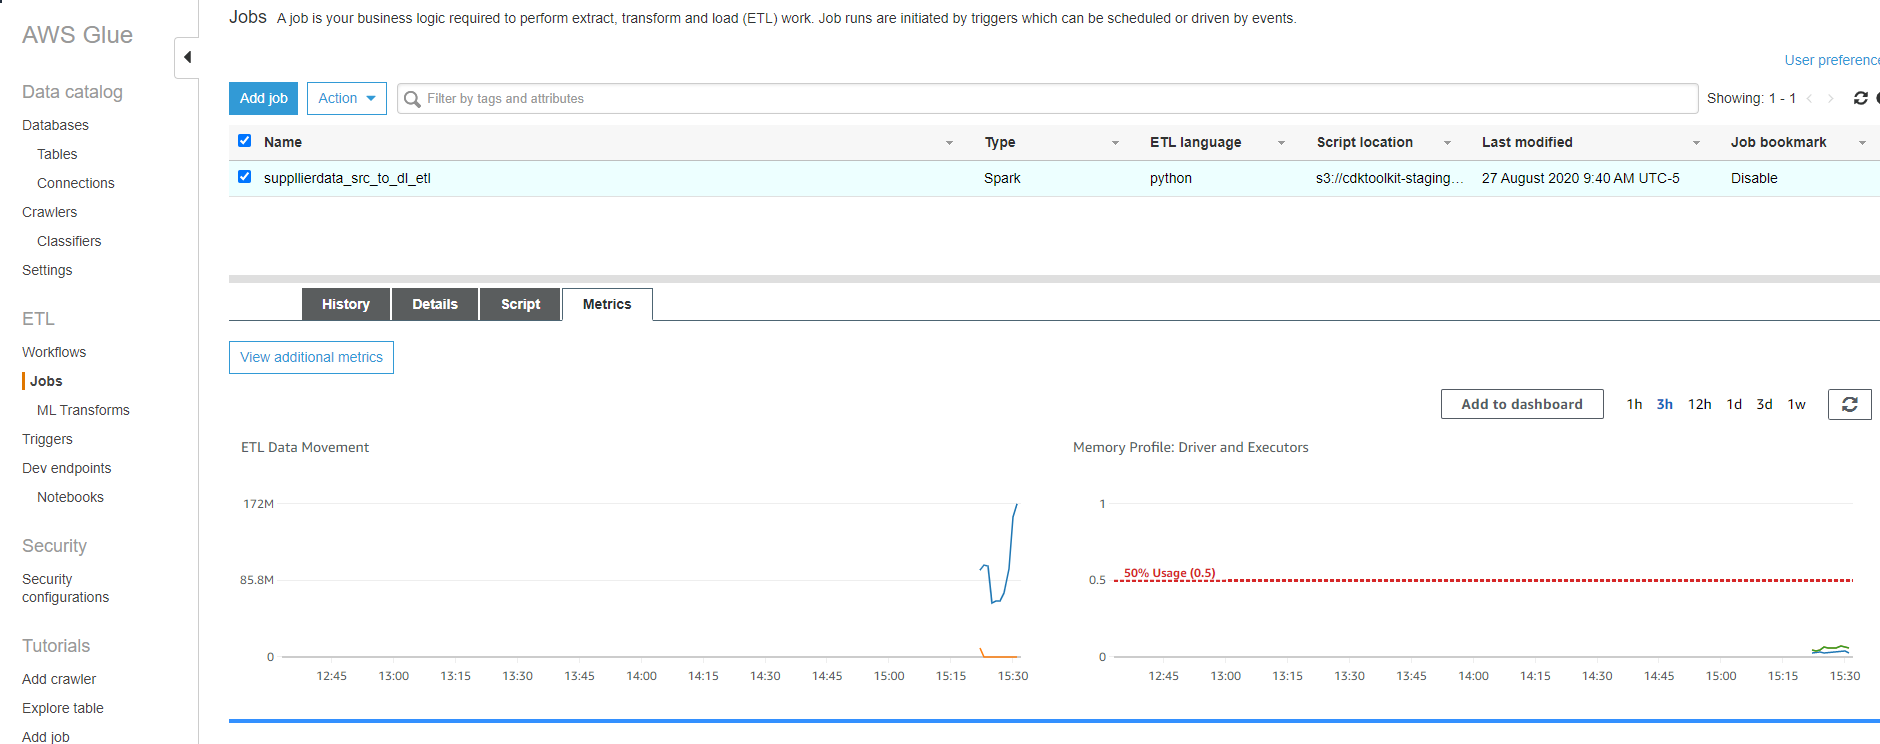
Once the source crawler is finished you can see the Job kicking off by visiting the 'Jobs' section in the glue console. Select the ETL job to see its history and real time metrics:
Query an Conquer!
Your data sets are now enrolled into the Data Lake. You can now provide a data access layer to your data lake through Amazon Athena, Amazon Redshift Spectrum, and Amazon EMR.
The easiest way to start querying your data is through Amazon Athena. To start go to Athena in the AWS Console.
If you haven't used Athena in your account before, you will need to define a storage location for your query results. Click on the ‘Settings’ tab in the top right and specify a bucket name where you would like Athena results stored and click save.

Now, click the ‘Databases’ dropdown. You will see 2 types of databases listed.
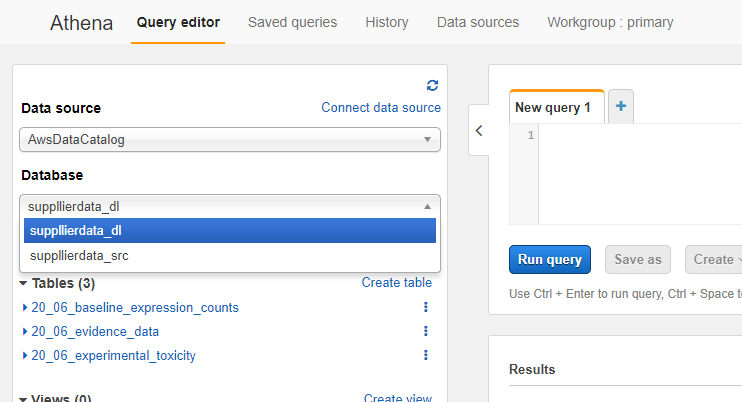
Databases that end in _src are the 'source' databases as they were first crawled. For the most part, you wont use the src tables. Databases that end in _dl are the 'data lake' databases that have been transformed by the Glue job and crawled on completion. You will almost always want to use the _dl tables as they have been optimized for performance and cost and have any transformations you have included in the Glue Job.
To start exploring your data, try clicking on one of the horizontal dot buttons next to a table and choose the 'Preview table' option. That will prepopulate select * on that table in the query editor and run it. You should see your data now!

The Athena SQL editor experience in the AWS console is handy for exploring the data, looking at table schemas, and testing queries. However, if you want to use your on BI tools or notebooks to query the data through Athena you have a few options:
- For BI/Visualization tools - Details on using JDBC/ODBC drivers with Athena.
- For Python Notebooks - PyAthena returns native Pandas objects for your preferred analysis, plotting, and visualization toolchain.
Permissions & Lake Formation
There are two methods of security that can apply to your data lake. The default account configuration, which is likely what you are using at the moment is "IAM Only Permissions". Essentially “open” Lake Formation permissions with “fine-grained” IAM polices that restrict access to S3 locations, Glue actions, etc.
IAM Only Permissions
The DataSetStack construct implements a number of CDK-style grant*() methods. The grantIamRead() method of the code grants a “fine-grained” IAM policy that gives users read access to just the tables in the data set you preform the grant on.
For example, in the bin/aws.ts file you can see an example of granting that “fine-grained” IAM read permission thats been commented out.
const exampleExistingIamUser = iam.User.fromUserName(coreDataLake, 'exampleUserGrantee', '--- EXISTING IAM USERNAME GOES HERE --' );
const exampleExistingIamRole = iam.Role.fromRoleArn(coreDataLake, 'exampleRoleGrantee', '--- EXISTING IAM ROLE ARN GOES HERE --' );

exampleS3DataSet.grantIamRead(exampleExistingIamUser);
exampleS3DataSet.grantIamRead(exampleExistingIamRole);
If you are fine simply granting read permissions to all tables and all columns in a data set. This is really as far as you need to go. If you need to be able to grant permissions to specific tables, specific columns, or manage grantors (permissions to give permissions) then you need Lake Formation.
Lake Formation Permissions + IAM Permissions
Lake Formation permissions gives you more granular control. Specifically, the ability to grant permissions at the database, table, and column level as well the ability to give others grant power to data sets. In the AWS documentation you may see this referred to as “fine-grained” Lake Formation permissions and “coarse” IAM permissions.
The grantDatabasePermissions(), grantTablePermissions(), and grantTableWithColumnPermissions() methods setup both the fine-grained LakeFormation and coarse IAM permissions for you.
Again, another example that has been commented out in the bin/aws.ts file:
var exampleGrant: DataLakeEnrollment.TablePermissionGrant = {
    tables: ["association_data", "evidence_data","target_list","disease_list"],
    DatabasePermissions: [DataLakeEnrollment.DatabasePermission.Alter, DataLakeEnrollment.DatabasePermission.CreateTable, DataLakeEnrollment.DatabasePermission.Drop],
    GrantableDatabasePermissions: [DataLakeEnrollment.DatabasePermission.Alter, DataLakeEnrollment.DatabasePermission.CreateTable, DataLakeEnrollment.DatabasePermission.Drop],
    TablePermissions: [DataLakeEnrollment.TablePermission.Select, DataLakeEnrollment.TablePermission.Insert, DataLakeEnrollment.TablePermission.Delete],
    GrantableTablePermissions: [DataLakeEnrollment.TablePermission.Select]
};

examplePgRdsDataSet.grantTablePermissions(exampleExistingIamUser, exampleGrant);
examplePgRdsDataSet.grantTablePermissions(exampleExistingIamRole, exampleGrant);
The GrantableDatabasePermissions, GrantableTableColumnPermissions, and GrantableTableColumnPermissions give the supplied IAM principal permissions to grant permissions others. If you have a steward for your data set, or someone who should have the authority to grant permissions to others, you can "grant the permission to grant" using those properties.
To illustrate the the relationship between the fine-grained and coarse permissions, think of it as two doors. An IAM principal needs to have permission to walk through both doors to query the data lake. The DataLakeEnrollment construct handles granting both the fine and coarse permissions for you.

'Turning on' Lake Formation
If you decide that you want the additional flexibility of Lake Formation permissions, you need to perform two manual actions before Lake Formation permissions will begin protecting your resources. Until you perform these two steps, you are only protecting your resources with the coarse IAM permission and the Lake Formation permissions wont apply.
Step 1) Change the default permissions for newly created databases and tables
Visit the Lake Formation service page in the AWS console, and go to the “Settings” section on the left.
You need to UNCHECK the two boxes and hit “Save”

Step 2) You need to revoke all of the Lake Formation permissions that have been granted to IAM_ALLOWED_PRINCIPALS.
If you have used Glue in the past or the ChEMBL or OpenTarget workflows have already completed you can see a bunch of them in the “Data Permissions” section in the Lake Formation console. By unchecking the boxes before, we are now stopping the default behavior where Lake Formation adds a IAM_ALLOWED_PRINCIPALS grant to any Glue Tables/Resources created.
Now that we have stopped that default-add IAM_ALLOWED_PRINCIPALS behavior, we need to back out any existing grants to IAM_ALLOWED_PRINCIPALS. As long as they remain, any IAM principal with coarse IAM permissions to the resource will still be able to query columns or tables they shouldn't have access to.
The local.datalake.RemoveIamAllowedPrincipals.py python script will save you the effort of manually revoking those permissions from IAM_ALLOWED_PRINCIPALS. Running the following command will issue the revokes for all IAM_ALLOWED_PRINCIPALS granted permissions.
python ./script/local.datalake.RemoveIamAllowedPrincipals.py
DONT RUN THIS COMMAND IF YOU HAVE PEOPLE ALREADY RELYING ON THE AWS GLUE CATALOG (via Athena for example). This will effectively remove their access until you grant them user/role/group specific Lake Formation permissions.
