Building A Complete Mobile App With Ionic Framework Save
JSConfUY 2015 Ionic workshop app. Ionic example conference app.
JSConfUY
View the complete tutorial in: https://ionicthemes.com/tutorials/about/building-a-complete-mobile-app-with-ionic-framework
Please support this project by simply putting a Github star ⭐. Share this library with friends on Twitter and everywhere else you can. 🙏
Notice: This is an Ionic v1 tutorial, if you are looking for an Ionic v3 tutorial please go to https://ionicthemes.com/tutorials/about/building-a-complete-mobile-app-with-ionic-3
In this workshop, we are going to go through the process of building a hybrid mobile app using Ionic Framework.
This repo will serve as a guide and in this README.md, you can find all the steps and instructions needed to build the app.
- Here you can find the slides of the presentation at the JSConfUY 2015
- Here you can find a hosted version of the app we are going to build
- You can also deploy your own copy of the app using this button:

- This is the ID (
7364750e) of the JSConfUY app on Ionic View. If you want to test the app in your device, you can follow these steps and get the app through Ionic View - If you are an Android user, you can download the
.apkhere
Notice:
- This is not a mobile web; after compiled, you will get a native app that uses web technologies (JS, CSS, HTML). The hosted example is just for you to see how the app is going to be, but remember that what you are going to see in the hosted version is a pre-build example of the app; all the interactions with native mobile APIs (inAppBrowser, Social Share, etc.) won't be available.
- Ionic View is meant to provide an easy way to share and try mobile apps built with Ionic. That said, there are some Cordova plugins that are not yet integrated in Ionic View. That may cause some functionalities to not work if you are trying the app on Ionic View.
- For a better experience, we recommend you download the app from the App Store or Google Play or to download the
.apkif you are an Android user. - For more information about using Heroku, check out https://devcenter.heroku.com/
Requirements
Are you using Windows? It is probable that you will get some errors when running npm install because your computer needs some other things to use npm. Stay calm, you are not alone! If that's the case, please look at these links to fix your issues and then continue with the rest of the installation process below.
Install Ionic
You can find the Ionic official installation documentation here.
- Make sure you have an up-to-date version of Node.js installed on your system. If you don't have Node.js installed, you can install it from here.
- Open a terminal (Mac) or a command interpreter (
cmd, Windows), and install Cordova and Ionic:-
npm install -g cordova -
npm install -g ionic -
npm install -g bower - On a Mac, you may have to use
sudodepending on your system configuration:sudo npm install -g cordova ionic
-
- If you already have Cordova and Ionic installed on your computer, make sure you update to the latest version:
-
npm update -g cordova -
npm update -g ionic -
npm update -g bower - Or
sudo npm update -g cordova ionic
-
Follow these links if you want more information:
Step 1 - Git & ionic start
This step corresponds with this slide of the presentation.
First we need to link this new Ionic project with our reference repo on github. Clone and checkout the initial commit (e37d84e) of this repo so we can start working on the app:
-
git clone https://github.com/startapplabs/jsconfuy.git -
cd jsconfuy -
git checkout e37d84e
After this, we need to set up some stuff before starting working on the Ionic project. To do so, run these commands:
-
npm install -
bower install -
ionic setup sass
Note: If you are starting a brand new project with Ionic, run these commands instead:
-
ionic start jsconfuy sidemenu -
cd jsconfuy -
ionic setup sass
Finally, to see the current state of the project, run:
-
ionic serve
If you followed the procedure above, after serving the app, you can see that the Ionic dev server is running on http://localhost:8100 and there, you will see one of Ionic's starter projects, which showcases an app with a side menu.

What we have learned so far:
- Bind the project to an existing Github repo
- Start and perform basic configurations for your Ionic project using the powerful Ionic CLI
- Serve and see your app running on Ionic dev server which includes:
- Live reload: every time you change a file, you will see the changes without refreshing
- Tasks and watchers: every time you change a file, Gulp tasks running on the background will perform certain procedures that will ease the development (for example sass compilation and minification)
Step 2 - Ionic templates & AngularJS navigation
This step corresponds with this slide of the presentation, and this commit (e8d787b) represents the starting point of this step. Please checkout this commit so we are all on the same page: git checkout e8d787b
In this step, we are going to remove all the example files that came with the Ionic starter project and add our own starter files.
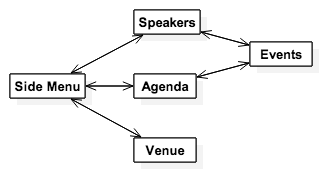
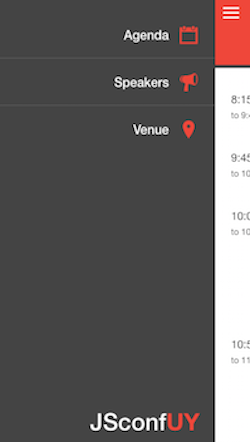
This app will have information about Uruguay's Javascript Conference 2015 (JSConfUY 2015). To serve that purpose, the content will be the following:
- 3 main views containing
- Speakers information
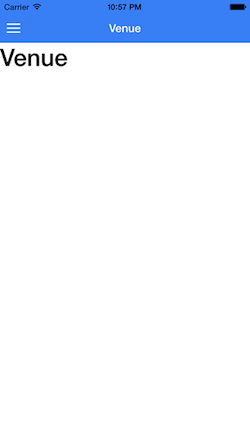
- Venue information
- Agenda information
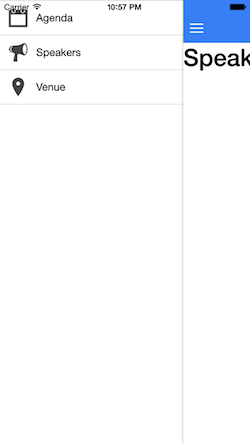
- 1 side menu for a clear navigation
- 1 sub view to show extended information of events such as keynotes, talks, workshops, coffee breaks, etc.
This image illustrates the navigation between views
To achieve this, we are going to:
- Add
www/templates/agenda.htmlwith basic agenda view layout - Add
www/templates/speakers.htmlwith basic speakers view layout - Add
www/templates/venue.htmlwith basic venue view layout - Add
www/templates/event.htmlwith basic event view layout - Update
www/templates/menu.htmlwith navigation layout to the other views - Update
www/js/app.jswith app's desired routing - Update
www/js/controllers.jswith a basic controller for each view
The final point of this step is this commit (296941e). Run git checkout 296941e and you will see the implementation of the instructions above.
Serve the app with ionic serve and look at the Ionic dev server running on http://localhost:8100. There you will see our JSConfUY app with the navigation DONE.


If you want to see more details of what we have done, take a look at this comparison between the initial commit (e8d787b) and the final commit (296941e) of this step.
What we have learned so far:
- Define custom routing for our app using AngularJS
ui-route - Change the layout of our views using HTML
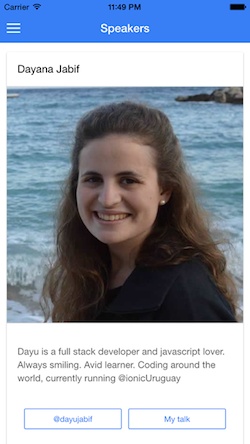
Step 3 - Speakers Layout
This step corresponds with this slide of the presentation, and this commit (296941e) represents the starting point of this step. Please checkout this commit so we are all on the same page: git checkout 296941e
In this step we are going to work on the layout of the speakers view. For this view, we need to:
- Show a list with all the speakers of the conference
- Show information about the speaker
- Provide a quick link to the speaker's talk
- Provide a link to the speaker's social profiles
Luckily, Ionic provides awesome components that will help us layout the content. Ionic avatar list or thumbnails list may be good options, but I think Ionic cards are the best choice for this view because we can fit all the information we have within one clean component.
The final point of this step is this commit (fb02948). Run git checkout fb02948 and you will see the implementation of the instructions above.
Serve the app with ionic serve and look at the Ionic dev server running on http://localhost:8100. There, you will see our JSConfUY app with the speakers view DONE.
If you want to see more details of what we have done, take a look at this comparison between the initial commit (296941e) and the final commit (fb02948) of this step.
What we have learned so far:
- Explore Ionic components
- Compose different components to get the UI we want
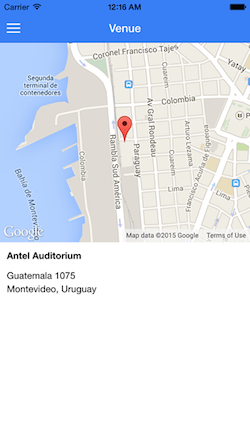
Step 4 - Venue Layout
This step corresponds with this slide of the presentation, and this commit (fb02948) represents the starting point of this step. Please checkout this commit so we are all on the same page: git checkout fb02948
In this step, we are going to work on the layout of the venue view. For this view, we need to:
- Show a map pointing the location of the venue
- Show information about the location of the venue
As we mentioned before, one of the reasons Ionic is awesome is because it's built using the web stack. In this case, that means that we don't have to reinvent the wheel for the map we need for this view. We can easily reuse any angular map directive and it will work like a charm.
Angularjs-Google-Maps will do the trick. We just need to add the dependency using bower:
-
bower install ngmap --save
The final point of this step is this commit (7bfcf29). Run git checkout -f 7bfcf29 and you will see the implementation of the instructions above.
Serve the app with ionic serve and look at the Ionic dev server running on http://localhost:8100. There, you will see our JSConfUY app with the venue view and its map DONE.
If you want to see more details of what we have done, take a look at this comparison between the initial commit (fb02948) and the final commit (7bfcf29) of this step.
What we have learned so far:
- Use the web stack to build mobile apps
- Reuse AngularJS directives in our app
Step 5 - Agenda Layout
This step corresponds with this slide of the presentation, and this commit (7bfcf29) represents the starting point of this step. Please checkout this commit so we are all on the same page: git checkout -f 7bfcf29
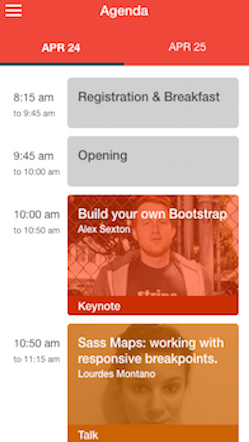
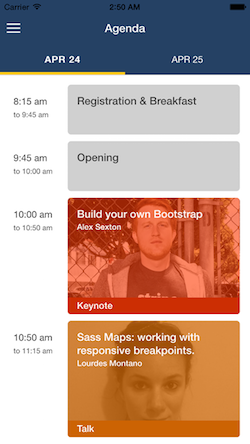
In this step we are going to work on the layout of the agenda view. For this view we need to:
- Show the schedule for both days of the conference
- Show information about each event
Again, Ionic has awesome components; in this case, tabs will work perfectly for displaying both days' schedule in a clean and organized manner.
The final point of this step is this commit (9d797d7). Run git checkout 9d797d7 and you will see the implementation of the instructions above.
Serve the app with ionic serve and look at the Ionic dev server running on http://localhost:8100. There, you will see our JSConfUY app with the agenda view and a tabs component showing both days' schedule.


If you want to see more details of what we have done, take a look at this comparison between the initial commit (7bfcf29) and the final commit (9d797d7) of this step.
What we have learned so far:
- Use advanced components such as tabs for our mobile app layout
Step 6 - AngularJS data access
This step corresponds with this slide of the presentation, and this commit (9d797d7) represents the starting point of this step. Please checkout this commit so we are all on the same page: git checkout 9d797d7
In this step, we are going to remove all hard coded data and replace it with data we get from our data source (in this case, a simple JSON). We are going to:
- Define the structure and set all the data of the agenda.json data source
- Define the structure and set all the data of the speakers.json data source
- Grab images and resources from jsconf.uy website so we have rich content for our app
- Add
www/js/services.jsto get data from JSON data sources using AngularJS $http service - Add
www/js/filters.jsto display raw html - Add
www/js/directives.jsto use directive templates for agenda events - Update
www/js/controllers.jsto use the AngularJS services we defined inwww/js/services.js
In this step, we are using all the power of AngularJS controllers, directives, services, and filters to give real value to our app.
We are going to use underscore.js to ease our work; we just need to add the dependency using bower:
-
bower install underscore --save
Now we have an app that gets data from a data source and displays it dynamically to the users. In this case, we are using two JSON files as data sources, but you could easily use any other backend. The way many apps communicate with backend is through an API.
Having that in mind, in my opinion, you have three alternatives here:
- You can use almighty WordPress as your backend
- WordPress is very flexible and you can use it in many ways, as a blog, a cms, or ecommerce (using woocommerce, for example), etc. Also, there are tons of plugins that will help you add different functionalities.
- You can easily access your WordPress content through its JSON API.
- This is a fast and general solution, so depending on what you are planning to build, you may need something more powerful and custom.
- Use Parse or Firebase (both “backend as a service”)
- If you are one of those who like to have strict control over the backend implementation, I suggest you to try Strongloop.
- Strongloop is a perfect solution if you need full control and custom functionalities on your backend. Basically, it is a platform that enables you to easily (I would say VERY easily) build custom API’s for your backend needs. (This is the solution I use for my clients' production apps).
The final point of this step is this commit (14dd74a). Run git checkout 14dd74a and you will see the implementation of the instructions above.
Serve the app with ionic serve and look at the Ionic dev server running on http://localhost:8100. There, you will see our JSConfUY app with real data for the event.


If you want to see more details of what we have done, take a look at this comparison between the initial commit (9d797d7) and the final commit (14dd74a) of this step.
What we have learned so far:
- Reuse what we already know from AngularJS (controllers, services, directives, filters) in our Ionic app
- Get data from different data sources
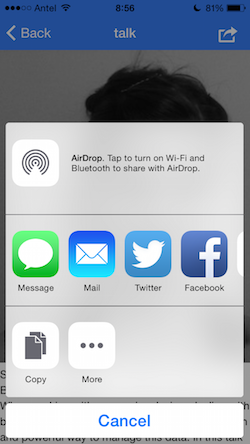
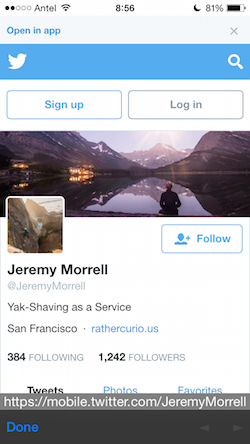
Step 7 - Cordova plugins + Ionic UX
This step corresponds with this slide of the presentation, and this commit (14dd74a) represents the starting point of this step. Please checkout this commit so we are all on the same page: git checkout 14dd74a
In this step, we are going to integrate some mobile native functionality using Cordova plugins and some Ionic UX components that will improve our app. We are going to:
- Add Cordova social sharing plugin to easily share talks with your friends
- Add Cordova inAppBrowser plugin to open social profiles of speakers
- Add Ionic loader
- Add Ionic slide box for speaker images
These are part of the so-called "ionic superpowers". Using Ionic to develop hybrid apps gives you the advantage of accessing the native API’s of devices, including the geolocation, social sharing, inAppBrowser, device camera, touchID, push notification, and so on. When developing an Ionic app, you can have several device API’s integrated using ngCordova or other Cordova plugins. That’s the difference between mobile web and hybrid apps.
To install these plugins, you just need to run:
-
cordova plugin add https://github.com/EddyVerbruggen/SocialSharing-PhoneGap-Plugin.git -
cordova plugin add org.apache.cordova.inappbrowser
The final point of this step is this commit (73cec82). Run git checkout 73cec82 and you will see the implementation of the instructions above.
Serve the app with ionic serve and look at the Ionic dev server running on http://localhost:8100. There, you will see our JSConfUY app with the Ionic loader and slide box integrated but as you are accessing the app through the browser, you won't see either the social sharing plugin or the inAppBroswer plugin. You will need to install and test the app in your phone to see those in action.
If you want to see more details of what we have done, take a look at this comparison between the initial commit (14dd74a) and the final commit (73cec82) of this step.
What we have learned so far:
- Give superpowers to your app using Cordova plugins
- Give a more polished look to your app using Ionic UX components
Step 8 - Sass
This step corresponds with this slide of the presentation, and this commit (73cec82) represents the starting point of this step. Please checkout this commit so we are all on the same page: git checkout 73cec82
In this step, we are going to take care of the app styles using CSS with the help of Sass. We are going to:
- Use Sass mixins
- Define and use Sass variables for fast customization
Mixins will ease our styles development by helping us with prefixing vendor properties, defining functions, etc., which will help us reuse our styles across the app.
This is the structure of the mixins we are going to use:
@mixin cssCalc($property, $expression) {
  #{$property}: calc(#{$expression});
}

@mixin flexbox() {
  display: -webkit-box;
  display: -moz-box;
  display: -ms-flexbox;
  display: -webkit-flex;
  display: flex;
}

@mixin flex-wrap($value) {
  flex-wrap: $value;
  -webkit-flex-wrap: $value;
}
Other awesome features are Sass variables. These will enable us to reuse variables across our style sheets. This is particularly useful, for example, when defining colors that will be spread across the app.
Here, you can see the variables we defined for our app, and how easily we can change those and immediately change the UI color scheme of the whole app.
$content-bg: #EAEAEA;
$content-color: #444444;

$top-bar-bg: #254164;
$top-bar-color: #FFFFFF;

$loading-color: #FFFFFF;

$main-menu-bg: #FFC900;
$main-menu-color: #FFFFFF;

$loading-color: #FFFFFF;

$speaker-actions-bg: #FFFFFF;

$workshop-bg-color: #00B454;
$talk-bg-color: #FF7C00;
$keynote-bg-color: #FF3900;
$global-bg-color: #DDDDDD;
$event-color: #FFFFFF;

$get-directions-btn-bg: #419e61;
$get-directions-btn-color: #FFFFFF;
The final point of this step is this commit (6eaea0f). Run git checkout 6eaea0f and you will see the implementation of the instructions above.
Serve the app with ionic serve and look at the Ionic dev server running on http://localhost:8100. There, you will see our JSConfUY finished with a professional and polished look.


If you want to see more details of what we have done, take a look at this comparison between the initial commit (73cec82) and the final commit (6eaea0f) of this step.
What we have learned so far:
- Give a professional and polished look to our app
- Use some of the cool features of Sass (mixins, variables, etc.)
Common Issues
Errors when running npm install on Windows
Please make sure you have node version 0.10.36
You should fix your errors by reading these links:
