Binner Save
Open source parts inventory system for makers, electronics hobby, and professional engineers
Binner


Binner is a free open-source parts inventory tracking system you can run locally in Windows or Unix environments. It was created for makers (like myself), hobbyists or professionals to keep track of your parts inventory.
Screenshots
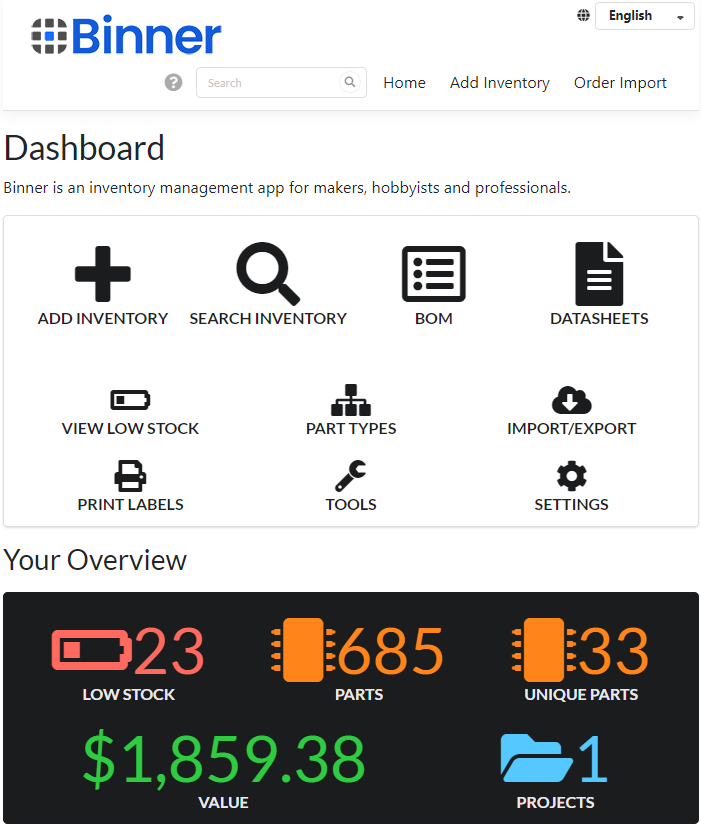
Features
- Standard inventory management input
- Import your orders from Digikey, Mouser, Arrow, or ~AliExpress~
- Customizable nested category placement
- Track parts by Project
- Automated datasheet retrieval / Datasheet search
- Automated part lookup on Digikey/Mouser/Arrow/Octopart/Nexar/TME
- Flexible search engine
- Export your data to CSV / Excel if you need
- Proprietary file-based database (or use providers for other formats such as SQL Server)
- No web server installation required, uses standalone Kestrel service API
- Based on .Net - runs on Windows, Unix and embedded devices like Raspberry PI
- Simple web-based UI
- Barcoding support
- Label printing
Planned Upcoming Features for 2024
- Dedicated datasheet repository (Q1)
- Schematics repository for example circuits per part (Q1)
- Local upload of datasheets/images
- Integration of Arrow's API for orders and parts (Q1)
- Multiple language support (Q1)
- Auto update (Q1)
- Full BOM / PCB management (Q1)
- TME parts api support
- Electronic bins support (Q2)
- Maybe a parts marketplace? with lasers?
Installation
Binner is a cross-platform distribution and runs on Windows, Raspberry Pi OS, Ubuntu and more!
Installation on Windows
Download the Windows installer from the latest release .
Binner can be run as a standalone console application, or as a service.
To run as a service, run the following in an Administrative console:
.\Binner.Web install
.\Binner.Web start
Other commands are available to manage the service such as uninstall, stop, help.
To run as a console application:
.\Binner.Web.exe
Proceed to the web interface at https://localhost:8090 to start using Binner!
Login
The first time you login you will be prompted for a username and password. The default credentials are:
Username: admin
Password: admin
Installation on Ubuntu
Download the ubuntu.14.04-x64.tar.gz from the latest release .
// extract the archive
tar zxfp ./Binner_ubuntu.14.04-x64-VERSION.tar.gz

// to install as a service
sudo chmod +x ./install-as-service.sh
sudo ./install-as-service.sh

// or you can just run directly
sudo chmod +x ./Binner.Web
./Binner.Web
Installation on Raspberry Pi OS
Download the linux-arm.tar.gz from the latest release .
// extract the archive
tar zxfp Binner_linux-arm-VERSION.tar.gz

// to install as a service
sudo chmod +x ./install-as-service.sh
sudo ./install-as-service.sh

// or you can just run directly
sudo chmod +x ./Binner.Web
./Binner.Web
See the Wiki for help installing on other platforms.
Description
Binner is designed for electronics in mind, however it could be used for other types of inventory management (chemistry, retail). It is purpose built for quick data entry and fast performance. I built it because I couldn't find good free alternatives for tracking inventory in my home maker lab - it's easy to forget what you bought and where you put them and I end up sometimes ordering things I already have around. Saves money and time! It's built on .Net Core / C# with a React js front end.
I welcome all who want to contribute to this project, and please suggest features in the Issues section.
What if I want to use it but not to install it myself?
A free online version of Binner is available at Binner.io. This service offers both free and paid subscriptions based on inventory size requirements and additional features. Compared to other options out there it's incredibly useful for makers, and it helps me keep this project alive!
Getting Help
Help with your installation, questions, reporting bugs, suggesting features can be provided in multiple ways:
- If you simply have a question or need help with installation issues, you have 2 options:
- create a post in Discussions
- join our Discord server for a more real-time response
- If you are reporting a bug or suggesting a feature, create a New Issue
Storage Provider
Binner supports multiple storage providers. If your needs are simple, you can continue to use the built-in Binner storage provider which is configured by default. Alternatively, you can specify to use any of the following supported storage providers:
- Binner
- SqlServer
- Postgresql
- MySql
- Sqlite
Configuring Binner Provider (default)
In appsettings.json under StorageProviderConfiguration set the Provider to Binner and under ProviderConfiguration specify the database file location as "Filename": "C:\\Binner\\binner.db" or the location of your choice. It should look like the following:
"StorageProviderConfiguration": {
    "Provider": "Binner",
    "ProviderConfiguration": {
      "Filename": "C:\\Binner\\binner.db" // for unix environments use: "./binner.db"
    }
  },
Configuring SQL Server
In appsettings.json under StorageProviderConfiguration set the Provider to SqlServer. Example:
"StorageProviderConfiguration": {
    "Provider": "SqlServer",
    "ProviderConfiguration": {
      "ConnectionString": "Server=localhost;Database=Binner;Trusted_Connection=True;TrustServerCertificate=True;Integrated Security=True;"
    }
  },
Configuring Postgresql
In appsettings.json under StorageProviderConfiguration set the Provider to Postgresql. Example:
"StorageProviderConfiguration": {
    "Provider": "Postgresql",
    "ProviderConfiguration": {
      "ConnectionString": "Server=localhost;Port=5432;Database=Binner;Userid=postgres;Password=password;SslMode=Disable;Persist Security Info=true;"
    }
  },
Configuring MySql / MariaDb
In appsettings.json under StorageProviderConfiguration set the Provider to MySql. Example:
"StorageProviderConfiguration": {
    "Provider": "MySql",
    "ProviderConfiguration": {
      "ConnectionString": "Server=localhost;Database=Binner;Uid=root;Pwd=password;"
    }
  },
Configuring Sqlite
In appsettings.json under StorageProviderConfiguration set the Provider to Sqlite. Example:
"StorageProviderConfiguration": {
    "Provider": "Sqlite",
    "ProviderConfiguration": {
      "ConnectionString": "Server=localhost;Database=Binner;Uid=root;Pwd=password;"
    }
  },
Integrations
Currently supports Digikey, Mouser, Octopart and ~AliExpress~. For standalone installations, you will need to obtain your own API keys to enable these features. It's easy to obtain them but be aware Octopart is not free so you may want to avoid using it.
Integrations enable features such as automatic part metadata lookup, datasheet retrieval and automatic importing parts from your orders. To get the best out of Binner, it is a good idea to sign up for Digikey and Mouser API keys at a minimum however they are not required.
Configuring DigiKey API
Visit https://developer.digikey.com/ and sign up for a free developer account. You will be asked to create an App which will come with a ClientId and ClientSecret and needs to be set in the appsettings.json under the DigiKey configuration section.
Creating an App
-
The API uses oAuth with postbacks so they will want you to provide an
OAuth Callback. This can be safely set tohttps://localhost:8090/Authorization/Authorize. If you are not familiar with oAuth, Digikey will call this URL when you successfully authenticate with DigiKey. It is not called by their servers, but rather by the web UI so it does not need to resolve to an external IP. It does need to be set exactly the same in Binner'soAuthPostbackUrlinappsettings.jsonotherwise the API calls will not work, as this value must match on both ends. -
You will want to enable API access for the
Product InformationandOrder SupportAPIs.
Sandbox
If you wish to use the DigiKey sandbox rather than their production API, you can specify the ApiUrl to use https://sandbox-api.digikey.com. Otherwise, you can leave it set to https://api.digikey.com
Configuring Mouser API
Visit https://www.mouser.com/api-hub/ and sign up for a free developer account. Mouser requires you to sign up for each API product you wish to use. Currently, Binner supports both the Search API and Order API so sign up for those two APIs separately. Once you have an API key for each, set those in the appsettings.json under the Mouser configuration section.
Configuring Octopart/Nexar API
Visit https://portal.nexar.com/sign-up and sign up for an account. Plug in your ClientId & ClientSecret in the appsettings.json in the Octopart section. Please note that Octopart/Nexar API is not free to use so you may opt to skip this one.
Configuring Arrow API
Visit https://developers.arrow.com/api/index.php/site/page?view=requestAPIKey and request an API Key. If you wish to import Arrow orders you will need to know your Arrow account details as well. Once you have an API key, set those in the appsettings.json under the Arrow configuration section.
Configuring TME API
Visit https://developers.tme.eu/login and sign up for a free account. TME works with either an anonymous key, or a private key so it doesn't matter which you choose to go with unless you have special pricing available to you. Currently, Binner supports the Products API but will look at adding Order import support when TME offers this option. Once you have your anonymous and secret API keys, set those in the appsettings.json under the Tme configuration section.
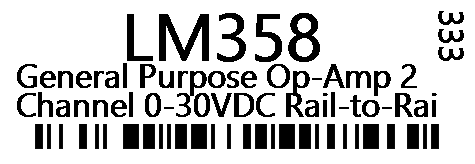
Label printing
Binner currently has label printing support. It works best with a Dymo LabelWriter 450 series printer (Turbo dual label is supported too), model 30346 or 30277 labels. If desired additional label sizes and other printers can be easily added. Label design can be customized with different types of barcodes and information.
Label Example