Atmega Save
Bare ATmega 8/168/328 microcontrollers with the Arduino IDE.
About
With these configuration files you can program bare ATmega microcontrollers from the Arduino IDE, without using the Arduino bootloader. It supports chips using external or internal clocks.
Skipping the Arduino bootloader means sketches start immediately after power-on, without any delay, and you have a little extra flash memory available to your programs. Using the (optional) slower internal clock options means you can save on components, but also on power (since a slower chip draws less current).
Supported Chips and Clocks
- ATmega8/168: The chips used in early arduino boards (e.g. Arduino NG, Arduino Diecimila).
- ATmega328p: The chips used in recent arduino boards (eg. Arduino Duemilanove, Arduino UNO).
- ATmega168p/328: Different but functionally equivalent to the above. People sometimes buy these by mistake.
The core delay() function is not very precise for clock rates other than external 8 and 16MHz. The internal clock should provide enough precision for most cases but external 12 and 20 MHz are useful only if your code does not depend on precision timing.
Install
Open the Arduino IDE preferences window and add the following URL to the Additional Boards Manager URLs list:
Now go to Tools > Board > Boards Manager and search for Barebones ATmega Chips. Select it from the list and click Install. A new section called ATmega Microcontrollers will immediately appear in the Tools > Board menu.
Alternatively you can create an <Arduino Sketckbook Folder>/hardware directory and git clone this repository inside it. The Arduino IDE must be restarted for this to take effect.
Programming
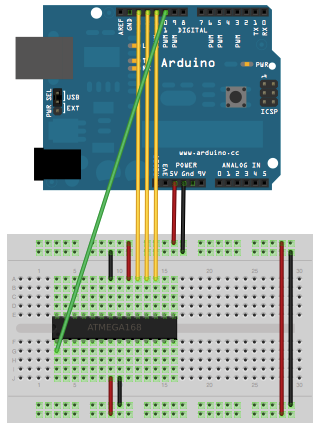
To program the microcontroller you will need an ISP programmer. An Arduino as ISP works just fine (don't forget to put a 10uF capacitor between the Arduino's RESET pin and GND if your're using an Arduino UNO):
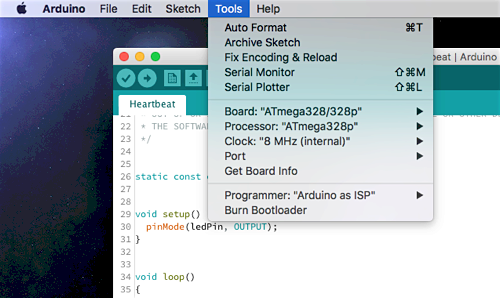
Choose your ISP programmer in the Tools > Programmer menu. Then choose your ATmega microcontroller family from Tools > Board, the specific chip you have from Tools > Processor and your choice of clock frequency and source from Tools > Clock.
To set the ATmega configuration fuses, use the Tools > Burn Bootloader menu item. This doesn't actually burn an Arduino bootloader onto the chip, it only sets the chip configuration for the chosen clock settings.
Note: If you're seeing weird behavior, like things not running at the speed you're expecting, check if you're updated the chip configuration with "Burn Bootloader". The configuration isn't updated automatically when you upload a sketch to the chip.
To load programs into the microcontroller, use the Upload button as usual. You can also use the Sketch > Upload with Programmer menu entry. Both will make the IDE upload the code using the selected ISP programmer.
Pin Mapping
The ATmega168/328 families have identical pin configurations. Check this diagram for their correspondence to Arduino pin numbering:
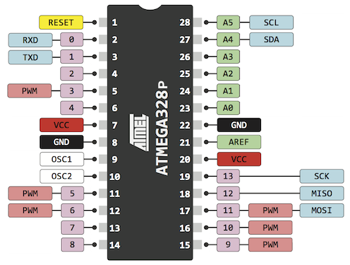
The pin layout for the ATmega8 is also identical to these, but additional functions may be missing (eg. PWM on the left-side pins).
Tips and Caveats
If you're using an ATmega chip that already has the Arduino bootloader inside or has otherwise been configured to require an external clock source, you may get an avrdude: Yikes! Invalid device signature. error. In this case, connect an appropriate external clock source to it (most likely 16 MHz) and try again. Once the ATmega has been configured to use its internal clock source, you can remove the external one and the error shouldn't happen again.
You may also get this error if you're using an Arduino UNO as an ISP programmer and you forget to put a 10uF capacitor between its RESET and GND pins to prevent it from resetting on upload.
