ASP.NET Core CMS Save
The world’s first ASP.NET Core CMS
Shree RAM CMS - the world's first ASP.NET Core CMS
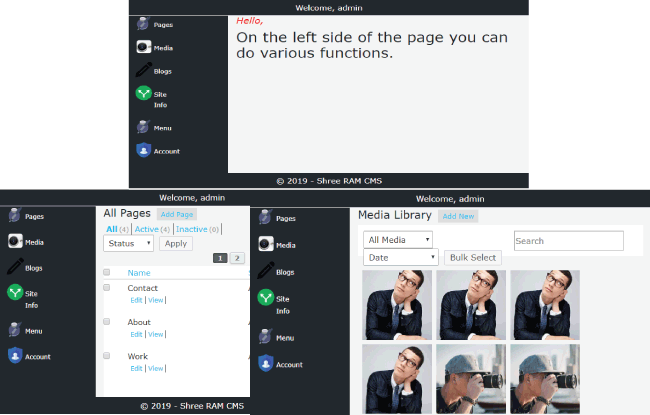
This is an Open-Source Content Management System(CMS) developed with ASP.NET Core framework by Microsoft. Use it to create any type of Responsive websites with unlimited pages and unlimited blogs.
This CMS works like WordPress CMS and you will like it.
Programming Language, Web Technologies, Frameworks and Scripts used to Build this CMS.
I have build this CMS using the following:
- ASP.NET Core 5.0
- C#
- Bootstrap 4
- SQL Server
- ASP.NET Core Identity
- Entity Framework Core 5.0
Installation
Download the CMS files in your system and click the .sln file to open it with Visual Studio 2019 or newer version.
- I have also created a Youtube video for the installation of this CMS, you will find it very useful.
- Also check the working tutorial of this CMS Youtube video for the working of this CMS.
You need to follow the following Steps:
Step 1: Change connection string
Then open the appsettings.json file given in the root of the CMS and change the connection string to your database. By default it is:
{ "ConnectionStrings": { "DefaultConnection": "Server=vaio;Database=CMSCore;Trusted_Connection=True;", "IdentityConnection": "Server=vaio;Database=CMSCoreIdentity;Trusted_Connection=True;" } }
To run this CMS you will need 2 databases. One that will store pages, blogs, images, etc. The other one will be used by Identity Management to do authentication and authorization of Admin User.
You don't have to learn Identity for using this CMS but if you still like then visit How to Setup and Configure Identity Membership System in ASP.NET Core
Step 2: Run EF Core Migration commands
The EF Core Migrations commands will create both the databases for this CMS.
Open Package Manage Console and go to the directory of the Startup.cs class:
PM> cd CMS
Then run these 4 commands one by one:
PM> dotnet ef migrations add Migration1 --context AppIdentityDbContext
PM> dotnet ef database update --context AppIdentityDbContext
PM> dotnet ef migrations add Migration2 --context CMSContext
PM> dotnet ef database update --context CMSContext
Step 3: Create the SQL Stored Procedures and SQL Functions
I have placed a file called script.sql on this repository. You run this script in your SQL Server Management Studio on the CMS database (not on Identiy Database). This script will add all the SQL SPs and SQL Functions.
Step 4: Create ADMIN User
The ADMIN user should be created in the Identity Database and this user will access the CMS to add, update, delte the pages, blogs, media, menus, etc.
Run your application in Visual Studio (shortcut F5 key) and then open the below URL in your browser to create the Admin user:
https://localhost:44375/Login/Create
Change port 60905 to the one your VS has set for this CMS. If you are running this CMS online in a domain then URL will be:
https://yourdomain.com/Login/Create
By default the Admin user will be created with the following Credentials:
Username - admin
password - Secret123$
Step 5: Login to CMS using Admin URL
The login URL of the CMS is:
https://localhost:44375/Login
Login with the following Credentials:
Username - admin
password - Secret123$
Step 6: Create Demo Data
You need to add one page and one menu in the CMS for the website to start displaying.
a. Add Page
After loggin to the CMS go to Page > Add Page and create a new page called 'Home'. Add it's name as 'Home', url as 'Home' and inside the description add the HTML for the home page of your site.
b. Add Menu
In the CMS go to Page > Add Menu. There are 2 sets of textboxes, on on the right side and other on the bottom.
On the right side text boxes you add menu items. So add 'Home' for name field and 'home' for slug field.
On the bottom text boxes you give the menu name. So add 'Main' for name and select 'Active' for status.
Finally Click the submit button at the bottom.
You can now View the website by running this URL in your browser:
https://localhost:44375
Demo Data by running SQL Script
You can ignore step 6 completely and just run the data.sql file (provided in this repository) in your SQL Server Management Studio on the CMS database (not on Identiy Database). This script file will add all your DEMO data.
Support
If you find it useful then support this Project. Thank you.


You will love the 'Sree RAM' CMS made in ASP.NET Core framework. Star this Repository to show your support.
Please use the GitHub issue tracker to ask questions.
