Arduino Sainsmart Save
Arduino software to control SainsSmart 6-axis palletizing robot arm
arduino-sainsmart 
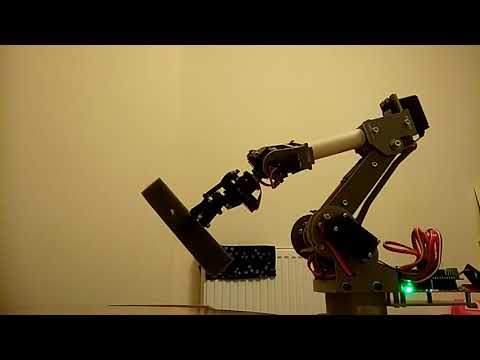
Arduino software to steer the SainSmart DIY 6-axis palletizing robot arm and Sunfounder Rollpaw gripper.

The software uses smooth sin²(t) (where t is the time) speed profiles to drive the robot joints. At any time the sum of up to two speed profiles is output to the drives. Using sin²(t)+cos²(t)=1 one can achieve constant motion. The plot shows jerk (blue), acceleration (red), speed (green), and position (magenta).

equipment


Altogether the equipment cost is about 200£. Furthermore you need a PC with a USB port.
software build
First install the dependencies. Please refer to the file .travis.yml for more information.
Create the initial calibration file with the limits and offsets of each servo:
cp calibration.hh.default calibration.hh
Then build the Arduino program using make:
make
Note: You might have to change the BOARD_TAG in the arduino/Makefile. See /usr/share/arduino/hardware/arduino/boards.txt for supported board tags.
software test
You can also build and run the tests on the PC using the check target:
make check
install on Arduino
The upload target will upload the program via /dev/ttyUSB0 to the Arduino board.
make upload
Warning: program the board before connecting the servos the first time to prevent erratic motion!
Warning: once servos are plugged into the board, always connect the servo power to the DFRobot I/O expansion shield before connecting the USB cable to the Arduino to prevent the board power from stalling which causes erratic motion!
Warning: self-collisions or collisions with the surface and other objects can damage the servos!
You can then adjust the limits and offsets for your robot and then compile and upload the modified software.
control robot
You can control the robot using the screen serial terminal (make sure ttyUSB0 is the correct port):
screen /dev/ttyUSB0 115200
Examples of servo commands are:
- o: check whether drives are ready to receive more commands (1=ready, 0=busy)
- t: get time
- b: get base servo angle
- s: get shoulder servo angle
- e: get elbow servo angle
- r: get roll servo angle
- p: get pitch servo angle
- w: get wrist servo angle
- g: get gripper servo angle
- B: get base servo pulse width
- S: get shoulder servo pulse width
- E: get elbow servo pulse width
- R: get roll servo pulse width
- P: get pitch servo pulse width
- W: get wrist servo pulse width
- G: get gripper servo pulse width
- c: get current configuration (base, shoulder, elbow, roll, pitch, and wrist)
- l: get lower limits for servos
- u: get upper limits for servos
- 45b: set base servo angle to 45 degrees
- -12.5s: set shoulder servo angle to -12.5 degrees
- 10e: set elbow servo angle to 10 degrees
- 20r: set roll servo angle to 20 degrees
- 30p: set pitch servo angle to 30 degrees
- 40w: set wrist servo angle to 40 degrees
- 0g: set gripper servo angle to 0 degrees
- 2400B: set base servo pulse width to 2400
- 1500S: set shoulder servo pulse width to 1500
- 720E: set elbow servo pulse width to 720
- 1500R: set roll servo pulse width to 1500
- 1500P: set pitch servo pulse width to 1500
- 1500W: set wrist servo pulse width to 1500
- 2000G: set gripper servo pulse width to 2000
- 1 2 3 4 5 6c: set configuration (base, shoulder, elbow, roll, pitch, and wrist) to 1, 2, 3, 4, 5, and 6 degrees
- 1 2 3 4 5 6t: time required to reach the specified configuration
- T: report time required to finish current motion
- ma: save teach point a (there are 12 teach points from a to l)
- 'a: go to teach point a
- da: display configuration of teach point a
- x: stop all servos (in fact any undefined key should do)
You can exit the screen terminal using Ctrl-A \.
Warning: self-collisions of the robot can damage the servos!
XBox controller
You can control the robot using a calibrated XBox controller.
ruby control.rb
Note that for some reason you sometimes need to run the serial terminal first, press t a few times, and then exit for the Arduino to wake up.

External links
- Sainsmart DIY 6-axis palletizing robot arm (also see Sainsmart Wiki)
- Sunfounder Standard Gripper Kit Rollpaw for Robotic Arm (gripper installation instructions)
- Redboard (Arduino compatible board)
- DFRobot IO expansion shield for Arduino (manual)
- 6V DC/3A power supply
- 2.1 x 5.5mm DC Socket
- Sparkfun USB Mini-B cable
- Towerpro MG996R servo (comes with Sainsmart robot)
- Towerpro SG90 9g servo (comes with Sainsmart robot; servo shaft not compatible with Sunfounder Rollpaw servos!)
- 22 AWG RC JR Servo Straight Extension Wire 150mm
- Arduino multitasking part 1, part 2, part 3
- How to run test headlessly with Xvfb
