Android Things Workshop Save
AKA the connected catapult!
Hands-on Lab Android Things
This codelab will introduce you to the key concepts to creating your own IoT devices using the Android Things platform. By the end of the codelab, you will build your first connected catapult and control it wirelessly.
Do no harm! We know how tempting it could be, but don't try to hurt other members of the codelab with your catapult. It would only bring you trouble (hint: they may retaliate with a more powerful one).
Authors
This workshop has been prepared and is maintained by Gautier Mechling, Romain Ménétrier and Eyal Lezmy.
Setup
Clone the project, import it to Android Studio, and build it.
git clone https://github.com/eyal-lezmy/android-things-workshop.git
Import the project
- Start Android Studio
- Select "Open an existing Android Studio project"
- Open the project directory
- Double click on the
build.gradlefile in the android-things-workshop directory - Click OK on the "Import Project from Gradle" screen without making changes
Please note that Android Studio might take several seconds to compile the project in the background for the first time. During this time you will see a spinner in the bottom status bar.
We recommend that you wait until this has finished before making code changes. This will allow Android Studio to pull in all the necessary components.
Understand the sample project
This project is composed of a single Java file: MainActivity.java. This file contains 2 methods:
-
onCreateis where you will instantiate your variables, and where you can call some methods to access IOs. -
onDestroyis where you can free / close your IO resources
Methods that deal with IO may throw an IOException. You will have to catch this checked exception, both in the onCreate and onDestroy:
try {
  // access IOs here
} catch (IOException e) {
  Log.e(TAG, "IO issue", e);
}
How to get started with Android Things from scratch?
To save you some time, we have already prepared a sample project, flashed Android Things on Raspberry Pi boards, and set up the Wi-Fi.
If you want to repeat this at home, here is what we did:
- Download and flash Android Things on the Raspberry Pi 3
- Use Android Studio (3 or above) to create a new Android Things project
- Add dependencies in the
build.gradlefile
That's all!
We've also built a paper catapult for you. How-to video here.
Hardware
Discovering the Raspberry Pi
The following pinout diagram illustrates the locations of the available ports exposed by the breakout connectors of the Raspberry Pi:
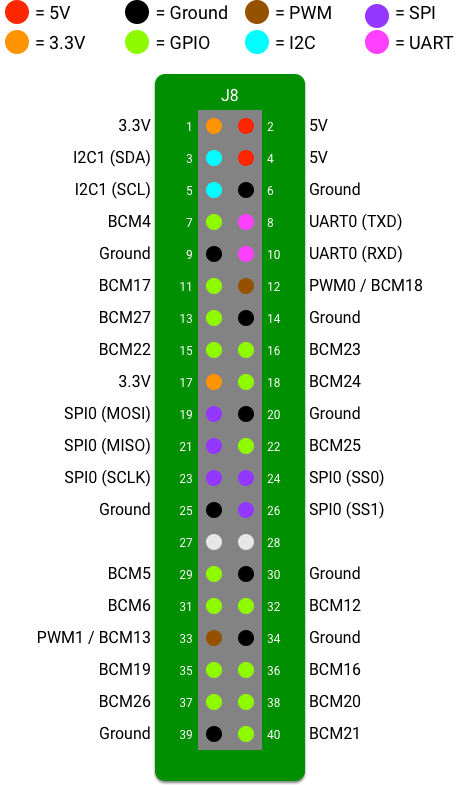
As you can see, with the Raspberry Pi 3, you cannot connect more than 2 PWM devices. The Raspberry Pi also has 1 port to connect I²C, SPI and UART devices.
Each of these interfaces has a name (e.g.: "BCM4", "UART0", "PWM0"). When you connect a component (e.g. an LED) to the board, you will need to know the name of the connector to communicate with the component.
Discovering the Rainbow HAT
The Rainbow HAT is a board that features sensors, inputs, and displays you can directly plug onto the Raspberry Pi.
It makes it easy to get started with Android Things, skipping the (fun, but time consuming) components wiring part.
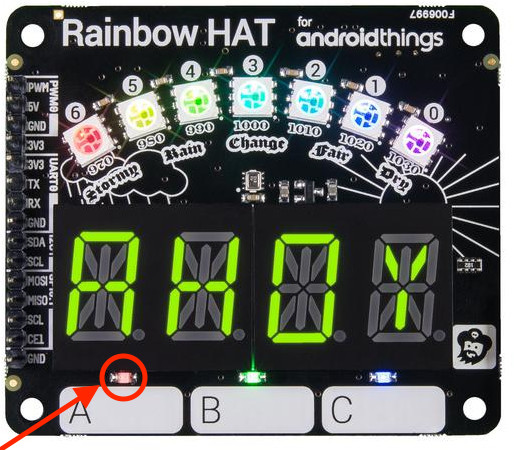
Here is a list of the different Rainbow HAT components, and their associated connector names:
- Red LED: "BCM6"
- Green LED: "BCM19"
- Blue LED: "BCM26"
- Button A: "BCM21"
- Button B: "BCM20"
- Button C: "BCM16"
- Piezo buzzer: "PWM1"
- Segment display: "I2C1"
- LED strip: "SPI0.0"
- Temperature Sensor: "I2C1"
- Additional PWM: "PWM0"
This information will be useful later on, when we ask you to manipulate some specific components.
Servo motor
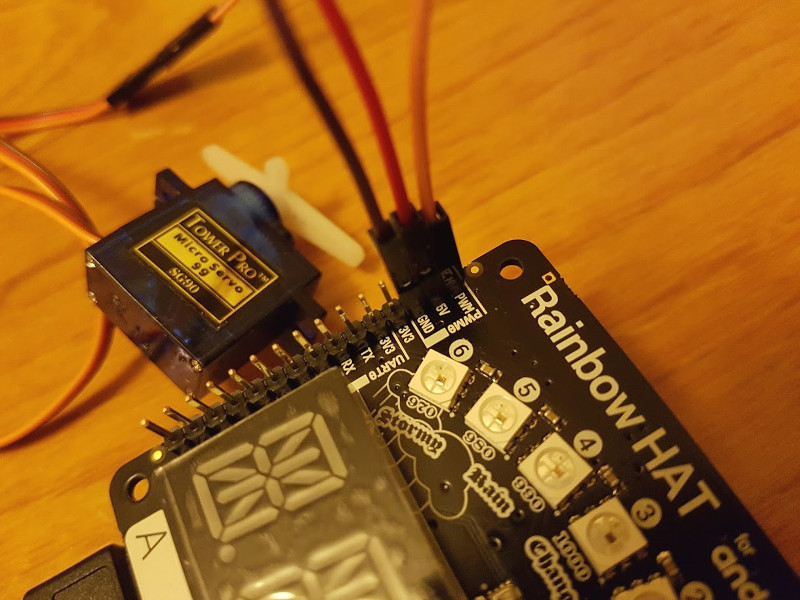
During this workshop, you will also use an additional hardware component: an SG90 9g Micro Servo.
A Servo is a type of geared motor that can only rotate 180 degrees. It is controlled by sending electrical pulses that tell the servo what position it should move to.
A servo has three wires, the brown wire is GND, the red one is 5V, and the orange one is PWM.
Now you know that, your first task is to connect the servo to the following connectors of the Rainbow HAT.
Deploy your new project to the Raspberry Pi
Now that the environment is set up, you can deploy this bootstrap project to the Raspberry Pi.
As you may know, relying on a conference Wi-Fi for a workshop is like living on the edge. That's a risk we prefer not to take, so we decided to connect the Raspberry Pi to a different local Wi-Fi network.
Your development machine should be connected to the following Wi-Fi network to deploy your Android Things application to the Raspberry Pi.
- Security: WPA2
- SSID: SomethingsPC
- Password: Somethings
Make sure the Raspberry Pi is powered on, then use adb to connect the Raspberry Pi to your development computer over Wi-Fi.
adb connect <RASPBERRY_IP>
You should see the following message:
connected to <RASPBERRY_IP:5555>
Now, you can deploy the project on Android Studio, clicking on the "Run" menu > "Run 'app'"
In the device's logs (adb logcat | grep Things) you should see the following message:
Android Things project is ready!
Congratulations, you have deployed your first Android Things app!
Let's start writing some code!
Turning on LEDs
Succeeding in turning on an LED is a necessary first step in understanding GPIOs (General Purpose Input Output).
An LED is a GPIO device that glows when electricity is passed through it.
To feed current to an LED, we will use the Gpio's setValue(boolean) method.
When the value is set to true, the LED is light on, when the value is set to false, the LED is off
First, we'll need a reference to our LED in the MainActivity.onCreate().
private Gpio led;

protected void onCreate(Bundle savedInstanceState) {
  super.onCreate(savedInstanceState);

  PeripheralManager manager = PeripheralManager.getInstance();
  led = manager.openGpio("BCM6");
  led.setDirection(Gpio.DIRECTION_OUT_INITIALLY_LOW);
}
The PeripheralManagerService is an Android Things helper class that provides references of components depending on their types and specified port names.
Here, we want a Gpio device on port "BCM6" (Rainbow HAT's red LED, that one), and we set its direction to initially low (we want the component to start as 'off').
Then, we can light it up using
led.setValue(true);
Also, don't forget to close your LED in the onDestroy()
led.close();
Your turn! Try to turn on the 3 Rainbow HAT LEDs (red, green, blue)
Question: What does the following code do? Try it.
while (true) {
  led.setValue(!led.getValue());
  Thread.sleep(1000);
}
Optional: if you are familiar with Android, you probably noticed that we made a sleep call on the main thread.
Feel free to execute this code on a different thread if you want. Additionally, if you are an RxJava fan, you could also try to use Rx (e.g. Observable.interval) to blink your LEDs . Using a reactive library to blink LEDs ? Welcome to 2017... Or if you want to embrace the future, you could use Kotlin coroutines ;)
Buttons
Great! You know how to use Android to blink LEDs.
Now, we will create a light switch: when a user presses a button, it should light an LED. When the button is pressed again, the LED should be off.
Android Things provides an official Button driver to let us deal with physical buttons:
// First, you initialize your button
Button button = new Button("BCM21", Button.LogicState.PRESSED_WHEN_LOW);

// Then, you listen for pressed events
button.setOnButtonEventListener(new Button.OnButtonEventListener() {
    @Override
    public void onButtonEvent(Button button, boolean pressed) {
        Log.d(TAG, "Button A pressed:" + pressed);
    }
});

// Don't forget to close the device in the onDestroy.
button.close();
Try it! You can run the following command to see the logs:
adb logcat | grep Things
Now that it works, add some code to turn on and off an LED when pressing a button.
How does the Button driver work internally?
Similar to LEDs, buttons are GPIO components.
The Gpio class provides an additional method: registerGpioCallback() that listens for input state changes.
The button driver (source code) takes advantage of this method to detect pressed state.
Buzzer
Turning on an LED when a button is pressed is cool, but turning on an LED, while playing some sound when a button is pressed is even cooler.
Remember: GPIOs are only for [true, false] binary operations. Either your component is fed by some current, either it is not.
While it is possible to use GPIO to play some sound, this would mean that you could play only a single and unique tone, that's quite limited.
There's a way to play different tones, using PWM (Pulse Width Modulation) instead of GPIO.
With PWM, you can either vary the duty cycle, or the frequency.
If you vary the frequency, the buzzer will play different tones.
// Initialize the buzzer
PeripheralManager manager = PeripheralManager.getInstance();
Pwm pwm = manager.openPwm("PWM1");
pwm.setPwmDutyCycle(50.0); // square wave

// Play a note
int frequency = 440;
pwm.setPwmFrequencyHz(frequency);
pwm.setEnabled(true);

// Wait
Thread.sleep(500);

// Stop playing the note
pwm.setEnabled(false);

// Close the device when done (onDestroy)
pwm.close();
Now, integrate that code to your project, to play some sound when a button is pressed.
Question: What does the following code do? Try it!
int[] frequencies = new int[] { 261, 294, 329, 349, 392, 440, 493, 523 };
pwm.setEnabled(true);

for (int frequency : frequencies) {
  pwm.setPwmFrequencyHz(frequency);
  Thread.sleep(300);
}
pwm.setEnabled(false);
Making things simpler
As for the button, there's an official PWM speaker driver that makes it easier to play tones
Speaker buzzer = new Speaker("PWM1");
buzzer.play(frequency);
buzzer.stop();
buzzer.close(); // onDestroy()
If you take a look at the PWM speaker driver source code, you will be surprised by how small the implementation is.
It is actually very similar to what we wrote manually.
If one day you have to create your own driver, you can see that it may be easier than you might think.
Using the servo motor
Now that you are familiar with PWM, we will use the servo motor which also is a PWM component.
There is an official driver that simplifies using PWM servo motors.
We will use it; we already know how PWM works, and it will prevent us from writing too much code.
Setting up the Servo motor
When creating a driver, or setting up a component. We have to read the documentation.
Take a look at the following picture, extracted from an official SG90 documentation
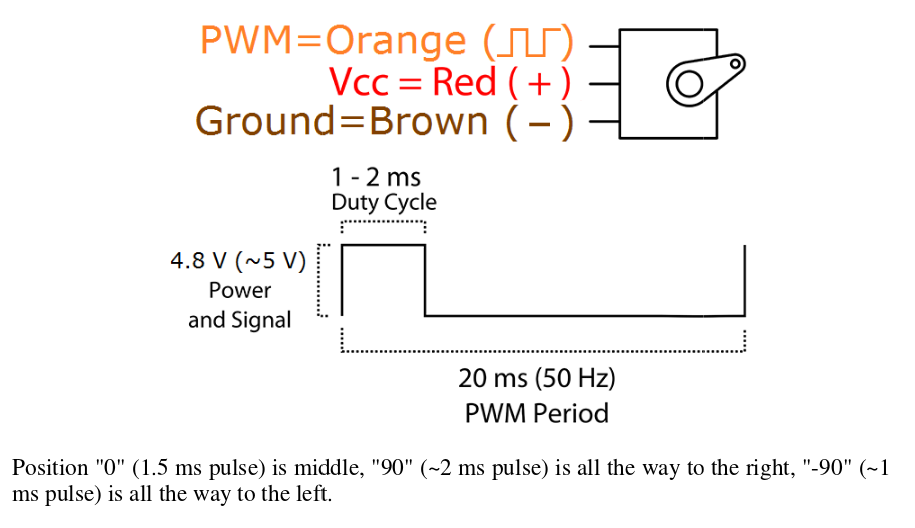
We can see the following information:
- A ~1ms pulse means moving the servo to -90
- A ~2ms pulse means moving the servo to 90
This translates into code like that:
Servo servo = new Servo("PWM0");
servo.setPulseDurationRange(1, 2);
servo.setAngleRange(-90, 90);
servo.setEnabled(true);
(again, don't forget to close the servo in the onDestroy)
To make the servo move, we have to provide it an angle. Examples:
servo.setAngle(42d);
// or
servo.setAngle(servo.getMinimumAngle());
// or
servo.setAngle(servo.getMaximumAngle());
Using this code snippet, move the servo to its minimum angle when pressing a button, and move it to its maximum angle when pressing the button again.
You'll probably have to create a boolean variable that keeps the state of the PWM (whether it is at its minimum or maximum angle).
Note: After implementing this code, you'll probably notice that setting a 1ms-2ms pulse duration range only makes the servo move around a 90° angle instead of 180°.
The documentation values seem not to be perfect here. If you want to have a wider angle, use a wider range like 0.6ms-2.4ms for example.
Fasten the servo motor to the catapult
Ok, now you are able to move the servo to its minimum and maximum angle when pressing a button.
The next step is to connect it to the catapult, so that the servo can lock and release the catapult when pressing a button.

Note: if it makes it easier for you, use some scotch tape to stick the catapult / servo to the table.
You have created an Android Things catapult. Take some time to have fun with it, and then, go to the next part
Wirelessly control the catapult
Wouldn't it be funnier if you can control the catapult from your phone / computer?
There are many ways to add remote control capabilities to an Android Things project. Among those:
- Sending a push, via Firebase Cloud Messaging
- Using Google's Nearby Connections API to control it over Wi-Fi
- Embedding an HTTP server (such as NanoHttpd) in the Android Things project
Keep in mind this list is not exhaustive. We'll use today an easy way: embedding an HTTP server inside our catapult
Embedding an HTTP server
NanoHttpd is a tiny web server, written in Java.
It can be embedded to an Android project using a single import in the build.gradle file (we have already imported the dependency, so you don't have to do it).
To serve embedded web pages, you first need to create a class that extends NanoHTTPD and overrides a serve method.
public class HttpdServer extends NanoHTTPD {

  private static final int PORT = 8888;

  public interface OnFireTriggerListener {
    void onFireTriggered();
    void onArmTriggered();
  }

  private OnFireTriggerListener listener;

  public HttpdServer(OnFireTriggerListener listener) {
    super(PORT);
    this.listener = listener;
  }

  @Override
  public Response serve(IHTTPSession session) {
    Map<String, List<String>> parameters = session.getParameters();
      if (parameters.get("fire") != null) {
        listener.onFireTriggered();
      } else if (parameters.get("armed") != null) {
        listener.onArmTriggered();
      }

    String html =
      "<html><head>"
      +  "<script type=\"text/javascript\">"
      +  " function fire() { window.location = '?fire=true'; }"
      +  " function arm() { window.location = '?armed=true'; }"
      +  "</script></head>"
      + "<body>"
      + "<button style=\"width: 50%; height: 100%; font-size: 4em;\" onclick=\"fire();\">FIRE!</button>"
      + "<button style=\"width: 50%; height: 100%; font-size: 4em;\" onclick=\"arm();\">Arm Catapult!</button>"
      + "</body></html>";

      return newFixedLengthResponse(html);
    }
}
Then, add the following code to your MainActivity class to start and stop the server:
private HttpdServer httpdserver;

// In your onCreate()
httpdserver = new HttpdServer(this);
httpdserver.start();

// In your onDestroy()
httpdserver.stop();
Note: if you tried starting the server twice (i.e.: 2 deployments without calling the httpdserver.stop() method), the embedded server may not work anymore ("Unable to connect").
Don't forget that you can consult the logs anytime (from Android Studio, in the "Android Monitor" tab at the bottom of the screen).
If you see the following error: java.net.BindException: Address already in use, try uninstalling the app and deploy it again:
adb uninstall com.example.androidthings.myproject
Now, the Android Things device will embed an HTTP server.
To control it, start a web browser to the http://<RASPBERRY_IP>:8888/ URL, and click on the button to move the servo motor remotely.
What's next?
Now it's your turn! Try to improve your catapult the way you want, developing some features that make it unique.
If you're a little lost on ideas, here are some suggestions of what you could do right now:
Show the world your awesomeness
Proud of what you achieved today? Tweet pics/videos using the #ThingsLethalWeapon hashtag.
Use the LED strip
The Rainbow HAT is named that way because it embeds an LED strip you can use to show the colors of the rainbow.
Apa102 ledstrip = RainbowHat.openLedStrip();
ledstrip.setBrightness(1);
int[] rainbow = new int[RainbowHat.LEDSTRIP_LENGTH];
for (int i = 0; i < rainbow.length; i++) {
    rainbow[i] = Color.HSVToColor(255, new float[]{i * 360.f / rainbow.length, 1.0f, 1.0f});
}
ledstrip.write(rainbow);

// Close the device when done (onDestroy)
ledstrip.close();
Try to use this strip and create a colorful, or funky animation.

Use the segment display
The Rainbow HAT features a nice 7-segment display. Sadly, we didn't use it so far.
Now it's our chance. Use the following code to display some text:
AlphanumericDisplay segment = RainbowHat.openDisplay();
segment.setBrightness(Ht16k33.HT16K33_BRIGHTNESS_MAX);
segment.display("BOOM");
segment.setEnabled(true);
// Close the device when done (onDestroy)
segment.close();
A 4 digit screen is kind of limited, but it's enough to display important words such as "OMG!", WTF?", "AHOY", "GROG", and other YARR"s.
If you feel it's too restrictive, create a scrolling text animator.
Show the room temperature on the segment display
The Rainbow HAT also embeds a temperature sensor. Well... not that it's particularly important for a catapult to be aware of the room temperature, but who knows?
Bmx280 sensor = RainbowHat.openSensor();
sensor.setTemperatureOversampling(Bmx280.OVERSAMPLING_1X);
AlphanumericDisplay segment = RainbowHat.openDisplay();
segment.setBrightness(Ht16k33.HT16K33_BRIGHTNESS_MAX);
segment.display(sensor.readTemperature());
segment.setEnabled(true);
// Close the devices when done (onDestroy)
sensor.close();
segment.close();
Create your own melody
With the PWM speaker, you can play some melody.
Here is a list of frequencies per notes
Read the Android Things documentation
For more information about Android Things, the official documentation is available here
Create a native companion app
Create a native iOS / Android / Desktop app that sends an HTTP GET request to the catapult to throw a projectile.
Don't use that ugly embedded web page anymore.
Use Firebase Cloud Messaging instead of NanoHttpd
You prefer using a Google service instead of a generic HTTP server? Try using Firebase Cloud Messaging or check out other Firebase features you can use.
Integrate the catapult to a third-party service
Throw a projectile when the CI build fails, or when your alarm clock rings for a sweet wake up.
A final word
We hope that you have enjoyed this workshop, and can't wait looking forward to your future Android Things projects.
