Aceql Http Save
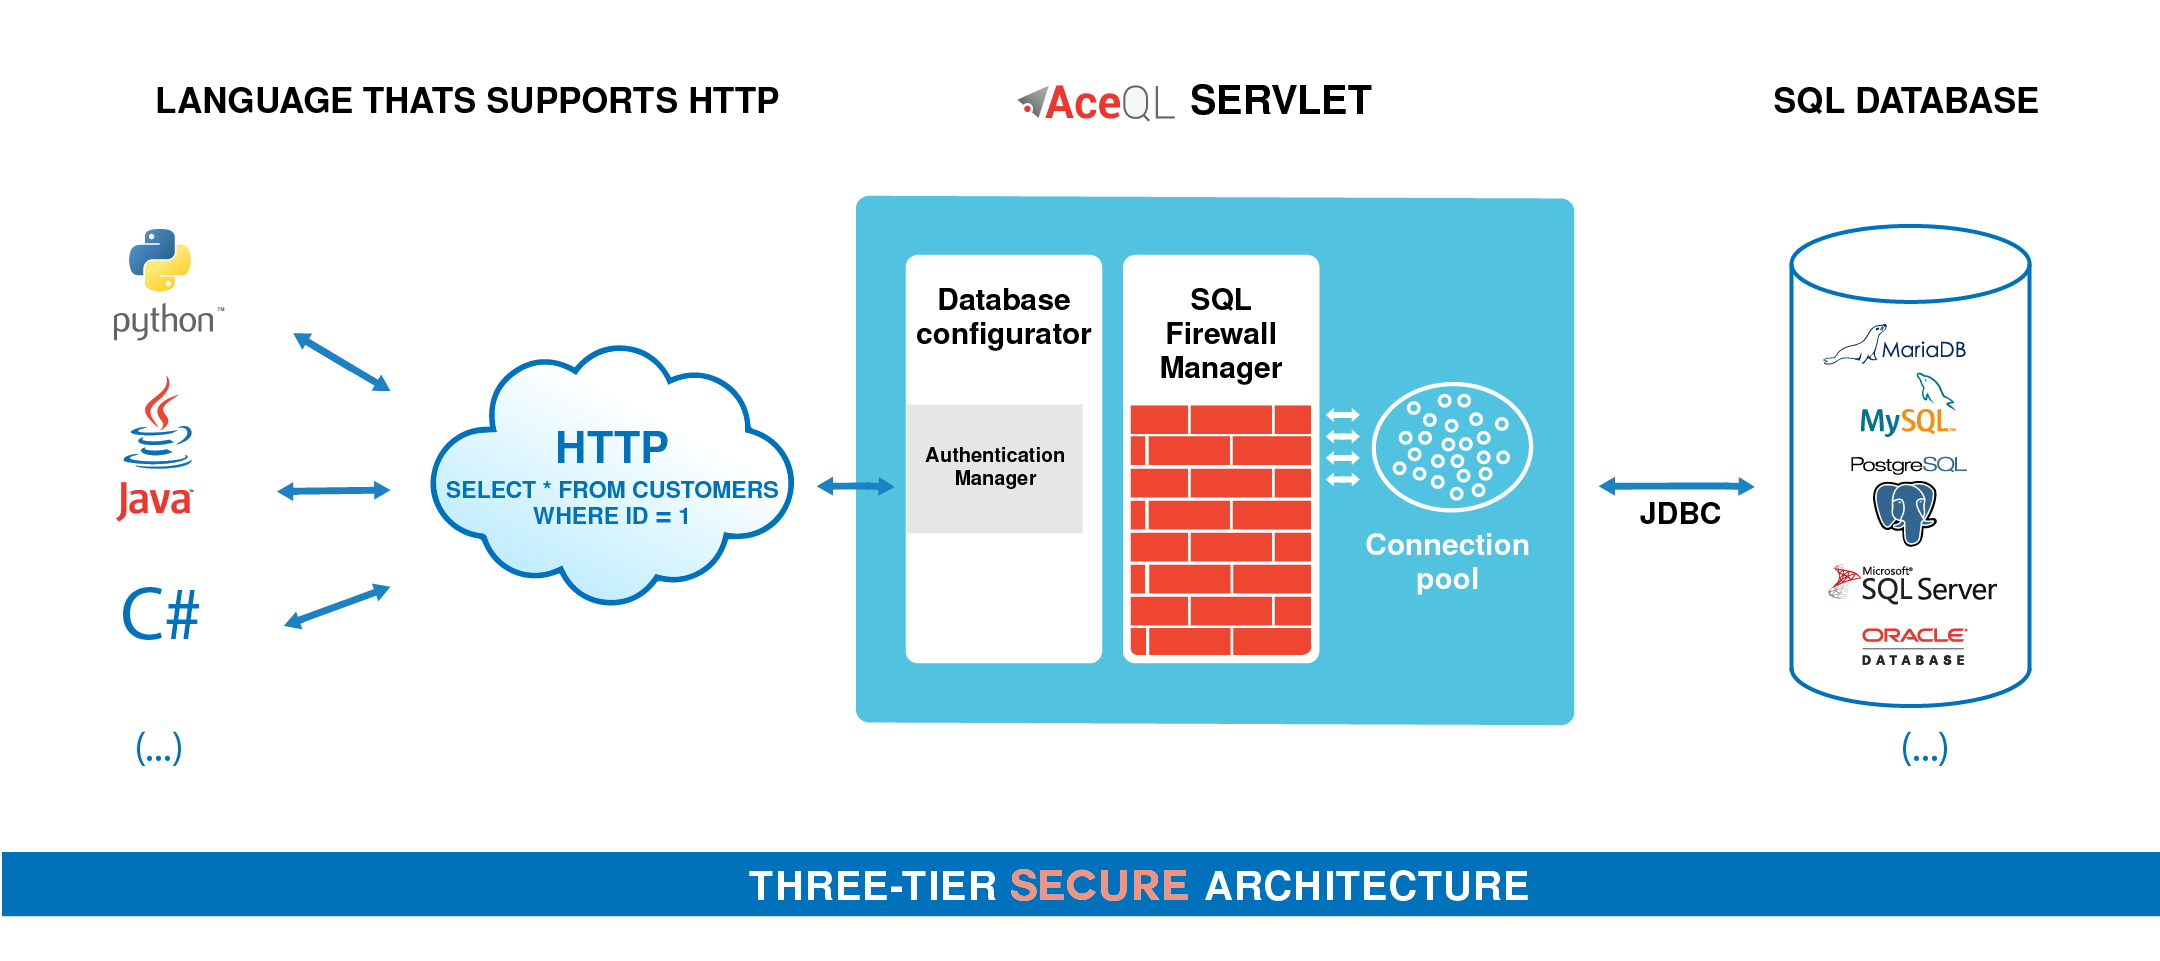
AceQL HTTP is a framework of REST like http APIs that allow to access to remote SQL databases over http from any device that supports http.


AceQL HTTP v12.2 - February 21, 2023
Server Installation and Configuration Guide

- Fundamentals
- Licensing
- Download and Installation
-
Quickstart
- The AceQL Manager servlet
-
The aceql-server.properties file
- Tomcat JDBC Connection Pool Section
- User Authentication Section
- SSL Configuration Section
- SQL Firewall Managers Section
- SQL Firewall Triggers Configuration
- Update Listeners Configuration
- Sample aceql-server.properties file
- Starting/Stopping the AceQL Web Server from Linux/Unix
- Starting/Stopping the AceQL WebServer from Windows
-
Advanced Usage
- Development Environment
- AceQL Servlet Name Configuration
- Calling SQL Stored Procedures from the client side
- Calling ServerQueryExecutor classes from the client side
- Stateful and Stateless Modes
- Session Management
- Headers Authentication Configuration
- Tomcat HTTP Connector Configuration
- Advanced Authentication Configuration
- Advanced Firewall Configuration
- DatabaseConfigurator - Advanced Connection Pool Management
- Starting/Stopping the AceQL WebServer from a Java program
- Running AceQL HTTP in a Java EE servlet container
- Interacting with the JDBC Pool at runtime
- ThreadPoolExecutor Configuration
- Encrypting Properties in the aceql-server.properties file
- Running the AceQL Web Server without Windows Desktop
- AceQL internals
Fundamentals
Overview
AceQL HTTP is a library of REST like APIs that allows you to access remote SQL databases over HTTP from any device that supports HTTP. This software has been designed to handle heavy traffic in production environments.
For example, a select command would be called from the client side using this HTTP call with cURL:
$ curl --data-urlencode \
 "sql=select id, title, lname from customer where customer_id = 1" \
 https://www.acme.com:9443/aceql/session/mn7andp2tt049iaeaskr28j9ch/execute_query
The AceQL HTTP framework consists of:
-
The AceQL Web Server.
-
Configuration Java classes injected at runtime. These are server classes that ensure both security and configuration. Many built-in classes are provided and standard configuration may be done without any coding.
-
The AceQL Client SDKs for C# , Java and Python that allow you to wrap AceQL HTTP API calls using fluent code:
-
// C# AceQL Client Calls Sample string sql = "select id, title, lname from customer where customer_id = 1"; using (AceQLCommand command = new AceQLCommand(sql, connection)) using (AceQLDataReader dataReader = await command.ExecuteReaderAsync()) { while (dataReader.Read()) { Console.WriteLine(); int i = 0; Console.WriteLine("customer id : " + dataReader.GetValue(i++)); Console.WriteLine("customer title: " + dataReader.GetValue(i++)); Console.WriteLine("customer name : " + dataReader.GetValue(i++)); } } -
// Java AceQL Client Calls Sample String sql = "select id, title, lname from customer where customer_id = 1"; try (Statement statement = connection.createStatement(); ResultSet rs = statement.executeQuery(sql);) { while (rs.next()) { System.out.println(); int i = 1; System.out.println("customer id : " + rs.getInt(i++)); System.out.println("customer title: " + rs.getString(i++)); System.out.println("customer name : " + rs.getString(i++)); } } -
# Python AceQL Client Calls Sample
with closing(connection.cursor()) as cursor:
    sql = "select customer_id, title, lname from customer where customer_id = 1"
    cursor.execute(sql)
    rows = cursor.fetchall()

    for row in rows:
        print("customer id   : " + str(row[0]))
        print("customer title: " + row[1])
        print("customer name : " + row[2])
-
The execution of each AceQL HTTP API statement is conditioned by optional rules, defined in properties files and built-in or programmed configuration classes.
The AceQL Web Server embeds its own Tomcat 9.0 servlet container in order to run AceQL without any Java EE servlet container.
Note that AceQL can run inside any Java EE servlet container (see Running AceQL HTTP in a Java EE servlet container).
Tomcat 9.0 expertise is not required to configure and use the AceQL Web Server:
- All Tomcat configuration values are optional: AceQL uses Tomcat 9.0 default values if no user configuration is done.
- You may only be required to read short portions of the Tomcat 9.0 user documentation for using SSL & Certificates.
The AceQL Web Server consists of one Java jar that's started by calling a Java class on the command line. All configuration elements are defined in a Java .properties file, named aceql-server.properties in this document.
All communication between the client and the server uses HTTP/ HTTPS protocols.
This User Guide covers:
-
Quickstart: describes how to run through complete setup using only configuration files and CSV files. (Programming and compiling are not necessary.)
-
Advanced Usage: describes advanced setup and fine tuning. It includes powerful configuration and customization options using dynamic Java code Injection of your own or third-party Java classes.
Technical operating environment
The AceQL HTTP server side is written entirely in Java, and functions identically under Microsoft Windows, Linux, and all versions of UNIX that support Java 8+, Servlet 3.1+ and JDBC 4.0+.
The only required third-party installation is Java 8+.
The following environments are supported by KawanSoft in this version:
| Databases |
|---|
| IBM DB2 9.7+ |
| MariaDB 10.0+ |
| MySQL 5.5+ |
| PostgreSQL 9.0+ |
| Microsoft SQL Server 2008 R2+ |
| Oracle Database 11g Release 2+ |
Licensing
AceQL HTTP’s software is licensed under the AceQL HTTP BSL, which allows source code access and free use in non-production environments.
Note that usage in production is not free. A subscription is required in order to run AceQL in production:
-
The Basic plan allows running up to 2 Open-Source database names* in production in your organization.
-
The Professional or Enterprise plan is required in order to run more than 2 database names* and/or run MS SQL Server or Oracle Database in production.
AceQL’s BSL is based on Business Source License (BSL) version 1.1 developed by MariaDB. This license has been adopted by other commercial open-source projects like CockroachDB.
See the www.aceql.com/pricing page for more information.
*database name: This should be understood as the applicative name of the database to which your applications connect. Examples of database names: “sales,” “inventory” and ”employees”. This differs of course from the database product name like “MySQL” and “SQL Server.”
Download and Installation
Linux / Unix Installation
Open a terminal and download with Wget.
$ wget https://download.aceql.com/soft/download/12.2/aceql-http-12.2.run
If you get a certificate error message, do one of the following:
- If a known root CA is missing and you're using Ubuntu or Debian, you can solve the problem with the line:
sudo apt-getinstall ca-certificates. Then retry the Wget call. - Retry the Wget call with
--no-check-certificateat the end of command line. Then check the PGP signature of the downloaded file using the corresponding.ascsignature file available on download page using the PGP hyperlink.
Make the file executable and then run:
chmod +x aceql-http-12.2.run
./aceql-http-12.2.run
This will create the aceql-http-12.2 folder, which you can move wherever you want.
The full path to the final aceql-http-12.2 installation folder will be called ACEQL_HOME in following text.
Example: If you run aceql-http-12.2.run from /home/mike, then software is installed in /home/mike/aceql-http-12.2 which is the value of ACEQL_HOME.
Update the PATH (Optional)
Open a shell session and make sure java binary is in the PATH by typing
java -version on the command line.
Add java to your PATH if the command does not display Java version.
Add the path to the bin directory of aceql-http-12.2 installation to your PATH:
$ PATH=$PATH:/path/to/aceql-http-12.2/bin/
export PATH
Testing server installation
Open a shell session and make sure java binary is in the PATH by typing
java -version on the command line.
Add java to your PATH if the command does not display Java version.
Call the aceql-server script to display the AceQL version:
$ aceql-server -version
It will display a line with all version info, like:
AceQL HTTP v12.2 - 21-Feb-2023
Windows Installation
Download AceQL Windows Installer.
Because the software installs and runs on Windows, you must be logged in as a Windows Administrator to install AceQL.
Run the installer.
It will run AceQL at end of installation and display the Window:
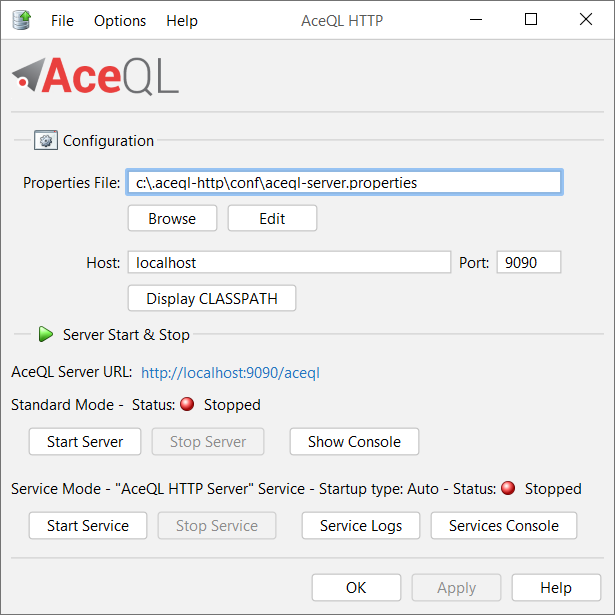
N.B: Because of a bug in all Java versions > 8 on Windows, the interface will appear "ugly" or "blurred" on Java version > 8 if you have Windows Screen Resolution Options increased to 125% or 150%. See Java Bug Database for more info. Set Windows Screen Resolution back to 100% for a clean display.
[Advertisement] 📢
Explore Sqlephant for Streamlined SQL Development! 🐘
Sqlephant brings a heap of benefits to your SQL workflow:
- 🚄 Swift Schema Generation: Auto-infer types and generate schemas.
- 🛠 SQL Fixers: Easily manage SQL requests and injection issues.
- 📦 SQL Wrapper Generation: Full support for C#, Java, PHP, and Python.
- 🔄 SQL CRUD Generation: Automate CRUD operations seamlessly.
✨ Optimize Your Development: Save Time, Reduce Bugs, Eliminate Tedious Work!
👉 Explore Sqlephant and elevate your SQL development experience!
Quickstart
The AceQL Manager servlet
All HTTP commands sent by the client side are received by the AceQL Manager servlet. The AceQL Manager servlet then:
- Authenticates the client call
- Extracts a JDBC Connection from the connection pool
- Analyzes the JDBC statement that was received
- Executes the statement if the JDBC statement matches the rules defined by the SQL Firewall Managers (see below)
- Sends the result of the statement back to the client side
The aceql-server.properties file
Most AceQL configuration is carried out by defining properties in the aceql-server.propertie file, except the hostname and port, which are passed as start parameters.
The file is organized into Sections. Only the first Section must be configured to start the AceQL Manager. Sections 2 to 6 allow users to secure AceQL, and are optional. The subsequent Sections are covered under Advanced Usage:
- Tomcat JDBC Connection Pool Section.
- User Authentication Section.
- SSL Configuration Section.
- SQL Firewall Managers Section.
- SQL Firewall Triggers Configuration.
- Update Listeners Configuration.
Tomcat JDBC Connection Pool Section
This section allows you to define:
- The names of the databases to use.
- The JDBC parameters used to build the embedded The Tomcat 9.0 JDBC Connection Pool for each database.
The databases are defined with the databases property. If there is more than one database, separate each name with a comma:
# Database names separated by commas
databases = my_database1, my_database2
Only the following four properties must be defined per database name if you want to use the Tomcat JDBC Connection Pool:
| Property | Value |
|---|---|
driverClassName |
The fully qualified Java class name of the JDBC driver to be used. |
url |
The connection URL to be passed to our JDBC driver to establish a connection. |
username |
The connection username to be passed to our JDBC driver to establish a connection. |
password |
The connection password to be passed to our JDBC driver to establish a connection. |
Each property must be prefixed with the associated database name defined in the databases property, and a dot.
Example:
# Database names separated by commas
databases = my_database1, my_database2

# Mandatory JDBC properties:
my_database1.driverClassName = org.postgresql.Driver
my_database1.url= jdbc:postgresql://localhost:5432/sampledb
my_database1.username= user1
my_database1.password= password1

my_database2.driverClassName = oracle.jdbc.driver.OracleDriver
my_database2.url= jdbc:oracle:thin:my_database2@//localhost:1521/XE
my_database2.username= user2
my_database2.password= password2
You may add other properties supported by the Tomcat JDBC Connection Pool, as defined in Common Attributes and in Enhanced Attributes.
Note: Using the Tomcat JDBC Connection Pool isn't mandatory. If you want to use another preferred Connection Pool system, just comment the driverClassName property. Implementing another Connection Pool system is described in Advanced Connection Pool Management.
User Authentication Section
This section allows users to define how to authenticate a remote use client that connects to the AceQL Server.
Authentication is defined through the injection of a "User Authenticator", a Java class that's injected at AceQL Server startup. It's a built-in or user-developed Java class that implements the UserAuthenticator interface built in AceQL.
The login method of the class is called when a remote client first connects to the AceQL and inputs credentials (username and password). If the login method returns true, user access is granted; otherwise it's denied.
AceQL provides five built-in (and ready-to-use without any coding) User Authenticators:
| User Authenticator Name | Role | Parameters |
|---|---|---|
JdbcUserAuthenticator |
Authenticates the remote client (username, password) with a JDBC query against a SQL table. | database name, authentication query, hash algorithm, iterations and salt. |
LdapUserAuthenticator |
Authenticates the remote client (username, password) against a LDAP server. | URL of the LDAP server |
SshUserAuthenticator |
Authenticates the remote client (username, password) against a SSH server. | IP or host & port of the SSH server |
WebServiceUserAuthenticator |
Authenticates the remote client (username, password) against a Web service. (See below). | URL of the Web service & connection timeout. |
WindowsUserAuthenticator |
Authenticates the remote client (username, password) against the Windows server on which the AceQL server is running. | The Windows domain (optional). |
Just select the userAuthenticatorClassName to use in the aceql-server.properties section, and fill in the required parameters.
All the rest will be done automatically once the AceQL server is started.
The WebServiceUserAuthenticator usage
AceQL allows for the authentication of remote client users against a Web service that's developed and deployed on Web infrastructure by your organization. This enables you to develop or use an existing authentication program decoupled from AceQL. You can thus use whatever technology stack you wish to authenticate remote client users, and wrap it in a Web service that gets called by AceQL when a remote client user wants to authenticate.
The Web service must implement these features:
-
It must accept the 2 POST parameters
usernameandpassword. -
It must return either:
- The JSON string
{"status"="OK"}if the authentication succeeds. - The JSON string
{"status"="FAIL"}if the authentication fails.
- The JSON string
SSL Configuration Section
This section is optional. It allows you to configure the Tomcat HTTP Connector to use SSL when calling the AceQL Manager Servlet from the client side.
It also allows you to define the SSL Certificate to be used.
Set the SSLEnabled property to true to say that the HTTP Connector will accept SSL calls from the client side.
Each property must be prefixed by sslConnector.
Note: If SSLEnabled is set to true, the AceQL HTTP Web server will accept only SSL connections, i.e. a non SSL call from the client side with http scheme will fail.
To define SSL HTTP Connector attribute values, refer to the Tomcat 9.0 SSL Support documentation.
The following properties are mandatory and must be defined:
| Mandatory Property Name | Property Role |
|---|---|
sslConnector.scheme |
Scheme to use. Must be set to "https" |
sslConnector.keystoreFile |
The file containing the SSL/TLS certificates |
sslConnector.keystorePass |
The keystore password |
sslConnector.keyPass |
The certificate password |
To create an SSL Certificate, refer to:
- Tomcat 9.0 Prepare the Certificate Keystore.
- Oracle JDK Security Tools.
SQL Firewall Managers Section
The SQL Firewall Managers Section allows users to define SQL firewall rulesets to use for each database.
The rulesets are defined through one or more "SQL Firewall Managers", which are Java classes that are injected at AceQL Server startup. A SQL Firewall Manager is a built-in or user-developed Java class that implements the SqlFirewallManager interface.
A SqlFirewallManager concrete implementation allows users to:
- Define if a client user has the right to call a
Statement.executeUpdate(i.e. call a statement that updates the database). - Define if a client user has the right to call a raw JDBC
Statementthat's not aPreparedStatement. - Define if a client user has the right to call the AceQL Metadata API.
- Define a specific piece of Java code to analyze the source code of the SQL statement before allowing (or denying) its execution.
Multiple SqlFirewallManager classes may be defined and chained.
AceQL provides several built-in (and ready-to-use without any coding) SQL Firewall Managers:
| SQL Firewall Manager Name | Details |
|---|---|
CsvRulesManager |
Manager that applies rules written in a CSV file. (See below). |
CsvRulesManagerNoReload |
Manager that extends CsvRulesManager - the only change is to prohibit reloading rules when the CSV file is updated. |
DenyDatabaseWriteManager |
Manager that denies any update of the database. (The database will be accessed in read-only mode). |
DenyDclManager |
Manager that denies any DCL (Data Control Language) call. |
DenyDdlManager |
Manager that denies any DDL (Data Definition Language) call. |
DenyExceptOnWhitelistManager |
Manager that allows only statements that are listed in a whitelist text file. |
DenyMetadataQueryManager |
Manager that denies the use of the AceQL Metadata Query API. |
DenyOnBlacklistManager |
Manager that denies statements that are listed in a blacklist text file. |
DenySqlInjectionManager |
Manager that allows for the detection of SQL injection attacks, using Cloudmersive third-party API. |
DenySqlInjectionManagerAsync |
Same as DenySqlInjectionManager, but detection is done asynchronously. |
DenyStatementClassManager |
Manager that denies any calls of the raw Statement Java class. (Calling Statements without parameters is forbidden). |
Only the following property must be defined per database name if you want to add SQL Firewall Managers:
sqlFirewallManagerClassNames.
SqlFirewallManager may be chained in property value by separating class names with commas.
When SqlFirewallManager classes are chained, an AND condition is applied to all the SqlFirewallManager execution conditions to compute the final allow.
For example, the allowExecuteUpdate() of each chained SqlFirewallManager instance must return true to allow updates of the database.
The following example defines two built-in firewalls to chain for the sampledb database:
- First
DenyDdlManagerwill deny DDL statements (such as DROP, CREATE TABLE, etc.) to pass - Second
DenyExecuteUpdateManagerwill deny write access to the database,
sampledb.sqlFirewallManagerClassNames=\
    DenyDclManager,\
    DenyExecuteUpdateManager
After an AceQL server restart, remote clients won't be allowed to execute DDL statements or update the database.
The CsvRulesManager SQL Firewall Manager
The CsvRulesManager manager allows users to define detailed rules using only a CSV file.
It checks each SQL request against the contents of a CSV file. The CSV file is loaded in memory at the AceQL server startup.
The name of the CSV file that will be used by a database is: <database>_rules_manager.csv, where <database> is the name of the database declared in the aceql.properties files.
The file must be located in the same directory as the aceql.properties file used when starting the AceQL server.
The CSV file contains the rules for accessing the tables, with a semicolon for separator:
-
First line contains the element names:
username;table;delete;insert;select;update;optional comments -
Subsequent lines contain the rules, with the values for each element:
-
username: AceQL username of the connected client. -
table: the table name to access. Cannot include dots and prefixes. -
delete:trueif the username has the right to delete rows of the table, elsefalse. -
insert:trueif the username has the right to insert rows in the table, elsefalse. -
select:trueif the username has the right to select rows of the table, elsefalse. -
update:trueif the username has the right to update rows of the table, elsefalse. - Optional comments for the rule.
-
Note that:
- the
publicvalue may be used for theusernamecolumn and means any username. At execution time: if a rule withpublicreturnstruefor a CSV column, the rule supersedes other rules declared for specific users for the same CSV column. - the
allvalue is allowed fortablecolumn and means any table. At execution time: if a rule withallreturnstruefor a CSV column, the rule supersedes other specific rules declared for specific tables for the same CSV column.
Here's an example of a documented CSV File: sampledb_rules_manager.csv.
The DenyExceptOnWhitelistManager SQL Firewall Manager
This SQL Firewall Manager only allows incoming SQL statements that match a list of SQL statements stored in the following text file sequentially, one per line.
The name of the text file used by a database is: <database>_deny_except_whitelist.txt, where <database> is the name of the database declared in the aceql-server.properties files.
The file must be located in the same directory as the aceql-server.properties file used when starting the AceQL server.
Each line of the text file must contain one statement, without surrounding quotes (") or ending semicolons (;).
The DenyExceptOnWhitelistManager naturally takes precedence over all other SQL Firewall Managers, as its default behavior is to forbid all SQL statements that are not explicitly stored in the <database>_deny_except_whitelist.txt file.
Note that all statements will be "normalized" (using the StatementNormalizer class execution) before the incoming statement from the client side is compared with the list of permitted statements.
How SQL statement are normalized
The normalization will remove all excess spaces, tabs, or line breaks. Also, the SQL keywords will appear in uppercase, and columns and table names in lowercase. This ensures that a SQL statement that should be recognized won't be rejected due to differences in capitalization or spaces between words.
For example the following two statements:
 SELECT *     from     my_table   where my_colum   =   ?
 SELECT 	*         from     my_table      where     my_colum   =   ?"
will be normalized to the same string with extra spaces removed:
SELECT * FROM my_table WHERE my_colum = ?
Note that all string and numerical values are replaced by question marks.
So, when using normalization, the following different input statements:
SELECT film_title, RENTAL_RATE from FILM where film_title like '%Star%' and rental_rate > 2.20
select film_title, rental_rate from film where film_title like '%Alien%' and rental_rate > 3.30
select film_title, rental_rate from film where film_title like '%Odyssey%' and rental_rate > 4.40
They will all be normalized to:
SELECT film_title , rental_rate FROM film WHERE film_title LIKE ? AND rental_rate > ?
If normalization cannot be applied due to unsupported or sloppy formatting, the original SQL statement is returned without any normalization.
The two main causes of normalization failure are:
- The input SQL statement contains nested SQL comments, which this version's parser does not support. (Regular non-nested SQL comments are successfully parsed.)
- The input SQl statement is somewhat invalid.
The DenyOnBlacklistManager SQL Firewall Manager
This SQL Firewall Manager denies incoming SQL statements that match a list of SQL statements stored in the following text file sequentially, one per line.
The name of the text file used by a database is: <database>_deny_blacklist.txt, where <database> is the name of the database declared in the aceql-server.properties files.
The file must be located in the same directory as the aceql-server.properties file used when starting the AceQL server.
Each line of the text file must contain one statement, without surrounding quotes (") or ending semicolons (;).
Note that all statements will be "normalized" following the same principle as with the DenyExceptOnWhitelistManager SQL Firewall Manager.
The SQL Firewall Operational Mode per database
A SQL Firewall Operational Mode maybe defined for each database, with the possible values:
-
detecting: In this mode, intrusions are detected but not not blocked. This allows, for example, you to log all suspicious activity using one or more SQL Firewall Triggers. -
learning: This is the firewall training mode. It is to be used only with theDenyExceptOnWhitelistManagerSQL Firewall Manager. When executing SQL calls, Incoming statements received are stored in append mode, one per line, in the<database>_deny_except_whitelist.txtdescribed above in the The DenyExceptOnWhitelistManager SQL Firewall Manager section. Note that statements are normalized - as described above - before being appended to the the<database>_deny_except_whitelist.txtfile. -
protecting: In this mode, the SQL Firewall rules are fully enabled for the database and will block SQL statements that break the rules.protectingis the default mode if nooperationalModeproperty is defined for a database (see below).
Defining the SQL Firewall Operational Mode per database
In the aceql-server.properties file, define each Operational Mode per database by creating a property whose name is the database name followed by a dot and the operationalMode keyword. The possible property values are only: detecting, learning, and protecting.
The following example shows how to apply the learning mode to the sampledb database:
# The Operational Mode for firewalling a database.
# The possible values are:
# - detecting: Intrusions & attacks are detected using the SQL Firewall
#   Manager's rules, but are not blocked. SQL Firewall Triggers will be
#   applied.
# - learning: Recording mode is on, building a white list whose file
#   name is <database>_deny_except_whitelist.txt and located in the same
#   directory as the current file. "learning" is meaningful only if a
#   DenyExceptOnWhitelistManager SQL Firewall Manager is defined for the
#   database.
# - protecting: The SQL Firewall Manager's rules are fully enabled
#   for the database.
# Defaults to protecting.
sampledb.operationalMode=learning
Reminder: there is no need to define a property for protecting databases.
Changing the SQL Firewall Operational Mode per database
AceQL server restart is required in order to take into account Operational Mode value changes.
SQL Firewall Triggers Configuration
The SqlFirewallTrigger allows you to define per database a "trigger" in Java if a
SqlFirewallManager.allowSqlRunAfterAnalysis() call returns false, meaning a possible attack is detected.
A trigger is thus the Java code executed in the implementation of the unique SqlFirewallTrigger.runIfStatementRefused() method.
Multiple SqlFirewallTrigger instances may be defined and chained.
AceQL provides several built-in (and ready-to-use without any coding) SQL Firewall Triggers:
| SQL Firewall Triger Name | Details |
|---|---|
BanUserSqlFirewallTrigger |
Trigger that inserts the username and other info into a SQL table. The SQL table is scanned/controlled at each request, so the banned user can no longer access the AceQL server. See Javadoc for implementation details. |
BeeperSqlFirewallTrigger |
Trigger that simply beeps on the terminal if an attack is detected by a SqlFirewallManager. |
JdbcLoggerSqlFirewallTrigger |
Trigger that logs all info about the denied SQL request into a SQL table. See Javadoc for implementation details. |
JsonLoggerSqlFirewallTrigger |
Trigger that logs all info about the denied SQL request in JSON format. |
Update Listeners Configuration
The Update Listeners Section allows you to define Java code to execute after a successful SQL database update is done.
Update Listeners can be viewed as a kind of Java "trigger" executed on the completion of SQL updates.
The actions to trigger are defined through one or more "Update Listeners ", which are Java classes injected at AceQL Server startup. An Update Listener is a built-in or user-developed Java class that implements the UpdateListener interface with code to execute defined in the unique updateActionPerformed method. Multiple UpdateListener may be defined and chained.
AceQL provides a built-in (and ready-to-use without any coding) Update Listener:
| Update Listener Name | Details |
|---|---|
JsonLoggerUpdateListener |
Logs all successful & completed SQL update details in JSON format. |
Only the following property must be defined per database name if you want to add Update Listeners:
updateListenerClassNames.
UpdateListener may be chained in property value by separating class names with commas.
The following example defines two Update Listeners to chain for the sampledb database:
sampledb.updateListenerClassNames=\
    com.mycompany.listener.MyUpdateListener1,\
    com.mycompany.listener.MyUpdateListener2
Sample aceql-server.properties file
Here is a documented example of an aceql-server.properties file:
Starting/Stopping the AceQL Web Server from Linux/Unix
Add your JDBC driver to the AceQL installation
Before starting the AceQL Web Server, drop your JDBC driver jar into
ACEQL_HOME/lib-jdbc directory or add it to the Java CLASSPATH.
Starting the AceQL Web Server
Open a shell and type:
$ aceql-server -start -host <hostname> -port <port number> -properties <file>
where:
-
-host <hostname>is the hostname of the Web server -
-port <port number>is the port number of the Web server. Defaults to 9090 -
-properties <file>is the properties file to use for this SQL Web server Session. Defaults toACEQL_HOME/conf/aceql-server.properties.
The console will display the properties used and should end with this line (assuming you choose 9090 for port):
[ACEQL HTTP START] AceQL HTTP Web Server OK. Running on port 9090
If configuration errors occur, they are displayed with the tag
[ACEQL HTTP START FAILURE] - USER CONFIGURATION FAILURE]
Examples
Starting the AceQL Web Server on port 9090
$ aceql-server -start -host localhost
The URL to use on the client side will be: http://localhost:9090/aceql
assuming the AceQL Manager Servlet Section contains the following line:
aceQLManagerServletCallName=aceql
Starting the AceQL Web Server on port 9091
$ aceql-server -start -host www.acme.org -port 9091
The URL to use on the client side will be: http://www.acme.org:9091/aceql
assuming the AceQL Manager Servlet Section contains the following line:
aceQLManagerServletCallName=aceql
Using SSL from the client side
Assuming you've enabled SSL and defined a Certificate in the
aceql-server.properties file, the URL to use on the client side will be:
https://www.acme.org:9091/aceql
Stopping the AceQL Web Server
To stop a running instance of the AceQL Web Server:
$ aceql-server-stop -port <port number>
where:
-port <port number> is the port number of the Web server. Defaults to 9090
Linux: running the AceQL Web server as a service
The aceqlhttp wrapper allows you to run the AceQL program as a Linux service.
- Click here to download
aceqlhttp.sh - Copy aceqlhttp.sh to
/etc/init.d/aceqlhttp(requires root privilege). -
sudo chmod +x /etc/init.d/aceqlhttp - Then edit
/etc/init.d/aceqlhttpand:- Modify JAVA_HOME to the path of your Java installation.
- Modify ACEQL_HOME to the path of your AceQL installation.
- Modify ACEQL_HOST and ACEQL_PORT with your hostname and port.
- Modify CLASSPATH if you plan to inject your own Java classes (See Advanced Usage).
Then:
- Test that it runs:
sudo service aceqlhttp start - Test that it stops:
sudo service aceqlhttp stop - Test that it restarts:
sudo service aceqlhttp restart
Then check the contents of the log file defined by LOG_PATH_NAME and which defaults to: /var/log/aceqlhttp.out.
Starting/Stopping the AceQL WebServer from Windows
Server may be started within the current JVM, or as a Windows Service.
If you wish to run the AceQL HTTP Server as a Windows Service, it's highly recommended to test your configuration by starting the server once in Standard Mode.
Running options are fully described in the user interface help.
Advanced Usage
Development Environment
Setting up a development environment will allow you to develop your own Java classes to be injected at runtime.
Create a Server project and add the jars of the:
-
<installation-directory>\AceQL\lib-server subdirectory & <installation-directory>\AceQL\lib-jdbcto your development CLASSPATH .
Or for Maven users:
<groupId>com.aceql</groupId>
<artifactId>aceql-http</artifactId>
<version>12.2</version>
AceQL Servlet Name Configuration
The AceQL Manager servlet Section in the aceql-server.proprties file allows you to modify the default name of the AceQL SQL Manager Servlet to call from the client side. The default name is aceql. It's the name that will be used in the URL by client calls:
aceQLManagerServletCallName=aceql
Calling SQL Stored Procedures from the client side
AceQL supports calling SQL stored procedures from C# and Java client side. See the C# Client SDK and the AceQL Client JDBC Driver documentation for more information.
Calling ServerQueryExecutor classes from the client side
AceQL supports calling implementations of the ServerQueryExecutor implementation. This is a a kind of server "AceQL stored procedure" written in Java. The executeQuery method returns a ResultSet to the client side that's appropriately converted by the client side SDK (DataReader in C#, ResultSet in Java and a list in Python).
See the ServerQueryExecutor Javadoc for server side usage and each C#, Java or Python documentation for client side usage.
Stateful and Stateless Modes
AceQL may be run either in stateful or stateless mode.
See the AceQL Manager servlet Section in the aceql-server.properties file. Stateful or stateless running mode is configured using the statelessMode property.
Stateful Mode
AceQL runs by default in stateful mode (statelessMode=false): when creating a session on the client side with the /login API, the AceQL servlet that is contacted extracts a JDBC Connection from the connection pool (with DatabaseConfigurator.getConnection()) and stores it in memory in a static Java Map.
The server's JDBC Connection is persistent, attributed to the client user, and will not be used by other users: the same Connection will be used for each JDBC call until the end of the session. This allows for the creation of SQL transactions.
The Connection will be released from the AceQL Manager Servlet memory and released into the connection pool by a client side /close or /logout API call.
Therefore in stateful mode, it's cleaner to avoid phantom JDBC connections persisting for a period of time on the server. There are two options:
-
Choice 1: make sure that client applications explicitly and systematically call the
/logoutAPI before the application exits. -
Choice 2: configure the "Tomcat JDBC Connection Pool" Section in the
aceql-server.proprtiesfile to remove abandoned connections. SeeremoveAbandoned&removeAbandonedTimeoutproperty comments in the file.
Note that in the stateful mode, it's required that the client always accesses the same AceQL server during the entire life of their session.
Stateless Mode
In stateless mode (statelessMode=true), the JDBC Connection is extracted by the AceQL servlet from the Connection pool at each client SQL request. The Connection is also closed and released in the pool at the end of each client SQL request.
The Java server on which AceQL Server is running doesn't hold any session info or state structure. Different client SQL requests can thus be processed by different physical servers, assuming that the SQL database is on a dedicated and separated location (or that each server has a copy of the SQL database that's consolidated elsewhere at a chosen timeframe.)
Stateless mode enables resiliency and elasticity, as well as easier deployment: one can typically deploy AceQL instances easily, using known tools like Docker & Kurbenetes.
Closing a Connection from the client side is unnecessary when running in stateless mode (a call to the /logout API will do nothing).
Note that in this 12.2 version, SQL transactions are not supported in stateless mode.
Session Management
SessionConfigurator interface
After server authentication succeeds (through the UserAuthenticator.login() method), the AceQL Manager builds an authentication session id that is sent back to the client and will be used by each succeeding client call to authenticate them.
Session security is managed by implementing the SessionConfigurator interface that defines how to generate and verify the session id for (username, database) sessions.
Interface implementation allows you to:
- Define how to generate a session id after client /login call.
- Define the session's lifetime.
- Define how to verify that the stored session is valid and not expired.
Session management default implementation
The default mechanism that builds an authentication session id is coded in the class
- Session ids are generated using a
SecureRandomwith the SessionIdentifierGenerator class. - Session info (username, database) and session date/time creation are stored in a
HashMap, whose key is the session id. - Session id is sent by the client side at each API call. AceQL verifies that the
HashMapcontains the username and that the session is not expired to grant access to the API execution.
Benefits of this implementation are:
- Session ids are short and generate less HTTP traffic.
- Because session ids are short, they're easy to use manually (with cURL, etc.)
The disadvantage is that session information is stored on the server side.
Session management using JWT
Session management using JWT is coded in JwtSessionConfigurator.
Session management is done using self-contained JWT (JSON Web Token).
See https://jwt.io for more information on JWT.
A benefit of JWT is that no session information is stored on the server and that it allows full stateless mode.
A disadvantage of JWT is that the tokens are much longer and thus generate more HTTP traffic and are less convenient to use "manually" (with cURL, etc.).
Activating JwtSessionConfigurator
Edit the aceql-server.properties file and uncomment the two lines:
sessionConfiguratorClassName=JwtSessionConfigurator
jwtSessionConfiguratorSecret=changeit
Change the jwtSessionConfiguratorSecret property value with your own secret value.
Restart the AceQL Web Server for activation.
Creating your own session management
If you want to create your session management using your own session id generation and security rules, you can implement the SessionConfigurator in your own class, and then:
Add your class in the CLASSPATH.
Add your class name in the SessionConfigurator section in your aceql-server.properties file:
sessionConfiguratorClassName=com.acme.MySessionConfigurator
Restart the AceQL Web Server for activation.
Headers Authentication Configuration
The Headers Authentication Section allows you to authenticate a client user using the request headers set and sent from the client side.
This enables an alternate or supplementary authentication to UserAuthenticator.
Typical usage would be to send - using HTTP - an authentication token stored in one of the request headers to a remote cloud provider.
This is done through your own implementation of the RequestHeadersAuthenticator interface: overload the public boolean validate(Map<String, String> headers) method in your concrete class implementation. Your method code will be able to check all headers sent by the client side and decide whether or not to grant access to the client user.
Tomcat HTTP Connector Configuration
Tomcat HTTP Connectors allow fine tuning of Tomcat 9.0.
It's possible to define properties for a unique HTTP Connector that will either accept HTTP or secured HTTPS calls. The properties must be defined in the HTTP Connector Attributes Section.
This section is optional. If no value is defined, default Tomcat values will be used for the default HTTP Connector.
You may define all attributes defined in the Tomcat HTTP Connector documentation, except SSL attributes that must be defined in the SSL Configuration Section.
Each property must be prefixed by connector.
# Example: Change default connectionTimeout from 60000ms to 80000ms
connector.connectionTimeout=80000
Advanced Authentication Configuration
In order to give remote client users access to the AceQL server, you may develop your own authentication mechanism. This is done through your own implementation of the UserAuthenticator interface: overload the login method UserAuthenticator.login() in your concrete class implementation.
Your concrete implementation is passed to the AceQL as properties of the User Authentication Section in the aceql-server.properties file.
- The userAuthenticatorClassName property lets you define your concrete implementation of
UserAuthentication. - Your
UserAuthenticationclasses must be added to theCLASSPATHbefore the start of the AceQL Server.
Instances are loaded using a non-args constructor.
Advanced Firewall Configuration
AceQL provides several built-in and ready-to-use SQL Firewall Managers, as described earlier in the SQL Firewall Managers Section. You also may plug-in your own implementation or third-party SQL firewalling tools.
The SqlFirewallManager interface allows you to code your own firewall rulesets or plug a third-party software in.
After coding you own SqlFirewallManager implementation, just declare the full class name in the sqlFirewallManagerClassNames property. Remember that SQL Firewall Managers may be chained and you may declare several classes.
The following example defines two firewalls to chain for the sampledb database:
sampledb.sqlFirewallManagerClassNames=\
    com.mycompany.firewall.MySqlFirewallManager1,\
    com.mycompany.firewall.MySqlFirewallManager2
DatabaseConfigurator - Advanced Connection Pool Management
You may define your own preferred connection pool implementation, instead of using the default Tomcat JDBC Connection Pool.
This is done through your own implementation of the DatabaseConfigurator interface: overload the DatabaseConfigurator.getConnection() method in your concrete class implementation.
Your concrete implementations is passed to the AceQL as properties of the Database Configurators Section in the aceql-server.properties file, as described:
- The
databaseConfiguratorClassNameproperty lets you define your concrete implementation ofDatabaseConfigurator. - You
DatabaseConfiguratorclasses must be added to theCLASSPATHbefore the start of the AceQL Server.
Instances are loaded using a non-args constructor.
The Development of a DatabaseConfigurator implementation also allows you to:
- Define the directories where Blobs/Clobs are located for upload and download.
- Define some Java code to execute before/after a
Connection.close(). - Define the maximum number of rows that may be returned to the client.
- Define the
Loggerto use to trap server Exceptions.
Starting/Stopping the AceQL WebServer from a Java program
You may start or stop the AceQL Server from a Java program calling the WebServerApi API.
Running AceQL HTTP in a Java EE servlet container
AceQL server side may be run inside a Java EE servlet container such as Tomcat.
This option may be preferred by users who already have a Java EE servlet container configured with all Connectors & SSL options, etc., and want to recode the options in the aceql-server.properties file.
Installation
Install the installation directory webapp/WEB-INF/lib files in the lib directory of your webapp.
If your JavaEE servlet container is not Tomcat >=7, it may not contain the Tomcat JDBC Pool: add webapp/WEB-INF/lib-tomcat/tomcat-jdbc-9.0.xx.jar jar in the /lib directory of your webapp.
If you've coded your own Configurators, deploy the classes in the /classes directory of your webapp.
AceQL servlet configuration in web.xml
Create and configure the aceql-server.properties file like normal, as described in The aceql-server.properties file. Do not configure the Tomcat Connector sections that won't be used.
Add the license file location in the licenseFile param.
In web.xml, define the AceQL Manager servlet that is defined in the aceql-server.properties file. This dual definition is required. The servlet class is org.kawanfw.sql.servlet.ServerSqlManager.
Example:
Assuming the aceql-server.properties file is stored in c:\Users\Mike and you've defined the following aceQLManagerServletCallName in aceql-server.properties:
aceQLManagerServletCallName=aceql
then your web.xml should contain the following code:
<servlet>
    <servlet-name>aceql</servlet-name>
    <servlet-class>org.kawanfw.sql.servlet.ServerSqlManager</servlet-class>
	<async-supported>true</async-supported>

    <!-- The AceQL Server Properties File -->
    <init-param>
        <param-name>properties</param-name>
        <param-value>c:\Users\Mike\aceql-server.properties</param-value>
    </init-param>

    <load-on-startup>1</load-on-startup >
</servlet>

<servlet-mapping>
    <!-- Note the trailing /* in url-pattern -->
    <servlet-name>aceql</servlet-name>
    <url-pattern>/aceql/*</url-pattern>
</servlet-mapping>
Note the trailing /* in the URL pattern: this is required by the AceQL Manager that uses both the servlet name and elements in servlet path values to execute actions requested by the client side.
Testing the servlet configuration
After restarting your server, check you web server logs.
AceQL start statuses are written on standard output stream.
Type the HTTP address of each of your AceQL Manager servlets into a browser.
Example corresponding to previous web.xml:
http://www.yourhost.com/path-to-webapp/aceql
It will display a JSON string and should display a status of "OK" and the current AceQL version:
{
    "status": "OK",
    "version": "AceQL HTTP v12.2 - 06-Dec-2022"
}
If not, the configuration errors are detailed in your Java EE servlet container log files for correction.
Interacting with the JDBC Pool at runtime
The Servlets Section in aceql-server.properties allow you to define your own servlets to interact with the AceQL Web Server.
The provided DefaultPoolsInfo servlet allows you to:
- query info about JDBC pools in use,
- modify a pool size,
- etc.
The API DataSourceStore class allows you to retrieve the Tomcat org.apache.tomcat.jdbc.pool.DataSource for each database corresponding to the Tomcat JDBC Pool created at AceQL Web server startup.
ThreadPoolExecutor Configuration
The AceQL Manager serlvet is executed in asynchronous mode.
The ThreadPoolExecutor Section allows you to modify the default values of the parameters of the java.util.concurrent.ThreadPoolExecutor instance used to execute all servlet requests in async mode.
The properties to set in the aceql-server.properties file are:
| Property | Role | Default Value |
|---|---|---|
corePoolSize |
The number of threads to keep in the pool, even if they're idle. | 10 |
maximumPoolSize |
The maximum number of threads to allow in the pool. | 125 |
unit |
The time unit for the keepAliveTime argument. |
SECONDS |
keepAliveTime |
When the number of threads is greater than the core, this is the maximum time that excess idle threads will wait for new tasks before terminating. | 60 |
workQueueClassName |
The BlockingQueue class to use in ThreadPoolExecutor constructor. |
SynchronousQueue |
capacity |
The initial capacity of the BloquingQueue<Runnable> (0 for no or default initial capacity.) |
0 |
The properties are passed to the first ThreadPoolExecutor constructor.
Encrypting Properties in the aceql-server.properties file
In order to protect configuration passwords and other confidential values from eavesdropping, each property value may be replaced by an encrypted value in the aceql-server.properties file.
The encrypted values are generated using the PropertiesEncryptor class which allows you:
- To choose a secret password that will be used for encrypting each selected property value.
- To encrypt each selected value.
In order for the AceQL Server to decrypt the properties at runtime, the secret password must be returned by the getPassword() of a concrete implementation of the PropertiesPasswordManager interface. A default implementation is provided: DefaultPropertiesPasswordManager.
The PropertiesPasswordManager concrete class name must then be defined with the propertiesPasswordManagerClassName property. See the Properties Password Manager Section of the aceql-server.properties file.
Running the PropertiesEncryptor class
In order to run the PropertiesEncryptor class:
-
Open a command line on Windows or Linux/Bash.
-
Windows:
-
cd <installation-directory>/AceQL/bin> - run
properties-encryptor.bat.
-
-
Linux/Unix:
-
cd <installation-directory>/bin> - run
properties-encryptorBash.
-
-
Follow the instructions to create the password and encrypt property values.
Running the AceQL Web Server without Windows Desktop
If you don't have access to the Windows Desktop interface (running in a cloud instance, etc.) you can still run the AceQL HTTP Web Server from the command line.
- see
<installation-directory>\AceQL\bin\aceql-server.batscript.
You can also start/stop the AceQL Web Server from your java programs, as explained in the next section.
AceQL internals
Data transport
Transport format
AceQL transfers the least possible amount of metadata:
- Request parameters are transported in UTF-8 format
- JSON format is used for data and class transport
Content streaming and memory management
All requests are streamed:
- Output requests (from the client side) are streamed directly from the socket to the server to avoid buffering any content body
- Input responses (for the client side) are streamed directly from the socket to the server to efficiently read the response body
Large content (ResultSet, Blobs/Clobs) is transferred using files and never loaded in memory. Streaming techniques are always used to read and write this content.
Managing temporary files
AceQL uses temporary files which contain:
- Contents of Result Sets
- Contents of Blobs and Clobs
Temporary files are created to allow streaming and/or enable the earliest possible release of SQL resources and network resources.
These temporary files are automatically cleaned (deleted) by AceQL on the server side.
If you want to ensure that temporary files will be cleaned, you can access the temporary directories:
-
ResultSetdata is dumped in theuser.home/.kawansoft/tmpdirectory -
The uploaded/downloaded Blob or Clob files are located in the directory defined by
DatabaseConfigurator.getBlobsDirectory(). DefaultDefaultDatabaseConfigurator.getBlobsDirectory()implementation stores the Blob/Clob files inuser.home/.aceql-server-root/username.
Where:
-
user.home= theuser.homeof the user that started the AceQL Web Server. -
username= the username of the client user.
