0x4447 Product Answering Machine Save
☎️ An automated answering machine build on top of Amazon Connect
☎️ Answering Machine
This small demo tries to simulate an automated answering machine built on top of Amazon Connect and AWS Lex. The stack basically pushes what you can do with Amazon Connect to the limit because Connect was never designed to be used in a scenario like this. But we do like to test the limits of what the cloud has to offer here at 0x4447, so we did it anyway, just to see where the stack would break. So enjoy the read.
Overview
AWS Lex
Lex is the AWS service that powers Amazon Alexa, a Machine Learning model designed to understand the human voice by extracting the intent in the detected voice. The service also allows interfacing with AWS Lambda to control how Lex processes the intents.
Amazon Connect
Amazon Connect is a virtual call center service we can use to create phone call flows based on user input, time of day, active agents, and more. This means that when someone calls a phone number we've bought, we can screen the caller with a basic number wall of options the caller can choose from. Or, if Connect is combined with Lex, the caller can talk back based on questions asked.
All Together
In addition to these two services, we can add a number of Lambda functions to gain complete control over Lex and Connect. We can do the following:
- Intercept actions from Lex
- Receive notifications from Connect about all interactions with the caller
This enables us to ask for the caller's name if it doesn't appear in the database or use the caller's name in greeting if the calling number has a matching name.
Known Issues
We're pushing Connect to the limit, so there will be issues that can't be solved and issues that require more code to solve, which would lead to overkill for this type of project. Regardless, those issues are listed below:
- There isn't a delay after the "I'm looking for..." since there isn't a delay block in connect. You could solve this with a Lambda and a timeout.
- More often than not, Lex will struggle to get the message at the end of the flow because there isn't a general intent type that will just accept whatever is said. Lex is designed to determine the meaning of a sentence. The only way to solve this would be for AWS to add a new slot that just transcribes what is said.
DISCLAIMER!
This stack is available to anyone at no cost, but on an as-is basis. 0x4447, LLC is not responsible for damages or costs of any kind that may occur when you use the stack. You take full responsibility when you use it.
Deploy
This project is described using a CloudFormation file. Sadly, Lex and Connect are not yet supported by CloudFormation, and before deploying the stack, we need to perform some manual tasks to gather all necessary details for the CF stack itself.
AWS Lex
- Go to the Lex console.
- Click the blue button
Create.- Select
Custom bot. - Type
Officeas the name of your bot. - Select your favorite
Output voice. Joanna seems to be the most natural-sounding of them all. - Set five minutes in the
Session timeoutfield. - Select
Noin theCOPPAsection. - Click
Create.
- Select
- On the new page, click
Create Intent.- On the pop-up, select
Create intent. - Name it
GetName - In the
Slotssection, we first need to create a new entry calledfirst_namewith aSlot typeofAMAZON.US_FIRST_NAMEand aPromptset asCan I have your name. - Click the
+button next to the slot to save it. - Now that we have the Slot, we'll write some possible sentences a caller might use. You can come up with more if you like, but here are a few:
-
Yes sure my name is {first_name} -
I'm {first_name} -
My name is {first_name} -
{first_name} - Scroll down to the bottom and click
Save intent.
-
- On the pop-up, select
- We're going to make another Intent called
GetMessage.- For the
Slots, typemessage. - For the
Slot type, selectAMAZON.Festival. We want the most general type possible, because we want to get the entire voice transcript rather than letting Lex try to understand the meaning of what's said. - For
Prompt, type anything. Lex won't be asking the question, our lambda will. - Click the
+button next to the slot to save it. - Scroll down to the bottom and click
Save intent.
- For the
- On the same page, select
Error Hanlingfrom the left menu.- For
Clarification prompts, type something like:-
Sorry, I didn't hear you. -
What's that?
-
- Set the
Maximum number of retriesto three. - For the
Hang-up phrase, write:Sorry, the connection is bad. Please go to our contact page to send us an email. - Click the
+button next to the message. - Click the
xbutton for the default disconnect message.
- For
- On the Settings tab, go to
Aliasesand create an alias namedproduction. Then select the latestBot version. This alias is important for building our setup. - On the page's top right corner, click
Build. Once the process is done, you can test your bot by tying any string that infers your name. In return, only your name should be extracted from the message. - The last step is to publish the bot.
- Click
Publishat the top right corner next toBuild. - From the modal, select the alias that we created in the step above.
- Once the process is done, the bot is ready to be used by Connect.
- Click
Amazon Connect
- Go to the Connect console.
- Click the blue
Add an instancebutton orGet Started.- Check
Store users within Amazon Connect, write the name for theAccess URL, and clickNext step. - On the
Create an Administratorpage, fill out the form for a new admin user. This has nothing to do with a IAM user. Once ready, clickNext step. - On
Telephony Options, check all options if you like, then clickNext step. - Keep the
Data storagepage as is by clickingNext step. - Review the setup and click
Create instancewhen ready.
- Check
- Click on your new Connect setup and click
Contact flowsat the bottom of the left menu.- In the
Amazon Lexsection, select the region where you created the bot. - From the
Botdrop-down menu, select the Lex bot we created in the previous setup. - Click
+ add Lex Bot.
- In the
When this is done, we have Lex linked with Connect and the Connect Instance ARN for CloudFormation.
CloudFormation

To deploy this stack, all you need to do is click the button to the left and follow the instructions that CloudFormation provides in your AWS Dashboard. Alternatively, you can download the CF file from here.
What Will Deploy?
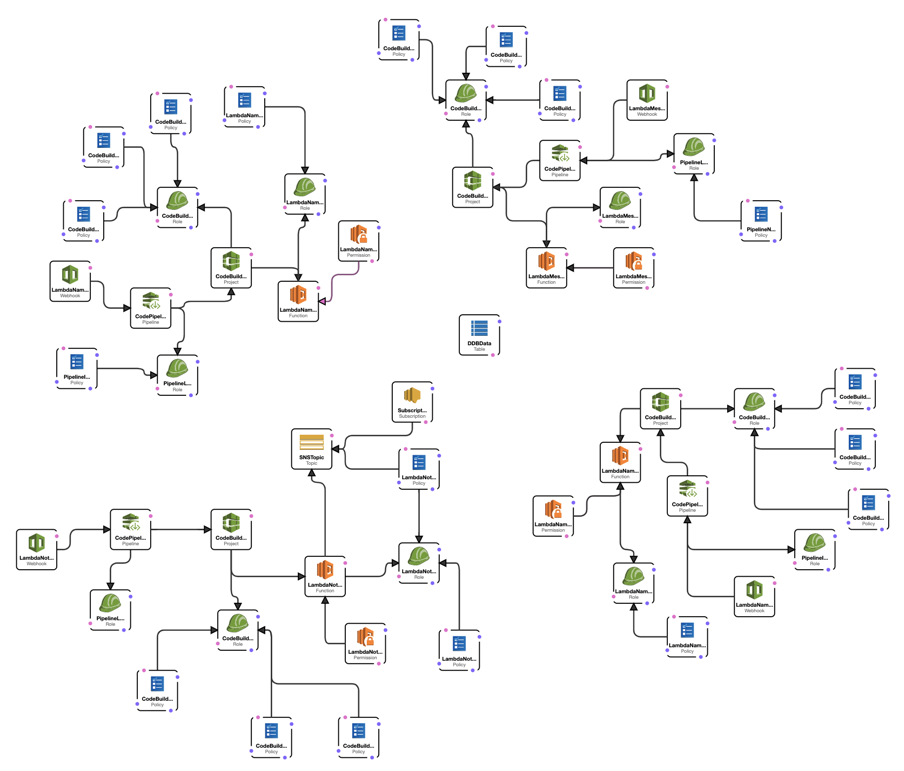
The stack takes advantage of AWS SES, AWS Lambda, and DyamoDB. You'll get:
- 4x AWS Lambda (1x CodeBuild and 1x CodePipeline for each Lambda to support auto-deployment)
- 1x DynamoDB table
- 1x SES Topic
- 1x SES Subscription
All project resources can be found here.
Auto Deploy
The stack is set up in a such a way that when new code is pushed to a selected branch, the CodePipeline picks up the change and updates the Lambdas for you. These are the available branches:
- master: the latest stable code
- development: unstable code that we test in our test environment - we don't recommend that you use this branch
AWS Lex Update
Now that we've deployed the stack, we have to go back to Lex for a moment to set one of the deployed Lambda to process the intent.
- Go to the Lex console.
- Click on the
Offciebot we previously created. - For the Intent, click on the
GetMessage. - In the
Lambda initialization and validationsection:- Check
Initialization and validation code hook. - From the drop down bellow, select the Message Lambda, and click
Okwhen the modal drops down.
- Check
- For the
Fulfillmentsection below:- Select
AWS Lambda function. - From the drop down below, select the Message Lambda.
- Select
- Scroll down to the bottom and click
Save intent.
Amazon Connect Flow

This part of the setup requires that you edit a JSON file to update it to your setup. But before we do that, let's start with the basics.
- Use the URL you created to access the Connect dashboard.
- Once logged in, hover over the third icon from the left menu and select
Contact flows. - On the
Contact flowspage, clickCreate contact flow. - On the new page, name your flow (for example,
Office).
At this stage, you can download our contact flow that we create. This is the file that you'll have to edit, replacing some ARNs of the Lambda functions with your own. Sadly, there's no automatic way to do this. You can find the Lambda ARNs in the output section of the deployed stack in CloudFormation.
Once you change the file, you can import the flow. At the top right corner is the Save button, which has a downward-pointing arrow. Click on it and select Import flow (beta). Select the file and upload it. Once the flow shows up on the page, don't forget to click Publish. At this point, we have to attach the flow we made with a phone number. To do so, follow these steps:
- Select the third icon on the left menu list and click
Phone numbers. - Click
Claim a numberon the right side of the page. - Select the country on the new page.
- Select the number you like best from the list of numbers.
- Add a simple
Description. - Select the flow you created from the
Contact flow/IVRdrop-down. - Click
Save.
Pricing
All resources deployed via this stack will potentially cost you money, but you'd have to do the following for this to happen:
- Invoke Lambdas over 1,000,000 times per month
- Send over 1000 SNS emails per month
- Send over 1 GB of data per month through SNS
- Exceed 100 build minutes on CodeBuild
- Exceed the read and write capacity of DynamoDB
- $1 per active CodePipeline (must run at least once a month to be considered active)
The only payment you'll encounter from Day One is with Connect, since they bill per minutes of use. Check their pricing page to get an idea of the cost.
How to work with this project
When you want to deploy the stack, the only file you should be interested in is the CloudFormation.json file. If you'd like to modify the stack, we recommend that you use the Grapes framework, which was designed to make it easier to work with the CloudFormation file. If you'd like to keep your sanity, never edit the main CF file 🤪.
The End
If you enjoyed this project, please consider giving it a 🌟. And check out our 0x4447 GitHub account, where you'll find additional resources you might find useful or interesting.
Sponsor 🎊
This project is brought to you by 0x4447 LLC, a software company specializing in building custom solutions on top of AWS. Follow this link to learn more: https://0x4447.com. Alternatively, send an email to [email protected].
