Streamline Save
A reference system for end to end live streaming video. Capture, encode, package, uplink, origin, CDN, and player.
![]()
![]()
Streamline
Streamline is a reference system design for a premium quality, white label, end to end live streaming system from HDMI / HD-SDI capture all the way to a player on a CDN that works on web, iOS, and Android devices.
Using commodity computer hardware, free software, and AWS, it’s an affordable way to learn how to build a very high quality live streaming system.
This project is primarily designed as a learning tool for people to learn how live video works end to end. It is meant to be as simple to understand as possible while still providing great visual quality and streaming performance. It’s not meant for production use as it hasn’t been heavily tested over long periods of time and there are many hard coded parameters. It also may just simply stop working at any time since I’m using the master branch of FFmpeg. Maybe in the next version iteration I’ll freeze to that, which will help, but that’s not out yet.
Processing on this system is a hybrid of GPU and CPU.
What is this not?
Streamline is not meant for mobile streaming, it’s meant for streaming from a more professional production with dedicated cameras, microphones, and video switching equipment. Think more “Apple Product Launch” live streaming, not Periscope or Twitch. In fact it’s not designed currently to feed services like YouTube Live, Facebook live, etc, it is meant to be its own end to end platform. The video will work on web browsers on a computer, iOS, or Android.
It's also not a production ready tool. I wouldn't like, use this in production. It might explode. I make no promises that it wont explode on you. Go check out AWS Elemental, Wowza, Bitmovin, Haivision, etc if you want production ready stuff with support that is available.
What is included?
- Hardware and OS specs for an encoder.
- A script to build the software on the encoder.
- Scripts that use FFmpeg to capture, process, and encode the video, and then create a web page and a player that can allow you to watch this live video.
- An Amazon Web Services configuration directions for an origin web server and a CDN configuration.
Projects leveraged
Services leveraged
Project approach
Since this is meant primarily as a teaching tool, we're going to be "showing our work" a lot, and, favoring simple to understand implementations over absolute ease of use through automation.
There are many architectures that can be used to build an end to end live streaming system. We have chosen one that provides better quality, is easy to understand, and has low server side costs. The tradeoff here is that it does require a faster connection from the encoder to the internet and requires more powerful hardware on site.
Additionally, we are not a production tool like OBS or Wirecast, meaning no video switching or compositing is provided. This is designed for higher end productions where you would use dedicated hardware for that purpose, like an ATEM switcher from Blackmagic.
We have not tried to address all possible hardware or trying to co-exist with a multi function system. We are targeting specific hardware with a dedicated software stack, giving us the most control for reliability as the project matures.
Parts of the system

Source - Camera with HDMI or HD-SDI output. (it could be a video switcher or a matrix router in a larger production.) We will be taking in raw video from a camera or some video production system. It will be a raw, uncompressed, full quality video source. HDMI and HD-SDI are two different standards for how you can connect raw video between devices. Our goal here is to take this source and compress it and deliver it across the internet, yet, try to make it look as close as possible to this original “golden master” source.
Encoder - A desktop PC with an NVIDIA Quadro GPU and Blackmagic Capture Card. The encoder is running FFMPEG which will take the raw video and audio from the capture card, and compress it. It will then multiplex it into mpeg-ts, and send it via HTTP PUT to a web server, as well as send up a manifest. It will continue to send new manifests as they are needed, and it will send HTTP DELETE requests on the old segments. I’ll provide a parts list for this, but, you can vary the hardware to some extend, such as building it as a rack mount server.
Origin server - This will be the web server that will host the segments of video that come in, so that clients can pull them now. We will be using the software “Caddy Server” for this use case. It will receive HTTP PUTs of segments from the encoder.
CDN - Between the clients and the origin server, will be a network of caching servers all over the world, called edge servers, to scale out how many people can watch at once and improve their viewing experience. We will use Amazon’s CloudFront CDN for this.
Web Page - The web page that people hit which contains the video
Player - This is the software running on the web page which pulls down the manifest repeatedly, decides which bitrates to play, then requests the segments and shoves them into the media source API of the web page for decoding and display. We will be using HLS.js for this.
How does streaming work?
Lets start off by talking about how live streaming works. As a disclaimer, I’m going to be explaining HLS. HLS is a very common live streaming protocol, which allows for high quality and adaptive bitrate, at scale, on publicly available content delivery networks. Is HLS the best protocol? No, it has issues like very high latency, often around 15 seconds, and that it is controlled by Apple. However, it is common, simple to understand, there are many tools for it, and with the right approach can work pretty much everywhere. There are many ways to implement HLS, and I’m going to describe a very basic one. I can’t cover every rule of HLS here, so if you want to know more check out the HLS spec on Apple’s developer website. I’ll cover things like live and ABR, but I will skip things like DVR, or going live to VOD, etc. If want to know more about the lower level details of how video works, check out this link.
While we would imagine a more complex production typically, the simplest source to imagine is a camera with HDMI or SDI output. You would plug this camera into your “encoder” which will take the raw uncompressed video and audio, compress each source, package it into segments, and send it to a server hosted in AWS EC2. Each segment is typically one second to ten seconds long, depending on your goals and use cases. Contained within each segment is a stream of H.264 compressed video data, and AAC compressed audio data. These two streams are multiplexed together with a “container” which in this use case is mpeg-ts (transport stream).
When a segment is created, it is added to a manifest. A manifest in HLS is a .m3u8 file. Its a text file which contains the URLs for all of the segments. It would look something like “playlist.m3u8” and if you were to open it with a text editor, it’s fully human readable.
If you have only one segment (because you just started) your manifest would look like...
#EXTM3U
#EXT-X-VERSION:3
#EXT-X-TARGETDURATION:2
#EXT-X-MEDIA-SEQUENCE:0
#EXTINF:2.000000,
1435_10.ts
If you have three segments it would look like...
#EXTM3U
#EXT-X-VERSION:3
#EXT-X-TARGETDURATION:2
#EXT-X-MEDIA-SEQUENCE:0
#EXTINF:2.000000,
1435_10.ts
#EXTINF:2.000000,
1435_11.ts
#EXTINF:2.000000,
1435_12.ts
Eventually you will reach the max number of segments in your manifest (which is configurable). At that point you would start removing old segments while you add new ones. Thus, you have a rolling window. It’s like a caterpillar track, as you lay down new segments you pick up old ones by deleting them. Note that segment 0 is now gone.
#EXTM3U
#EXT-X-VERSION:3
#EXT-X-TARGETDURATION:2
#EXT-X-MEDIA-SEQUENCE:1
#EXTINF:2.000000,
1435_11.ts
#EXTINF:2.000000,
1435_12.ts
#EXTINF:2.000000,
1435_13.ts
#EXTINF:2.000000,
1435_14.ts
#EXTINF:2.000000,
1435_15.ts
On the client, there will be what's called a "player." This is software that reads the manifest, and will keep pulling it down regularly looking for new segments. As it sees new segments, it will pull them down too and feed them into the player one after another, like a playlist of songs. The player will seamlessly go from one to the next as they come down. It will also make decisions such as what bitrate to select so that it does not rebuffer.
One important part of streaming, is bitrate adaptation. Some people will be on a cell phone, some will be on a fast wifi connection at home on a laptop. It’s important to provide the best quality experience given the variations in the speeds of different connections. To that end, we create multiple streams at different bitrates simultaneously, and a “variant playlist” which is a manifest that lists the location of the manifests for each bitrate stream. If you provide this variant playlist to a player, it can then decide which is the maximum quality for it’s connection in real time and adapt to that.
If you were to pull down a variant playlist like...
curl http://ec2-54-183-60-162.us-west-1.compute.amazonaws.com/5906.m3u8
You would get...
#EXTM3U
#EXT-X-VERSION:3
#EXT-X-MEDIA:TYPE=AUDIO,GROUP-ID="group_teh_audio",NAME="audio_0",DEFAULT=YES,URI="5906_0.m3u8"
#EXT-X-STREAM-INF:BANDWIDTH=140800,CODECS="mp4a.40.2",AUDIO="group_teh_audio"
5906_0.m3u8

#EXT-X-STREAM-INF:BANDWIDTH=1020800,RESOLUTION=512x288,CODECS="avc1.640015,mp4a.40.2",AUDIO="group_teh_audio"
5906_1.m3u8

#EXT-X-STREAM-INF:BANDWIDTH=1900800,RESOLUTION=640x360,CODECS="avc1.64001e,mp4a.40.2",AUDIO="group_teh_audio"
5906_2.m3u8

#EXT-X-STREAM-INF:BANDWIDTH=2560800,RESOLUTION=768x432,CODECS="avc1.64001e,mp4a.40.2",AUDIO="group_teh_audio"
5906_3.m3u8

#EXT-X-STREAM-INF:BANDWIDTH=4980800,RESOLUTION=960x540,CODECS="avc1.64001f,mp4a.40.2",AUDIO="group_teh_audio"
5906_4.m3u8

#EXT-X-STREAM-INF:BANDWIDTH=7400800,RESOLUTION=1280x720,CODECS="avc1.64001f,mp4a.40.2",AUDIO="group_teh_audio"
5906_5.m3u8

#EXT-X-STREAM-INF:BANDWIDTH=13340800,RESOLUTION=1920x1080,CODECS="avc1.640028,mp4a.40.2",AUDIO="group_teh_audio"
5906_6.m3u8
Notice how this calls out each resolution, bitrate, and codecs for each stream level. This allows us to share one audio stream between all of the video streams without having to copy it into every single video. It also allows the player to know whats available for it to adapt up and down to depending on the speed of the client internet connection.
Cool, we got that? Great. Let’s actually build this thing now.
Getting the hardware
Here is a parts list on Amazon of what I used to build my encoder. It’s a bit overkill, but it leaves room to grow.
With the current setup, an NVIDIA GPU is required. I used a quadro which is not artificially limited by NVIDIA to two encodes at at time. I’m thinking of trying to get away with only two encodes so you can use a geforce, but I haven’t tested that yet. I am however doing all the scaling on the GPU, freeing up more cycles for the CPU, but I don’t know if they limit scaling or not on a geforce. In the future I might get a slower GPU and get a threadripper CPU to do more encoding on the CPU for better quality. There are tons of configurations you can do, this is just a reference of something that worked and has room to grow. You can put it in smaller form factors, use an intel chip, whatever if you want.
Building the encoder
After ordering your parts, put it together like a normal DIY PC.
Does the PC have a WiFi module in it? Rip it out! If it’s there, someone might be stupid enough to try using WiFi for high bitrate live video streaming. Obviously, this would not be a good idea. ;) Ethernet cables are your friend.
Next, install Ubuntu Desktop 18.04 LTS 64 bit. To do this you will create a bootable USB stick to install the OS on your newly assembled encoder. You can follow the directions here. Feel free to skip the boxes that are asking if you want to install drivers or download updates.
Note that the screen shots in this readme are from 16.04 but everything should be roughly the same and 18.04 has been tested. I'll update the screenshots in the future.
Once you have installed and rebooted, log in, then open up the program “terminal.” Now run the command...
sudo apt-get -y update && sudo apt-get -y upgrade && sudo apt-get -y install git
Now you can clone the repository to get the scripts for this project.
cd ~/ && git clone https://github.com/streamlinevideo/streamline.git
Now lets execute the build script. This script will download all of the drivers you need for the NVIDIA GPU and Black Magic DeckLink capture card, as well as correctly compile FFmpeg for you with support for all the codecs and hardware that we need.
cd ~/streamline && ./buildEncoder.sh
Let it sit and finish everything until it tells you to reboot, then do so. Simply type...
reboot
Once you’re rebooted and back at the desktop, open up the BlackMagic Desktop Video software, which was installed by the build script. If this is your first time using a brand new Black Magic capture card, you may need to update it's firmware. This can be done with the application "Blackmagic Firmware Updater." Do that before proceeding.

Select HDMI or HD-SDI, whichever you will be using to ingest your raw video. Now plug in your video source. This is the HDMI or HD-SDI from your camera. The default is HD-SDI. You will need to select the video input manually if you want to use HDMI.

You should see that it detected the resolution and frame rate of your incoming video if you have the right input selected and everything is working correctly.

Next go ahead and open Media Express (also installed with the Black Magic software). Click on "Log and Capture", and see if you see your video. Close this window. You must close this if you intend to stream, you cannot have two pieces of software using the capture card at the same time.

Building the origin server
To proceed you will need an Amazon Web Services account.
Once you’ve made one, go to the EC2 console. Click on the region on the top right that is nearest to you.

Now hit the blue "Launch Instance" button.

On the "Choose AMI" screen, please select Ubuntu 16.04 by hitting the blue "Select" button next to it.

Now select your instance type. This is how fast your instance is and its resources. I’m going to choose a m4.xlarge for the sake of my personal testing. It’s a quad core instance with pretty good network throughput. In a Northern California data center, at the time of writing this, it’s $0.2 per Hour. That’s about 5 bucks a day. You can find AWS instance pricing here. The larger your origin server, the more edge servers can pull from your origin at the same time before overwhelming it. Small streams can use small origins. Large streams will need bigger ones. It's actually somewhat difficult to predict the capacity you will need, so I'd recommend only using larger instance types for the duration of large events. Don't forget to watch your AWS bill, this can add up fast and sometimes can be wrong! Keep a close eye on how much you're getting charged. After you've clicked on m4.2xlarge (or whatever you choose) click "Next: Configure Instance Details"

Now hit on the upper right "6. Configure Security Group" From here you can enable port 80 to the world, this is the port from which our CDN will be pulling our HTTP streams. Hit “Add Rule” then make the type "HTTP" to port open on 80 from the source of “Anywhere.” Then hit "Review and Launch" on the lower right hand corner.

On the next screen where it says "Step 7: Review Instance Launch" go ahead and hit the blue "Launch" button on the lower right.

Next a dialogue will ask you to “Select an existing key pair or create a new key pair.” You will want to “Create a new key pair” and name it. I’ll call it “myawesomekey.” Hit "Download Key Pair" to download the key.

Now hit the blue "Launch Instances" button. Now hit “view instances”.
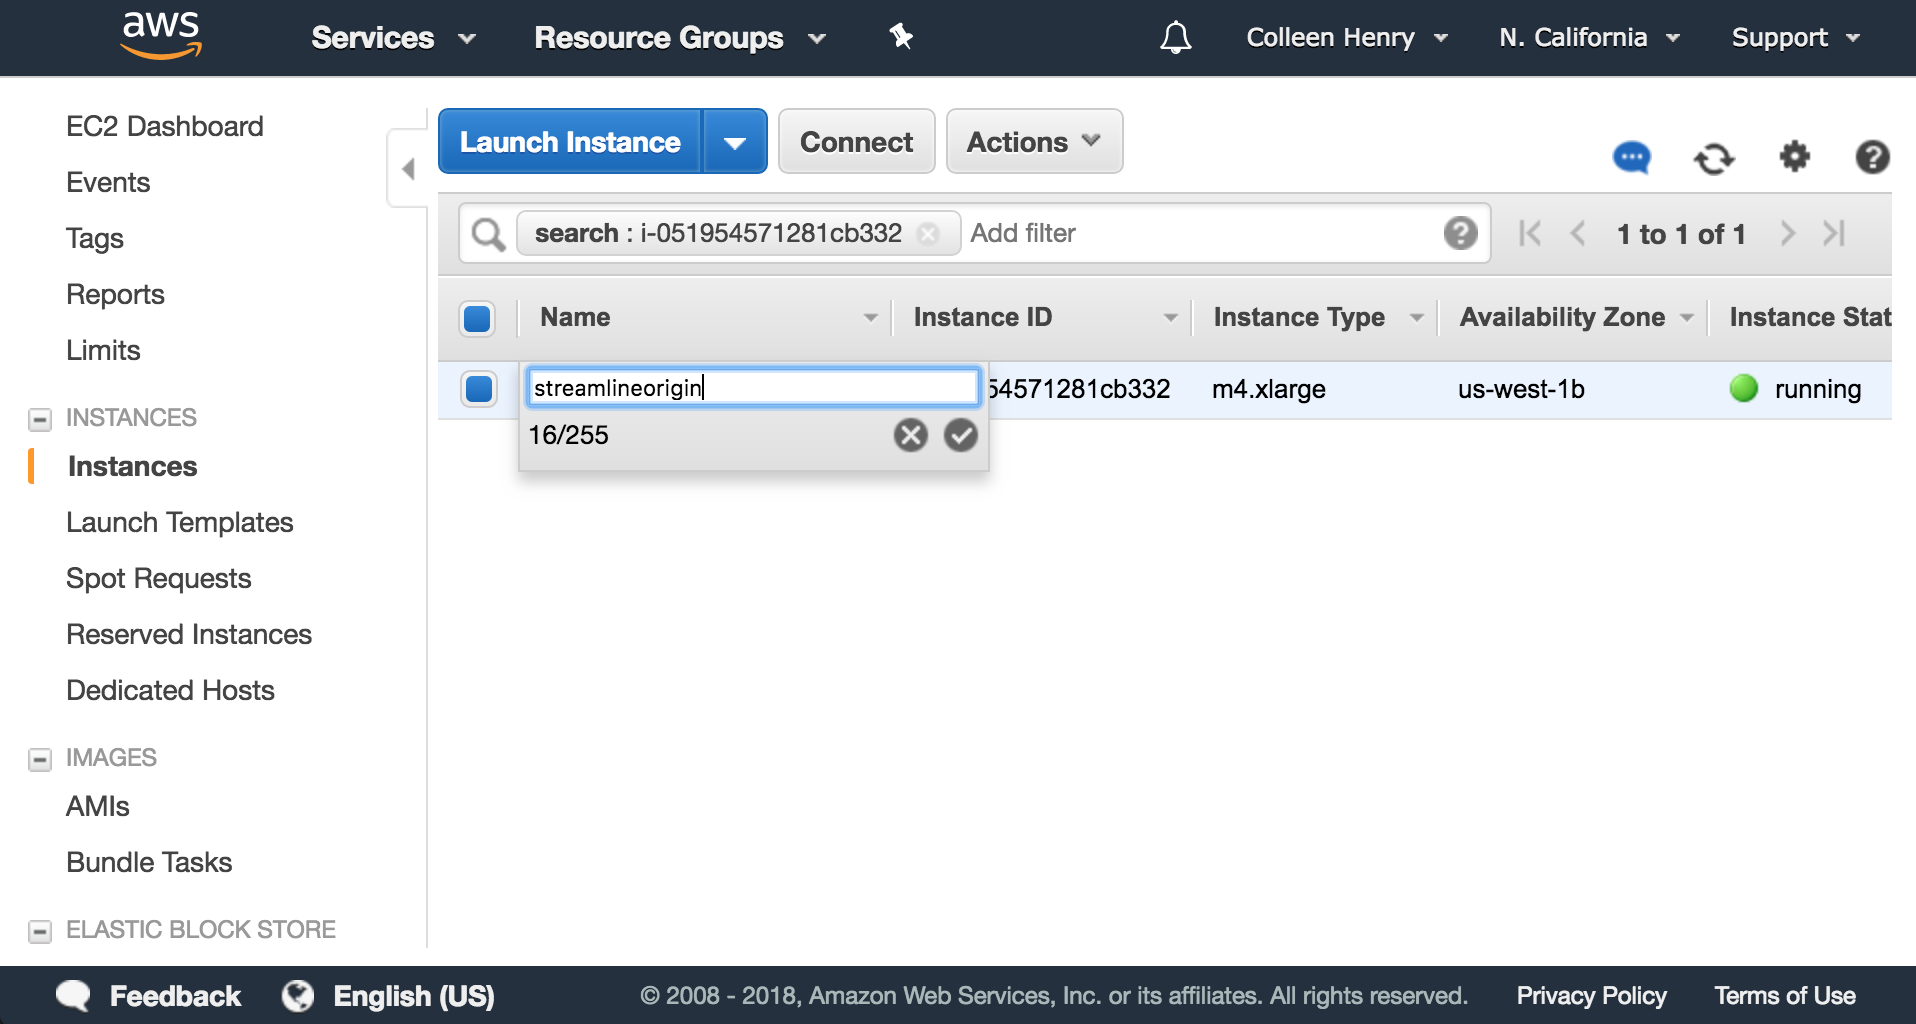
You will notice the name of your instance is blank on this screen. Hover over the blank area and click on the edit pencil and give your instance a name. I’ll call it “streamlineorigin.”
Now we will want to click on “Connect” up near the launch instance button. This will show you how to SSH (remotely connect to the command line shell of the remote server.) This step is different based on your personal operating system. There is a link to directions on this screen for how to connect via Windows if you hit “connect using PuTTY”.

On Linux or MacOS, simply find where you downloaded your key, and move it to your ~/.ssh directory, and then change it’s permissions to be correct. That would be in your terminal (asuming you're in the folder it was downloaded to)...
cp myawesomekey.pem ~/.ssh/myawesomekey.pem && sudo chmod 400 ~/.ssh/myawesomekey.pem
Cool, now you can SSH into your server. Again follow the PuTTY directions if you’re on Windows. For MacOS and Linux, go ahead copy the example command line from this window.
An example looks like
ssh -i ~/.ssh/myawesomekey.pem [email protected]
Cool, now you are SSHed into your origin server.
Now go ahead and clone this repository to get the build ...
git clone https://github.com/streamlinevideo/streamline.git && cd ~/streamline && ./buildServer.sh
At some point this will pop up. Just hit enter.

After the script is done, you will want to go ahead and download your caddy server. Go to caddyserver.com/download and choose the “Platform” to be “Linux 64-bit” and add the plugins http.cors and http.webdav. I’m going to assume that you are using this all for personal use, so please go ahead and select the personal license. If you are using this for Commercial stuff (please go ahead and use the commercial license workflow.) If you want to use server that is free for commercial use, but slightly harder to configure, but has no cost, please check out NGINX or Apache. You will need to Google how to allow HTTP PUT uploads. Caddy is nice because it’s so simple, and, if you need, it does HTTPS configuration for you super quickly.
After you’ve selected your options, copy the “One-step installer script (bash):” command line into your terminal where you are SSHed into your server. This will look like.
curl https://getcaddy.com | bash -s personal hook.service,http.cors,http.webdav
Paste this command into your terminal, and hit enter. Note that this is a personal license. Make sure this fits your use case before using it.
sudo caddy -service install -conf /home/ubuntu/streamline/caddyFile && sudo caddy -service start
Your origin server is now running.
Building the CDN
Go to https://console.aws.amazon.com/cloudfront/home

Click “Create Distribution”
Then click under Web “Get Started”

Under origin domain name, put the URL of your origin server. Earlier my example was “ec2-54-183-60-162.us-west-1.compute.amazonaws.com” You will also want to enable CORS to work on any domain (or your specific one), if you want to embed this on a third party website. To do that add a header under "Header Name" called "Access-Control-Allow-Origin" and give it a value of "*".

Then scroll all the way down...

...and click the blue “Create Distribution.” button.
Now click on your distribution and click “Distribution Settings”

Now click on “behaviors” then click the blue "Create behavior" button.

Make the “Push Pattern” *.m3u8. Hit “Customize” next to “Object Caching.” Then, change the "Maximum TTL" and "Default TTL" to 1. This means that the manifest won’t be cached in the system longer than 1 second. If we don’t do this, we will get stale manifests. That would work for on demand video, but, not for live HLS where we have to keep pulling down the manifest down. Therefore, we don't want this to be cached for too long. Scroll to the bottom and hit the blue “Create” button.
If you go back to your distributions you can see the status of your distribution, and you can see the domain name. Please copy that domain name.
You will have to wait for the Status of the distribution to go from “In Progress” to “ready” before you can use it. When it’s “ready” you are about ready to stream!
Now you can take that URL and go back to your encoder. You can SSH into it if you like and control it remotely. An example I had was d1043ohasfxsrx.cloudfront.net. Yours will look something similar.
Now go back to the terminal of your encoder. You can also feel free to SSH into the encoder from the computer you are controlling AWS from to make copying and pasting easier, an open-ssh server is now running. Once you are there go into the streamline directory...
cd ~/streamline
You are now all ready to launch your stream! Run the launch.sh script and put URL of your origin server as the first argument, and the url to your cloudfront distribution as the second argument. Make sure not to add http:// or https:// to the hostnames.
Run...
./launch.sh ec2-54-183-60-162.us-west-1.compute.amazonaws.com d1043ohasfxsrx.cloudfront.net
The command line will return something like
...and awaaaaayyyyy we go! 🚀🚀🚀🚀
Input detected on DeckLink Mini Recorder 4K as 1080 59.94
Currently streaming to: https://d1043ohasfxsrx.cloudfront.net/1014.html
If you go to this URL in your web browser you can now see your live video. 🔥🔥🔥 The encode script also creates an HTML page with an embedded hls.js player and uploads it along with the video stream. The hls.js player will pull down all of the segments and put them into the media source apis in the client's web browser in real time as they are added to the manifest. For iOS, we will use the
Every video will get a unique four digit ID based on the time it was created, which will be used in the naming of the page, the manifest, and the segments. This gives them all unique names so that the caches in the CDN do not serve up stale segments.
To kill the encoder run...
./kill.sh
This setup will result in HTTPS delivery, but, without further configuration you are relatively insecure as there is currently no authentication set up. If people find your origin server URL, they can use your platform. Also the video between the encoder and the server is unencrypted. I’ll leave that for people to figure out on their own for now :). The software supports SSL on the upload, if you get yourself a domain name and figure out how to configure it. Check out route53 and the caddy server documentation for more.
Things to know
There is no security in this configuration. Other people could stream using this system if you don't lock it down. One way to lock it down is to configure the network security such that you can only do HTTP PUTs from a specific static IP to an upload port, which would be the IP of your encoder. You would want to use a different port to allow the CloudFront CDN to pull from it. We may add directions for this in the future.
FFMPEG’s output will log to...
~/streamline/logs/encode.log
If you find your streaming dying or rebuffering, watch the logs in real time. It should update at regular intervals to give you info. If you see the FPS below real time, or things running slower than 1x, your computer or your internet connection is not fast enough. It should look something like... “speed= 1x” if it’s running correctly, meaning, it's able to compress and stream out the video as fast as it’s coming in. This is most likely your bandwidth not being fast enough on the uplink.
Run...
watch tail ~/streamline/logs/encode.log
You can see if ffmpeg is running or not by running...
ps aux | grep ffmpeg
If you see a command line there, it’s running.
Join the community
We hang out on the video-dev slack chat in #streamline.
You can join video-dev here! https://video-dev.herokuapp.com/
Come hang with us! 2
Coming soon
- LHLS playback (pending finding an open source player which can support it, we have a server ready).
- Server side dynamic player creation.
- Maybe add low latency DASH.
- Clean up the build scripts / install process even further.
- Tune encoding parameters.
- VP9 in DASH via FPGA encoding. (We had it based on Intel, but, their implementation didn't provide useful gains.)
- Refine bitrates.
- More commenting.
Cool future work / Areas you can contribute / TODOs
- Remove any dependencies that are vestigial.
- Burn in test over time.
- Create a config for NGINX or Apache which works as well as Caddy, so all of sever install can be scripted, and can be used outside of a personal license.
- Add some sort of speed test so that you know what your connection can handle rather than rebuffering if the pixel rate is too aggressive.
- Create a way to remove old HTML files cleanly.
- Create an embed code setup.
- Move to a fixed version of FFmpeg when a stable branch comes out.
- Create a 4kp50 and 4kp60 profile.
- Make a web UI.
- Allow for redundant encoders / internet connections.
- Maybe make a cheaper intel-only version with hardware encoding.
- Add some animations that make it easier to understand.
- We would love an open-source LHLS client to go with the LHLS support we’re adding (Hint, hint).
- Refine hardware choices to be no more expensive than necessary. Gaming cards are able to do 2x NVENC encodes, where quadros are unlimited. However, we might be able to get away with one if we eliminate 1440p on the 4k encode. Hopefully it is not limited in how many scalers it can run at one time.
Acknowledgements
- Thank you Lei Zhang for your help on the input detection and ongoing work on LHLS.
- Thank you to Matt McClure for asking me to do a talk at the SF video meetup, which eventually spawned this monstrosity.
