PIFu Save
This repository contains the code for the paper "PIFu: Pixel-Aligned Implicit Function for High-Resolution Clothed Human Digitization"
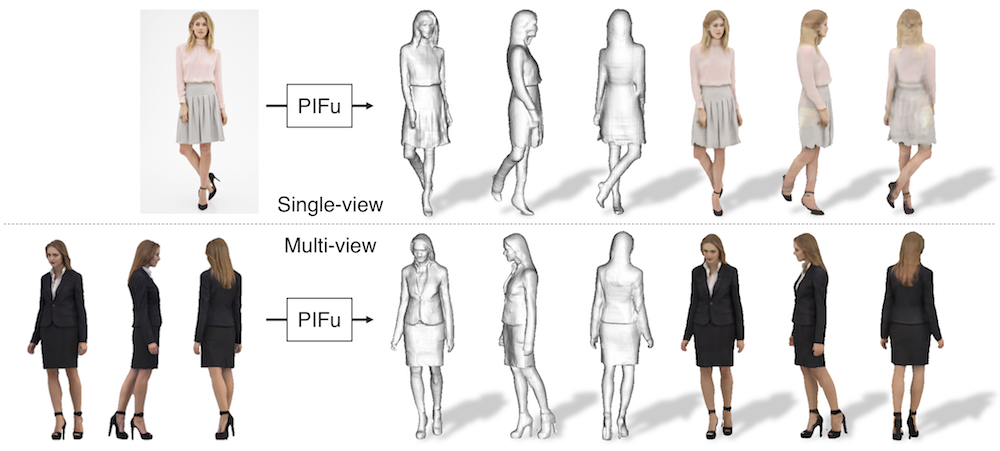
PIFu: Pixel-Aligned Implicit Function for High-Resolution Clothed Human Digitization
![]()
News:
- [2020/05/04] Added EGL rendering option for training data generation. Now you can create your own training data with headless machines!
- [2020/04/13] Demo with Google Colab (incl. visualization) is available. Special thanks to @nanopoteto!!!
- [2020/02/26] License is updated to MIT license! Enjoy!
This repository contains a pytorch implementation of "PIFu: Pixel-Aligned Implicit Function for High-Resolution Clothed Human Digitization".
If you find the code useful in your research, please consider citing the paper.
@InProceedings{saito2019pifu,
author = {Saito, Shunsuke and Huang, Zeng and Natsume, Ryota and Morishima, Shigeo and Kanazawa, Angjoo and Li, Hao},
title = {PIFu: Pixel-Aligned Implicit Function for High-Resolution Clothed Human Digitization},
booktitle = {The IEEE International Conference on Computer Vision (ICCV)},
month = {October},
year = {2019}
}
This codebase provides:
- test code
- training code
- data generation code
Requirements
- Python 3
- PyTorch tested on 1.4.0
- json
- PIL
- skimage
- tqdm
- numpy
- cv2
for training and data generation
- trimesh with pyembree
- pyexr
- PyOpenGL
- freeglut (use
sudo apt-get install freeglut3-devfor ubuntu users) - (optional) egl related packages for rendering with headless machines. (use
apt install libgl1-mesa-dri libegl1-mesa libgbm1for ubuntu users)
Warning: I found that outdated NVIDIA drivers may cause errors with EGL. If you want to try out the EGL version, please update your NVIDIA driver to the latest!!
Windows demo installation instuction
- Install miniconda
- Add
condato PATH - Install git bash
- Launch
Git\bin\bash.exe -
eval "$(conda shell.bash hook)"thenconda activate my_envbecause of this - Automatic
env create -f environment.yml(look this) - OR manually setup environment
-
conda create —name pifu pythonwherepifuis name of your environment -
conda activate -
conda install pytorch torchvision cudatoolkit=10.1 -c pytorch -
conda install pillow -
conda install scikit-image -
conda install tqdm -
conda install -c menpo opencv
-
- Download wget.exe
- Place it into
Git\mingw64\bin -
sh ./scripts/download_trained_model.sh - Remove background from your image (this, for example)
- Create black-white mask .png
- Replace original from sample_images/
- Try it out -
sh ./scripts/test.sh - Download Meshlab because of this
- Open .obj file in Meshlab
Demo
Warning: The released model is trained with mostly upright standing scans with weak perspectie projection and the pitch angle of 0 degree. Reconstruction quality may degrade for images highly deviated from trainining data.
- run the following script to download the pretrained models from the following link and copy them under
./PIFu/checkpoints/.
sh ./scripts/download_trained_model.sh
- run the following script. the script creates a textured
.objfile under./PIFu/eval_results/. You may need to use./apps/crop_img.pyto roughly align an input image and the corresponding mask to the training data for better performance. For background removal, you can use any off-the-shelf tools such as removebg.
sh ./scripts/test.sh
Demo on Google Colab
If you do not have a setup to run PIFu, we offer Google Colab version to give it a try, allowing you to run PIFu in the cloud, free of charge. Try our Colab demo using the following notebook:
![]()
Data Generation (Linux Only)
While we are unable to release the full training data due to the restriction of commertial scans, we provide rendering code using free models in RenderPeople.
This tutorial uses rp_dennis_posed_004 model. Please download the model from this link and unzip the content under a folder named rp_dennis_posed_004_OBJ. The same process can be applied to other RenderPeople data.
Warning: the following code becomes extremely slow without pyembree. Please make sure you install pyembree.
- run the following script to compute spherical harmonics coefficients for precomputed radiance transfer (PRT). In a nutshell, PRT is used to account for accurate light transport including ambient occlusion without compromising online rendering time, which significantly improves the photorealism compared with a common sperical harmonics rendering using surface normals. This process has to be done once for each obj file.
python -m apps.prt_util -i {path_to_rp_dennis_posed_004_OBJ}
- run the following script. Under the specified data path, the code creates folders named
GEO,RENDER,MASK,PARAM,UV_RENDER,UV_MASK,UV_NORMAL, andUV_POS. Note that you may need to list validation subjects to exclude from training in{path_to_training_data}/val.txt(this tutorial has only one subject and leave it empty). If you wish to render images with headless servers equipped with NVIDIA GPU, add -e to enable EGL rendering.
python -m apps.render_data -i {path_to_rp_dennis_posed_004_OBJ} -o {path_to_training_data} [-e]
Training (Linux Only)
Warning: the following code becomes extremely slow without pyembree. Please make sure you install pyembree.
- run the following script to train the shape module. The intermediate results and checkpoints are saved under
./resultsand./checkpointsrespectively. You can add--batch_sizeand--num_sample_inputflags to adjust the batch size and the number of sampled points based on available GPU memory.
python -m apps.train_shape --dataroot {path_to_training_data} --random_flip --random_scale --random_trans
- run the following script to train the color module.
python -m apps.train_color --dataroot {path_to_training_data} --num_sample_inout 0 --num_sample_color 5000 --sigma 0.1 --random_flip --random_scale --random_trans
Related Research
Monocular Real-Time Volumetric Performance Capture (ECCV 2020)
Ruilong Li*, Yuliang Xiu*, Shunsuke Saito, Zeng Huang, Kyle Olszewski, Hao Li
The first real-time PIFu by accelerating reconstruction and rendering!!
PIFuHD: Multi-Level Pixel-Aligned Implicit Function for High-Resolution 3D Human Digitization (CVPR 2020)
Shunsuke Saito, Tomas Simon, Jason Saragih, Hanbyul Joo
We further improve the quality of reconstruction by leveraging multi-level approach!
ARCH: Animatable Reconstruction of Clothed Humans (CVPR 2020)
Zeng Huang, Yuanlu Xu, Christoph Lassner, Hao Li, Tony Tung
Learning PIFu in canonical space for animatable avatar generation!
Robust 3D Self-portraits in Seconds (CVPR 2020)
Zhe Li, Tao Yu, Chuanyu Pan, Zerong Zheng, Yebin Liu
They extend PIFu to RGBD + introduce "PIFusion" utilizing PIFu reconstruction for non-rigid fusion.
Learning to Infer Implicit Surfaces without 3d Supervision (NeurIPS 2019)
Shichen Liu, Shunsuke Saito, Weikai Chen, Hao Li
We answer to the question of "how can we learn implicit function if we don't have 3D ground truth?"
SiCloPe: Silhouette-Based Clothed People (CVPR 2019, best paper finalist)
Ryota Natsume*, Shunsuke Saito*, Zeng Huang, Weikai Chen, Chongyang Ma, Hao Li, Shigeo Morishima
Our first attempt to reconstruct 3D clothed human body with texture from a single image!
Deep Volumetric Video from Very Sparse Multi-view Performance Capture (ECCV 2018)
Zeng Huang, Tianye Li, Weikai Chen, Yajie Zhao, Jun Xing, Chloe LeGendre, Linjie Luo, Chongyang Ma, Hao Li
Implict surface learning for sparse view human performance capture!
For commercial queries, please contact:
Hao Li: [email protected] ccto: [email protected] Baker!!
