Merico Dev Build Save
Merico Build is a web app empowering open source developers, maintainers, and communities with metrics from Git, GitHub, and more.

Merico Build is a web app empowering open source developers, maintainers, and communities with metrics from Git, GitHub, and more. The application uses novel static analysis to more accurately measure the value and impact of code contribution.
- For maintainers, Merico Build renders these metrics to track community growth and to identify rising star contributors.
- For developers, Merico Build automatically showcases your contributions in an evolving and sharable profile.
Why Merico Build?
- Code contribution is analyzed with more perceptive static code analysis, including ELOC, an enhanced noise-proof metric drastically improving upon Lines of Code (LOC.)
- Multidimensional signals extracted directly from the code, accounting for volume, dependencies, redundancy, test coverage, comment coverage, and more.
- Contributions get translated into badges. Share badges and celebrate accomplishments with proof.
We invite you to join us to improve the transparency, health, and sustainability of open source. Merico began as research in UC Berkeley's computer science department, we are excited to welcome contributors from around the world to join us in advancing this technology to empower developers everywhere to build better!
To use the app, go to https://merico.build/. To contribute, scroll down for instructions to set up for development.
If you have a feature request, feel free to create an issue in this repo or join us on Discord!
Summary
Requirements
Postgres 12.5 https://www.postgresql.org/download/
NodeJS 14.x https://nodejs.org/
Installation
To get the entire Merico Build application running on your computer, you'll need to clone and configure two different repositories: build-backend and build-frontend.
Installing build-frontend
Clone
Clone the repo
git clone https://github.com/merico-dev/build-frontend.git
Install dependencies
npm i
Installing build-backend
Clone
Clone the repo
git clone https://github.com/merico-dev/build-backend.git
Install dependencies
npm i
Initialize the submodule.
git submodule init
git submodule update
Install common-backend dependencies.
cd common-backend
npm i
Create the config file
Rename config/local.example.js to config/local.js
Set up the DB
Requirement: Postgres 12.5
- Create the DB
psql postgres -c "CREATE DATABASE your_db_name"
psql postgres -c "CREATE SCHEMA your_db_name"
psql postgres -c "CREATE USER merico PASSWORD 'merico'"
psql postgres -c "ALTER USER merico WITH SUPERUSER"
psql postgres -c "GRANT ALL ON ALL TABLES IN SCHEMA your_db_name to merico"
psql postgres -c "GRANT ALL ON ALL TABLES IN SCHEMA public to merico"
psql postgres -c "GRANT ALL ON SCHEMA your_db_name to merico"
-
Rename or copy
/config/database.example.jsonto/config/database.json -
Update the
developmentconfig object indatabase.json:
{
  "development": {
    "user": "merico",
    "host": "localhost",
    "database": "your_db_name",
    "password": "merico",
    "port": 5432,
    "dialect": "postgres"
  },
  ...
}
- Create the tables
psql -f db/schema-only.sql -d your_db_name -U merico
psql -f db/badge-types.sql -d your_db_name -U merico
psql -f db/refresh-views.sql -d your_db_name -U merico
Configuration
build-backend requires a good deal of configuration. Most of it is required to make it work. For this section you'll be editing config/local.js.
Please note, the Analytics Engine, RabbitMQ, and Minio are all shared resources for our open source developers. As such, you may receive other contributors' RabbitMQ messages. We are working towards making the Analytics Engine open source, but in the meantime we are offering this shared service.
GitHub Auth
Merico Build uses GitHub for Oauth and for access to the the user's public repo data.
- Create a GitHub OAuth app with the following settings:
| Property | Value |
|---|---|
| Application name | your-github-username-merico |
| Homepage URL | http://localhost:1337/ |
| Authorization callback URL | http://localhost:1337/auth/github/callback |
-
Once your app is created, on the Settings page for your GitHub app,
Generate a new client secret. -
Copy and paste your GitHub OAuth App
Client IDandClient Secretto thegithubAuthconfig object inconfig/local.js.
GitLab Auth
- As a logged-in Gitlab user, go to Preferences > Applications.
- Create a new application.
- Name it whatever you like.
- Check the
read_apiandread_userpermissions. - Set the
Redirect URItohttp://localhost:1337/auth/gitlab/callback - Save the
Application IdandSecretand paste them into thegitlabAuthconfig object inconfig/local.js
Analytics Engine
Merico Build uses GRPC to execute functions on the Analytics Engine (AE). Merico will soon be making AE open source. Keep your eye out for it!
Update CA_GRPC_SERVER config value in config/local.js to the following:
'52.41.108.240:30006'
Minio
Merico Build uses Minio to store the protobuf files created by the Analytics Engine. The common-backend submodule reads these protobuf files and enters the data in the Build DB.
Update the minio config object in config/local.js to the following:
minio: {
  endPoint: '52.41.108.240',
  port: 30003,
  useSSL: false,
  accessKey: 'GmXnuzA3a27uO8RU',
  secretKey: 'ahx57GhFwZhEBlNENkz0TgVn',
  bucketAE: 'merico-analysis'
},
RabbitMQ
Build uses RabbitMQ to receive messages from the Analytics Engine about report progress and completion.
Update the RABBIT_MQ_URL config value in config/local.js to the following:
'amqp://rabbitmq:[email protected]:30001/rabbitmq'
AWS S3
You'll need an AWS account for this. If you don't already have one, sign up for a free AWS account.
- Create a bucket. Use the following access settings:
-
Create a folder called
badgeswithin the new bucket. - Use an existing IAM user, or create a new one, and give them at least the S3 permission to
putObject(for testing purposes you can just give them full S3 access if you like). Copy theirAccess KeyandSecret Access Key. - Update the
AWS_S3settings inconfig/local.jswith the newly createdbucket name,Access Key,Secret Access Key, andRegion.
AWS SES
*Merico Build can function without SES. It will fail to send emails, but the app can handle these errors. If you do want to get email sending functionality working, follow these steps:
You'll need an AWS account for this. If you don't already have one, sign up for a free AWS account.
- Go to the AWS Simple Email Service console.
- Verify your email domain.
- Once your domain is verified, click on
SMTP Settings. - Click on
Create my SMTP Credentials - Copy the
Access KeyandSecret Access Key - Paste them in the SES section of
config/local.js
Encryption Key
Update the ENCRYPTION_KEY config value in config/local.js to a random string of your choosing. We use this for various encryption functions.
Usage
build-backend
npm run dev
build-frontend
npm run dev
After you've started the frontend app and the code has compiled, you should be able to visit http://localhost:3000/ and see the Merico Build homepage.
Sign up with your GitHub account, authorize the app, and submit a repository for analysis.
Note: it's best to stick with smaller repositories for now. We do limit analysis to the latest 2,500 commits, but even still, a really large repo (e.g. Django) can take up to a day to process. Try to limit your analyses to repos with under 5,000 commits.
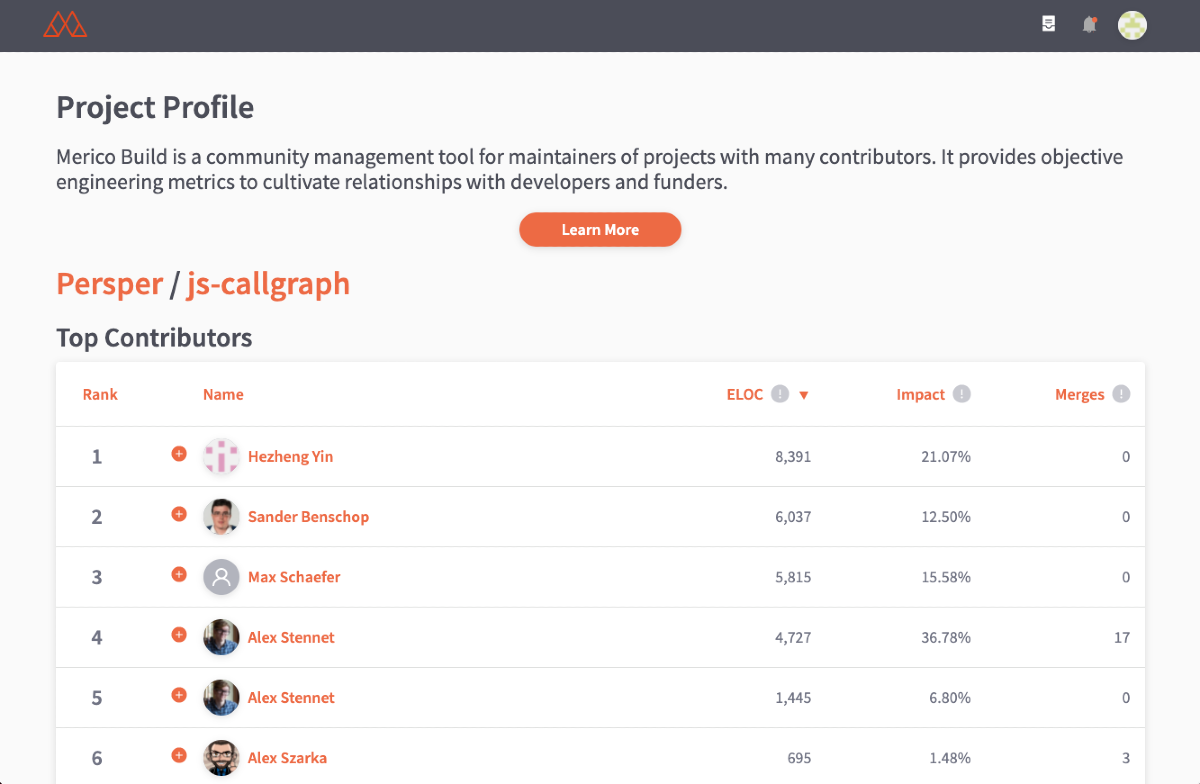
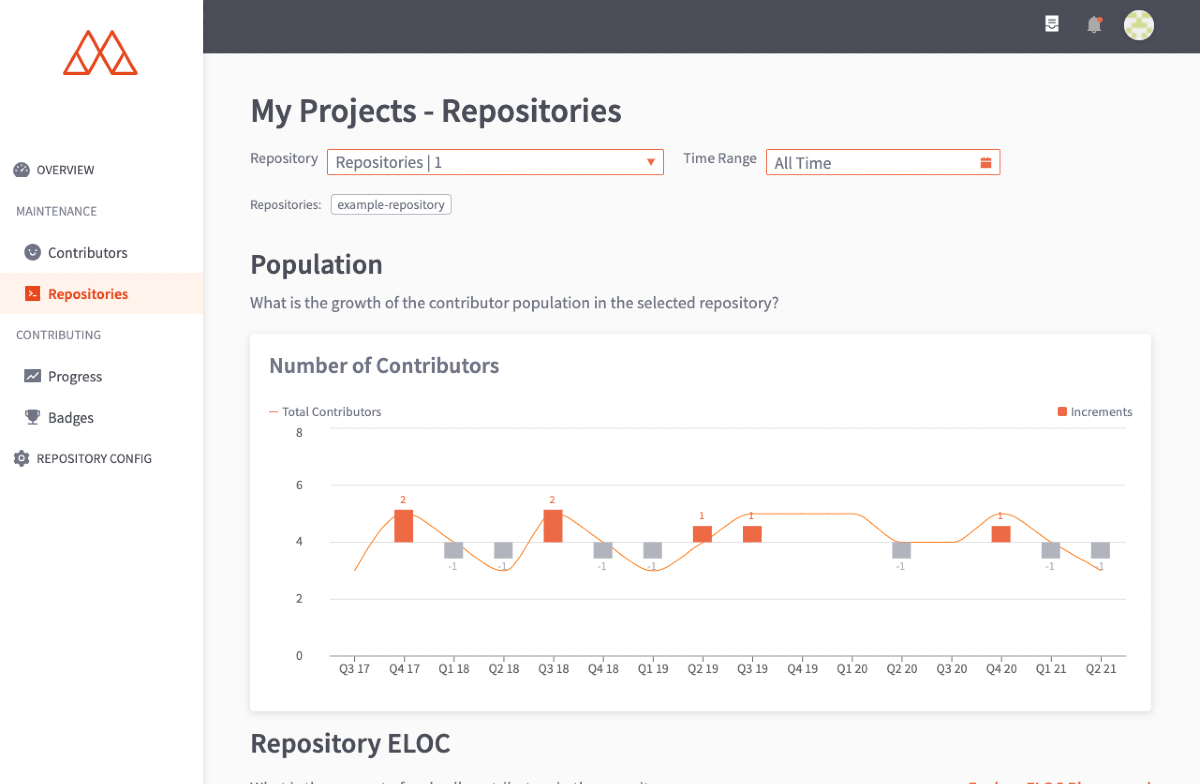
Screenshots
| Project Profile | My Repositories |
|---|---|
 |
 |
Contributing
We welcome and appreciate contributions. Feel free to find your own way and put up a pull request, or join us on our discord and we can help.
License
Build is Apache 2.0 licensed
