Hasinhayder Hydra Save
Hydra is a zero-config API boilerplate with Laravel 10x + Laravel Sanctum that comes with an excellent user and role management API out of the box

Hydra - Zero Config API Boilerplate with Laravel Sanctum

Hydra is a zero-config API boilerplate with Laravel Sanctum and comes with excellent user and role management API out of the box. Start your next big API project with Hydra, focus on building business logic, and save countless hours of writing boring user and role management API again and again.
Hydra works with Laravel 10.x and Sanctum 3.x. If you want to work with Laravel 9.x then checkout the 9.x branch.
-
Hydra - Zero Config API Boilerplate with Laravel Sanctum
- Getting Started
- Database Migration and Seeding
- List of Default Routes
- Default Roles
-
Routes Documentation
- User Registration
- User Authentication/Login (Admin)
- User Authentication/Login (Other Roles)
- List Users (Admin Ability Required)
- Update a User (User/Admin Ability Required)
- Delete a User (Admin Ability Required)
- List Roles (Admin Ability Required)
- Add a New Role (Admin Ability Required)
- Update a Role (Admin Ability Required)
- Delete a Role (Admin Ability Required)
- List Available Roles of a User (Admin Ability Required)
- Assign a Role to a User (Admin Ability Required)
- Delete a Role from a User (Admin Ability Required)
- Notes
- Tutorial
Getting Started
It's super easy to get Hydra up and running.
First clone the project and change the directory
git clone https://github.com/hasinhayder/hydra.git
cd hydra
Then follow the process using either Docker or without Docker (simple).
Without Docker (Simple)
- Install the dependencies
composer install
- Copy
.env.exampleto.env
cp .env.example .env
- Generate application key
php artisan key:generate
- Start the webserver
php artisan serve
That's mostly it! You have a fully running laravel installation with Sanctum, all configured.
Using Docker & Laravel Sail
- Install the dependencies
docker run --rm \
    -u "$(id -u):$(id -g)" \
    -v $(pwd):/var/www/html \
    -w /var/www/html \
    laravelsail/php81-composer:latest \
    composer install --ignore-platform-reqs
- Copy
.env.exampleto.env
cp .env.example .env
- Run the containers
./vendor/bin/sail up
- Generate application key
./vendor/bin/sail artisan key:generate
To learn more about Sail, visit the official Doc.
Screencast

Database Migration and Seeding
Open your .env file and change the DATABASE options. You can start with SQLite by following these steps
- Create a new SQLite database
touch database/hydra.sqlite
Or simply create a new file as hydra.sqlite inside your database folder.
- You can run both migrations and seeders together by simply running the following command
php artisan migrate:fresh --seed
OR
you can run them separately using the following commands
- Run Migrations
php artisan migrate:fresh
Now your database has essential tables for user and roles management.
- Run Database Seeders
Run db:seed, and you have your first admin user, some essential roles in the roles table, and the relationship correctly setup.
php artisan db:seed
Please note that the default admin user is [email protected] and the default password is hydra. You should create a new admin user before deploying to production and delete this default admin user. You can do that using the available Hydra user management API or any DB management tool.
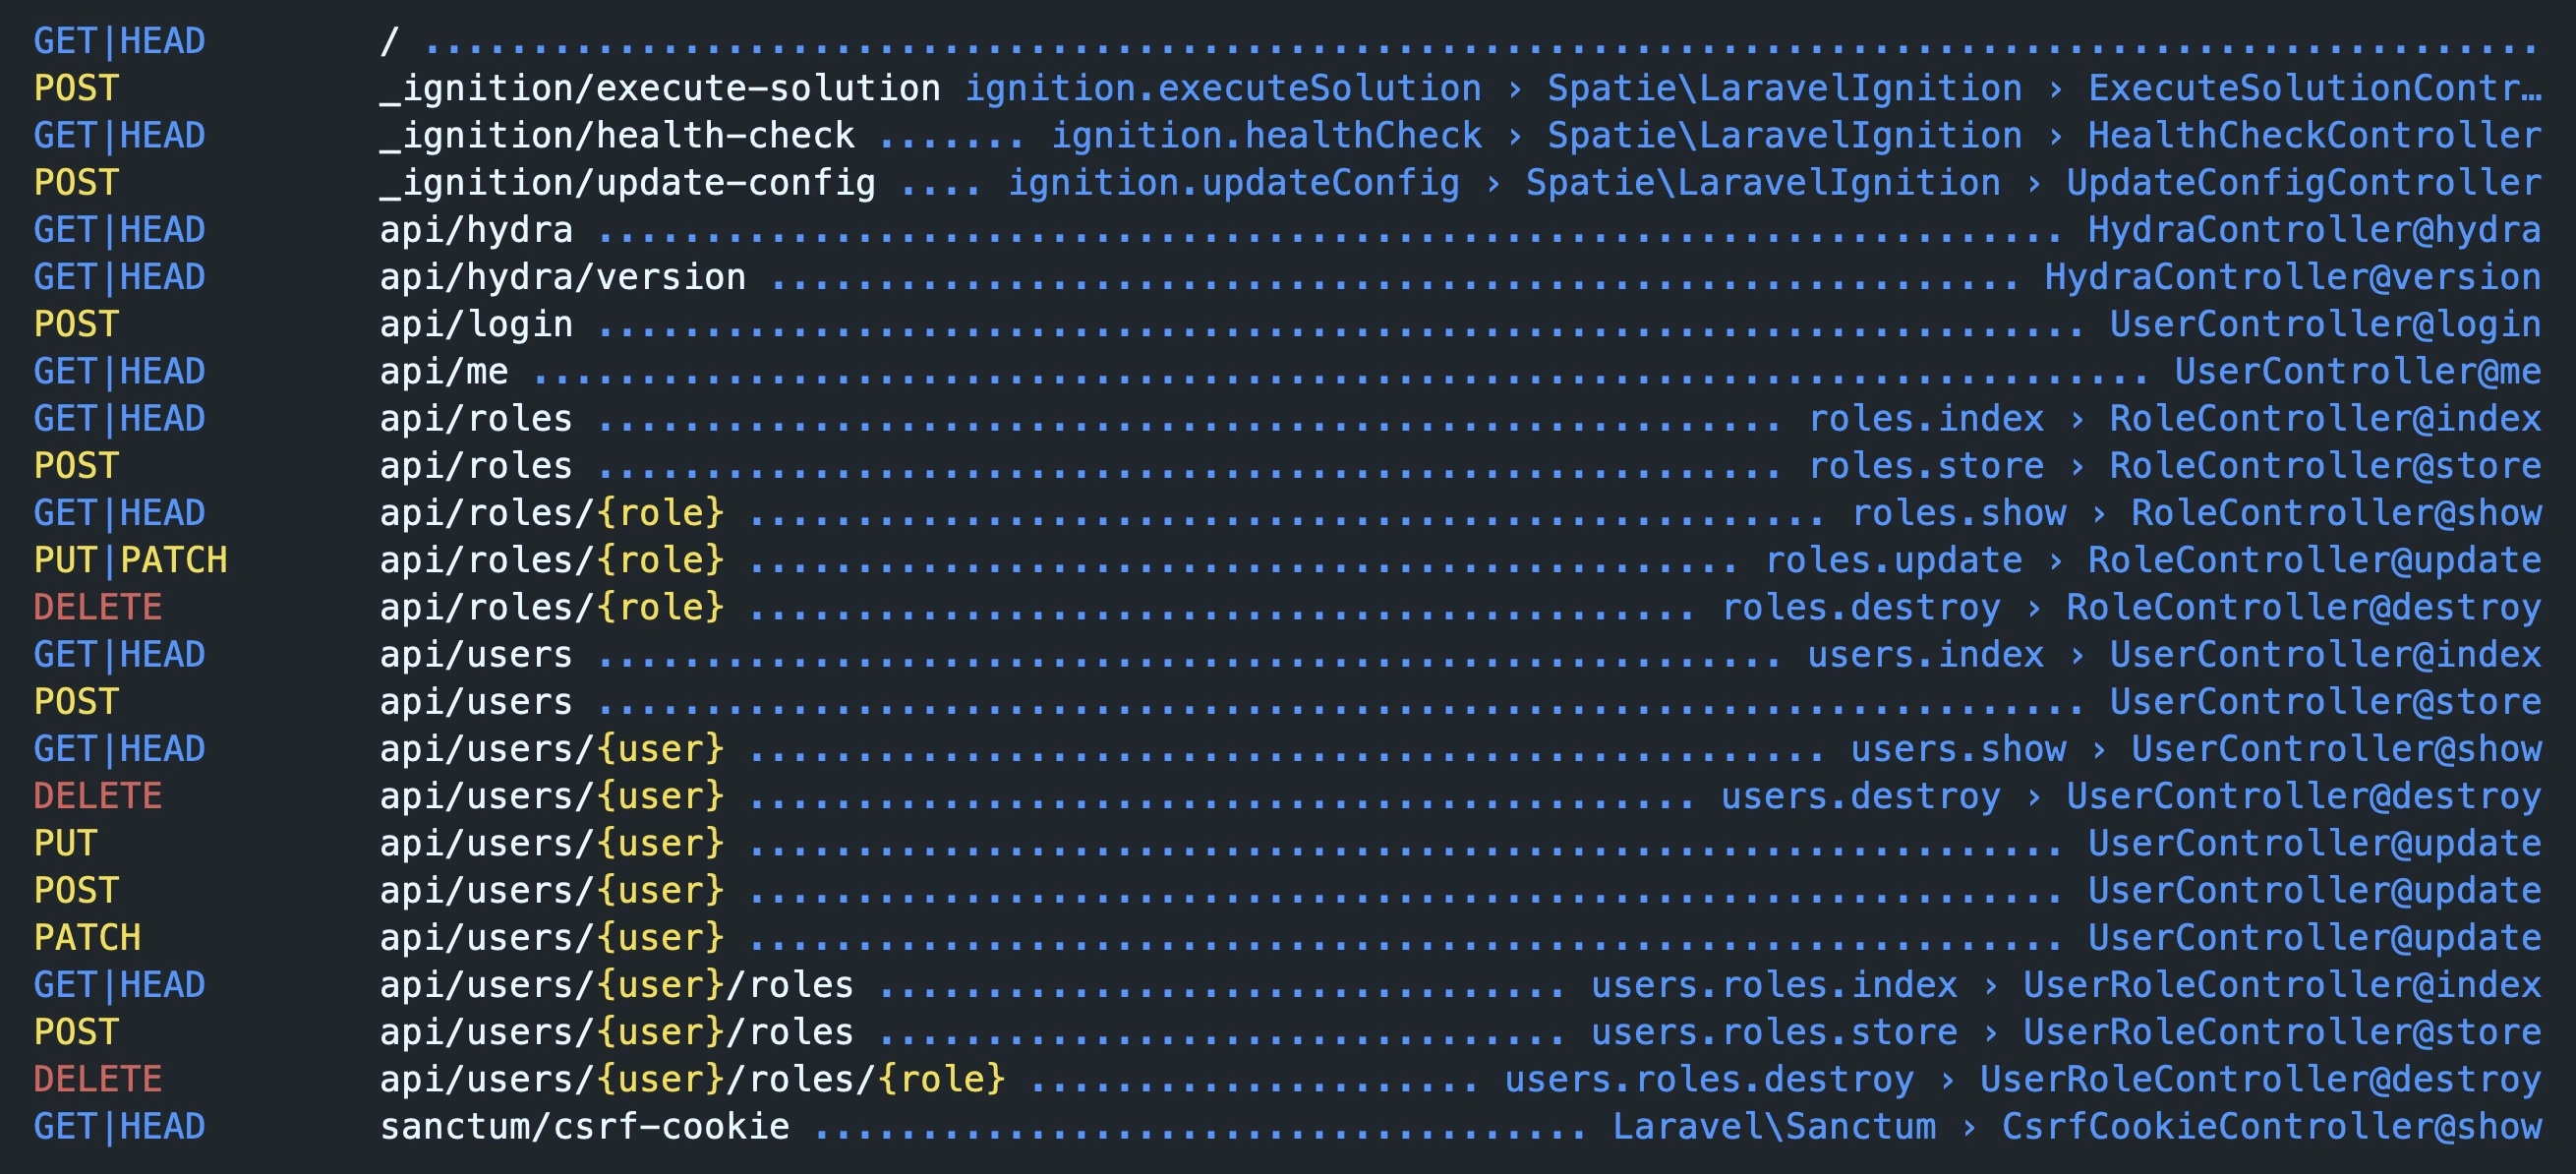
List of Default Routes
Here is a list of default routes. Run the following artisan command to see this list in your terminal.
php artisan route:list
Default Roles
Hydra comes with these super-admin,admin,editor,customer & user roles out of the box. For details, open the roles table after database seeding, or open the laravel tinker and experiment with the Role model.
php artisan tinker
run the following command
>>> Role::select(['id','slug','name'])->get()
//or
>>> Role::all(['id','name','slug'])
//or
>>> Role::all()
Routes Documentation
Let's have a look at what Hydra has to offer. Before experimenting with the following API endpoints, run your Hydra project using php artisan serve command. For the next part of this documentation, we assumed that Hydra is listening at http://localhost:8000
User Registration
You can make an HTTP POST call to create/register a new user to the following endpoint. Newly created users will have the user role by default.
http://localhost:8000/api/users
API Payload & Response
You can send a Form Multipart payload or a JSON payload like this.
{
    "name":"Hydra User",
    "email":"[email protected]",
    "password":"Surprisingly A Good Password"
}
Voila! Your user has been created and is now ready to log in!
If this user already exists, then you will receive a 409 Response like this
{
    "error": 1,
    "message": "user already exists"
}
User Authentication/Login (Admin)
Remember Hydra comes with the default admin user? You can log in as an admin by making an HTTP POST call to the following route.
http://localhost:8000/api/login
API Payload & Response
You can send a Form Multipart or a JSON payload like this.
{
    "email":"[email protected]",
    "password":"hydra"
}
You will get a JSON response with user token. You need this admin token for making any call to other routes protected by admin ability.
{
    "error": 0,
    "token": "1|se9wkPKTxevv9jpVgXN8wS5tYKx53wuRLqvRuqCR"
}
For any unsuccessful attempt, you will receive a 401 error response.
{
    "error": 1,
    "message": "invalid credentials"
}
User Authentication/Login (Other Roles)
You can log in as a user by making an HTTP POST call to the following route
http://localhost:8000/api/login
API Payload & Response
You can send a Form Multipart or a JSON payload like this
{
    "email":"[email protected]",
    "password":"Surprisingly A Good Password"
}
You will get a JSON response with user token. You need this user token for making any calls to other routes protected by user ability.
{
    "error": 0,
    "token": "2|u0ZUNlNtXgdUmtQSACRU1KWBKAmcaX8Bkhd2xVIf"
}
For any unsuccessful attempt, you will receive a 401 error response.
{
    "error": 1,
    "message": "invalid credentials"
}
List Users (Admin Ability Required)
To list the users, make an HTTP GET call to the following route, with Admin Token obtained from Admin Login. Add this token as a standard Bearer Token to your API call.
http://localhost:8000/api/users
API Payload & Response
No payload is required for this call.
You will get a JSON response with all users available in your project.
[
    {
        "id": 1,
        "name": "Hydra Admin",
        "email": "[email protected]"
    },
    {
        "id": 2,
        "name": "Test User",
        "email": "[email protected]"
    },
]
For any unsuccessful attempt or wrong token, you will receive a 401 error response.
{
    "message": "Unauthenticated."
}
Update a User (User/Admin Ability Required)
Make an HTTP PUT request to the following route to update an existing user. Replace {userId} with actual user id. You must include a Bearer token obtained from User/Admin authentication. A bearer admin token can update any user. A bearer user token can only update the authenticated user by this token.
http://localhost:8000/api/users/{userId}
For example, to update the user with id 3, use this endpoint http://localhost:8000/api/users/3
API Payload & Response
You can include name or email, or both in a URL Encoded Form Data or JSON payload, just like this
{
    "name":"Captain Cook",
    "email":"[email protected]"
}
You will receive the updated user if the bearer token is valid.
{
    "id": 3,
    "name": "Captain Cook",
    "email": "[email protected]",
}
For any unsuccessful attempt with an invalid token, you will receive a 401 error response.
{
    "error": 1,
    "message": "invalid credentials"
}
If a bearer user token attempts to update any other user but itself, a 409 error response will be delivered
{
    "error": 1,
    "message": "Not authorized"
}
For any unsuccessful attempt with an invalid user id, you will receive a 404 not found error response. For example, when you are trying to delete a non-existing user with id 16, you will receive the following response.
{
    "error": 1,
    "message": "No query results for model [App\\Models\\User] 16"
}
Delete a User (Admin Ability Required)
To delete an existing user, make a HTTP DELETE request to the following route. Replace {userId} with actual user id
http://localhost:8000/api/users/{userId}
For example to delete the user with id 2, use this endpoint http://localhost:8000/api/users/2
API Payload & Response
No payload is required for this call.
If the request is successful and the bearer token is valid, you will receive a JSON response like this
{
   "error": 0,
   "message": "user deleted"
}
You will receive a 401 error response for any unsuccessful attempt with an invalid token.
{
    "error": 1,
    "message": "invalid credentials"
}
For any unsuccessful attempt with an invalid user id, you will receive a 404 not found error response. For example, you will receive the following response when you try to delete a non-existing user with id 16.
{
   "error": 1,
   "message": "No query results for model [App\\Models\\User] 16"
}
List Roles (Admin Ability Required)
To list the roles, make an HTTP GET call to the following route, with Admin Token obtained from Admin Login. Add this token as a standard Bearer Token to your API call.
http://localhost:8000/api/roles
API Payload & Response
No payload is required for this call.
You will get a JSON response with all the roles available in your project.
[
    {
        "id": 1,
        "name": "Administrator",
        "slug": "admin"
    },
    {
        "id": 2,
        "name": "User",
        "slug": "user"
    },
    {
        "id": 3,
        "name": "Customer",
        "slug": "customer"
    },
    {
        "id": 4,
        "name": "Editor",
        "slug": "editor"
    },
    {
        "id": 5,
        "name": "All",
        "slug": "*"
    },
    {
        "id": 6,
        "name": "Super Admin",
        "slug": "super-admin"
    }
]
For any unsuccessful attempt or wrong token, you will receive a 401 error response.
{
    "message": "Unauthenticated."
}
Add a New Role (Admin Ability Required)
To list the roles, make an HTTP POST call to the following route, with Admin Token obtained from Admin Login. Add this token as a standard Bearer Token to your API call.
http://localhost:8000/api/roles
API Payload & Response
You need to supply title of the role as name, role slug in your payload as Multipart Form or JSON data
{
    "name":"Manager",
    "slug":"manager"
}
You will get a JSON response with this newly created role for successful execution.
{
    "name": "Manager",
    "slug": "manager",
    "id": 7
}
If this role slug already exists, you will get a 409 error message like this
{
    "error": 1,
    "message": "role already exists"
}
For any unsuccessful attempt or wrong token, you will receive a 401 error response.
{
    "message": "Unauthenticated."
}
Update a Role (Admin Ability Required)
To update a role, make an HTTP PUT or HTTP PATCH request to the following route, with Admin Token obtained from Admin Login. Add this token as a standard Bearer Token to your API call.
http://localhost:8000/api/roles/{roleId}
For example to update the Customer role, use this endpoint http://localhost:8000/api/roles/3
API Payload & Response
You need to supply title of the role as name, and/or role slug in your payload as Multipart Form or JSON data
{
    "name":"Product Customer",
    "slug":"product-customer"
}
You will get a JSON response with this updated role for successful execution.
{
    "id": 3,
    "name": "Product Customer",
    "slug": "product-customer"
}
Please note that you cannot change a super-admin or admin role slug because many API routes in Hydra exclusively require this role to function correctly.
For any unsuccessful attempt or wrong token, you will receive a 401 error response.
{
    "message": "Unauthenticated."
}
Delete a Role (Admin Ability Required)
To delete a role, make an HTTP DELETE request to the following route, with Admin Token obtained from Admin Login. Add this token as a standard Bearer Token to your API call.
http://localhost:8000/api/roles/{roleId}
For example, to delete the Customer role, use this endpoint http://localhost:8000/api/roles/3
API Payload & Response
No payload is required for this endpoint.
You will get a JSON response with this updated role for successful execution.
{
    "error": 0,
    "message": "role has been deleted"
}
Please note that you cannot delete the admin role because many API routes in Hydra exclusively require this role to function correctly.
If you try to delete the admin role, you will receive the following 422 error response.
{
    "error": 1,
    "message": "you cannot delete this role"
}
For any unsuccessful attempt or wrong token, you will receive a 401 error response.
{
    "message": "Unauthenticated."
}
List Available Roles of a User (Admin Ability Required)
To list all available roles for a user, make an HTTP GET request to the following route, with Admin Token obtained from Admin Login. Add this token as a standard Bearer Token to your API call. Replace {userId} with an actual user id
http://localhost:8000/api/users/{userId}/roles
For example to get all roles assigned to the user with id 2, use this endpoint http://localhost:8000/api/users/2/roles
API Payload & Response
No payload is required for this call.
For successful execution, you will get a JSON response containing the user with all its assigned roles.
{
    "id": 2,
    "name": "Test User",
    "email": "[email protected]",
    "roles": [
        {
            "id": 2,
            "name": "User",
            "slug": "user"
        },
        {
            "id": 3,
            "name": "Customer",
            "slug": "customer"
        }
    ]
}
For any unsuccessful attempt or wrong token, you will receive a 401 error response.
{
    "message": "Unauthenticated."
}
Assign a Role to a User (Admin Ability Required)
To assign a role to a user, make an HTTP POST request to the following route, with Admin Token obtained from Admin Login. Add this token as a standard Bearer Token to your API call. Replace {userId} with an actual user id
http://localhost:8000/api/users/{userId}/roles
For example to assign a role to the user with id 2, use this endpoint http://localhost:8000/api/users/2/roles
API Payload & Response
You need to supply role_id in your payload as Multipart Form or JSON data
{
    "role_id":3
}
For successful execution, you will get a JSON response containing the user with all its assigned roles.
{
    "id": 2,
    "name": "Test User",
    "email": "[email protected]",
    "roles": [
        {
            "id": 2,
            "name": "User",
            "slug": "user"
        },
        {
            "id": 3,
            "name": "Customer",
            "slug": "customer"
        }
    ]
}
Notice that the user has a Roles array, and this newly assigned role is present in this array.
Please note that it will have no effect if you assign the same role again to a user.
For any unsuccessful attempt or wrong token, you will receive a 401 error response.
{
    "message": "Unauthenticated."
}
Delete a Role from a User (Admin Ability Required)
To delete a role from a user, make an HTTP DELETE request to the following route, with Admin Token obtained from Admin Login. Add this token as a standard Bearer Token to your API call. Replace {userId} with an actual user id, and {role} with an actual role id
http://localhost:8000/api/users/{userId}/roles/{role}
For example, to delete a role with id 3 from the user with id 2, use this endpoint http://localhost:8000/api/users/2/roles/3
API Payload & Response
No payload is required for this call
For successful execution, you will get a JSON response containing the user with all asigned roles to it.
{
    "id": 2,
    "name": "Test User",
    "email": "[email protected]",
    "roles": [
        {
            "id": 2,
            "name": "User",
            "slug": "user"
        },
    ]
}
Notice that the user has a Roles array, and the role with id 3 is not present in this array.
For any unsuccessful attempt or wrong token, you will receive a 401 error response.
{
    "message": "Unauthenticated."
}
Notes
Default Admin Username and Password
When you run the database seeders, a default admin user is created with the username '[email protected]' and the password 'hydra'. You can login as this default admin user and use the bearer token on next API calls where admin ability is required.
When you push your application to production, please remember to change this user's password, email or simply create a new admin user and delete the default one.
Default Role for New Users
The user role is assigned to them when a new user is created. To change this behavior, open your .env file and set the value of DEFAULT_ROLE_SLUG to any existing role slug. New users will have that role by default. For example, if you want your new users to have a customer role, set DEFAULT_ROLE_SLUG=customer in your .env file.
There are five default role slugs in Hydra.
| Role Slug | Role Name |
|---|---|
| admin | Admin |
| user | User |
| customer | Customer |
| editor | Editor |
| super-admin | Super Admin |
This ENV variable is configured in in config/hydra.php as default_user_role_slug, and then used in app/Http/Controllers/UserController.php
Single Session or Multiple Session
Hydra doesn't invalidate the previously issued access tokens when a user authenticates. So, all access tokens, including the newly created one, will remain valid. If you want to change this behavior and delete all previous tokens when a user authenticates, set DELETE_PREVIOUS_ACCESS_TOKENS_ON_LOGIN to true in your .env file. The value of DELETE_PREVIOUS_ACCESS_TOKENS_ON_LOGIN is set to false by default.
This ENV variable is configured in in config/hydra.php, and then used in app/Http/Controllers/UserController.php
Add Accept: application/json Header In Your API Calls (Important)
This is very important. To properly receive JSON responses, add the following header to your API requests.
Accept: application/json
For example, if you are using curl you can make a call like this.
curl --request GET \
  --url http://localhost:8000/hydra/version \
  --header 'Accept: application/json' \
  --header 'Content-Type: application/x-www-form-urlencoded' \
  --data =
Logging
Hydra comes with an excellent logger to log request headers, parameters and response to help debugging and inspecting API calls. All you have to do is wrap the route with 'hydra.log' middleware, as shown below
Route::post('login', [UserController::class, 'login'])->middleware('hydra.log');
or, like this
Route::put('users/{user}', [UserController::class, 'update'])->middleware(['hydra.log', 'auth:sanctum', 'ability:admin,super-admin,user']);
And then you can see the API call logs in logs/laravel.log file.
Code Formatting
Hydra comes with an excellent code formatter called Laravel Pint out of the box, with an excellent configuration preset that you can find in pint.json. By default pint uses the Allman style for the braces where the braces are placed in a new line after the function name. So we have changed it to K&R style formatting where the brace stays on the same line of the function name.
To format your code using laravel pint, you can run the following command any time from inside your project diretory.
./vendor/bin/pint
And that's all for formatting. To know more, check out laravel pint documentation at https://github.com/laravel/pint
Tutorial
So you decided to give Hydra a try and create a new protected API endpoint; that's awesome; let's dive in.
Create a New API Controller
You can create a normal or a resourceful controller. To keep it simple, I am going with a standard controller.
php artisan make:controller MessageController
This will create a new file called app/Http/Controlers/MessageController.php
Add a Function
We will add a simple function that will greet the authenticated user. Since this will be protected using Sanctum middleware, only a request with a valid bearer token will be able to access this endpoint. You don't need to worry about anything else.
Open this file app/Http/Controlers/MessageController.php and add the following code
<?php

namespace App\Http\Controllers;

use Illuminate\Http\Request;

class MessageController extends Controller
{
    public function greet(Request $request){
        $user = $request->user();

        $response = [
            "name" => $user->name,
            "role" => $user->roles()->first()->name //or $user->roles()->first()->slug
        ];

        return $response;

    }
}
Create Protected Routes
Let's create a protected route http://localhost:8000/api/greet to use this API
Open your routes/api.php file and add the following line at the end.
Route::get('greet', [MessageController::class, 'greet'])->middleware(['auth:sanctum']);
Nice! Now we have a route /api/greet that is only accessible with a valid bearer token.
Test Protected Routes
If you have already created a user, you need his accessToken first. You can use the admin user or create a new user and then log in and note their bearer token. To create or authenticate a user, check the documentation in the beginning.
To create a new user, you can place a curl request or use tools like Postman, Insomnia or HTTPie. Here is a quick example using curl.
curl --request POST \
  --url http://localhost:8000/api/users \
  --header 'Accept: application/json' \
  --header 'Content-Type: multipart/form-data; boundary=---011000010111000001101001' \
  --form 'name=Hydra User' \
  --form [email protected] \
  --form 'password=Surprisingly A Good Password'
Great! Now we have our users. Let's login as this new user using curl (You can use tools like Postman, Insomnia, or HTTPie)
curl --request POST \
  --url http://localhost:8000/api/login \
  --header 'Accept: aplication/json' \
  --header 'Content-Type: application/json' \
  --data '{
    "email": "[email protected]",
    "password": "Surprisingly A Good Password"
}'
Now you have this user's accessToken in the response, as shown below. Note it.
{"error":0,"id":2,"token":"5|gbiWdd7yJFYiTIgoK1jK3C7HZJtJUK1PnBIToBLN"}
The bearer token for this user is 5|gbiWdd7yJFYiTIgoK1jK3C7HZJtJUK1PnBIToBLN
Now let's test our protected route. Add this bearer token in your PostMan/Insomnia/HTTPie or Curl call and make a HTTP GET request to our newly created protected route http://localhost:8000/api/greet. Here's an example call with curl
curl --request GET \
  --url http://localhost:8000/api/greet \
  --header 'Accept: application/json' \
  --header 'Authorization: Bearer 5|gbiWdd7yJFYiTIgoK1jK3C7HZJtJUK1PnBIToBLN'
The response will be something like this.
{
    "name": "[email protected]",
    "role": "User"
}
Great! you have learned how to create your protected API endpoint using Laravel Sanctum and Hydra!
Protect a Route with Laravel Sanctum's Ability and Abilities Middleware
Let's make our newly created API endpoint even more robust. Say, we want our route to be accessible by only admin users. Remember you added the following line in the routes/api.php file just a few minutes ago? Let's change it.
Route::get('greet', [MessageController::class, 'greet'])->middleware(['auth:sanctum']);
Change it like this
Route::get('greet', [MessageController::class, 'greet'])->middleware(['auth:sanctum', 'ability:admin']);
Only an HTTP GET call with a valid admin user's access token can access this route.
If you want this route to be accessible by the users with admin, OR the user role, then modify it.
Route::get('greet', [MessageController::class, 'greet'])->middleware(['auth:sanctum', 'ability:admin,user']);
If you want this route to be accessible by the users with both user, AND the customer role, then modify it.
Route::get('greet', [MessageController::class, 'greet'])->middleware(['auth:sanctum', 'abilities:customer,user']);
Note that this time we have used the abilities keyword instead of ability
Great, now you know everything to start creating your next big API project with Laravel & Laravel Sanctum using our powerful boilerplate project called Hydra. Enjoy!
