GrabAccess Save
Bookit / Windows Login Password and Bitlocker Bypass Tool
GrabAccess
Bookit / Windows Login Password and Bitlocker Bypass Tool
With physical access to the target device, GrabAccess can:
- Bypass the Windows login password to execute commands with System privileges, reset Windows account passwords, etc.
- Implant a specified program and add it to startup (this can bypass Bitlocker, but requires the victim to log in)
- Survive operating system reinstallations or hard drive replacement, by modifying the UEFI firmware of motherboard (Bootkit)
Quick Start
The basic function of GrabAccess is to bypass the Windows login password.
-
Prepare a USB drive formatted in either
FAT16orFAT32. -
Download GrabAccess_Release.zip and extract it to the root directory of the USB drive.
-
Plug the USB drive into the target computer. Reboot and enter the BIOS menu upon startup. Select the USB drive as boot option (disable
Security Bootif it's enabled).
-
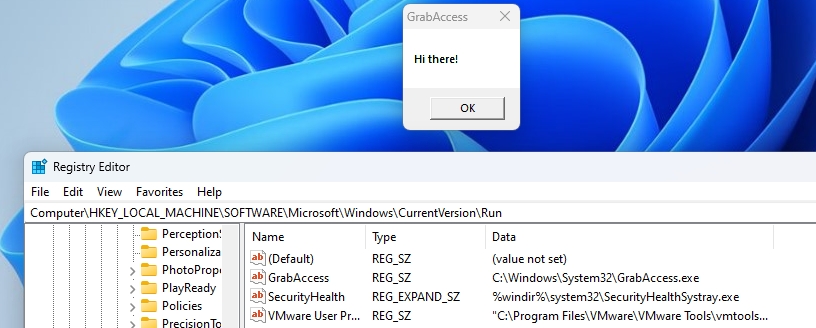
A CMD window and an account management interface will appear upon Windows startup, granting the ability to execute commands with System privileges without the need for login credentials.
-
Press
ALT+F4to close the CMD window, and Windows will return to the login screen.
Automated Implantation (Bypassing Bitlocker)
GrabAccess can automatically implant a specified program and add it to the startup items.
For this feature, you need to bundle GrabAccess with the program you wish to implanted:
-
Download GrabAccess_Release.zip and extract it to the root directory of the USB drive.
-
Name the program you wish to implanted as
payload.exeand place it in the root directory of the USB drive. -
Execute
build.batto bundle everything together.
-
Plug the USB drive into the target computer and boot from the USB drive (as previously described).
-
Once Windows boots up, the deployed application will be execute.
This implantation process can bypass Bitlocker's system disk encryption.
When the system is booted from GrabAccess, it loads into the system memory. The USB drive can be removed at this point, but you should remain at the Bitlocker password entry screen, waiting for the victim to return and enter the password. After Bitlocker is unlocked, the specified program will be written to the disk.
Note that before this point, since GrabAccess is only in memory, it will be lost if the computer is rebooted or powered off.
Implementing Bootkit via Motherboard UEFI Firmware Modification
GrabAccess can be integrated into a computer's motherboard UEFI firmware, ensuring a hardware-level persistence (Bootkit).
Each time the Windows boots, GrabAccess re-implants the specified program. This process remains effective even after reinstallation of the operating system or replacement of the hard disk. Removal of this implant requires reflashing the motherboard's firmware or replacing the motherboard.
Warning: The following procedure may damage your motherboard! Proceed only if you have sufficient knowledge of UEFI firmware. AT YOUR OWN RISK!!!!
The process involves four main steps:
- Bundle GrabAccess with the specified program.
- Extracting the motherboard's UEFI firmware.
- Inserting GrabAccessDXE into the UEFI firmware.
- Reflashing the modified firmware back onto the motherboard.
Steps 2 and 4 vary significantly across different motherboard models. While some can be flashed via software, others require a hardware programmer due to built-in verifications.
Due to these variations, the specifics are not discussed here, it is advised to search online for the procedure relevant to your specific motherboard model.
To package GrabAccess with the intended program, follow the previously outlined steps: rename the program to payload.exe, place it in the GrabAccess root directory, and run build.bat. This results in a file named native.exe, which will be used in the subsequent steps.
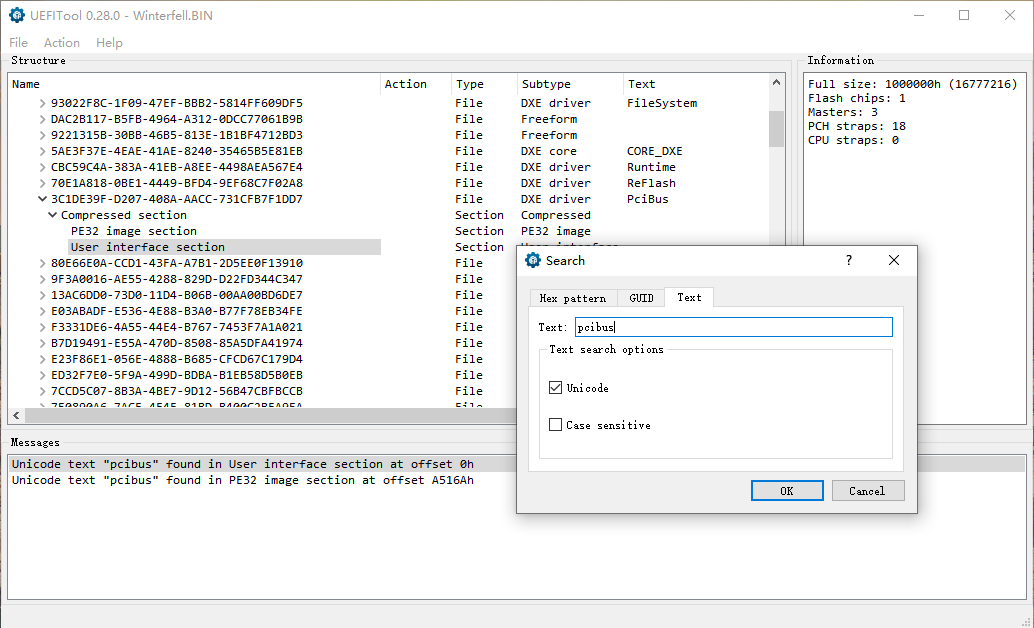
After extracting the motherboard UEFI firmware, use UEFITool to open it. Press Ctrl+F, select Text, and search for pcibus. Double-click on the first result in the subsequent list.
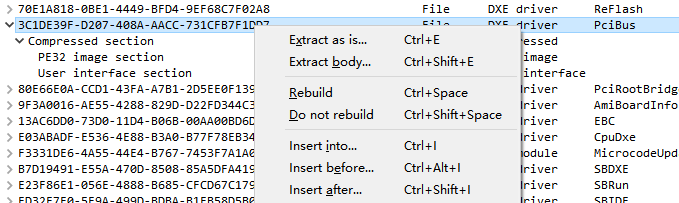
Right-click on the pcibus entry and choose Insert before. Then select GrabAccessDXE.ffs from the UEFI_FSS folder in the downloaded GrabAccess_Release.zip.
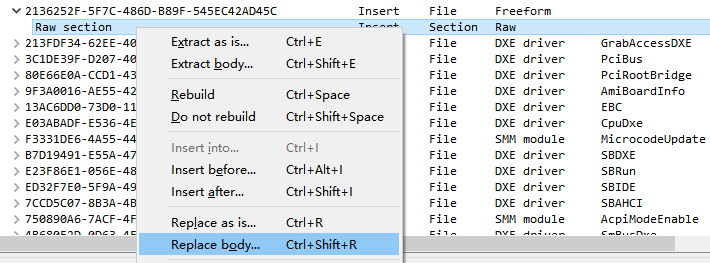
After inserting GrabAccessDXE, right-click on it, choose Insert before, and add native.ffs from the UEFI_FSS folder. The list should appear as follows:

Open native.ffs (identified by its GUID 2136252F-5F7C-486D-B89F-545EC42AD45C). Right-click on the Raw section, select Replace body, and replace it with the native.exe file which is previously created.
Lastly, save the modified firmware by selecting Save image file from the File menu.
This firmware is now embedded with a Bootkit and ready to be flashed back onto the motherboard. If done correctly, native.exe will be written and executed with each boot of Windows.
If the process fails, consider these steps:
- Turn off
Security BootandCSMin the UEFI settings, ensuring the OS boots in UEFI mode. - Insert
pcddxe.ffsfrom theUEFI_FSSfolder into the firmware (as previously described). Note that this module may conflict with others, potentially preventing booting. This step is advised only if using a programmer!
Supported Operating Systems
GrabAccess only supports Windows operating systems under UEFI, and is currently only supports x64 systems.
Tested on Windows 10 (1803, 22H2) and Windows 11 (23H2), including using TPM, online accounts, and PIN codes. However, it does not support bypassing Security Boot.
Going deeper
Windows Platform Binary Table
Unlike Kon-boot, which tampers with the Windows kernel, GrabAccess is based on a legitimate backdoor in Windows: WPBT (Windows Platform Binary Table).
Manufacturers typically use WPBT to integrate driver management and anti-theft software into their computers. Similar to a Bootkit virus, once a WPBT entry exists in the motherboard, the designated program will automatically installed on Windows system during boot-up, regardless of system reinstalls or hard drive changes.
WPBT was intended to be implemented by manufacturers into the UEFI firmware of the motherboard. However, attackers can exploit this mechanism by injecting a WPBT entry during the UEFI boot process, without needing to modify the motherboard firmware.
Components of GrabAccess
GrabAccess consists of two components:
- UEFI Application: In the source code as Stage1-UEFI, this is used to write WPBT entries into the ACPI table in the UEFI environment.
- Windows Native Application: In the source code as Stage2-NativeNT, this is used to deploying the payload and setting up startup items.
Functions of the Native Application
The application loaded by WPBT is not a standard Win32 program, but a Windows Native Application. It executes during the Windows Native NT phase, which occurs before user login. However, the APIs provided by Windows to Native NT phase are fewer than those available to Win32 programs.
In the source code, Stage2-NativeNT is tasked with writing out the final Payload (the specified program bundled by the user) to C:\\Windows\\System32\\GrabAccess.exe, and adding a startup item under HKEY_LOCAL_MACHINE\SOFTWARE\Microsoft\Windows\CurrentVersion\Run\GrabAccess.
If there is no Payload at its end, it hijacks Logonui.exe through IFEO, displaying cmd.exe and netplwiz.exe during Windows login.
