Go Mesos Executor Save
Custom Apache Mesos container executor written in Go
go-mesos-executor
Container Apache Mesos executor written in Go. It actually can launch Docker containers but is designed to accept others container engines as soon as they implement the containerizer interface. The particuliarity of this executor is the fact that it can use hooks to do actions at some container life steps.
Disclaimer
Please note that this executor is a replacement of the official Docker executor provided by Mesos. It aims to bring a more flexible container executor by allowing other containerizers to be used. It is not a custom executor.
General design
This project uses the new (v1) Mesos HTTP API to communicate with the agent.
- Subscribe to the agent and send its unacknowledged updates and tasks (in case we re-subscribe after we have lost the connection to the agent)
- Handle the
subscribedevent - Handle the
launchevent- Launch
pre-createhooks - Create the container
- Launch
pre-runhooks - Run the container
- Launch
post-runhooks - Set task status
- Launch
- Handle the
acknowledgedevent - Handle intermediate events such as
messageorerrorfrom the agent, or just some acknowledgement for tasks updates - Handle the
killorshutdownevent- Launch
pre-stophooks - Kill the task(s)
- Launch
post-stophooks
- Launch
- Shutdown the executor
Hooks system
This executor implements a hook system, allowing you to run custom functions on pre-create, pre-run, post-run, pre-stop and post-stop. The containerizer and the task information are passed to hooks so you can interact with containers directly or even manipulate task data before running the container (eg. to sandbox mount path). All hooks are executed sequentially and synchronously. On error, two behaviors are possible:
- the error occurs on
pre-create,pre-runorpost-runand the error stops the executor workflow, throwing the error message with aTASK_FAILEDupdate - the error occurs on
pre-stoporpost-stopand the error doesn't stop the executor workflow, so other hooks will be executed in order to avoid a teardown hook to do not be executed (would lead to leaks)
Also, hooks are sorted by priority in descending order. It means that the hook with the highest number as priority will be executed first.
You can take a look into the hook folder to view some examples.
Remove containers hook
This hook removes the stopped container after shutting down (or task kill) in order to keep containerizer clean.
ACL hook
This hook injects iptables rules in the host namespace. To use it, just pass a list of IP, comma separated, with or without CIDR, to the EXECUTOR_$PORTINDEX_ACL label. For example: EXECUTOR_0_ACL: 8.8.8.8,10.0.0.0/24.
This hook simply appends rules to a chain of the iptable filter table. Exemple :
- -A INPUT -s 8.8.8.8/32 -i ext1 -p tcp -m tcp --dport 10000 -j ACCEPT You need to configure the executor to use a specific chain:
acl:
  chain: "MYCHAIN"
The chain can be the INPUT chain, or another user-defined chain. In the first case, there is nothing more to do (aside from setting the chain policy to DROP to make the acl actually useful). In the second case, you will have to create the specified chain manually, configure it, and call it from the INPUT chain.
By default, acl is set for all host network interfaces. but you can specify the interface to use:
acl:
  external_interface: myinterface
You can add extra rules for all containers by adding this section to the configuration file:
acl:
  default_allowed_cidr:
    - 172.17.0.1/32
Those rules will be injected after the label defined rules and before the default rules. All rules (except the default ones) are filtering on the mapped ports and protocols given in the task.
Please note that you are in charge of allowing needed sources for health checks. If you are using the executor-based health checks (as described below), no extra rule is needed. If you are using framework-based health checks, you will have to allow either the host hosting the framework (if different).
Netns hook
This hook manages the netns tool links mainly used to executes command into the network namespace of a given container. It works by:
- creating a symbolic link on post-run from the network namespace file of the given container process to the netns directory
- for example, from
/proc/666/ns/netto/var/run/netns
- for example, from
- deleting this symbolic link on post-stop
Once the container is started, you can do the following:
- use
ip netnsto list available links - use
ip netns exec <link_name> <command>to execute the given command into the given link- example:
ip netns exec mesos-9408aa26-075b-47e3-9b1d-46c8e0c34251-S682.839e046e-4a1c-462b-bc3d-a3fb14cbf967 iptables -L -n -v
- example:
Please note that the link name is equal to the container task ID.
The hook uses the proc_path configuration to retrieve the container process network namespace file and the netns.path to retrieve the netns tool directory (by default: /var/run/netns).
Iptables hook
This hook injects iptables rules in the host network namespace. This iptables allow access to your containers from the outside world, and communication between containers. Iptables inserted by this hook are similar to iptables inserted by docker when docker option "iptables" is activated (--iptables=true) If you use docker as your containerizer and docker is configured with --iptables=true, the use of iptables hook will result in duplicates rules in your iptables tables.
For more information on how docker manage communiction with containers and iptables, here is the official documentation
Configuration
Iptables hook configuration is done by adding the following lines to your configuration file:
iptables:
  container_bridge_interface: docker0
The hook needs the container bridge interface name for specifying the interface in the iptable rules. Note that this hook will only work with bridge or user network mode. The bridge interface name is also used to retrieve the IP of the container on the bridge network. To find the correct IP, we look at the container interfaces and return the IPs matching the brigde network. This is particurlarly useful since in some configuration the bridge IP is not directly visible from the container info.
Other optional parameters can be configured :
iptables:
  ip_forwarding: false
  ip_masquerading: false
  container_bridge_interface: docker0
To learn more about these parameters, read the following section.
How does the iptables hook works ?
At task post-run, containers ip, ports and associated network protocol are retrieved, and iptables are inserted. At task pre-stop, the inserted iptables are removed.
Iptables managed by the hook are the following :
IP forwarding : these iptables ensure that packets destinated to the container bridge can be forwarded, and vice versa. This rules are useful when your FORWARD table policy is 'DROP'. If your FORWARD table policy is 'ACCEPT', then this rules are not mandatory for forwarding.
- -A FORWARD -d 172.17.0.2/32 ! -i docker0 -o docker0 -p tcp -m tcp --dport 80 -j ACCEPT
- -A FORWARD -s 172.17.0.2/32 -i docker0 ! -o docker0 -p tcp -m tcp --sport 80 -j ACCEPT
Ip forwarding management by the iptable hook is activated by default. You can disable it by specifying ip_forwarding: false in the iptables hook configuration.
IP masquerading : these iptables ensure that containers see incoming packets originating ip as the "real" originating ip. If this options is deactived, then containers will see all packets emaning from the bridge ip. Masquerading is necessary when you want to communicate to your container from another network interface or from an external system. This rules also ensure that data sent back by containers have the correct destination ip.
- -A PREROUTING ! -i docker0 -p tcp -m tcp --dport 32000 -j DNAT --to-destination 172.17.0.2:80"
- -A POSTROUTING -s 172.17.0.2/32 ! -o docker0 -j MASQUERADE
- -A POSTROUTING -s 172.17.0.2/32 -d 172.17.0.2/32 -p tcp -m tcp --dport 80 -j MASQUERADE
Ip masquerading management by the iptable hook is activated by default. You can disable it by setting ip_masquerading: false in the iptables hook configuration.
Network hook
This hook simply allows to force a user network for the container to join at startup. For now, the name of the user network to join should match the name of the task framework.
Inside the task, the hook will force the network mode to "USER", and the network name will be injected. When launching the container, this network name is retrieved and linked to the container.
Health checks
Introduction
Since Mesos 1.1.0, health checks should be done locally, by the executor, in order to avoid network issues and be more scalable. Because the health check system should not be containerizer dependent (except the command health check, more information below), all checks are done by entering required namespaces and execute commands.
Please note that Mesos native health checks are actually not available in Marathon UI, and can be tested only when sending raw JSON. You must prefix the check protocol with MESOS_ (only for HTTP and TCP). Another thing to know is that you can only have one Mesos native health check per task.
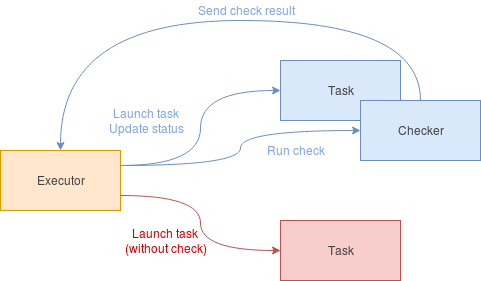
Design
The design is really simple: each task has one checker, in charge to execute one check periodically and to send result to the executor core using a channel.
The runtime is done like this:
- wait for
delayseconds before starting first check - check periodically with timeout
- if check is
healthy, just consider thegrace periodas ended and send result - if check is
unhealthy, send result (to update status) and- if we are in the
grace period, just continue - else, if the
consecutive failures thresholdis not reached, just continue - else, the task should be killed
- if we are in the
- if check is
To tell the executore core to stop the task, the checker does it in a 3-steps design:
- trigger the
Donechannel (to tell that the checker has finished its work) - wait for the core to trigger the
Quitchannel (to tell the checker to free resources) - trigger the
Exitedchannel (to tell the core that everything is done, resources are free)
This is a security pattern to avoid a check to stay stuck when core kills the checker. It ensures that the work done by the checker is finished.
Here are how the different health checks are implemented. Please note that these health checks lock the executing goroutine to its actual thread during the check to avoid namespace switching due to goroutine multiplexing.
HTTP health check
- enter container network namespace (only if in bridged network mode)
- open a TCP connection to the given port to check
- write a raw HTTP request
- read response and check status code
- exit container network namespace (only if in bridged network mode)
Please note that http.Get can't be used here because runtime default transport (round tripper) launches a lot of goroutines, making the call to be done in another thread (and so, to do not be inside the container network namespace).
TCP health check
- enter container network namespace (only if in bridged network mode)
- open a TCP connection to the given port to check
- exit container network namespace (only if in bridged network mode)
Command health check
- execute given command in the given container using its containerizer
Please note that you can't get inside the mount namespace of a process in Go because of multithreading. In fact, even by locking the goroutine to a specific thread can't fix it. setns syscall must be called in a single-threaded context. You can, at least, call this syscall using Cgo (and constructor trick) to execute C code before running the Go runtime (and so, run this C code in a single-threaded context). But it doesn't allow to dynamically join a mount namespace while running. This is why the containerizer is in charge of providing a way to execute a command inside the container.
Please take a look at this issue and this issue to know more about the setns Go issue.
References
- http://mesos.apache.org/documentation/latest/health-checks/#mesos-native-health-checks
- http://mesos.apache.org/documentation/latest/health-checks/#under-the-hood
- https://github.com/mesosphere/health-checks-scale-tests/blob/06ac7a2f0fa52836fedfd4b26fdb5420b5ab207e/README.md
Configuration file
Configuration file allows you to enable or not some hooks. The file must be named config.yaml and placed at the same place than the binary, or in /etc/mesos-executor. There's an example at project root.
Test it
If you want to test the executor, you can run make docker. It will create a basic stack with:
- ZooKeeper
- Mesos master
- Mesos agent
- Marathon
You can access Marathon framework UI using your http://<IP>:8080/. Executor logs are in the stderr of the task sandbox. When finished, please run make clean to remove stack containers.
Run tests
You can run tests using make test. Tests are using testify package to create suite and ensure tests are always ran in the same conditions. Some external packages are monkey patched in order to emulate its behavior. Finally, a fake containerizer (implementing the containerizer interface) is in the types package and is only used for testing.
Run linters
You can also run linters using gometalinter tool with the make lint command. Before running the linters, you have to install them using gometalinter --install command. Please take a look at https://github.com/alecthomas/gometalinter for more informations.
